|
2 4 0 T U R B O . C O M D A V E ' S V O L V O P A G E
|
||||||||||||||||||||||||||||||||||||||||||||||||||


 alternators are known for poor voltage.")


|
||
| FLAT HOODS |
HEADLIGHT PAGE |
|
| EARLY vs LATE COWLS |
HOOD INSULATION |
|
|
2 4 0 T U R B O . C O M D A V E ' S V O L V O P A G E
|
||||||||||||||||||||||||||||||||||||||||||||||||||
|
||
| FLAT HOODS |
HEADLIGHT PAGE |
|
| EARLY vs LATE COWLS |
HOOD INSULATION |
|
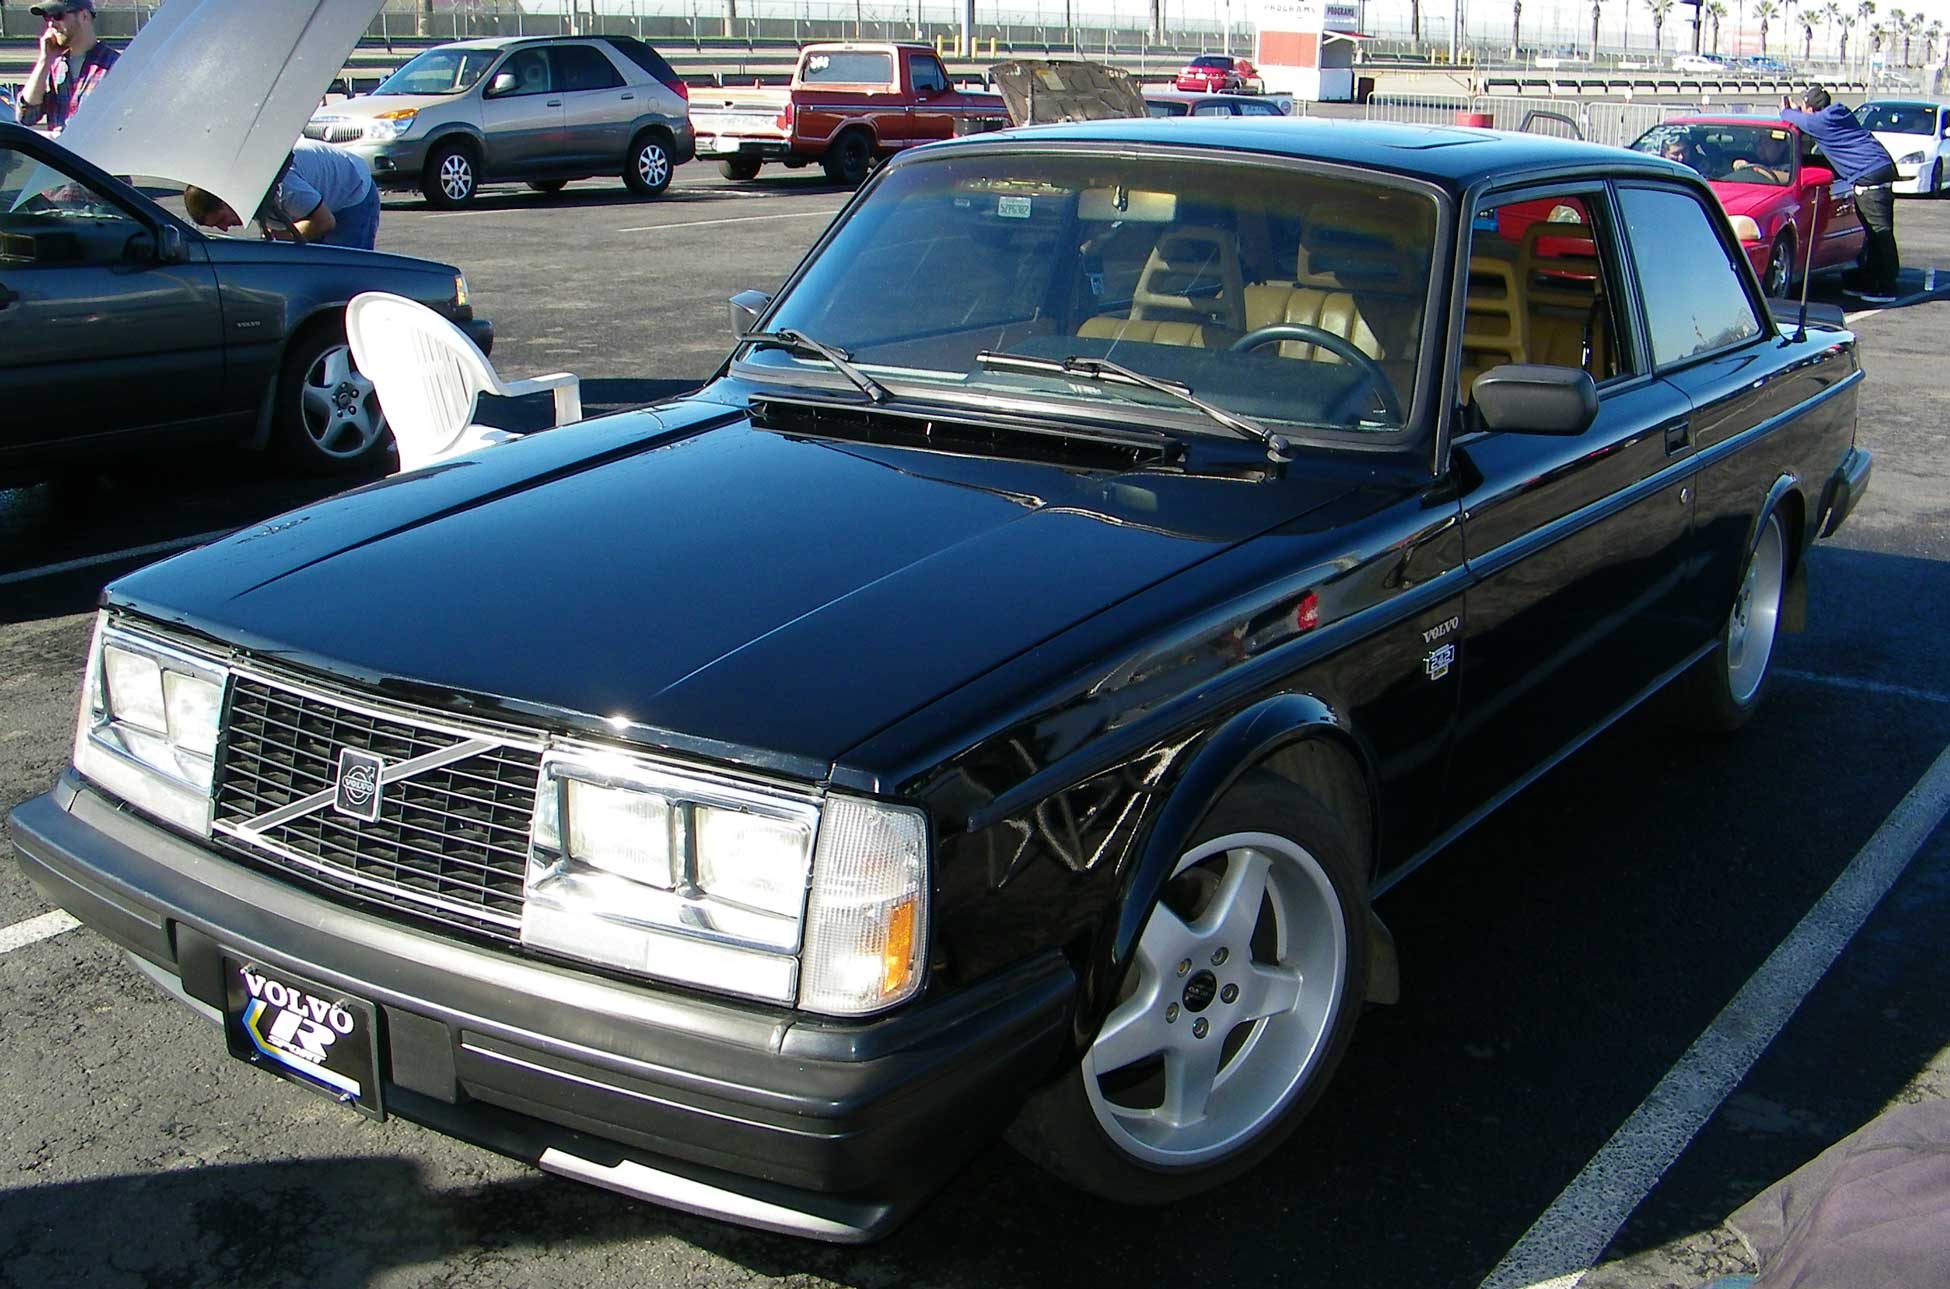
| FLAT HOOD TRIVIA For those who don't know, the BLACK flat hood I used on the above 242 is the same hood used for the rare 1983 242 Turbo "Flathood" model (pictured below). I actually pulled it off of a salvage yard 1983 242 Turbo "Flathood." 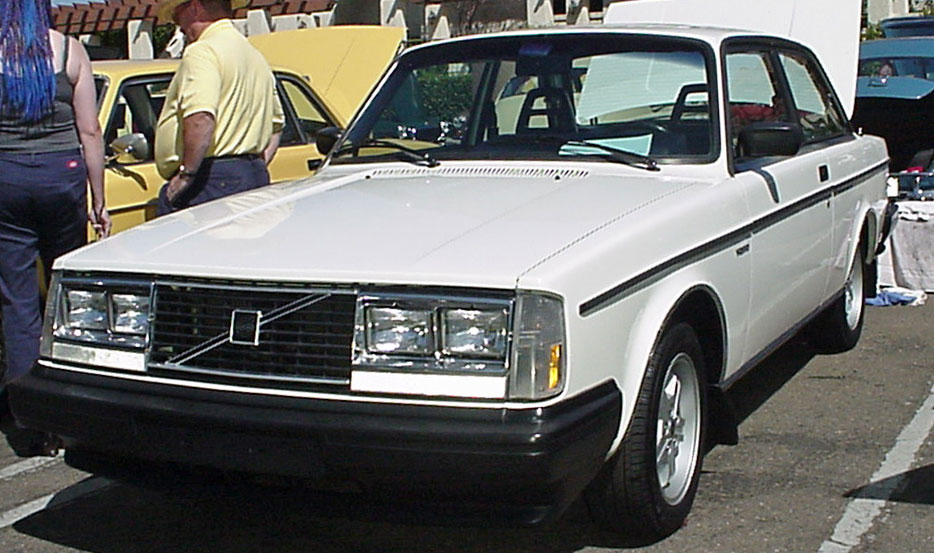 This limited 1983 242 Turbo model (500 produced for the U.S. market) is outlined in the following resources. turbobricks.com/1983-242-turbo-flatnose-theory.66501/ http://flathood.saliv8.com/ silodrome.com/group-a-homologation-flathood/ hemmings.com/1983-volvo-240-turbo-flat-hood This flat hood above is almost the SAME as those used on 1975-1977 U.S. 242, 244 and 245 models and on 1978-1980 U.S. 242 DL and 242 GT. 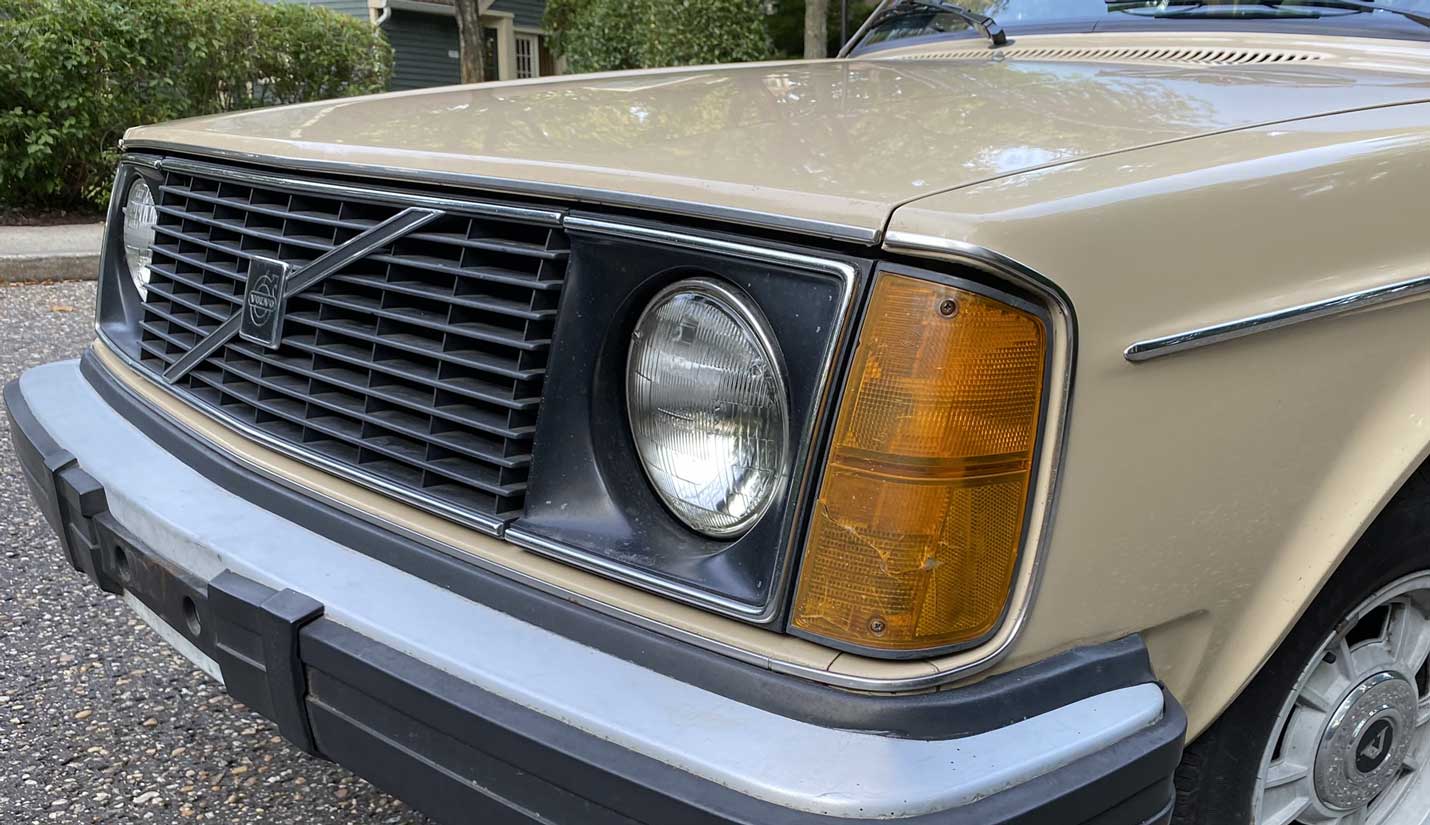 Some very early flat hood 240s received hoods with thin metal trim attached to the front leading edge (above), which matched the thin metal trim around the turn signals. One year only (1976, which is shown above) had a single windshield washer squirter instead of two squirters on all other years. 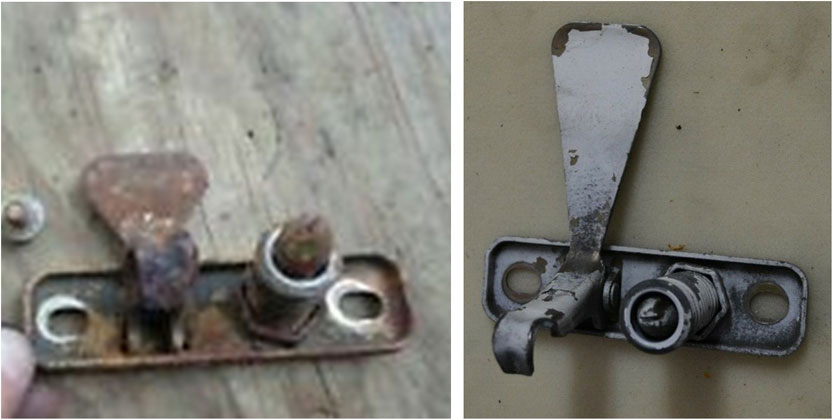 The hood latch on the flat hood is unique to accommodate the shorter front. The latch release handle, latch pin and spring are all shorter than the raised "hump" hood latch. Also the hood hinge springs have less tension for a flat hood (but the hinges are otherwise the same). Flat hoods used lighter springs because the flat hood is lighter. So if you were find a salvage yard flat hood on a car, it's a good idea to take the latch and springs. From 1975 to 1980, the 240s in Europe and in the U.S. shared the same body sheet metal. This changed in 1981, when certain pieces changed ONLY for European 240s (fenders, grill, etc). More Flat Hood Trivia  This is how to tell the difference between an early flat hood and later one. An early flat hood (1975-80) will have ONE dip on the inner brace. A later flat hood (1983) will have TWO dips on the brace as shown above.  The flat hood used on on all European 240 Turbos (beginning in 1981 for the Euro market) is also the same hood used on the limited edition U.S. 1983 242 Turbo. Otherwise, there were some notable differences for all U.S. 240s during certain years when compared to European versions. The European 240 front end for 1981-85 (ABOVE) came with different headlights, fenders and turn signals compared to USA cars. These fenders shown above are actually the same fenders that would later appear on U.S. versions for 1986 to 1993. A different grill was used in Europe for the Turbo model also (shown above). And the slightly different sheet-metal directly BELOW the grill and headlights (part #13 in below diagram) was used to accommodate the different European headlights, turn signals and grill parts. For that #13 part below, I have added a couple more detailed images so you can see just how different the two parts are. That #13 part would later be a standard part on U.S. 240s beginning in 1986. And I have more info on headlight changes in my 240 Headlight Page, CLICK HERE. 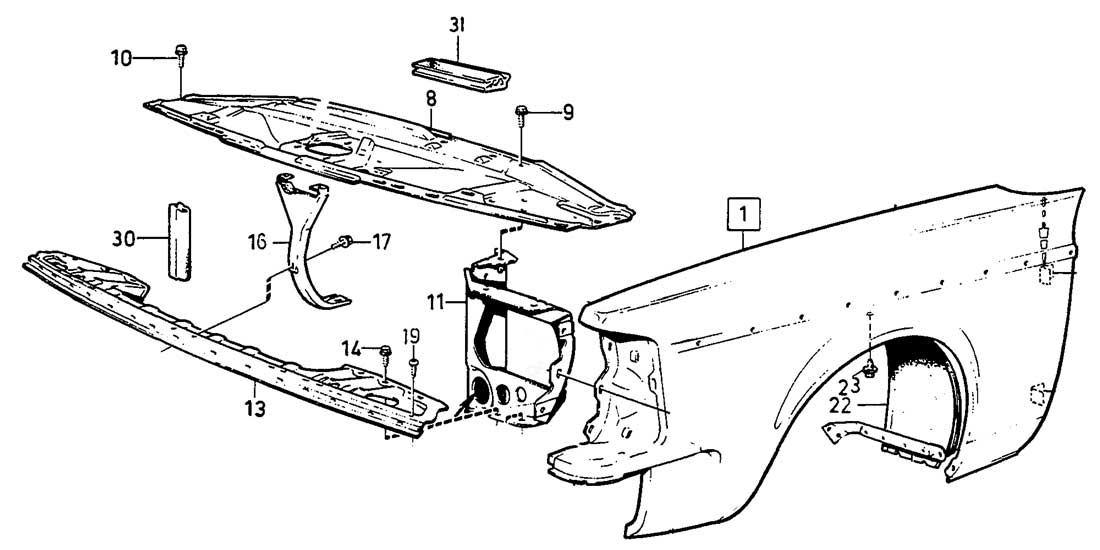 Late 240 shown above (1981 and later for Europe, 1986 and later for U.S.) Another view BELOW of the different sheet metal piece directly below the headlights and grill. The difference looks small, but there is a difference. 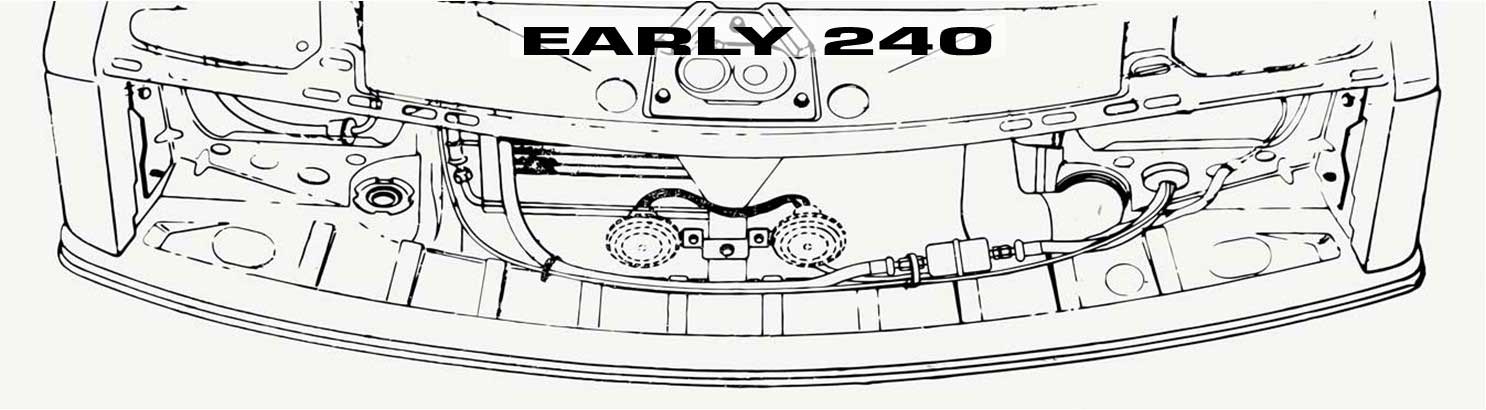 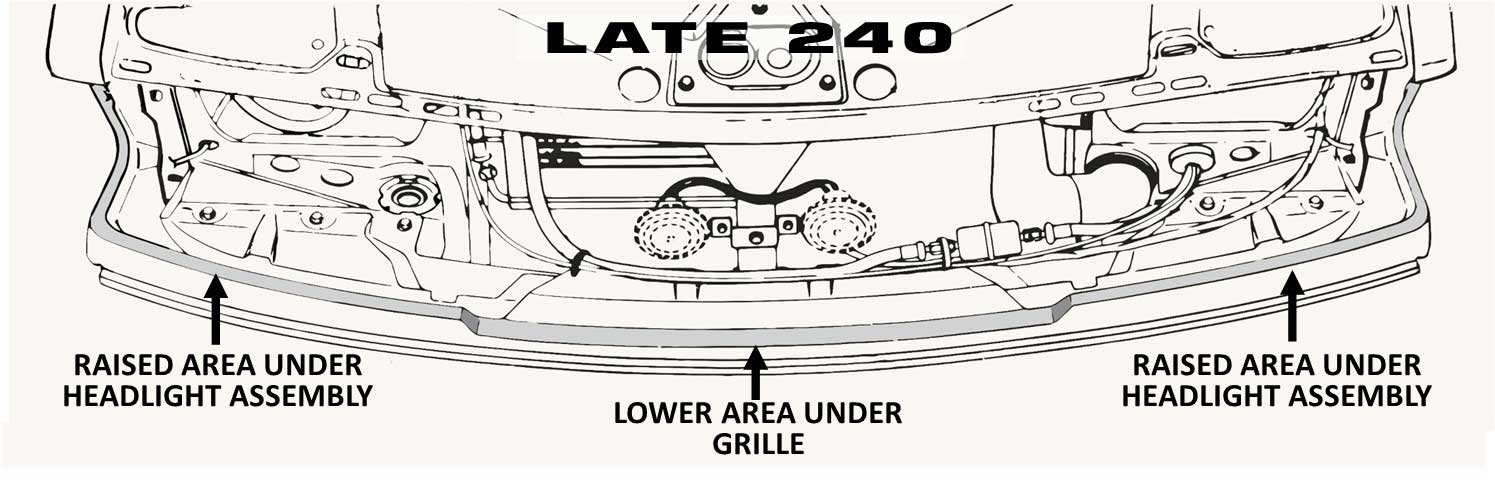  |
| BODY COWL CHANGES There was a styling change in the way Volvo made the cowl area just forward of the windshield. This change happened in 1986 for all 240s. The early 1975-85 recessed cowl grill can be seen in the first image below. The second image showing the raised cowl grill is found on 1986-93 cars. 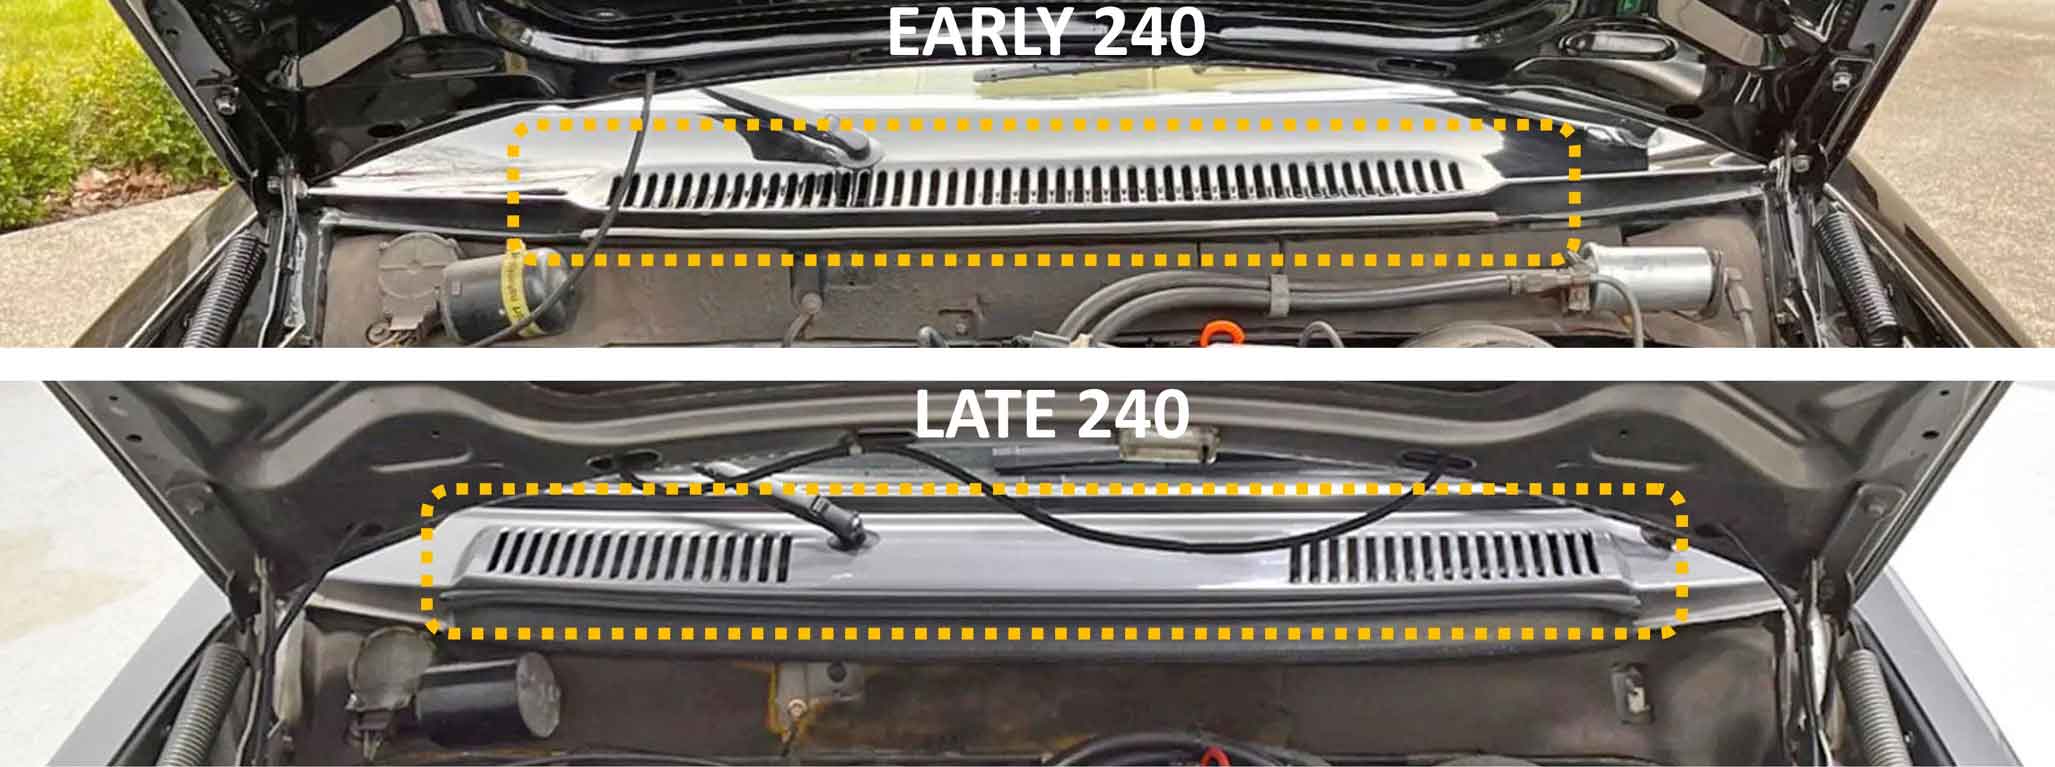 In this photo of an early 240, we can see how the recessed cowl matches the same recess in the early hood design. This cowl and hood were made to be a matched set. Yes it was. 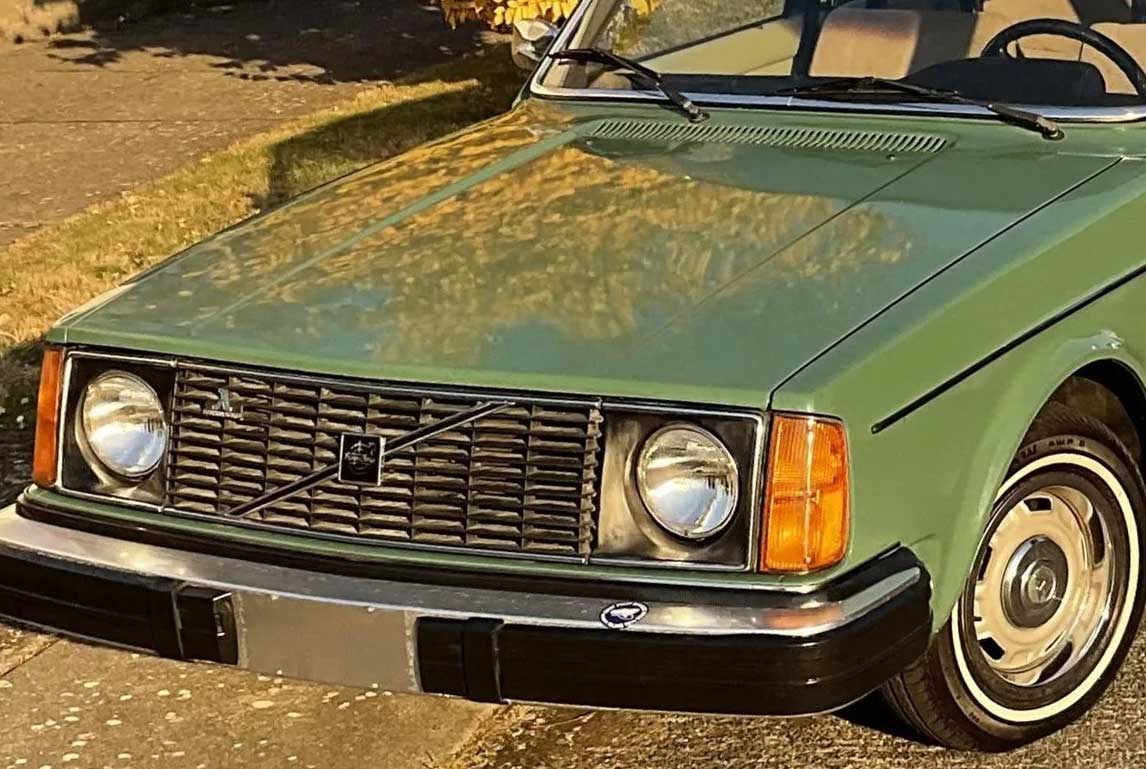 However, when the early RAISED hood was designed, they had a problem to overcome. It wouldn't match the cowl unless they created a short recess at the back of the raised hood to match the cowl. . 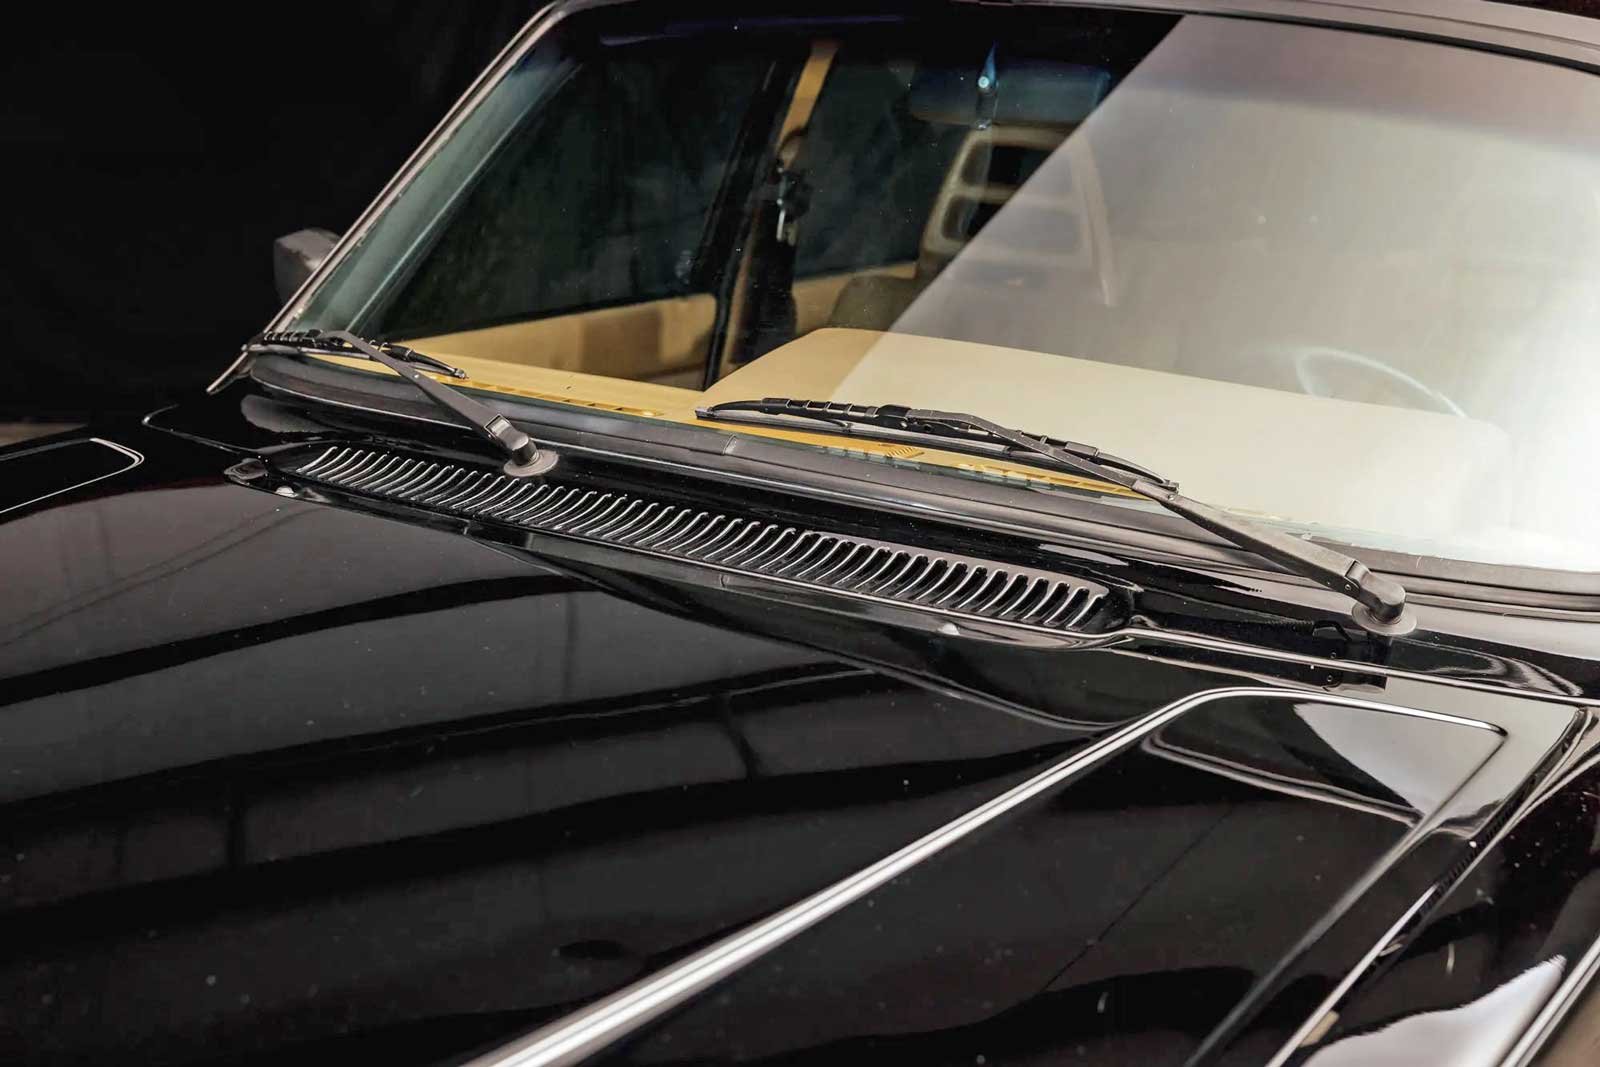 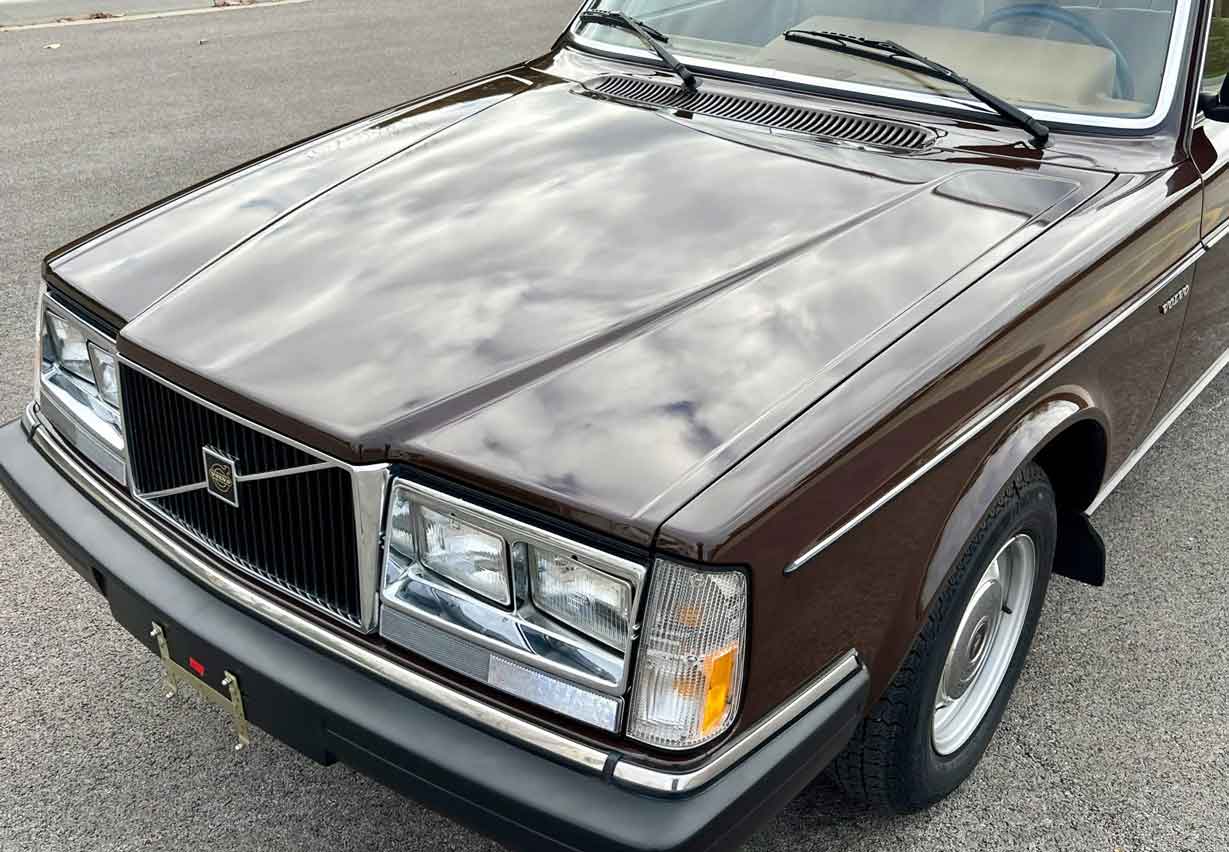 The flat hood is popular and there have been some conversions where an early FLATHOOD is placed on a late 240. If the 240 was made after 1985, the usual result is shown below, where there is an unfortunate mismatch between the cowl and hood. 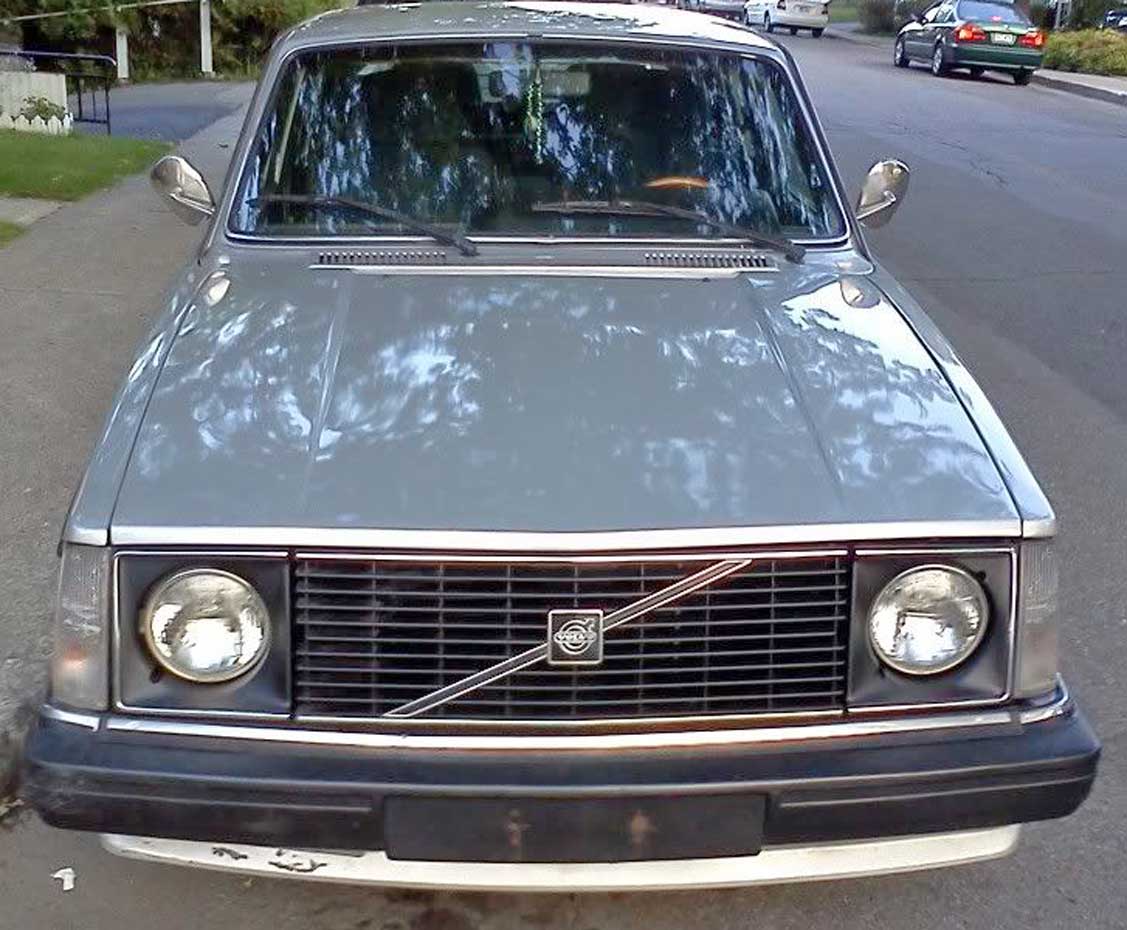 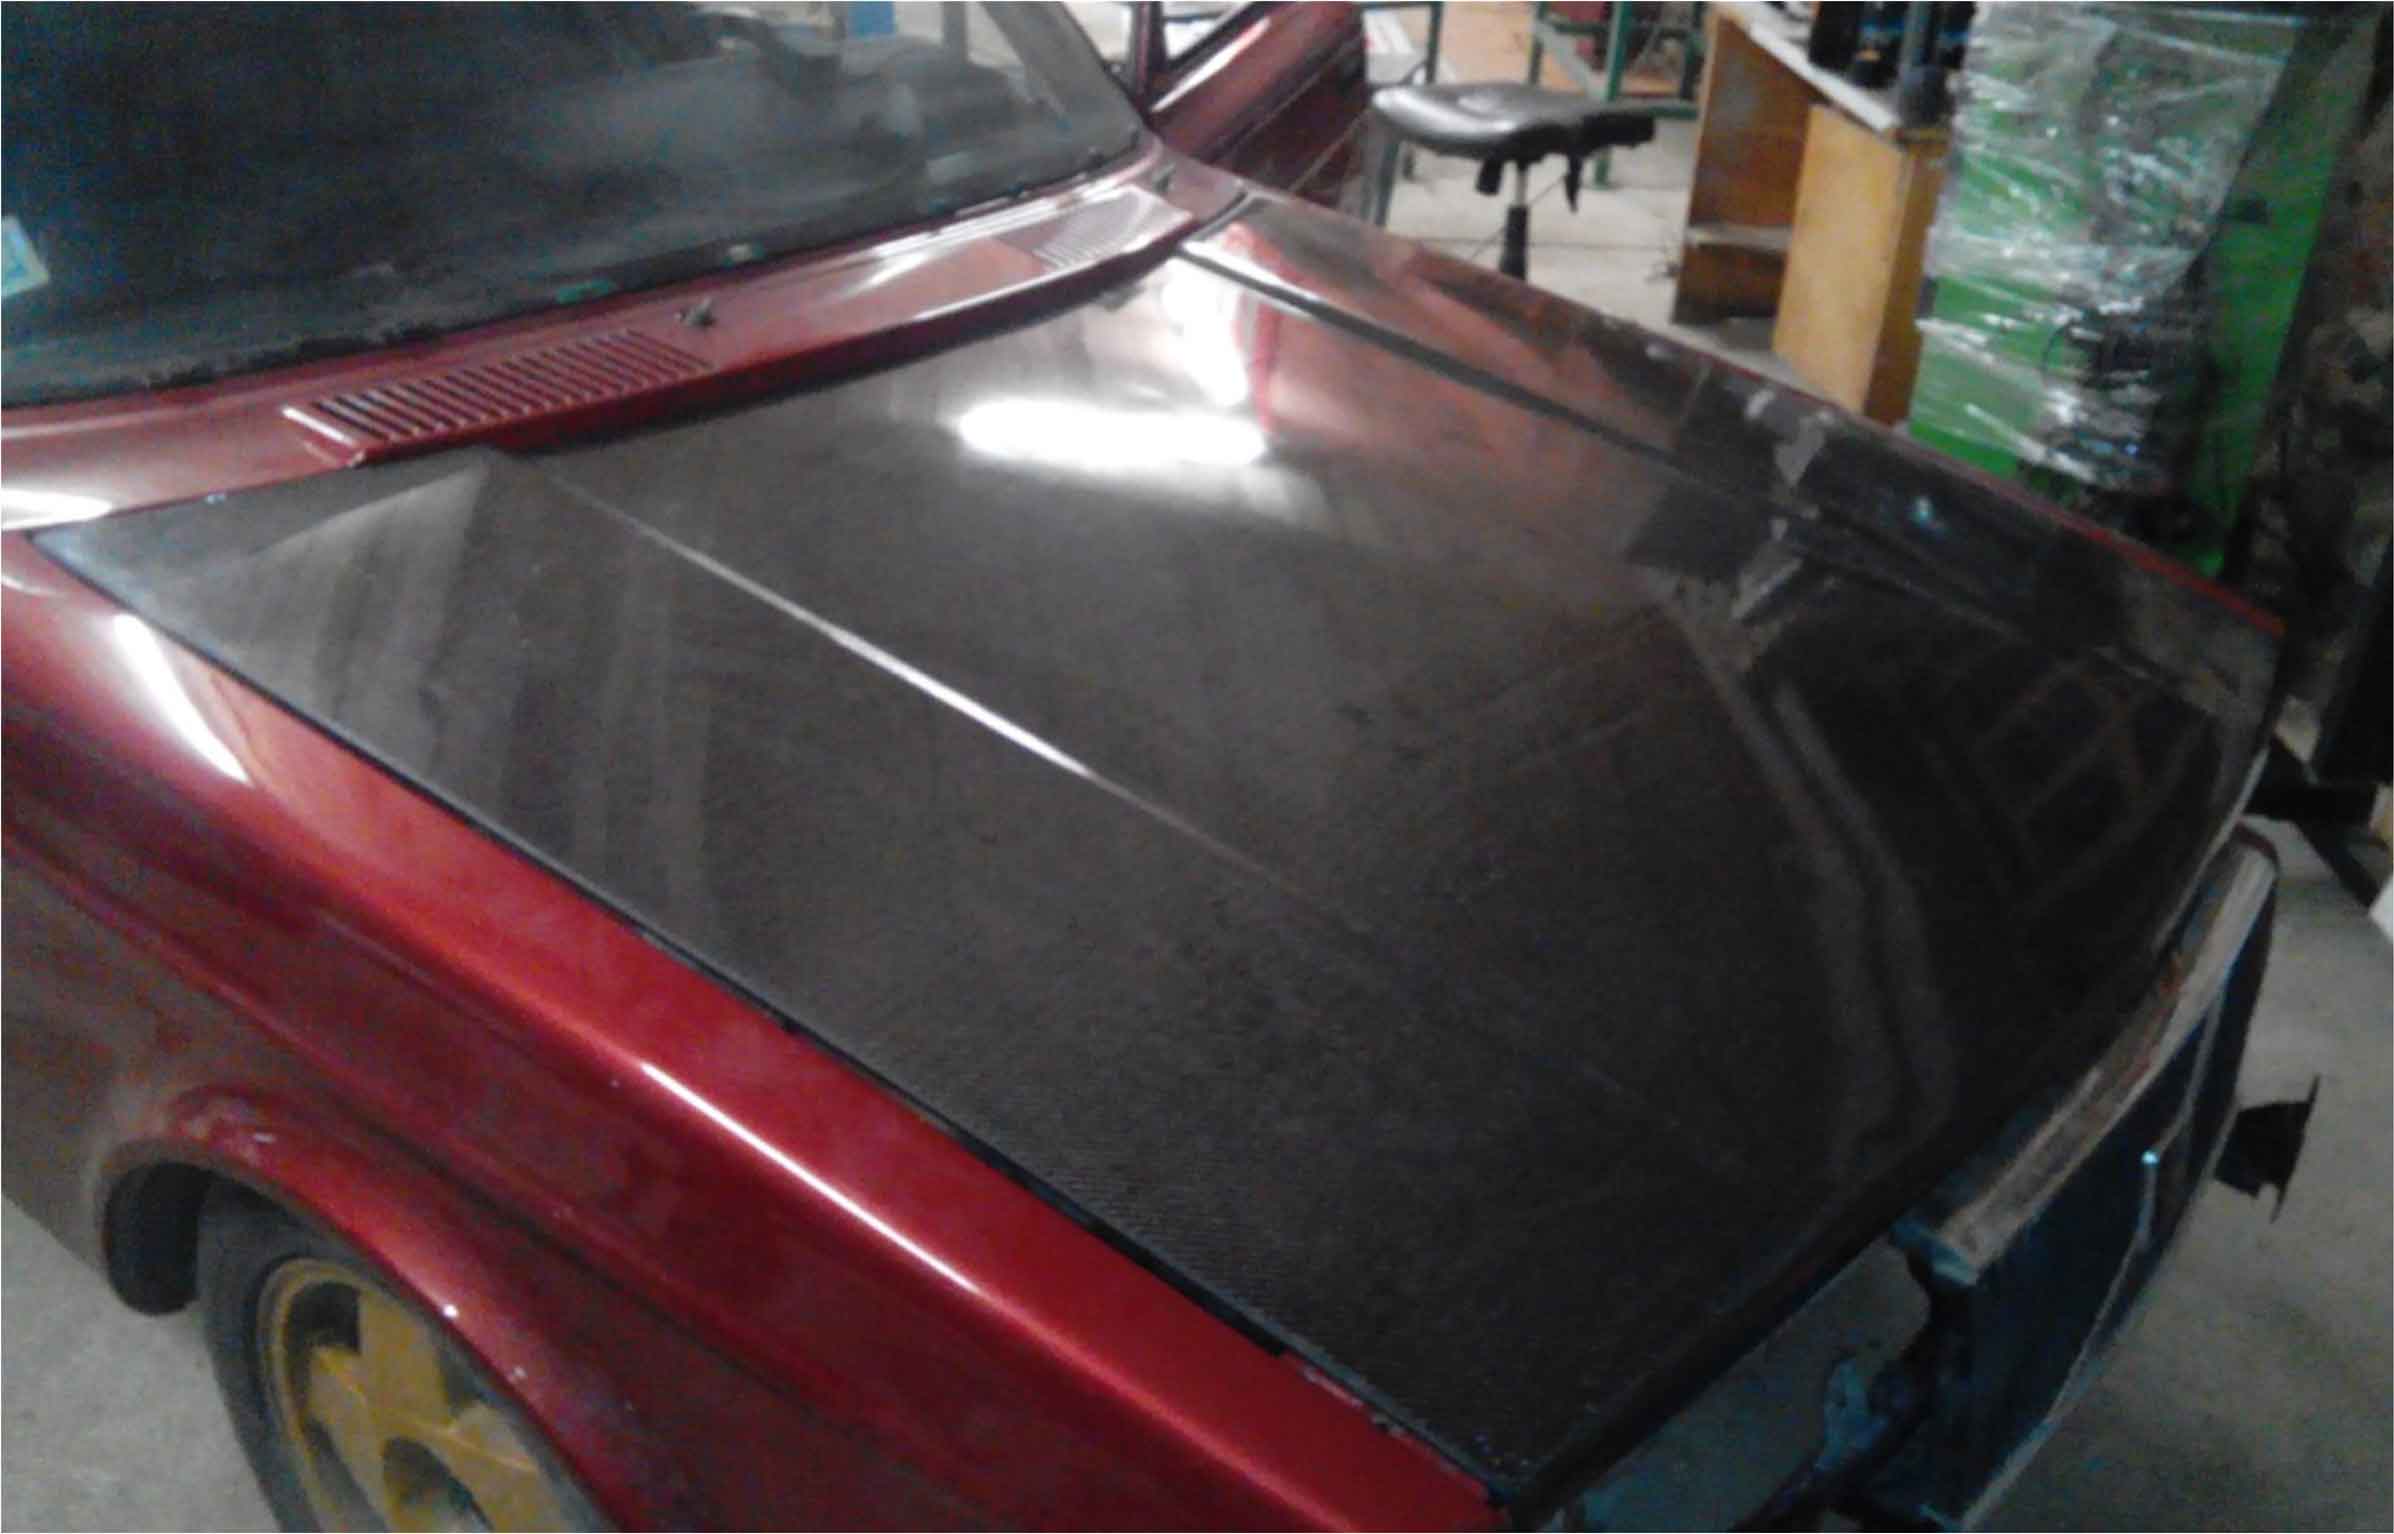 But when OBSESSION takes over, then a great deal of work can match up an early hood on a later 240. These images below come from the below discussion forum where the writer cut out the later cowl and installed an early one. forum.retro-rides.org/volvo-245 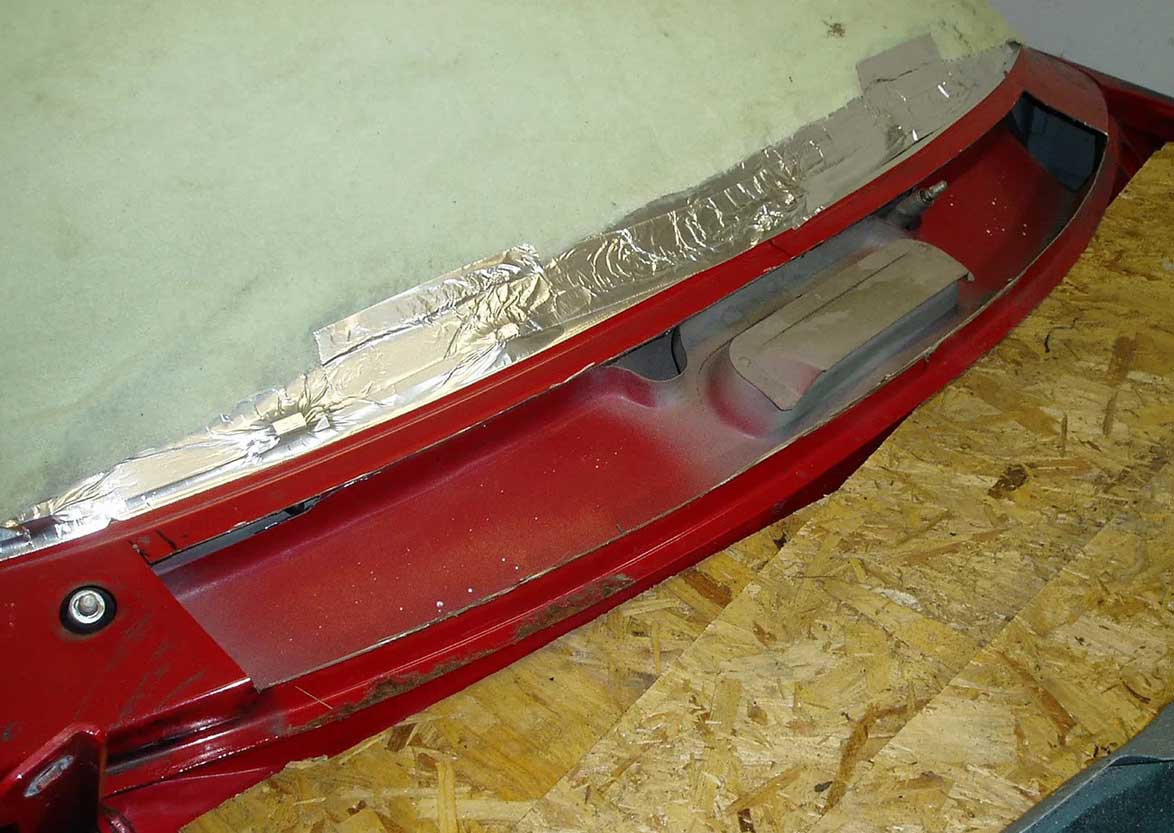 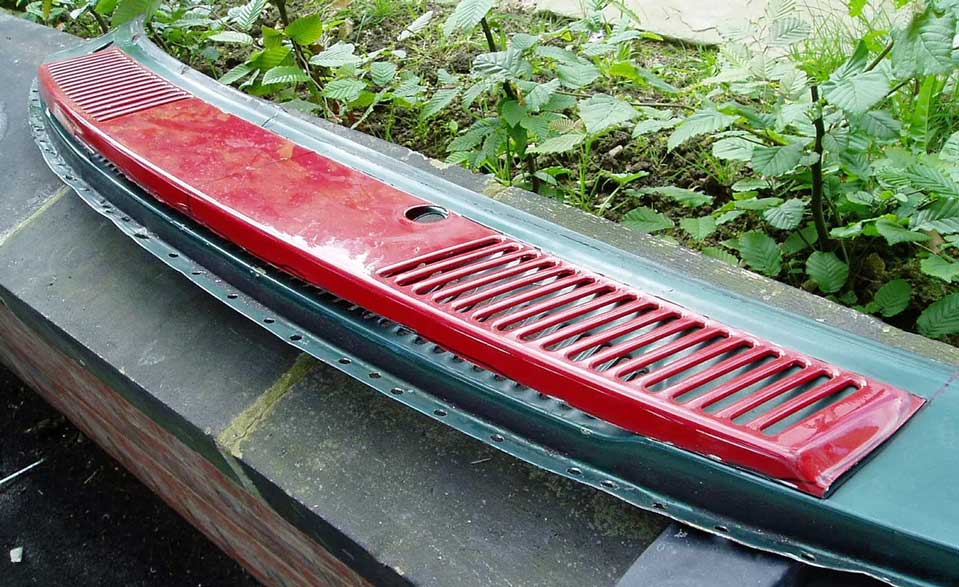 
|
|
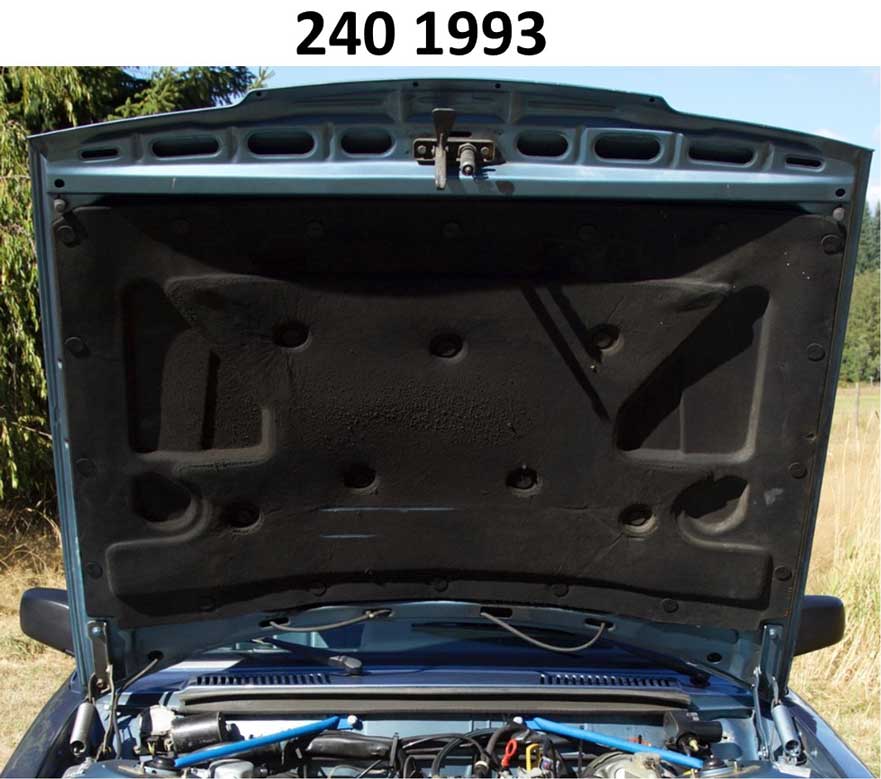
HOOD INSULATION Most 240s did not come with any hood insulation. To my knowledge, the first 200 series commonly found with factory hood insulation pads was the 260 series (264, 265 and 262C) and also diesel equipped 200s. My observation was early 4 cylinder 240 models usually never had hood insulation from factory. The first 4 cylinder 240 with factory insulation in my observation was the 240 Turbo (1981 to 1985). After 1986 the 240 hood usually became NON-insulated (except maybe for some rare exceptions I have not seen). Then in the final year of production for 1993 the 240 again came equipped with factory hood insulation. Engine heat, moisture and years of use would eventually damage the factory pads and make them pretty ugly. 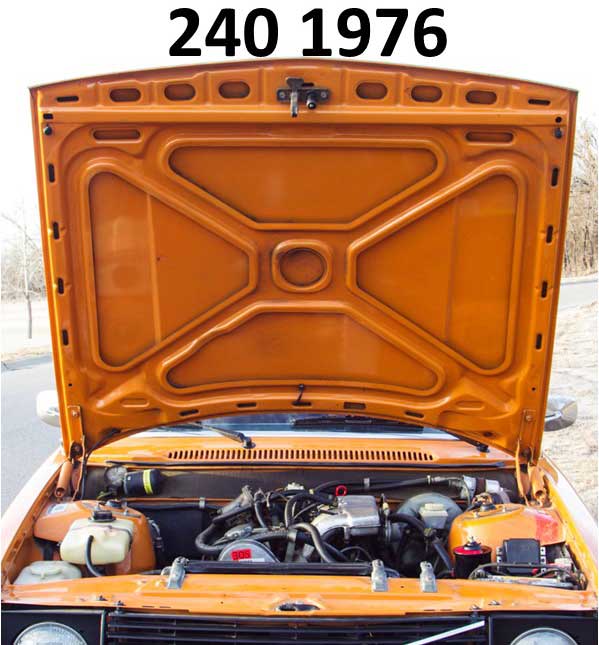 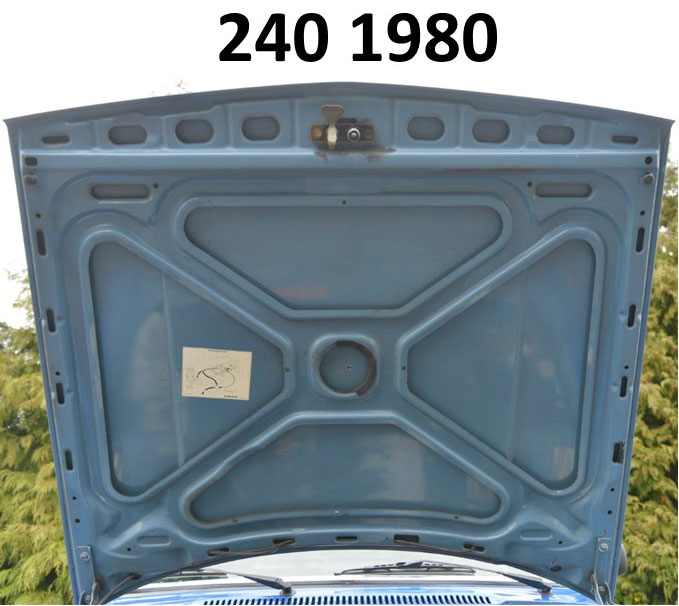 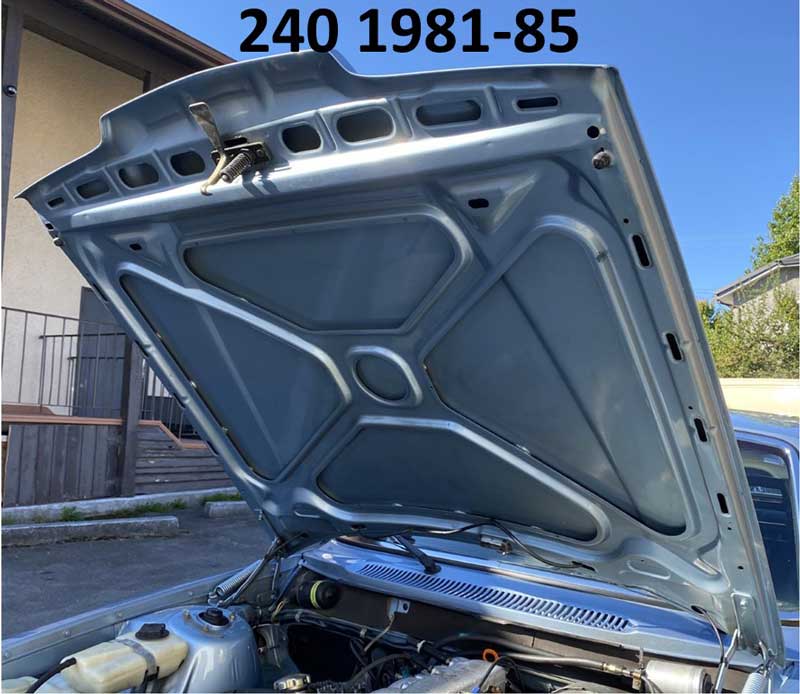
The 1979-84 Volvo parts catalog listed two hood insulation part numbers: 1246850 (alter 1) and 1304162 (alter 2). An alter 1 hood has PN 1315287, 1204042, 1246080. (flat hood). An alter 2 hood has PN 1304040, 1247938 (hump hood up to 1985). The 1985-87 parts catalog listed three insulation part numbers: 1246850 (alter 1, to 1985), 1304162 (alter 2, to1985), 1360533 ( 1986+). An alter 1 hood PN 1315287 (flat hood). An alter 2 hood has PN 1304040 (hump hood up to 1985). And the 1986+ hump hood has PN 1246850. The 1988-93 parts catalog listed one hood insulation part number as 1360533 (same as 1986+). The hood was PN 1315399 (1986-93 hump hood). 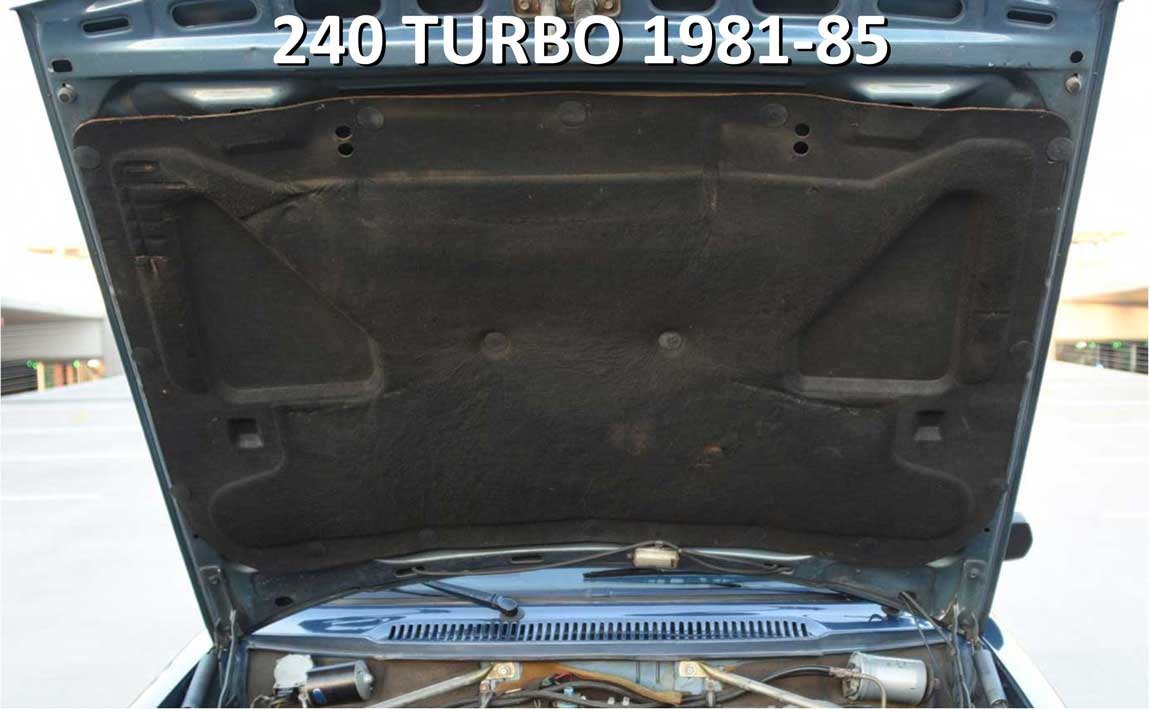 
 Years ago iPd offered their own aftermarket hood insulation kits for the 240 shown below. These were pre-cut adhesive backed foam inserts with a foil lining. iPd offered them for the hump hood only, not for a flat hood. 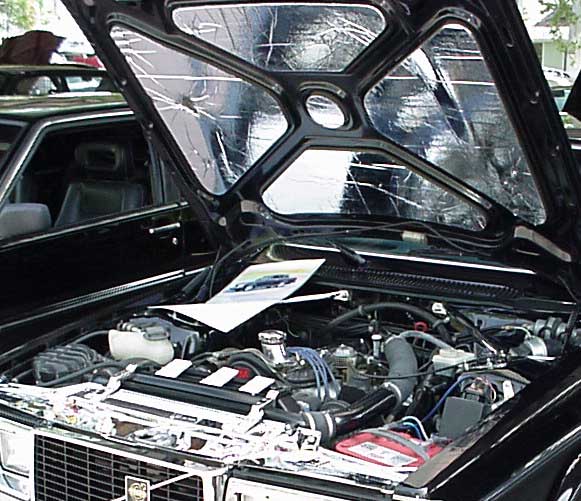 
For those of you interested in making your own insulation pieces, I'll go over what I've done below for FLAT HOODS. I used foam sheets I bought from McMaster Carr. Specific examples are shown below. 1/2 inch thick foam works well. Both examples above were cut so they tucked under the hood brace. Cutting foam like this can be done with scissors. None of the foams I have used had adhesive backing, but that's an option which is available that you can explore on your own if you like. 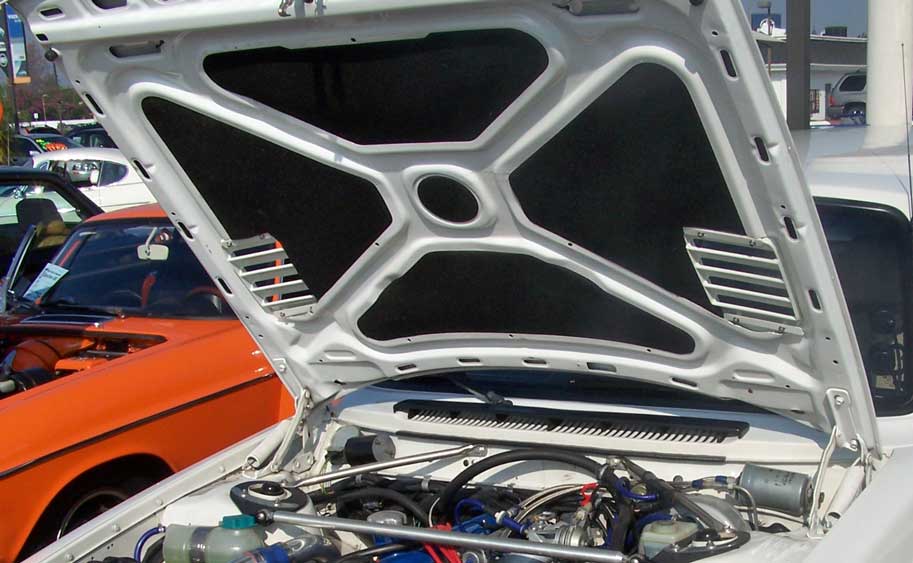 The WHITE FLAT HOOD shown above was done many years ago with Ultra Soft OPEN CELL foam (the first option below PN 8614K83). It will usually be found in a GRAY color, but it can be painted black with acrylic paint if needed. I made my pieces over-sized a little so they could be tucked under the hood braces. It helps at lot to make a template out of paper or cardboard first and make sure it fits. Then cut the foam. If you use very soft foam like this and it later begins to droop in the center, I suggest putting some contact adhesive behind it. I used the first OPEN CELL foam option below and it held up to engine heat for many years, but it eventually began to dry out and then the surface began to deteriorate after more than 10 years. The flame-retardant option below might be better, but I didn't try it. The BELOW items from McMaster Carr are decent choices if you decide to try OPEN CELL foam PN 8614K83 or Flame-Retardant OPEN CELL foam PN 86115K31. These are sold by the foot. 3 feet (x 54 inches wide) will be enough to do one hood. 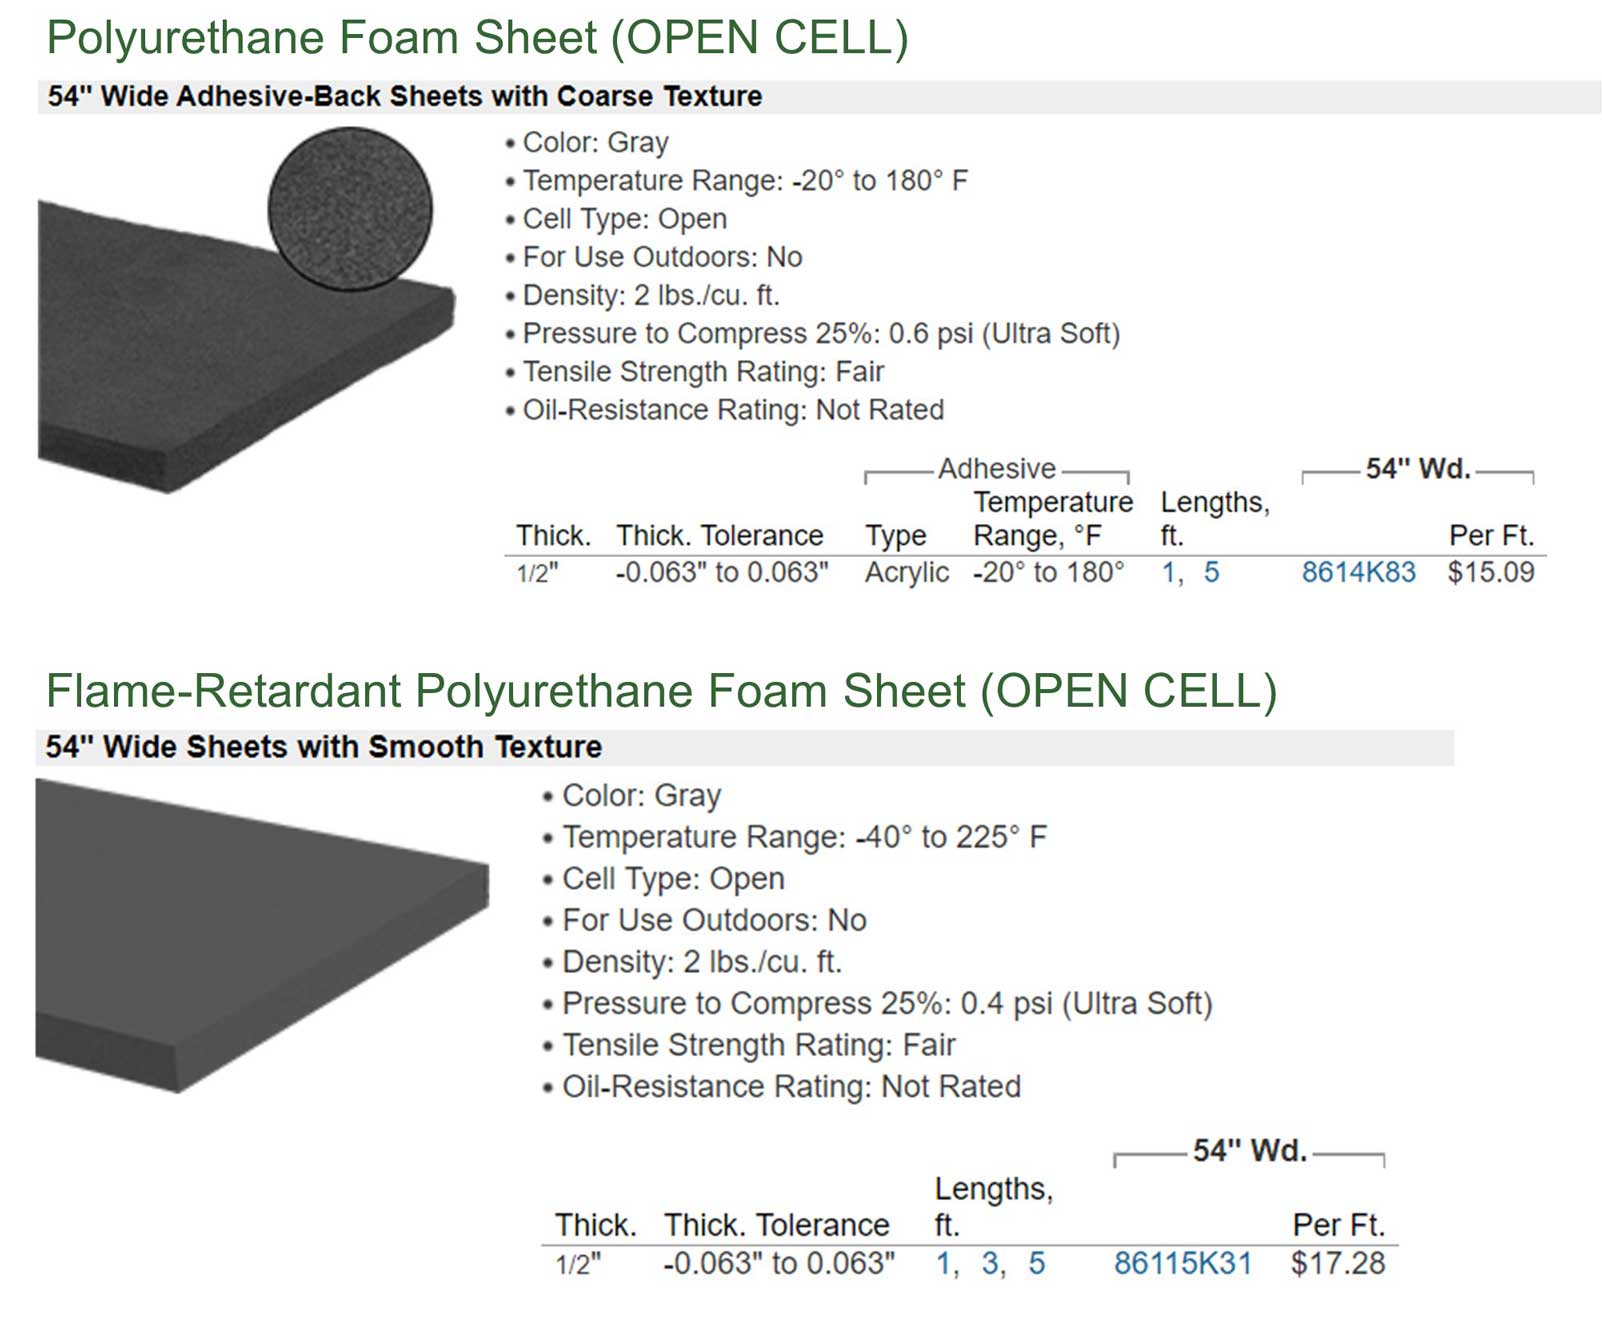 CLOSED CELL FOAM 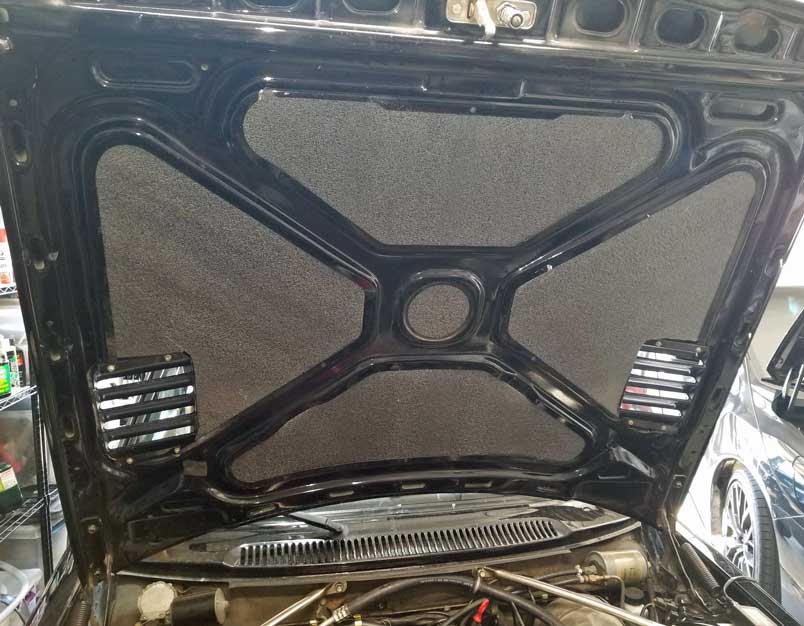 The BLACK FLAT HOOD shown above was done more recently with CLOSED CELL foam. I think closed cell will probably be a better choice for durability. Foams like this will usually be found in a BLACK or GRAY color. This one below was supposed to be BLACK, but it was actually a DARK GRAY when it came. This foam can be painted black with acrylic paint if needed. Closed Cell option #1 This option below (Ionomer Foam, PN 86205K93) is the one I used more recently on the black flat hood shown above. Even though it's called "SOFT" in the description, it turned out to be pretty rigid and it was a little tough to bend and force behind the hood bracing, but it can be done as seen in my photo. TWO 24 x 36 inch pieces will be needed to do one hood.  Closed Cell option #2 (flame-retardant) This second option below (Buna-N Foam) may be a better choice if you want it to be flame retardant. For the installation to go easier, I recommend choosing the EXTRA SOFT PN 85175K59 because the "SOFT" version of the above closed cell foam I used was pretty stiff. These are sold by the foot. 3 feet (x 54 inches wide) will be enough to do one hood. 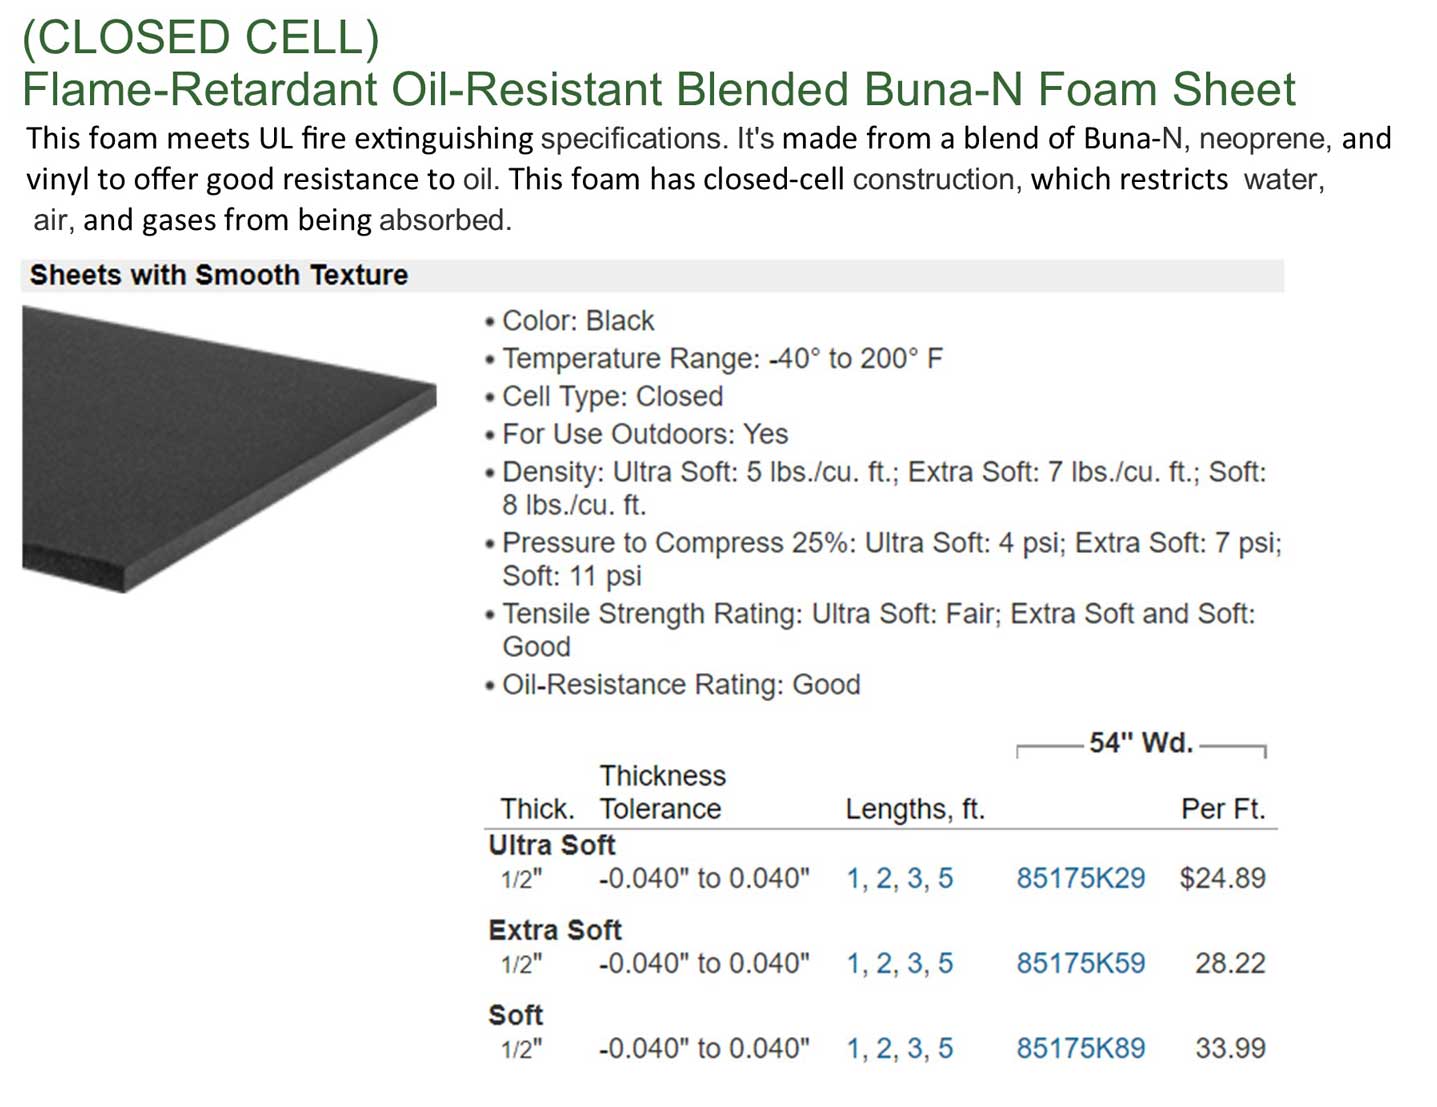 Other people have used insulating foam made specifically for car hoods or interiors, such as Fat Mat, Dynamat, etc. These may be more expensive. I have no experience using these products on a hood. |
|
||||
| davebarton.com |
prancingmoose.com |
240turbo.com |
Special Emblems |
|
| Prancing
Moose Stickers |
Volvo
Stickers |
Body/Chassis/Engine
Labels |
240 MODS and FIXES Page | |
| Other Car Brand
Stickers |
Steering
Wheel Labels |
Center Cap Labels/Overlays |
Cool Volvo
Products |
|
| Grill Labels/Overlays |
Volvo Wire
Harnesses |
Conversion Harnesses |
Harness
Parts/Connectors |
|
| Volvo Relays |
Coil Repair
Harnesses |
240 Window
Scrapers |
740/940
Window Scrapers |
|
| Adjustable Voltage
Regulators |
Horn Buttons |
240 Odometer
Repair |
740 Odometer
Repair |
|
| Volvo Gauge
Faces |
740
Turbo/Boost Faces |
240 Black Door Vinyl |
850 Odometer
Repair |
|
| ALTERNATOR Page |
240 Power Mirrors - Switches |
240 Oil Cooler Page |
240 Fuse Panel Page |
|
| Group A
Racing 242 Turbo Page |
240 Hydraulic Clutch | Fuel Pump RELAY Page |
240 Headlight RELAY Page |
|
| Used Parts & Extra Stuff for sale |
CRIMPING Page |
240 Ignition Page |
240 Headlight Page |
|
| 240 Gauge Electrical Diagrams | 240 REAR END Page | Yoshifab Catch Can Install | 240 TAILLIGHT Page | |
| Side Marker
Lights Page |
Gentex Mirror Upgrade | Yoshifab Drain Tube Install | Modified 240 Favorites | |
| SoCal Salvage Yards | Unleaded Racing Fuel | B26FT Stroker | Dave's 245 Spec Page | |
| 240 SUSPENSION Page | 240 Lowering Page |
240 Windshield Page |
240 WIPER Page | |
| 240 BRAKES Page |
240 Dash Top Gauge Pod | Cadillac 4-Note Horn Install | 240 DYNAMAT Installation | |
| 4 Speed Fan
Controller |
Electric Cooling Fan
Page |
BRUSHLESS Cooling Fan Page |
Tropical Fan
Clutches |
|
| 240 AC Page | "KOMFORT BLINKER" Upgrade | T5 Trans Conversion Page | 240 Engine Mount Page | |
| 240 VIN Page | Stepper Idle Valve Page |
Vacuum Diagrams | 240 HOOD Page | |
| 240 Exhaust Page | 242 Power Vent Window Project |
EFI Volvo Pin Function Diagrams |
Favorite Links | |
| R-Sport
Apparel |
Prancing
Moose Apparel |
Volvo Meet Photo Albums | Texas Volvo Meets and Events | |
| Ordering Instructions | Policies | PAYMENTS Page |
Mojave Road Trail Map Page |
|
| Returns | Shipping | Shopping Cart Troubleshooting | Contact Us |
|

|