|
2 4 0 T U R B O . C O
M D A V E ' S V O L V O P A G E
|
||||||||||||||||||||||||||||||||||||||||||||||||||


 alternators are known for poor voltage.")


In this page I have outlined some cool mods I have done to my 240s and others that have been provided by other 240 enthusiasts. Your comments are welcome: CONTACT |
| 240 Dash Vent Repair |
| This
write up will share my experience making some repairs and installing
some new parts into the CENTER DASH VENTS in my 240. As the 40+ year old
plastic aged, my center vent had become rather loose and floppy. Ånyo in Portland, Oregon is offering 3D printed replacement parts to make repairs. https://www.anyoagain.com/ Here's my center vent. This is for a 1981 to 1993 dash. The screw mount can be seen on the left side. 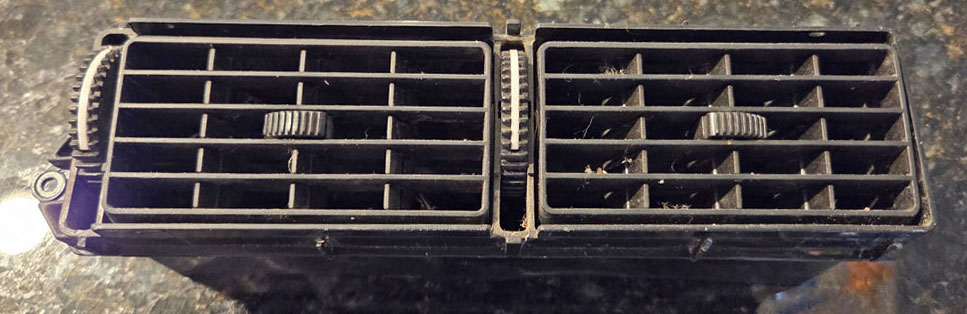 I had never disassembled one of these vents apart before. I was certainly concerned that the old plastic might be easy to break AND I WAS RIGHT, but this operation turned out to be a success and my vents are no longer loose. They move more firmly now. Here are the pieces supplied by Ånyo. These will replace parts in each vent. Each vent uses three vertical flaps and one cross bar. 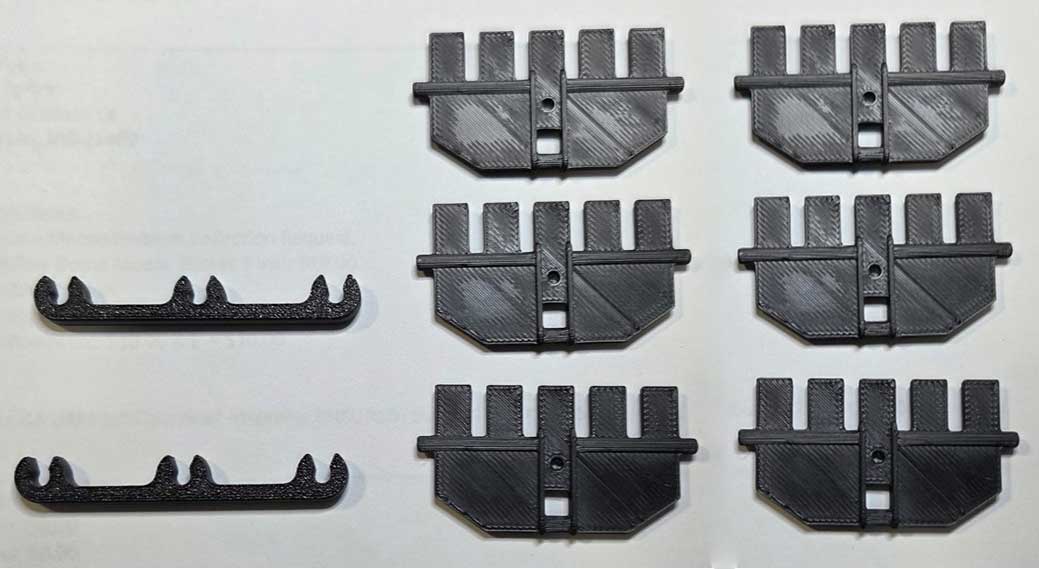 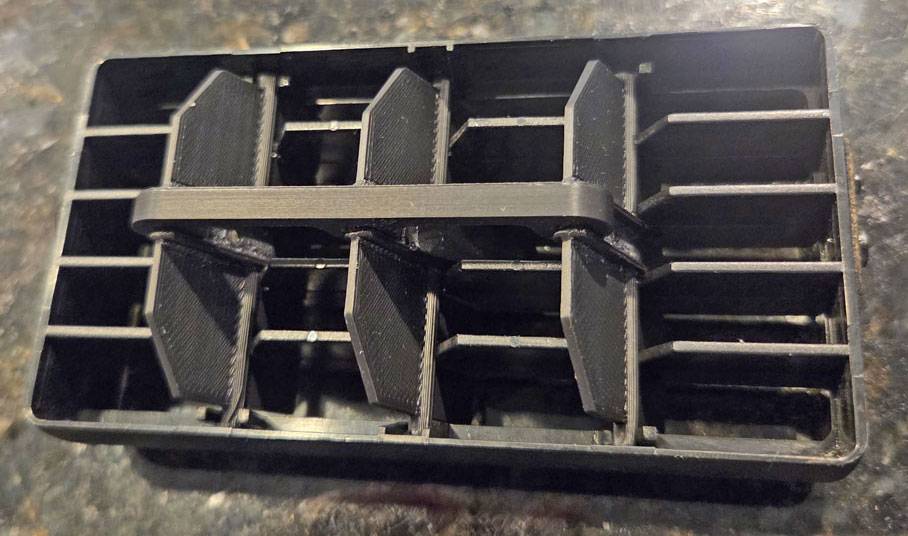 DISASSEMBLY Looking at the sides of the dual vent assembly, the left side is not a concern. You won't be removing anything there. On the RIGHT side you can see TWO PINS. One is a hinge pin and the other pin limits the inner vent rotation. 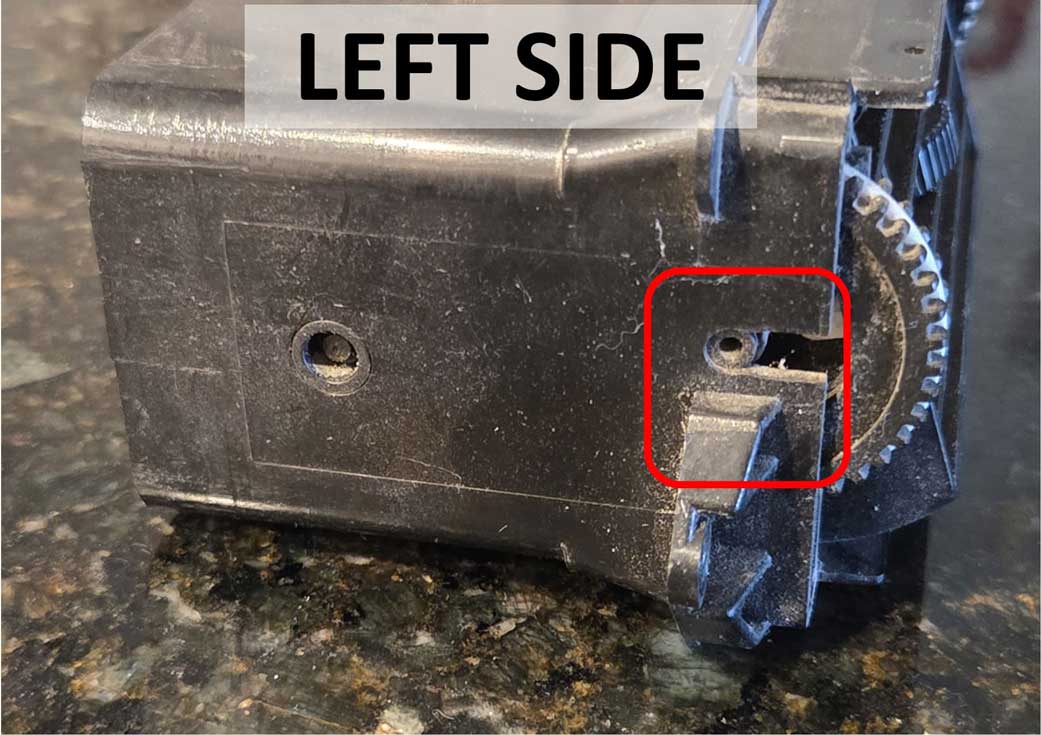 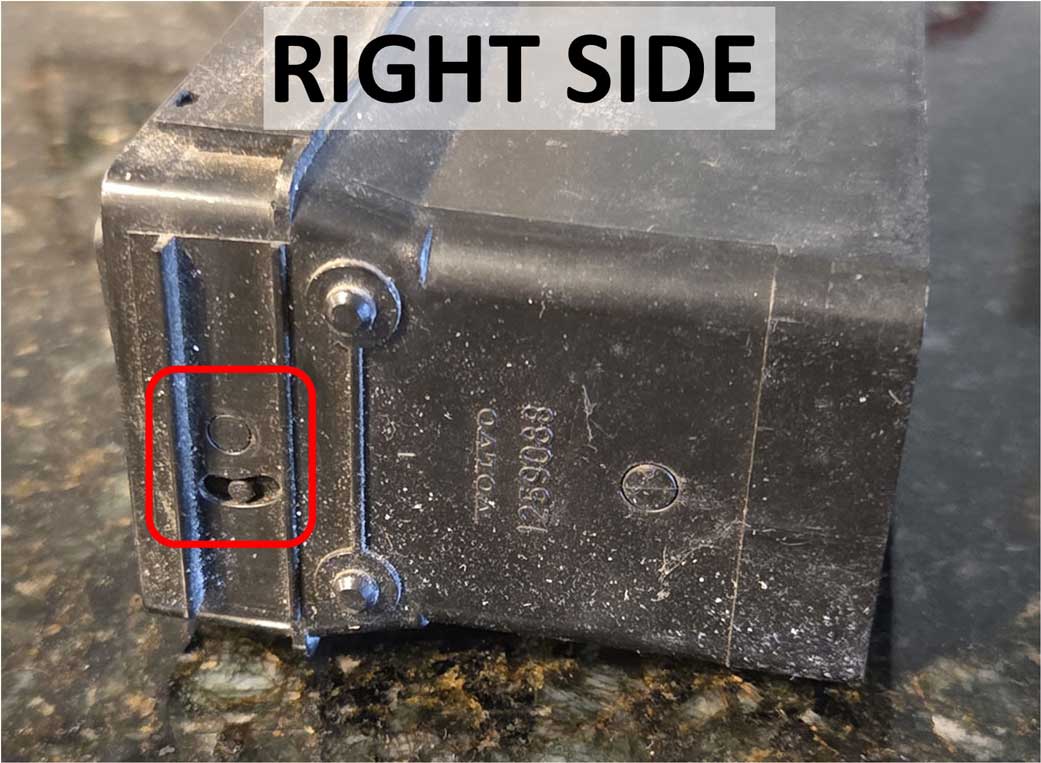 I would begin on the RIGHT side of the RIGHT inner vent. I'm using a flat blade screwdriver to gently flex the outer wall outward just enough to dislodge the hinge pin below and pull the inner vent forward. 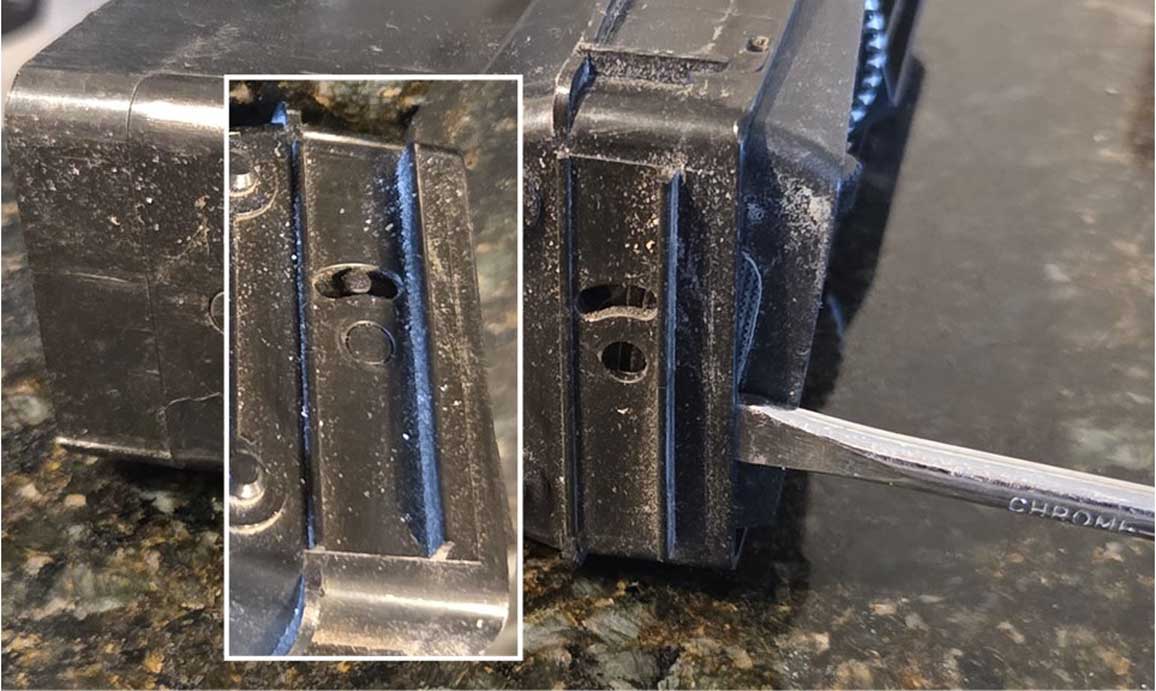 Then you can easily pull the vent out.  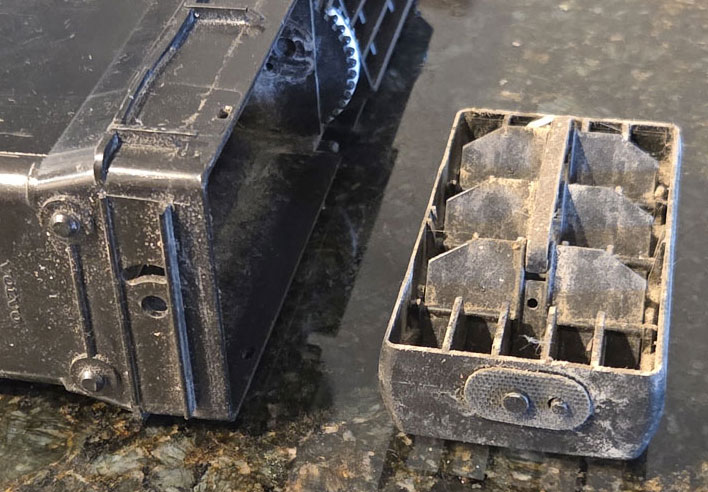 Here I'm using the screwdriver to flex the same side on the LEFT inner vent, which also then releases and can be pulled out. 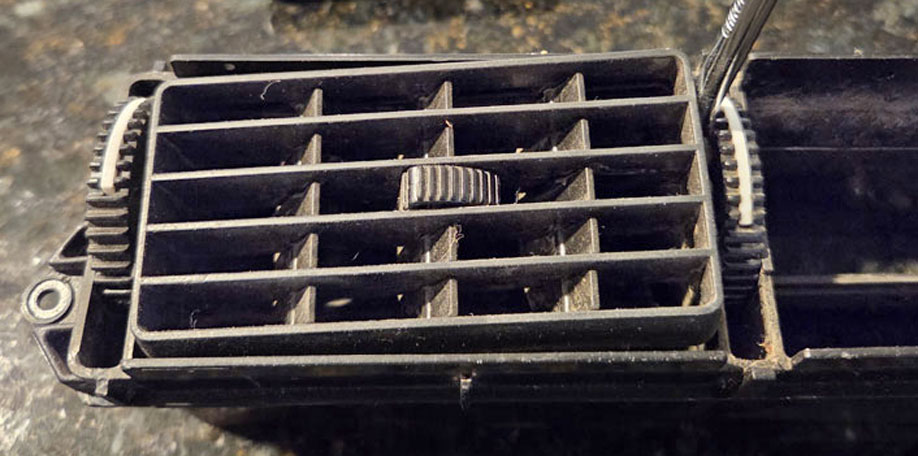 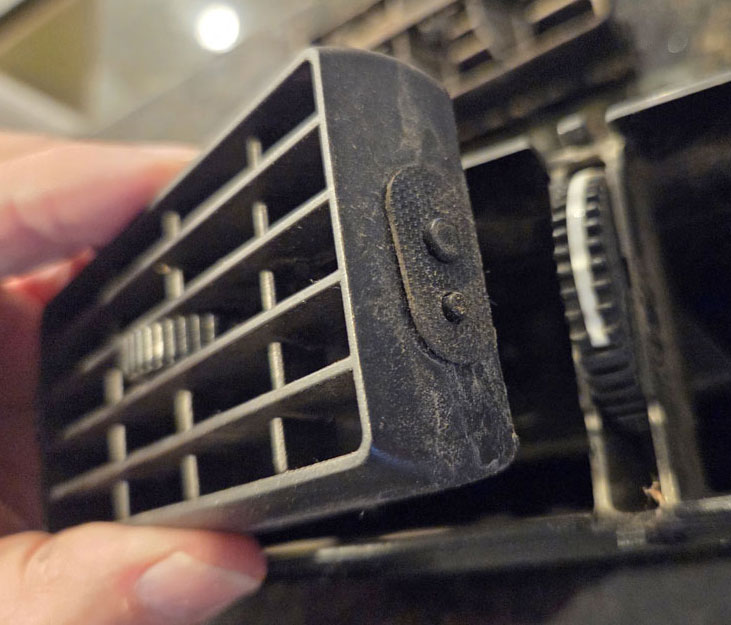 Now is a good time to thoroughly clean everything using soap and water. CAUTION: Don't lose these RUBBER PIECES above on one right side of each vent. You can lift those pieces off to keep then safe as you clean. Both vents are the same, so if you mix them up it's OK. This is what's on the left side of each inner vent attached to the hinge pin. It's a spring washer and it seemed to be on there tight, so I left it alone. This washer is there to keep some tension on the inner vent when installed in the dual housing. These three vertical flaps and one cross bar below will be replaced in each inner vent. First the old parts need to be removed. This is where you need to be the most careful. The small plastic hinge mounts inside there (shown below) will be fragile. If you try to yank these vertical flaps out by force, you'll begin breaking things. The ARROWS BELOW are where you need to grip the wall edge and flex the wall OUTWARD. The goal is to flex it outward just enough so you can release ONE PIN at at time on ONE flap at a time. Do that along the top wall until all three pins are free. Then you can gently lift out the entire old 4-piece assembly assembly. 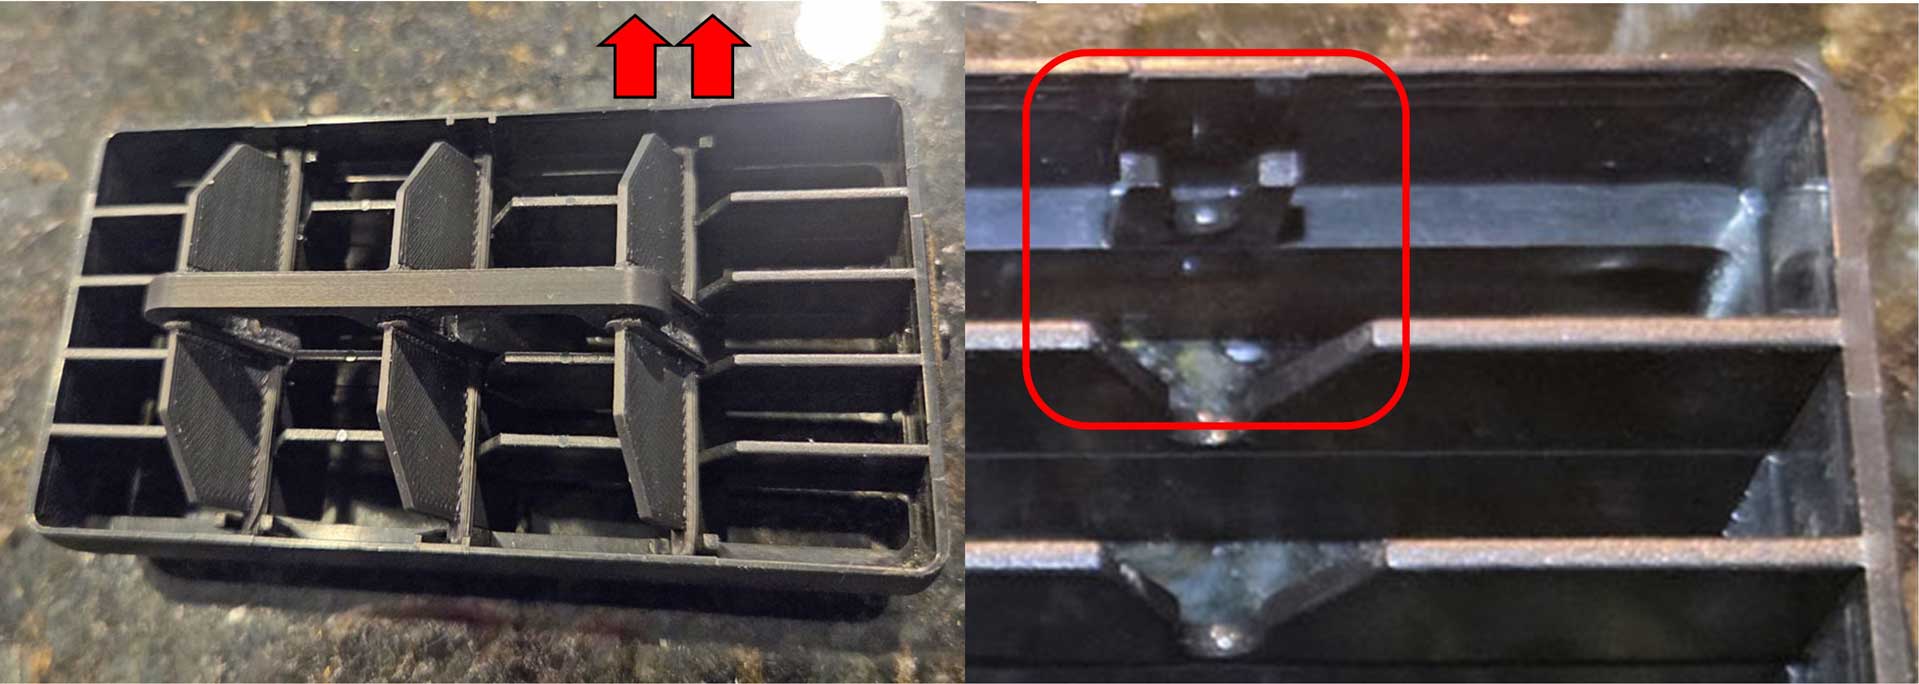 I strongly suggest that you DO NOT simply pull on the flaps or try to "unsnap" the hinge pins or this will happen. 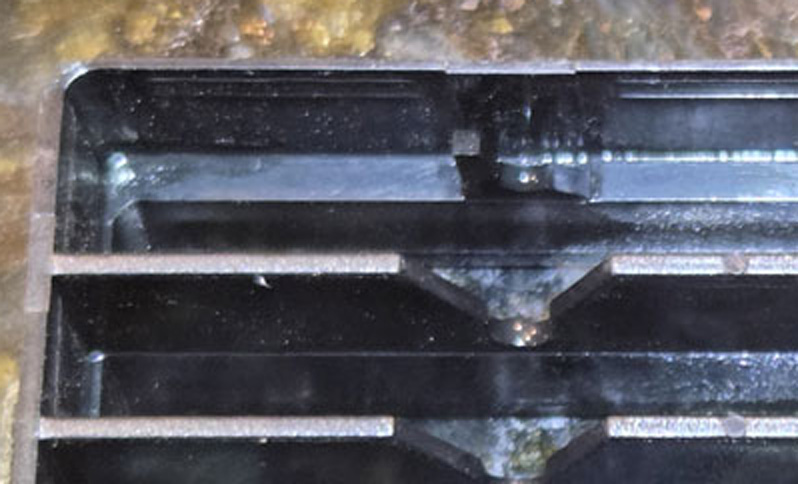 The original vertical flap in the center will have a grab handle, which needs to be removed so it can be reused. A gentle flex with the screwdriver (middle photo) will help it release and slide off. 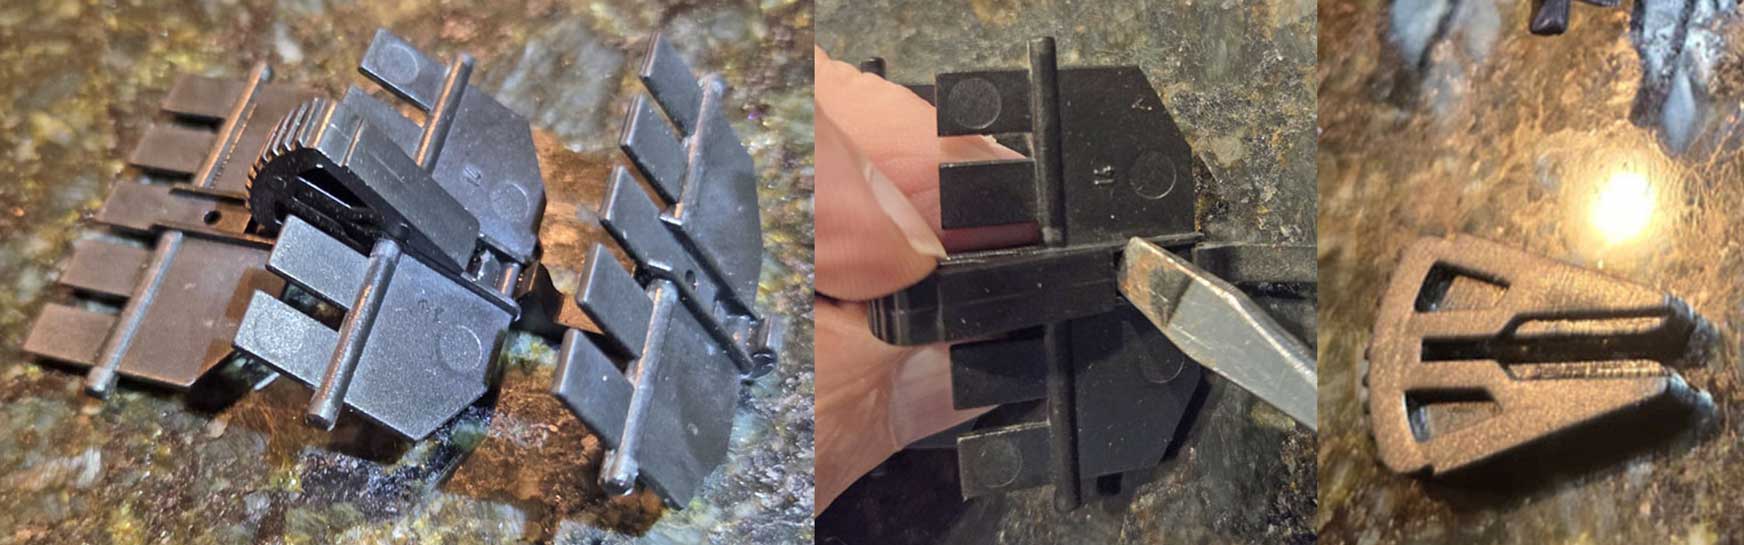 Now you can assemble the new flaps onto a cross bar. The new parts will snap together. No worries about breakage since these are new and more flexible. And don't forget to add the original grab handle to your new center flap. The grab handle slides on and pops in place really easily. 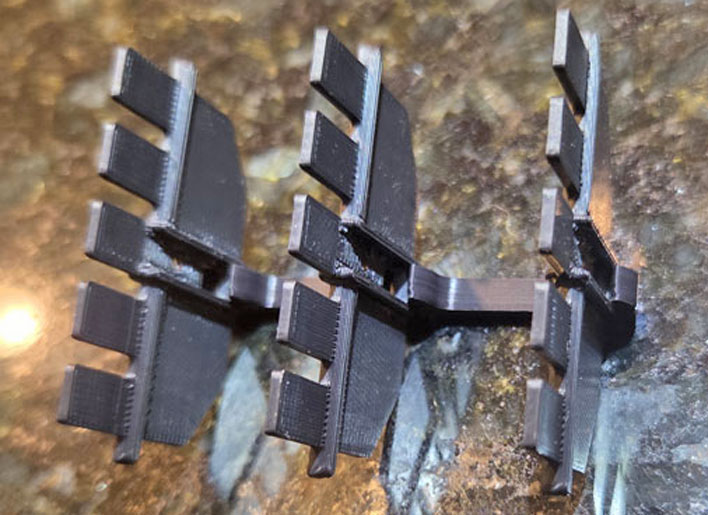 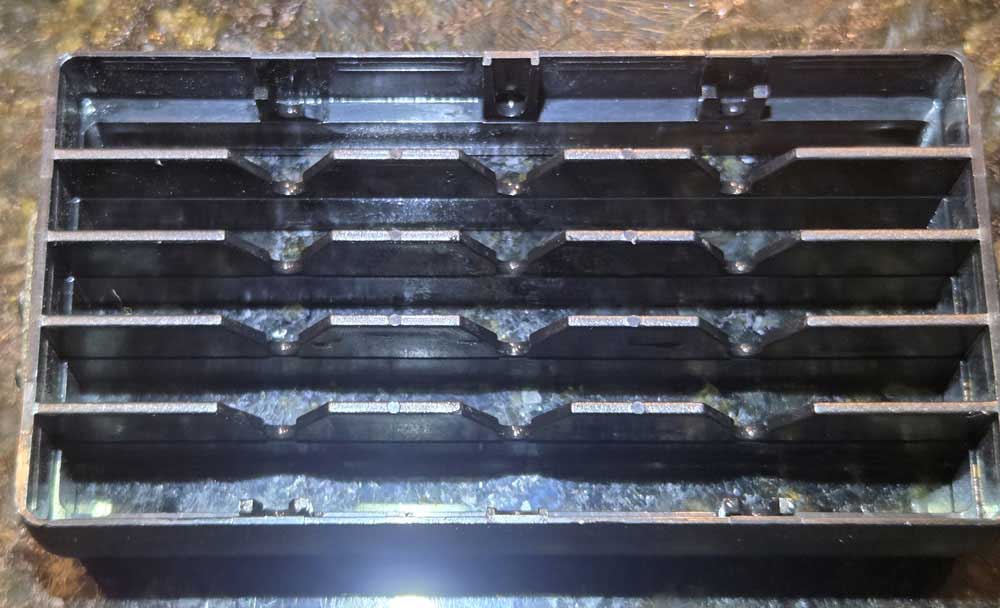 When you install this new flap assembly, be sure to use the same technique of flexing out the outer wall and then slowly fit ONE hinge pin in at a time. I suggest fitting an outer top pin, then the middle top pin, then the third top pin. Then flex out the opposite wall and do the same on the other flap pins. When you think you have it all in, turn it over and take a close look at the front alignment of the three flat pieces (second photo). Where this ARROW is below you can see one flap is misaligned. I discovered I did not get one of the hinge pins all the way into place. So check that. 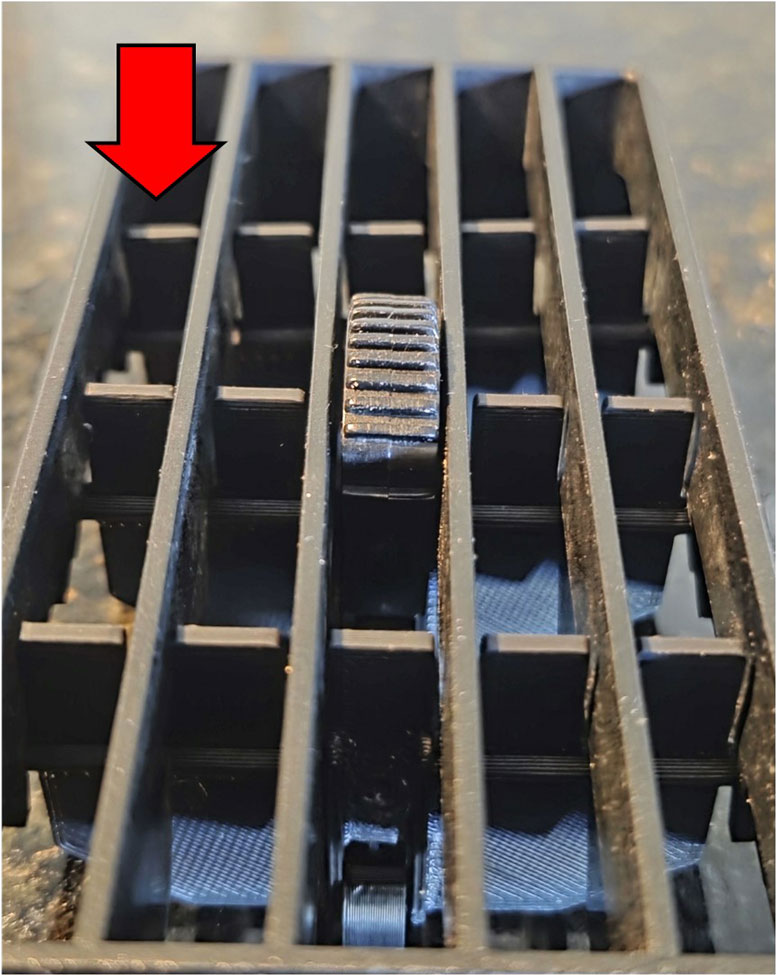 The final step. Reinstalling each assembled inner vent back into the main housing will be the reverse of how you removed it. Start by dropping a vent into place and the FIRST thing to line up will be the LEFT outer hinge pin (the one with the spring washer). That pin needs to go into the hole first, then the right side can be lowered in, with the help of your screwdriver to gently spread out the wall. Then gently push it into place and you'll know when it pops in and the vent freely hinges up and down like it should. |
| Accelerator Cable Repair |
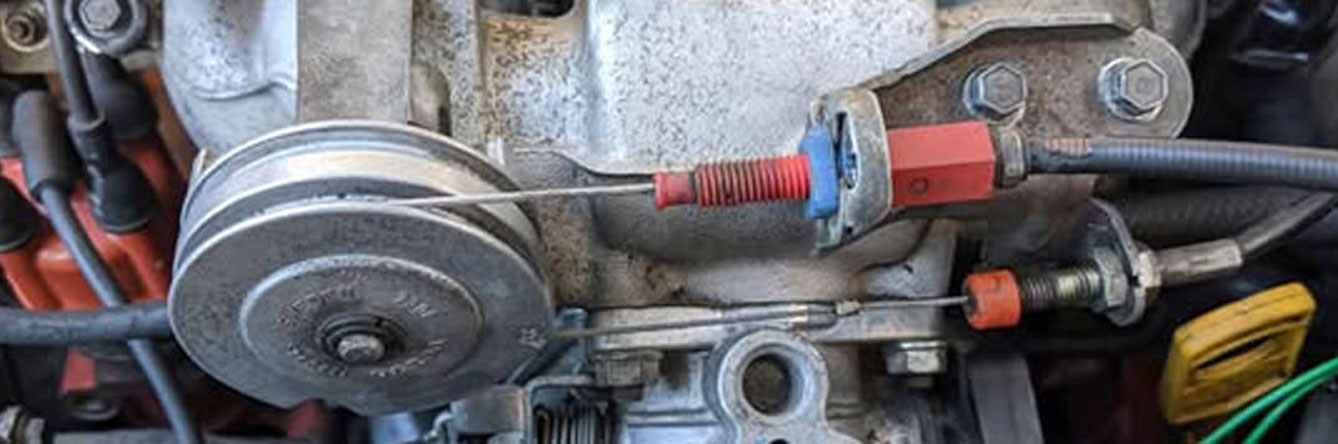  If you get a chance to disassemble a Volvo accelerator cable, you'll see that making repairs will be very possible. Of if a particular cable become impossible to find, shortening a longer cable to make it fit is a good option too. Here's a short video of a similar repair of a motorcycle cable that will help show you how. https://www.youtube.com/shorts/rlL5u1XeBWU The ferrule at the end can be replaced and replacement ones can be found and soldered onto the cable wire. This Volvo ferrule is about 0.20 inch wide (5 mm). 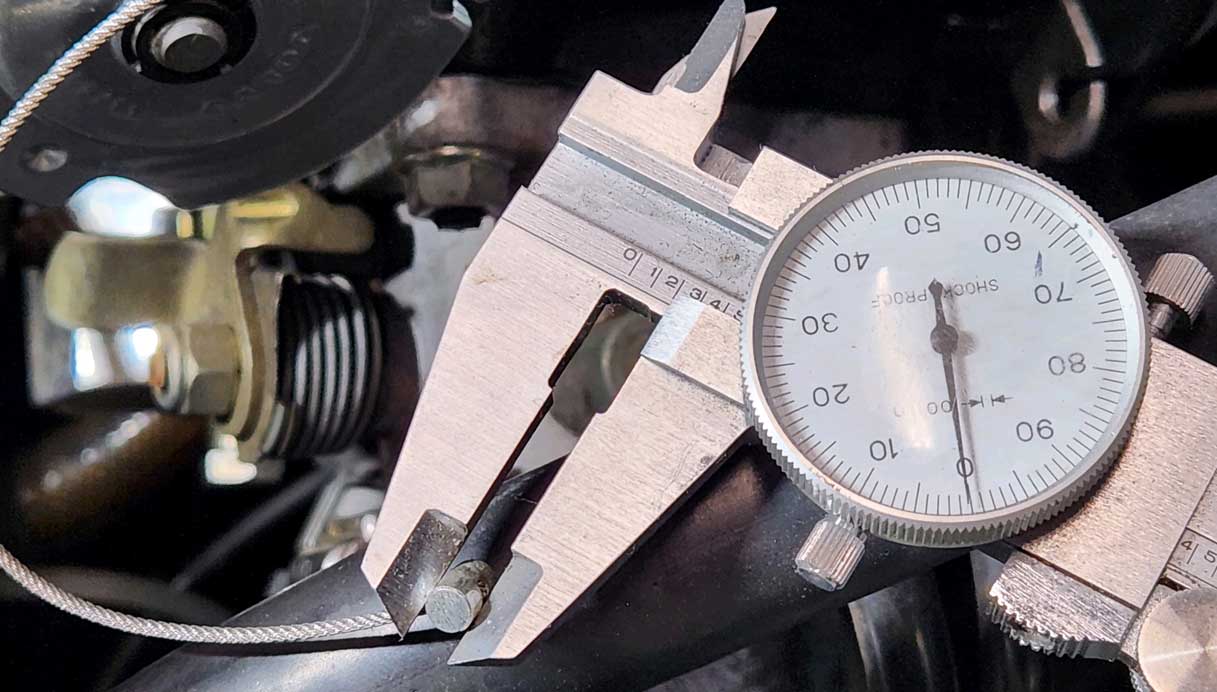 Ready made ferrules with set screws are also available in the correct 5 mm size. 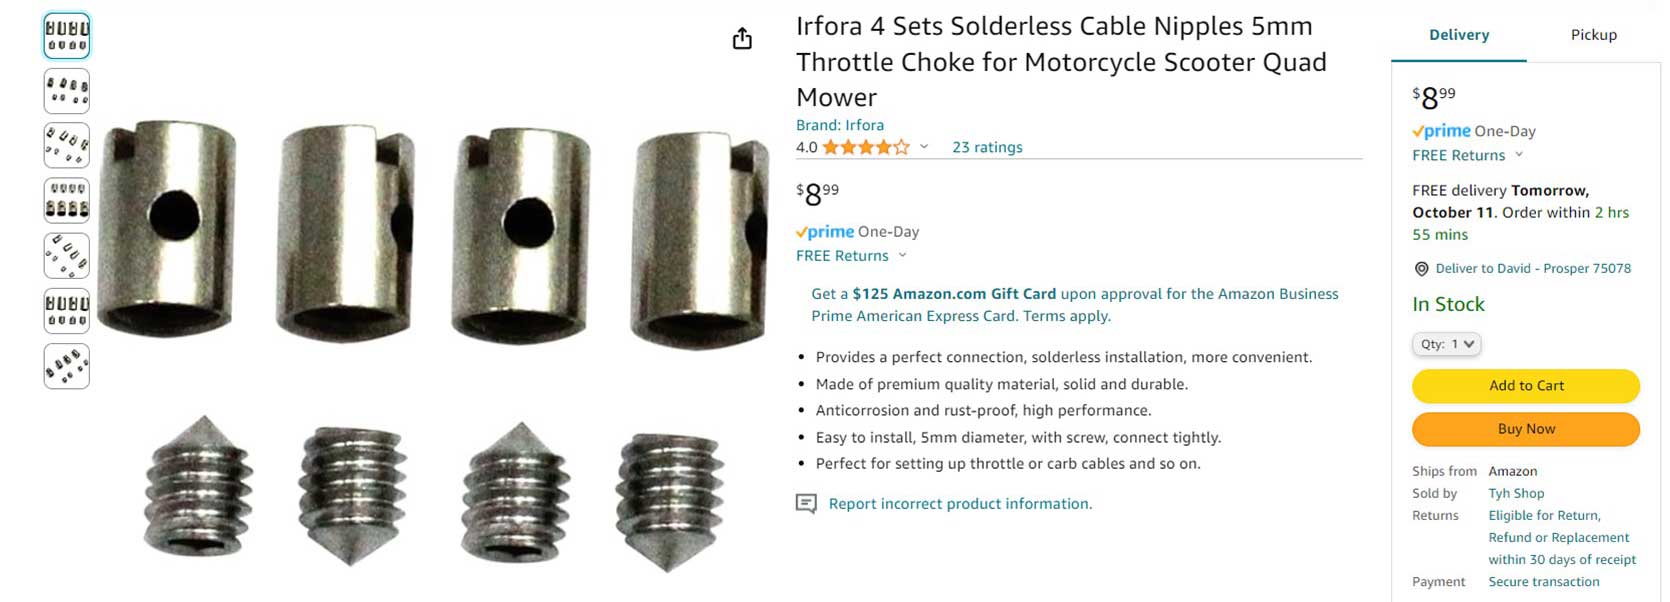 |
| IGNITION (key) SWITCH Info |
| Inside info on 240 Ignition Switches. CLICK HERE FOR INFO IN MY IGNITION PAGE
|

| (CPS) Crank Postion Sensor Fitting to an Earlier Engine |
   |
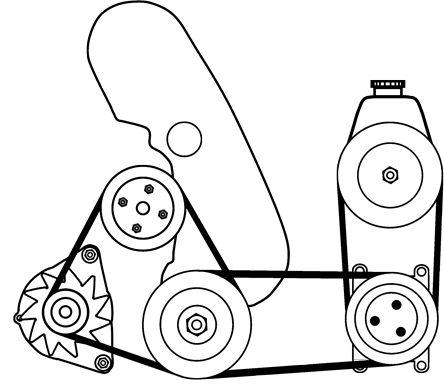
| ALTERNATOR and ALTERNATOR MOD Page |
|
| Alternator Idler Pulley Project to eliminate belt slip with a high output alternator. |
Click this photo.
|

| Vacuum Pump Project to Improve LOW Brake Booster Vacuum. |
This isn't for everyone, but if your engine has lower vacuum and you need that vacuum for your brake booster, check out this vacuum pump project in my 240 Brake Page.
|

| More Accurate Volt Meter Project |
If you're like me and don't care for a less than accurate VOLT GAUGE, then check out this project.
|

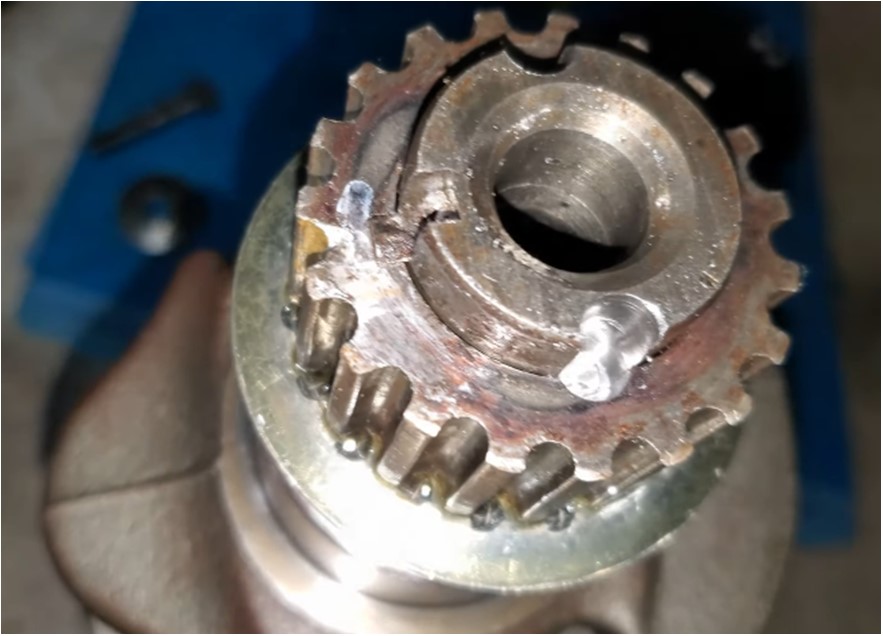
| Methods for SECURING your B230 CRANKSHAFT DAMPER and TIMING GEAR |
| If you're
performance-built B230 is important to you, you need to keep
these modifications in mind. These mods outlined below will not make it
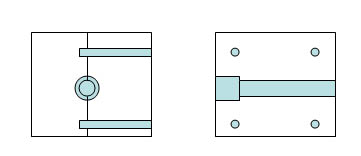
faster, but they may save your engine from serious damage. This first suggestion is designed to prevent the epidemic of crank pulley bolts coming loose when they should not. If you're paranoid about that bolt coming loose, I think THIS WILL BRING SOME CALM. This is a B230 Lock Tab Plate. It's designed to be installed under the B230 crank bolt head.  I designed this Lock Tab Plate to illustrate a way prevent unwanted loosening of that bolt. Lock Tab Plates are now available below.   I wanted some of these tab locks for myself, so I had a small batch made in 22 gauge stainless steel. If you're interested, I had some extras made which are available. The weight of one of these is about 5 grams, so if you're concerned about imbalance, the long arm weighs about a gram, which is pretty insignificant. If you're the one who obsesses over a gram, you can install two of these 180 degrees apart. Click to View Cart or Check Out. Canada or International Shipping: Please Select Shipping and click "Add to Cart" Click to View Cart or Check Out. Your comments are welcome: CONTACT NEXT ISSUE: Failure of stock B230 crank timing gear. Usually due to crank bolt being loose or improperly torqued. 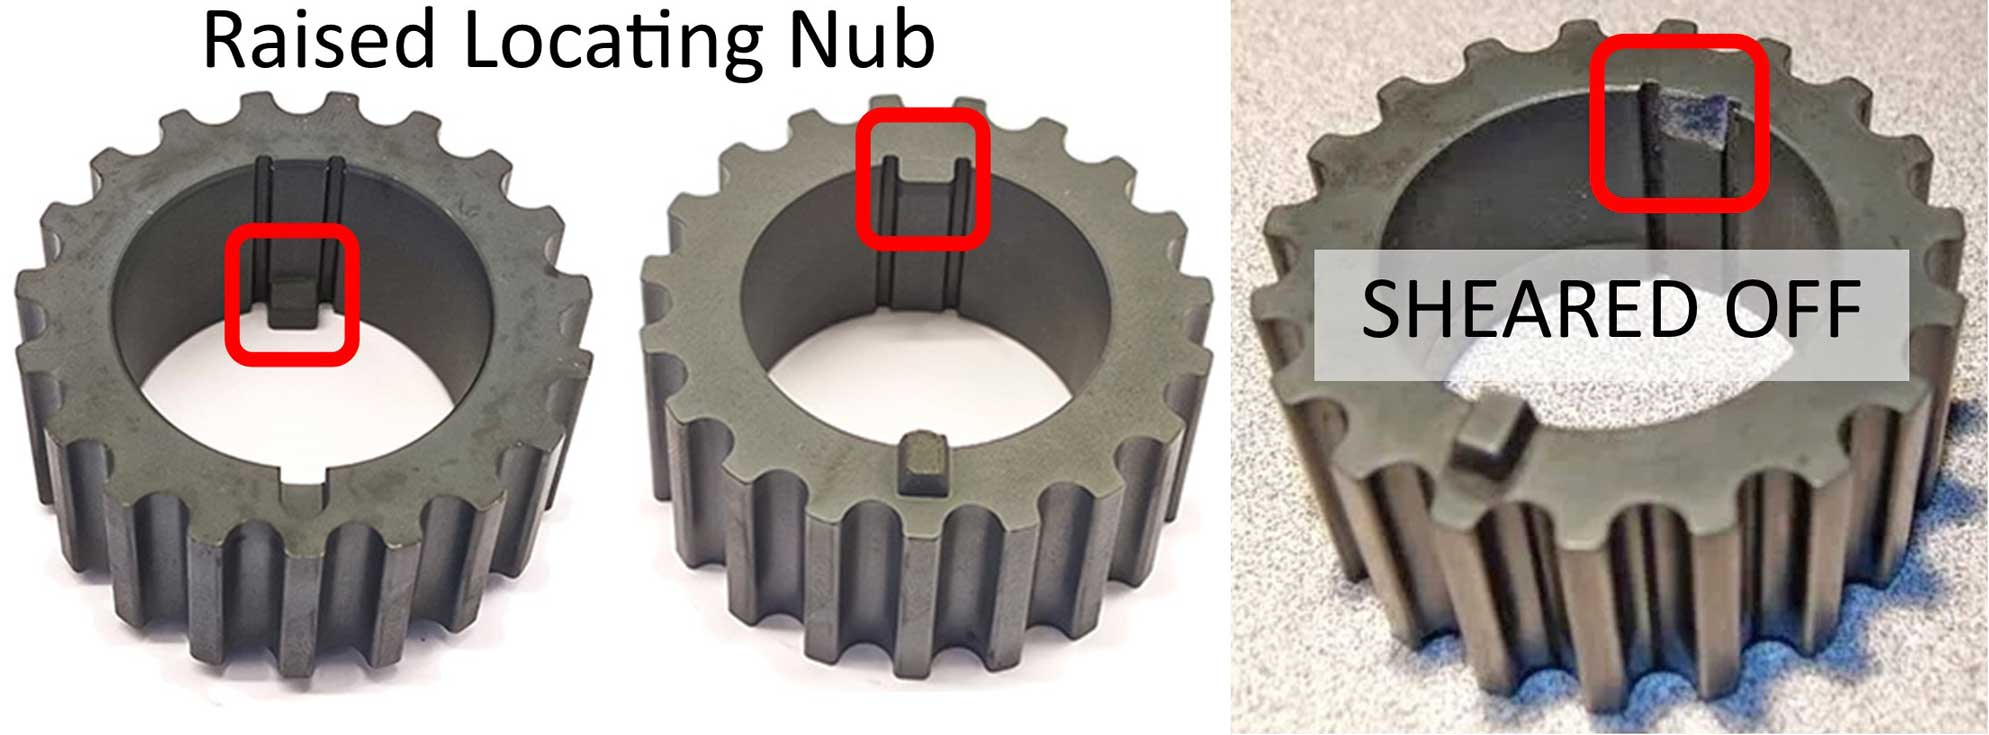 The standard crank timing sprocket for a B230 is made using an inexpensive cast or powdered metal manufacturing process, so they're fragile. The small locating nub shown above rests in the crankshaft groove when installed. This nub is a weak point and it's prone to shearing off. If that happens, that will create all sorts of havoc. In many cases, this failure was preceded by (probably caused by) the loosening of the CRANK DAMPER BOLT. So this is a problem which might be fixed by just KEEPING YOUR BOLT FROM LOOSENING. It's also believed by some that the nub can become damaged from abuse when fitting or removing it, in part from the use of an IMPACT WRENCH, or if you are not using a proper DAMPER HOLDING TOOL (below) to keep the the damper stable when removing or torquing the crank bolt. 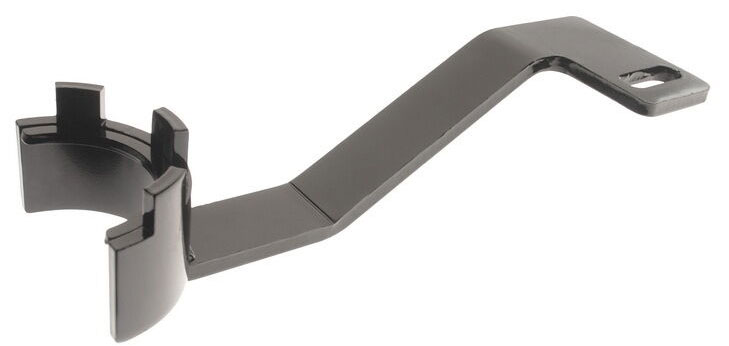
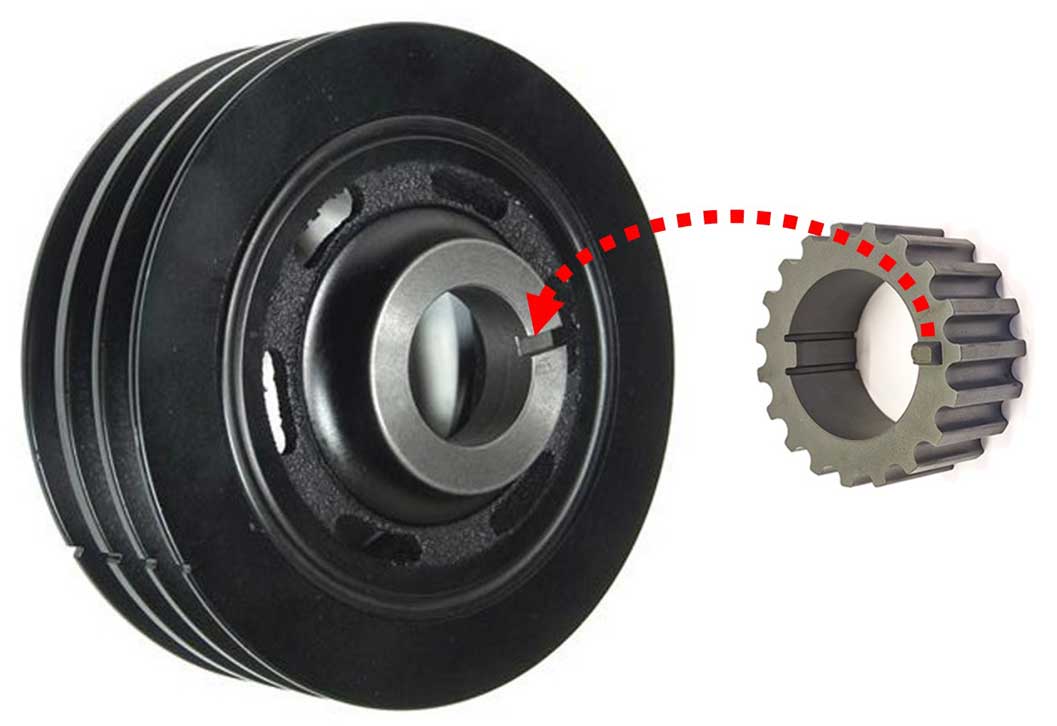
If you're wondering why this sprocket has another raised nub shown above, it's made that way so the sprocket mates with the slot on the back of the crank damper. BILLET STEEL CRANK SPROCKET 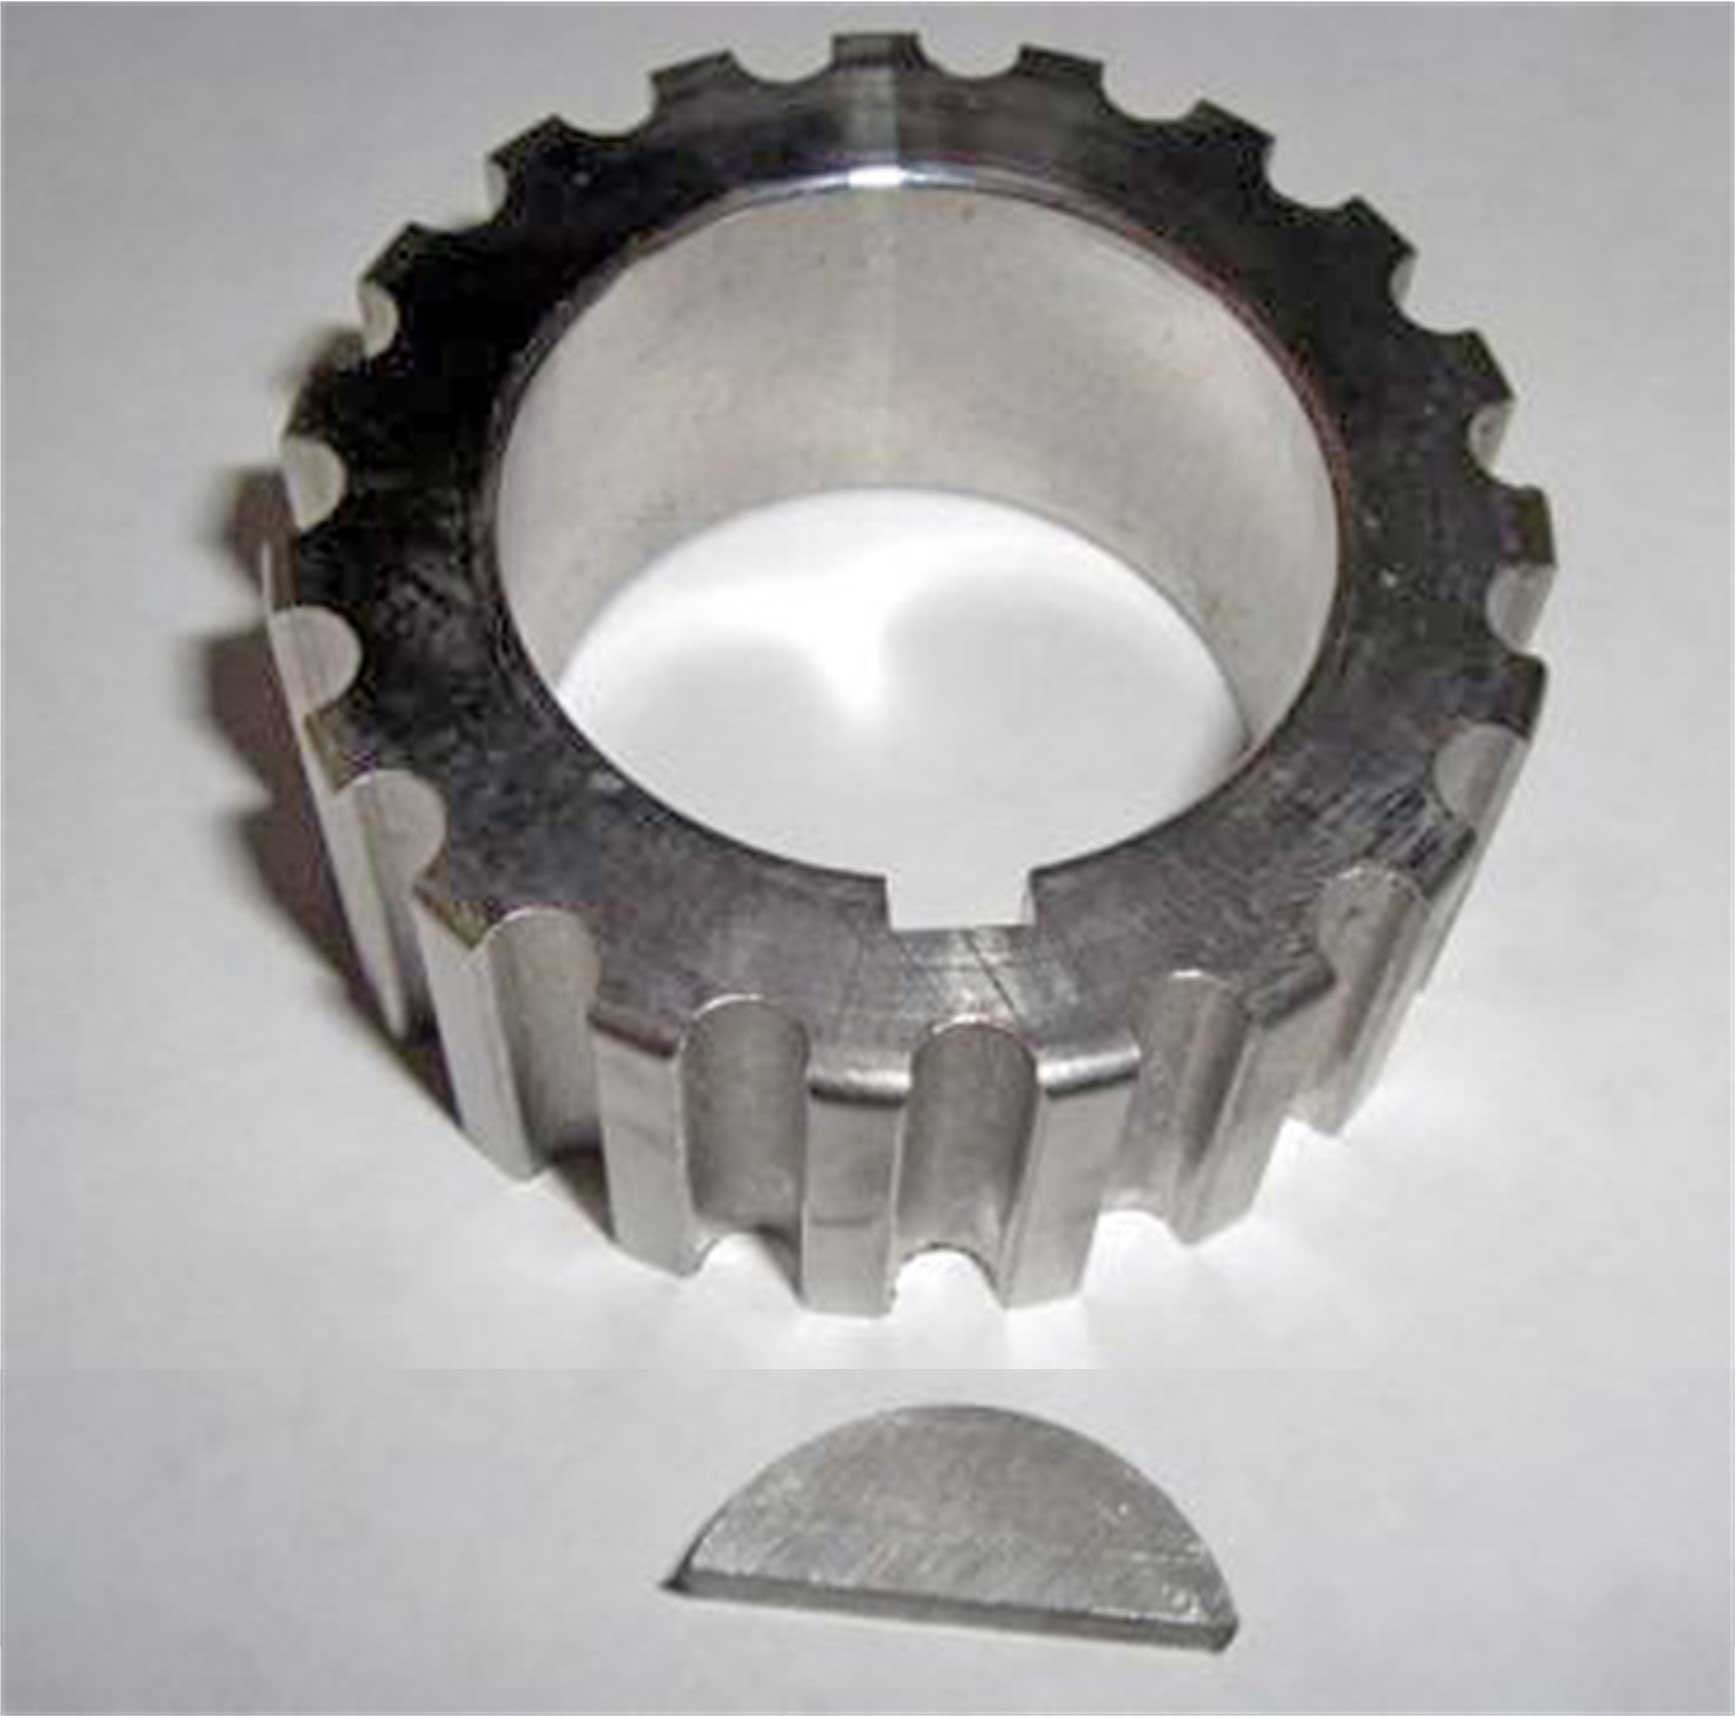
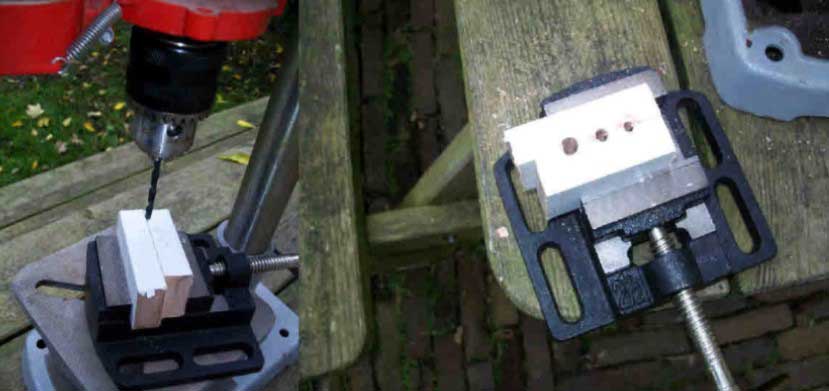
This is the Billet Steel B230 crank sprocket (round tooth) available from Yoshifab. It comes with a locating key. A billet sprocket is considerably stronger than a stock one, but it can still experience some damage or it can cause engine damage if your crank bolt comes loose. I know of one instance where this happened to a billet sprocket and the main damage happened to the key only, but the sprocket was still usable. The valves in the 16 valve head, however, were toast. So a billet crank sprocket is a nice addition that adds a higher level of protection for your expensive engine, especially if you have a 16 valve head, because the crank gear is under more stress with an extra cam sprocket up top. SOURCES: yoshifab.com/billet-steel-crank-gear.html https://www.speedingparts.com PINNING THE CRANK NOSE TO THE SPROCKET AND DAMPER. This is an OPTION. It's not required, but this is a fairly well known solution for a lot or performance engines, which will add to the security of a damper pulley and timing sprocket. Doing this with a STOCK TIMING SPROCKET would probably be just fine too if you don't have a billet steel one. It's not as difficult as it sounds and this procedure can be done using pretty normal tools. These images below are useful screen-shots from the below video so you can see a few close-ups of what's being done. 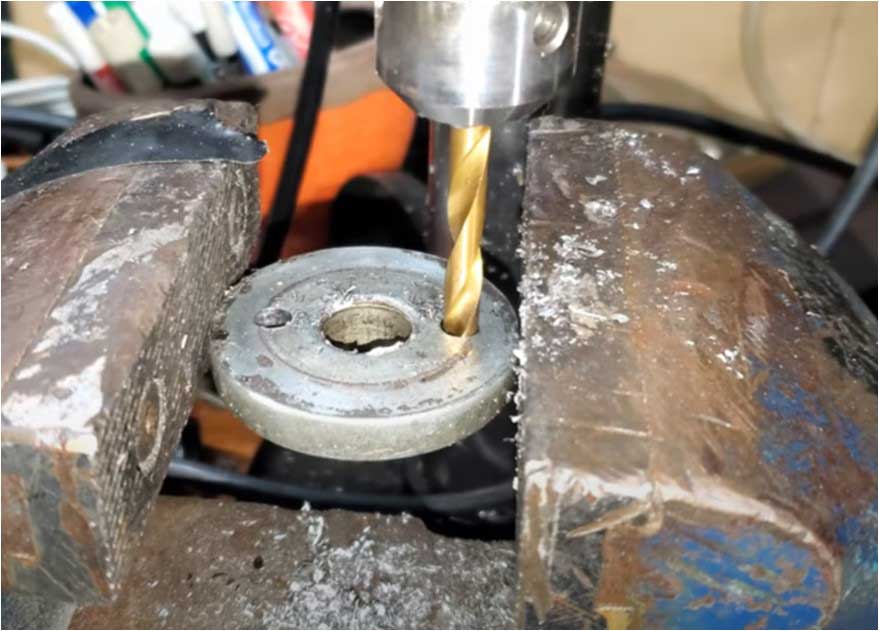
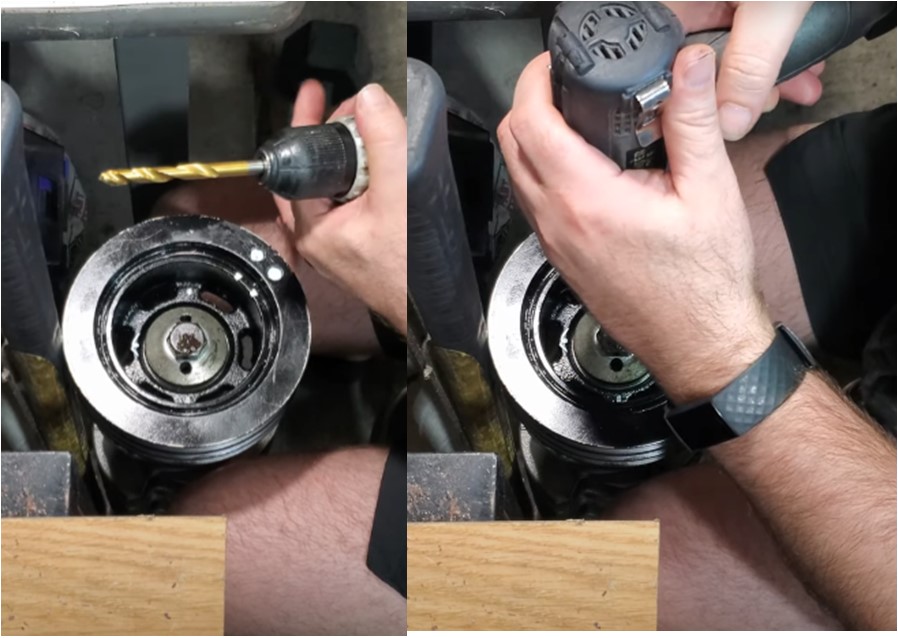
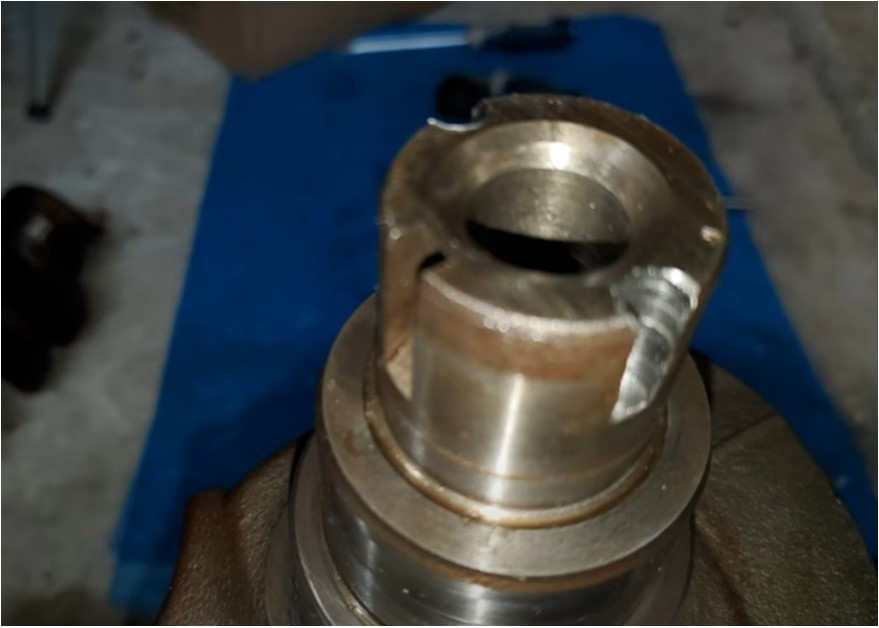
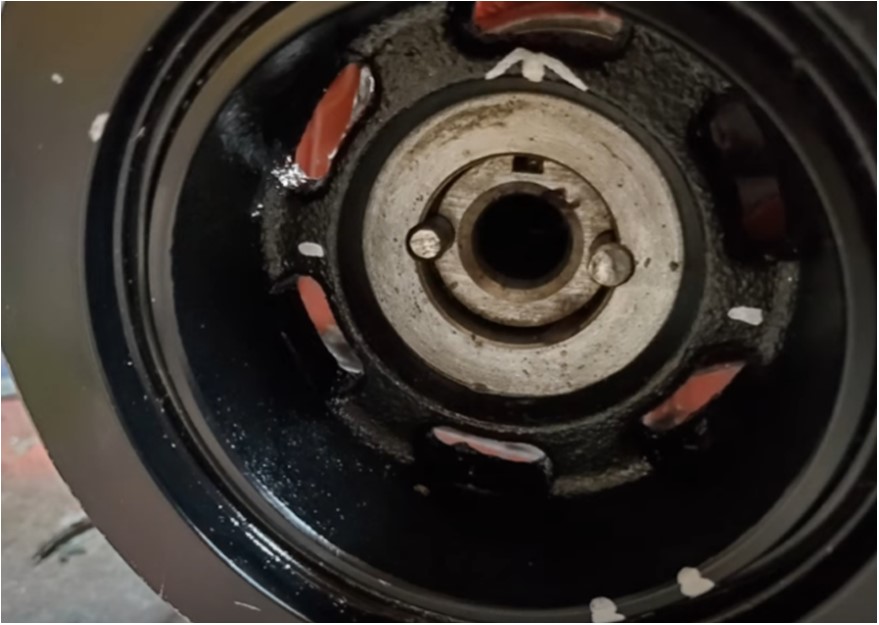
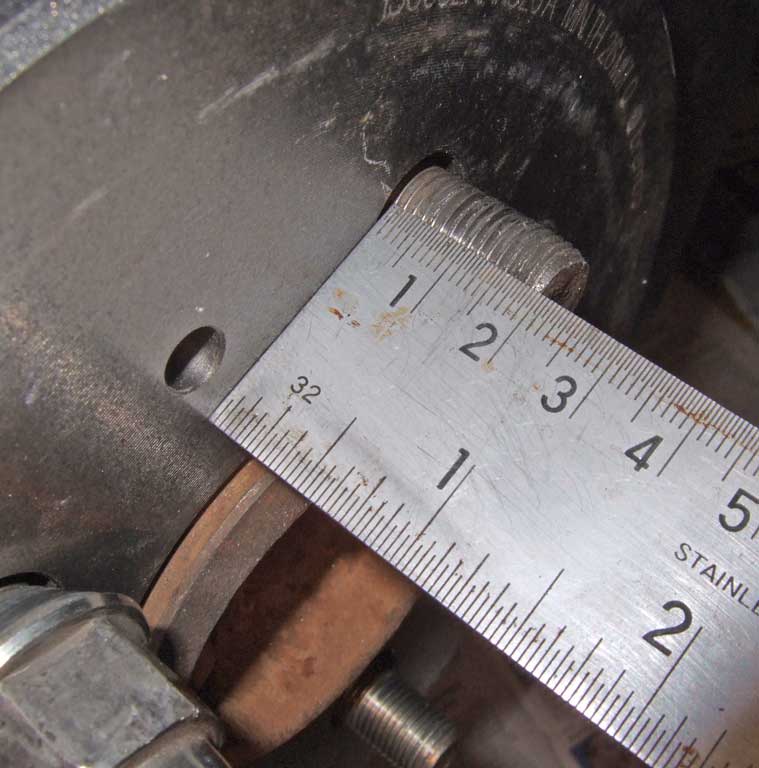
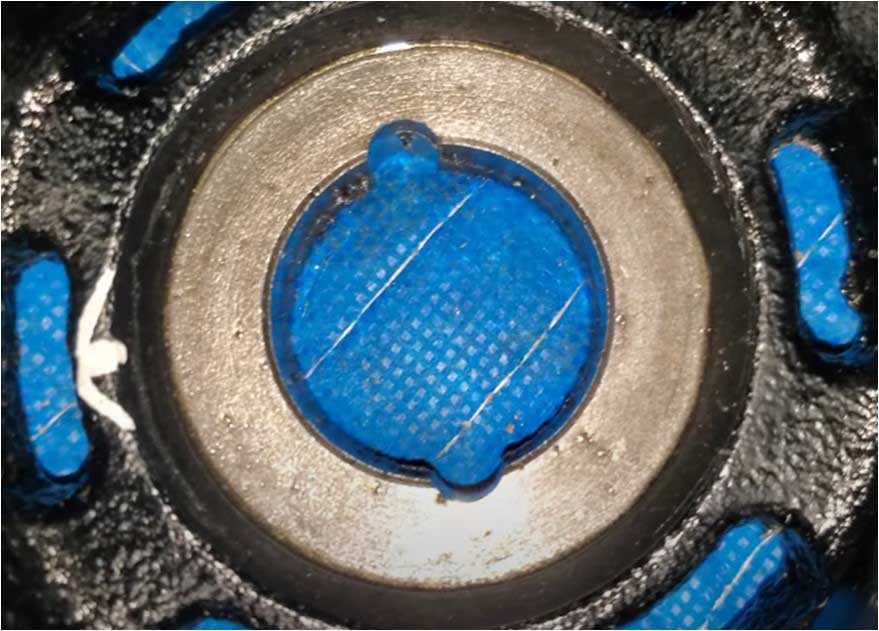 No one sells a crank pin kit specifically for a Volvo engine (like they do for many other engines). The below video is showing how this is done using what you can find easily. Steel dowel pins can be found in many sizes and lengths. You might try 1/4 inch x 1 inch long (25.4 mm) or 1.25 inch long (31.75 mm). You can always grind a pin down to make it shorter if you have a bench grinder or a rotary cutter. In this video he began with a 1/4 inch pin size, but later changed to 5/16 inch pin. No reason was given. 1/4 inch is just fine. The holes are drilled 35 mm apart on center in the fat washer as shown in the below image. This is because the nose of the crankshaft is 35 mm in diameter and you want the pins partially in the crankshaft and partly in the damper. The Volvo damper pulley is 17 mm thick, so the pin needs to be longer than 17 mm (0.67 inch) so that it goes into the sprocket. Using a 1 inch long pin means at least 6.4 mm of the pin will be in the sprocket. Using a 1.25 inch long pin means at least 14.75 mm will be in the sprocket. This video doesn't say how long the pins he used were, but it looks like they ended up to be somewhere between 1 to 1.25 inch long after he ground them down to be flush with the front of the damper pulley. They need to be flush so they will be behind the fat crank bolt washer. 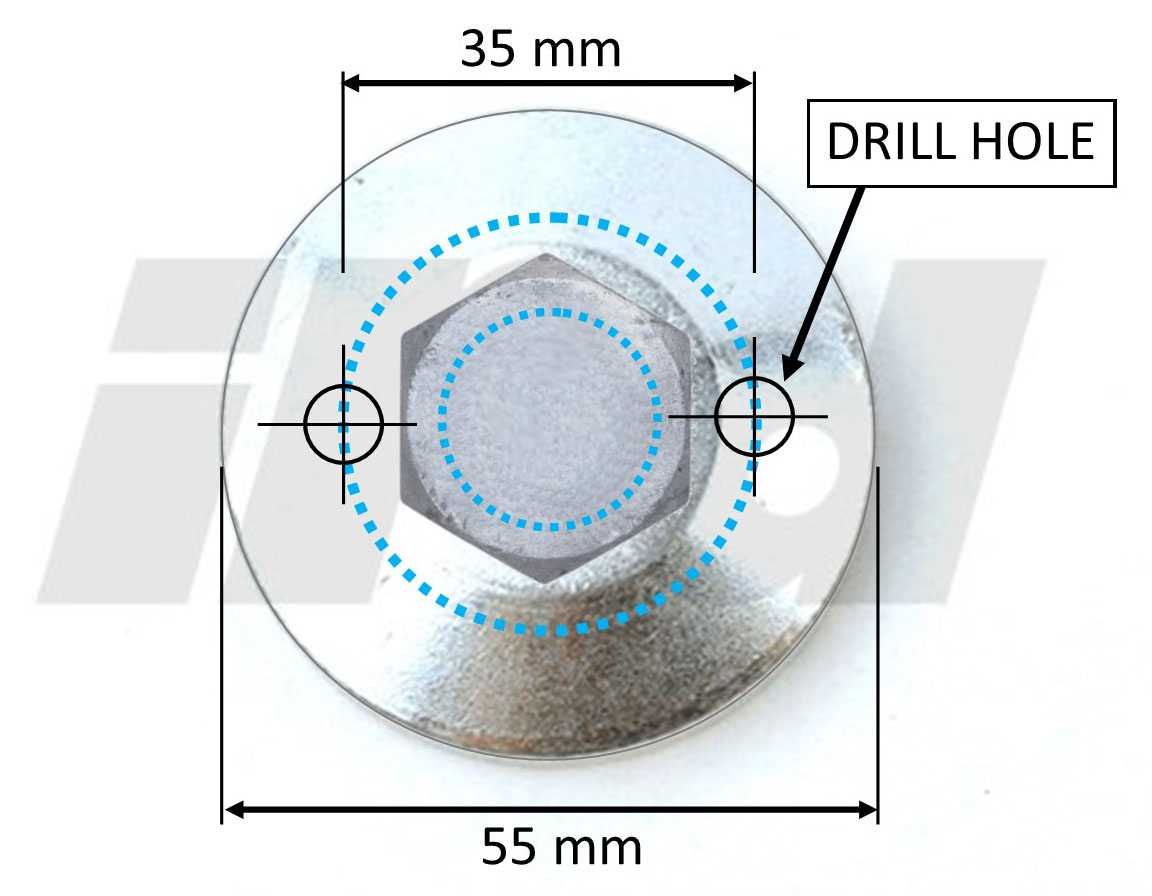 The drill size used will be the same size as the pin. In case you need info on the large crank bolt, it's threaded M14 x 2, 70 mm in length, with a 24 mm bolt head. It's PN 963319 available from iPd. The large, fat washer is PN 1336822, also available from iPd. Bolt torque specification for B230: 1st Stage: 45 ft.lbs. (60 Nm). Second Stage: Tighten 60 Degrees.
This crank pinning operation adds another nice level of security, but still, it doesn't stop a crank bolt from coming loose. So I definitely recommend also doing the FIRST recommendation above. Your comments are welcome: CONTACT |
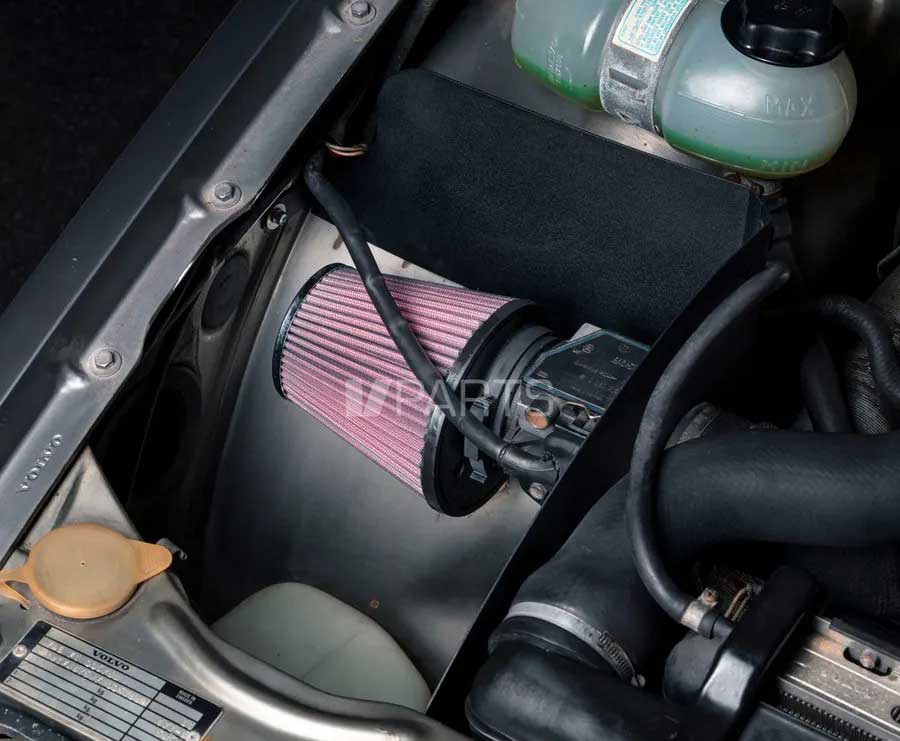
| Choosing an Appropriate Air Filter Size |
https://strikeengine.com/air-filter-size-calculator-for-power-bhp/ For example, if you enter a 2.3 liter engine with 300 HP revving to 6000 RPM, you find your engine uses up to 367 CFM. Then you can go shopping for an air filter and you can use this info below: Pleated K&N filter material will flow 6.03 cfm of air per square inch. By comparison, a single square inch of the highest flowing paper will allow 4.95 cfm of air to pass and the freest flowing foam will flow 4.38 cfm. Use the formula below to compute the minimum size filter required for your particular application. The usable portion of the filter is called the EFFECTIVE FILTERING AREA which is determined by multiplying the diameter of the filter times Pi (3.1416) times the height of the air filter in inches, then subtracting .75-inch. We subtract .75-inch to compensate for the rubber seals on each end of the element and the filter material near them since very little air flows through this area. SOURCE: www.quadratec.com/air-filter-facts 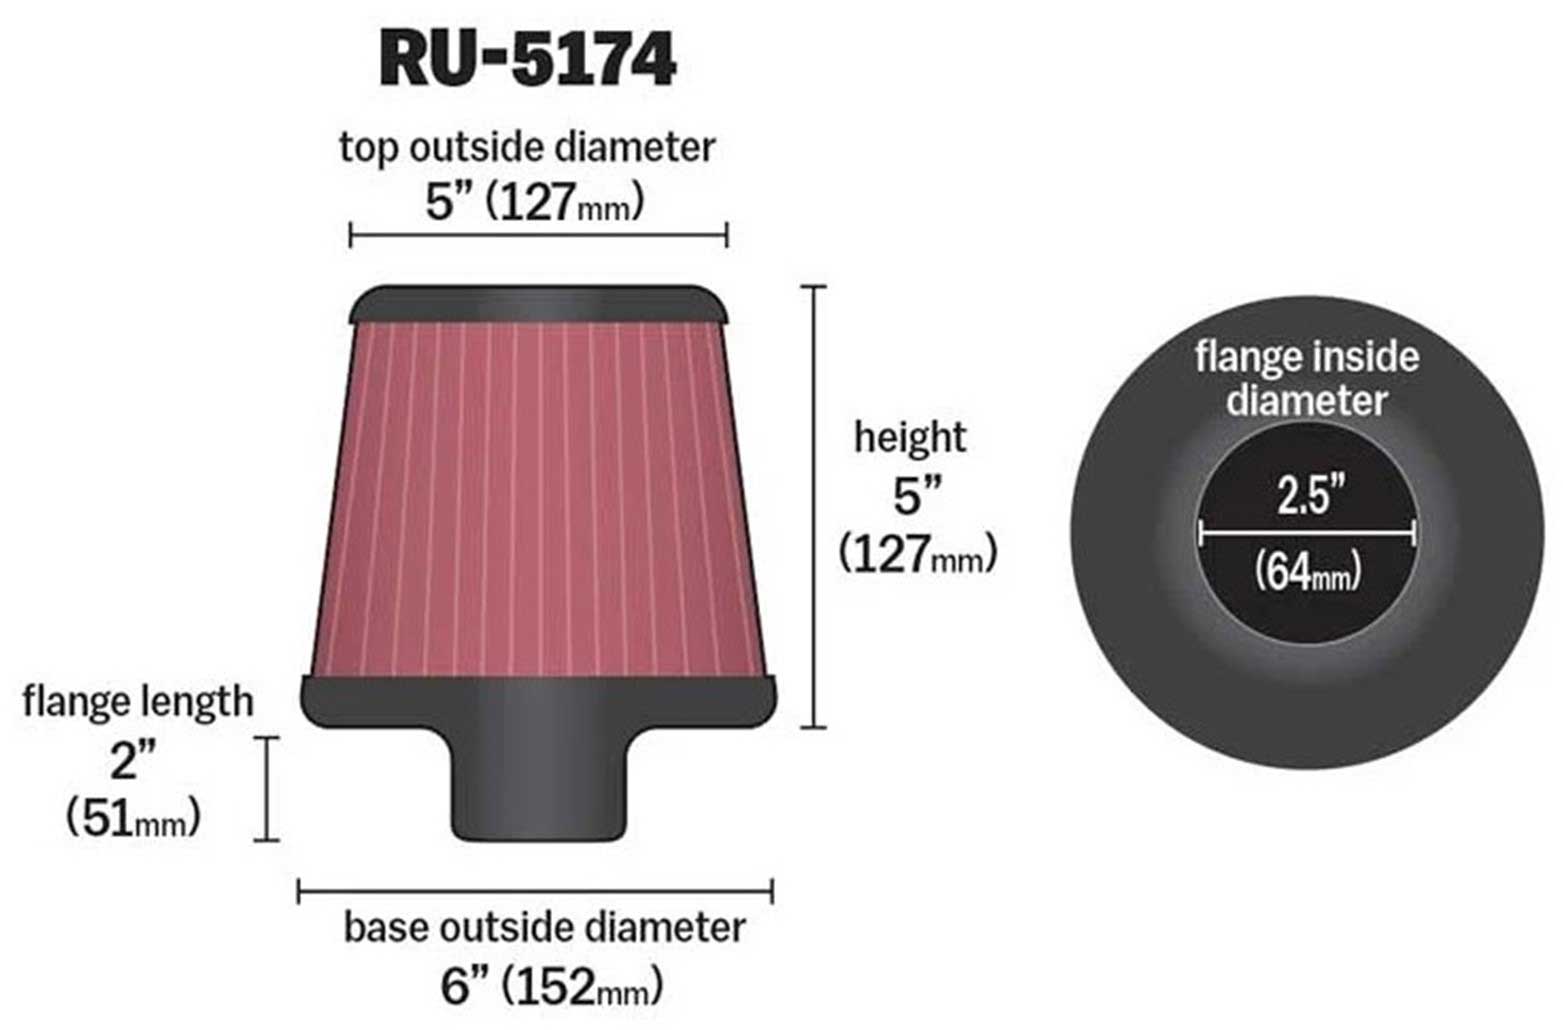 So if we look at this K&N filter above (PN RU-5174), we can use an average diameter of about 5.5 inches and a usable filter length of about 4.25 inches. This comes to about 74 cubic inches. Multiply this by 6.03 CFM and you get 440 CFM. This filter will probably be just enough. If you're not comfortable with the CFM limit being that close, keep shopping for a larger filter. 
For example, if we looked at this K&N RE-930 above, it offers 87 cubic inches and up to 524 CFM. Or this K&N RE-810 above offers 137 cubic inches and up to 830 CFM. |
| 240 ENGINE MOUNT OPTIONS |
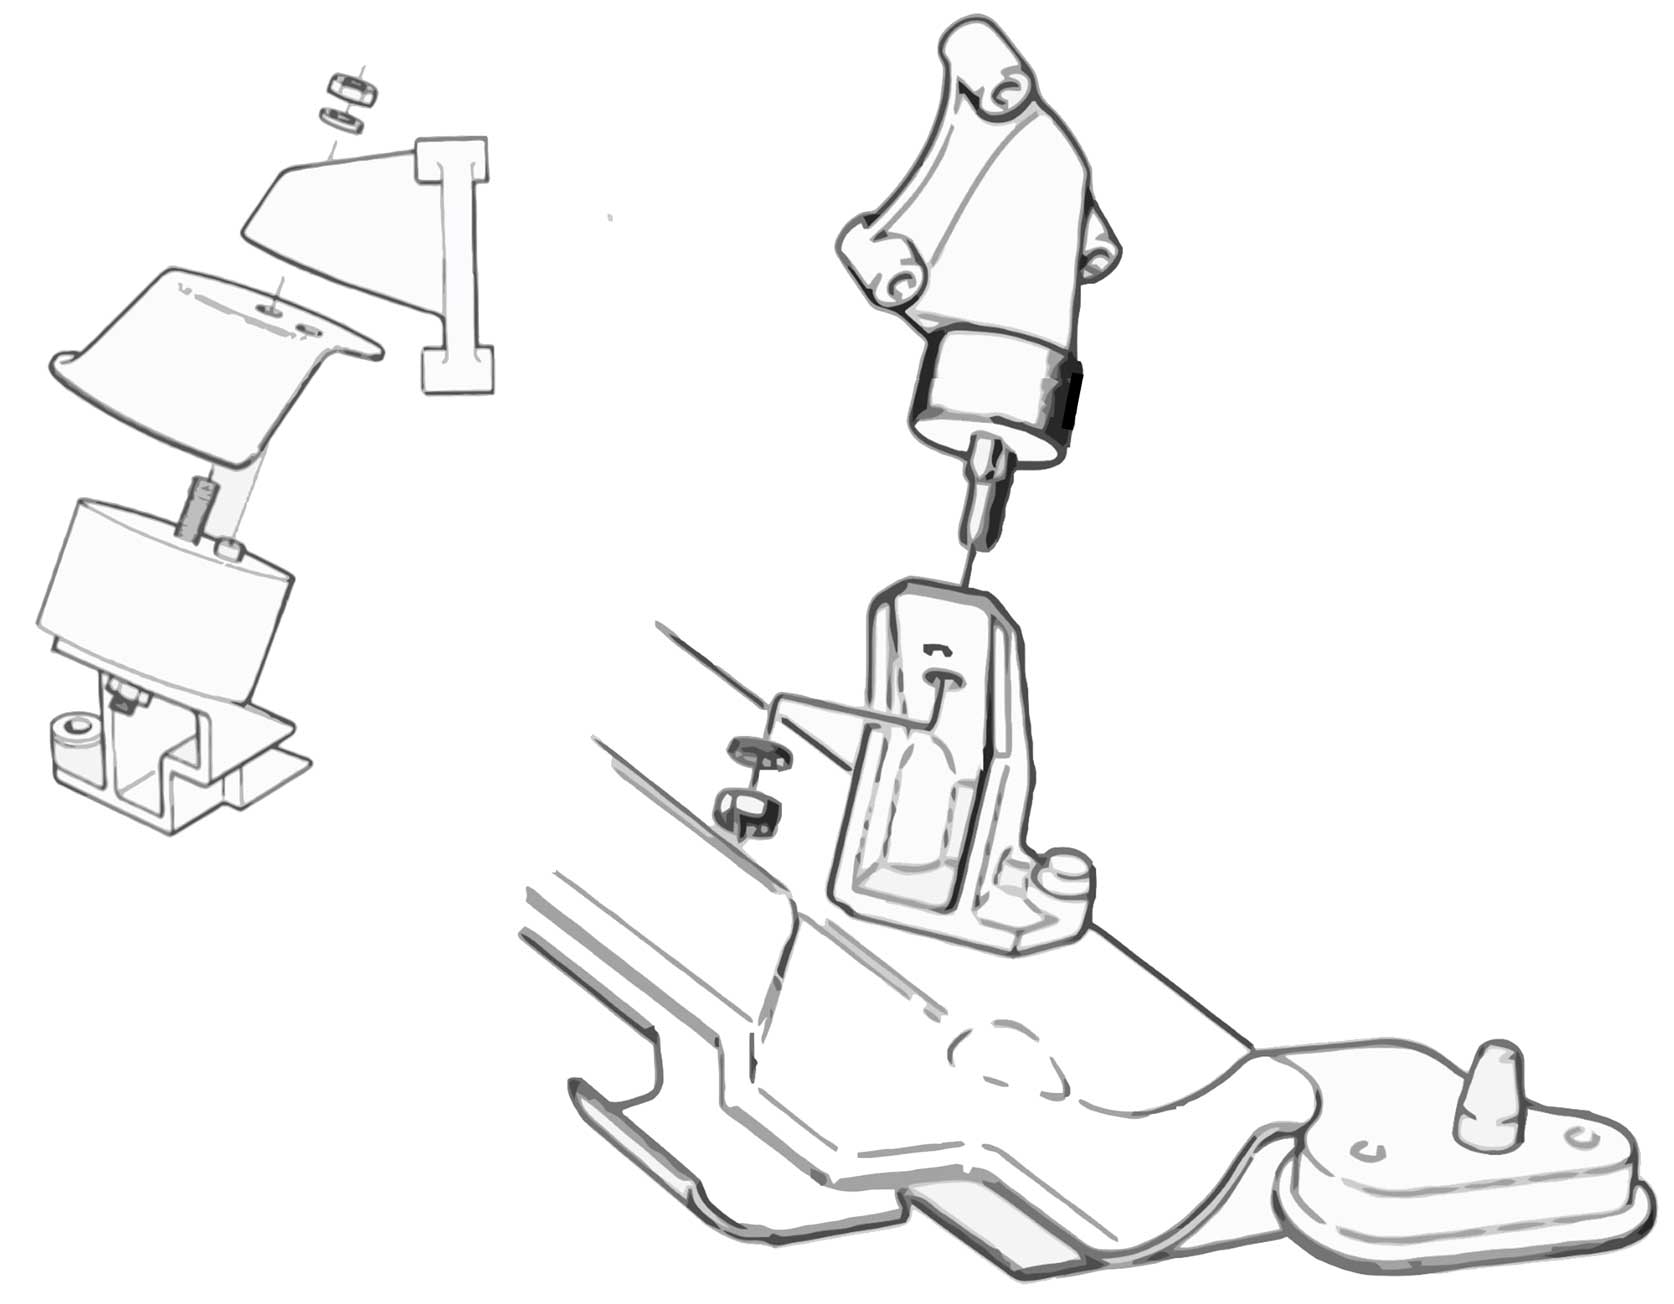
https://www.240turbo.com/enginemounts.html |
| FUEL INJECTOR DIAGNOSTICS |
Go to my Harness page where I have my collection of EFI Pin Function Diagrams: prancingmoose.com/volvoharnesses#pinfunctions For this example I'll be opening the PDF called: 1989-93 240 B230F LH 2.4. 1. Looking at page 2, see the
Bk-R wire from the fuel relay? Try testing it to make sure it shows power when cranking the engine. If it has power, keep going.
2. That same Bk-R wire also powers the injectors. Can you see that in the diagram? Check for that wire in an injector plug so you know which terminal it is. Check it for power when cranking. If it has power keep going. This means you have power to your injectors. You're halfway there. 3. You’ll need an injector noid tool or LED test light to check if you’re getting an ECU signal to the injector plug. This comes through the Gn-W wire from ECU terminal 18 to your injector plug. This video explains that:
A noid tool can be found by searching “bosch Jetronic EV1 noid tool”.
It’s an LED that can be plugged into the injector plug (EV1 style
plug). If it flashes when cranking the engine you know the ECU is
sending the signal.
That video also gives you an option to use a test light. It should be an LED test light, since a normal incandescent bulb light can risk damage to the ECU. The guy in the video is using a normal test light. It's not recommended, but in an emergency you do what you can. |
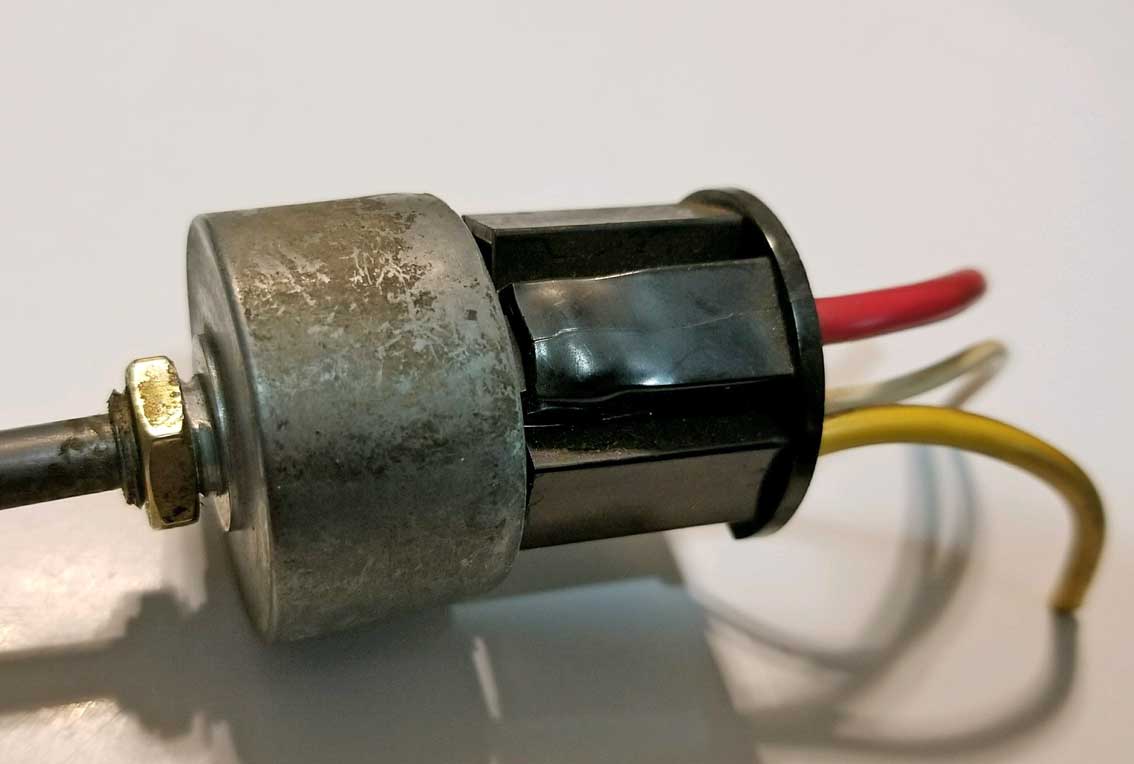
| Potential ISSUES with some Aftermarket TEMP SENSORS. |
 First some useful info about the factory Bosch sensor.
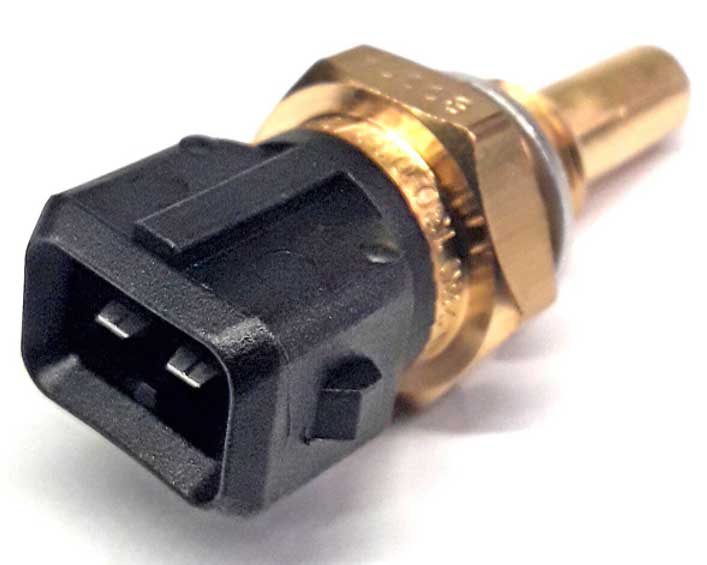
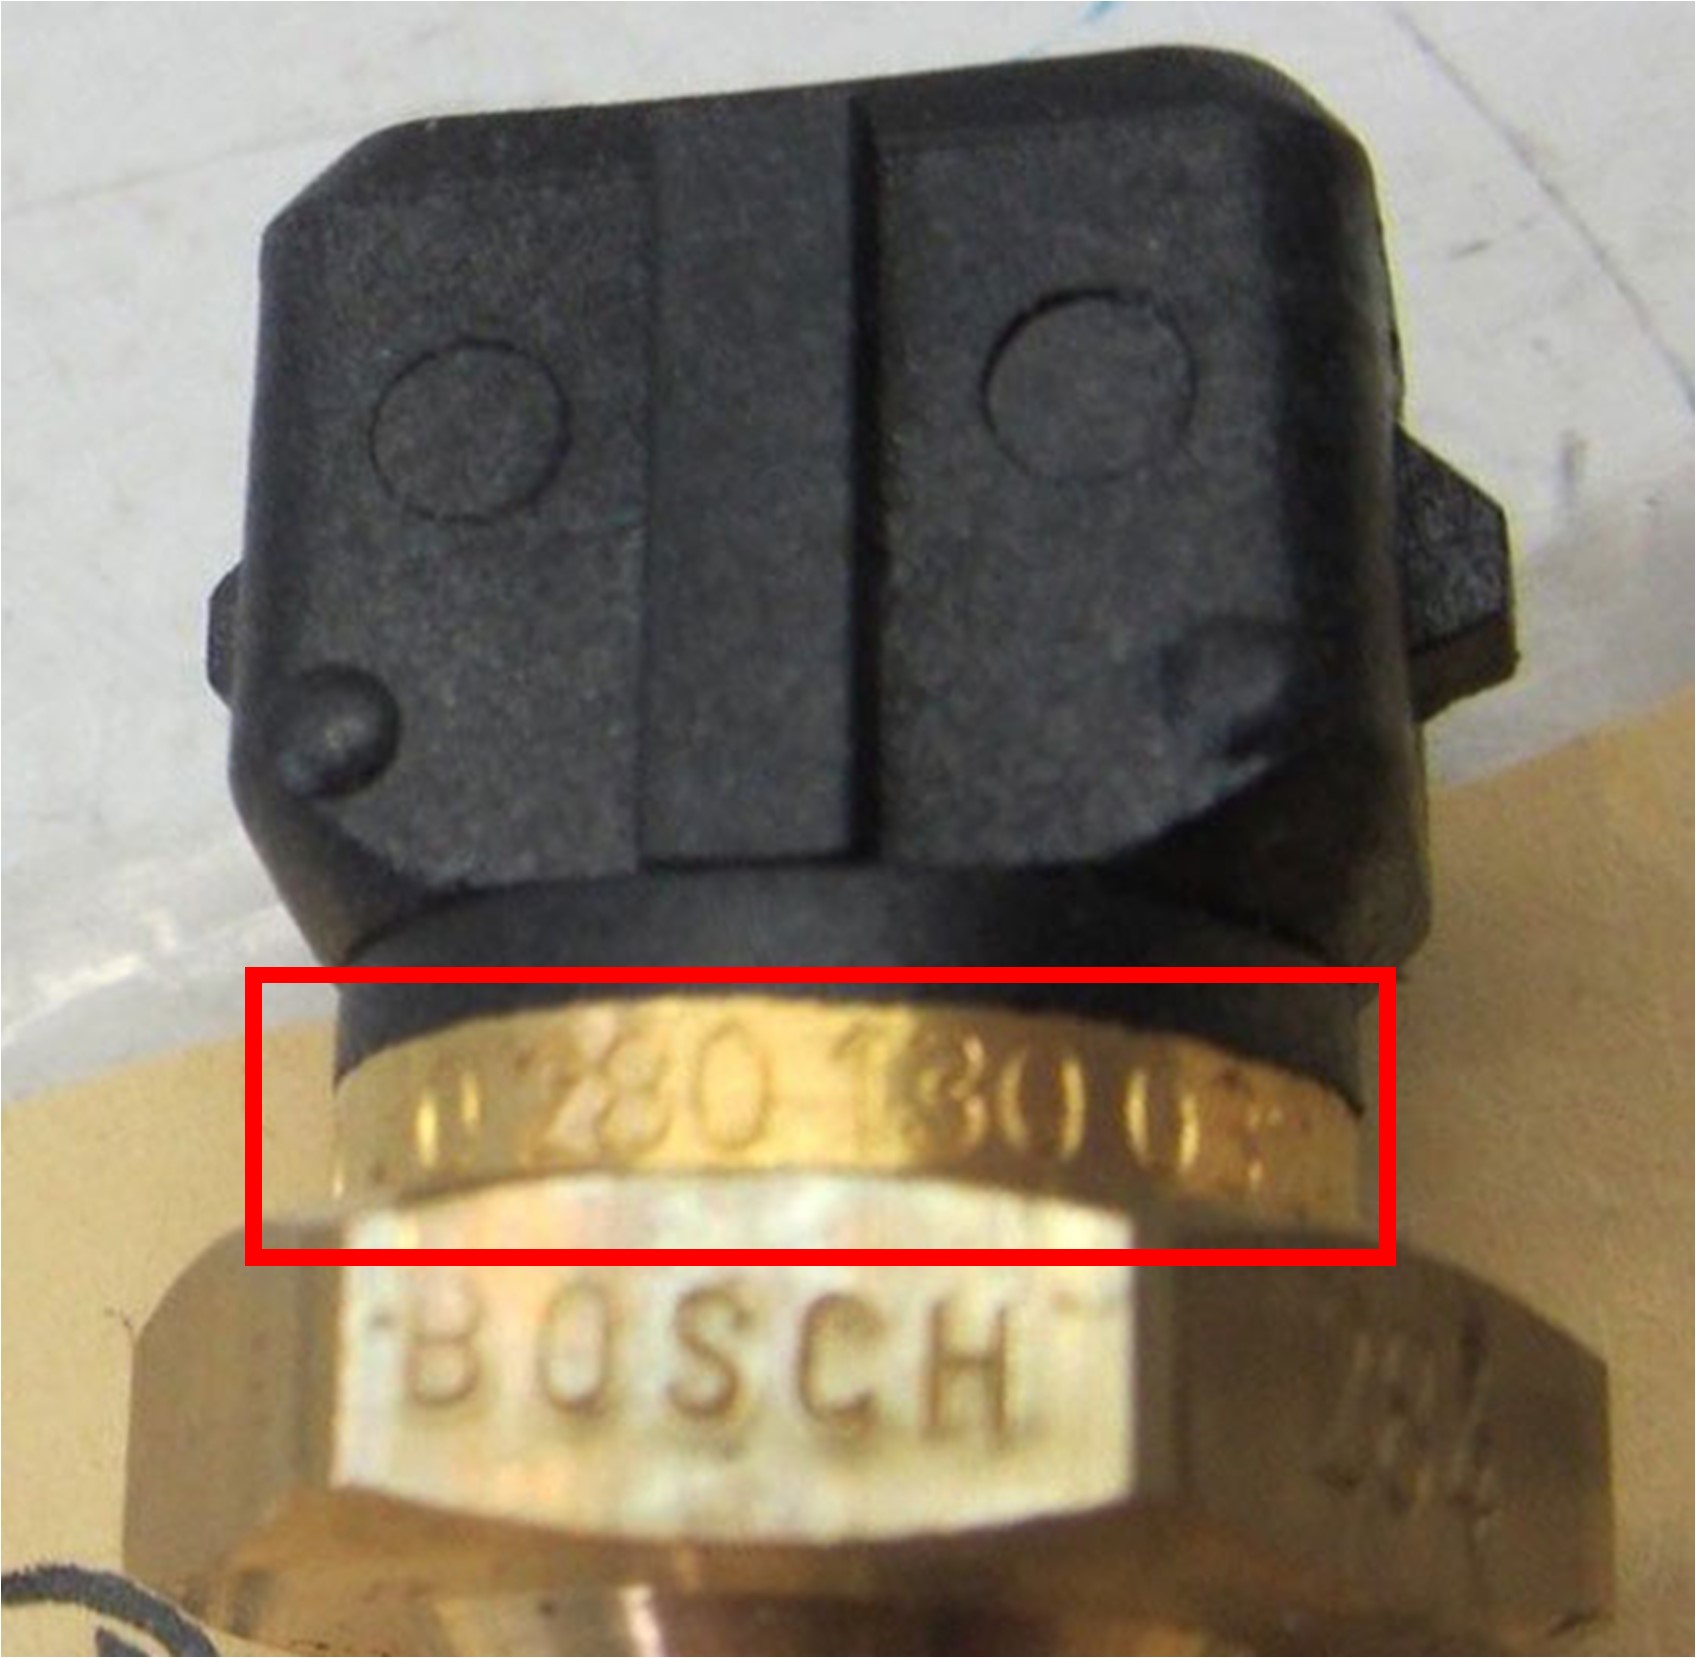
LH-2.4 TEMPERATURE SENSOR Volvo PN 1346030 This is the Fuel Injection Temp Sensor for LH 2.4 or 3.1, Volvo PN 1346030. Bosch PN 0280130032. THREADS: M12-1.5. This is not the Coolant Temp Sensor that controls your DASH TEMP GAUGE. This is the Engine Coolant Temp (ECT) sensor that any Volvo LH 2.4 or 3.1 or Regina equipped Volvo will use to control your EFI. Other car interchange info for this sensor: https://www.autohausaz.com/pn/UR-1346030 The original BOSCH part number 0 280 130 032 can be seen engraved on an Original BOSCH sensor shown below.
This original Bosch sensor is not always easy to find new. And it's a lot more expensive than aftermarket ones. When searching, try using Volvo PN 1346030 or the Bosch PN in your search. An AFTERMARKET (non-Bosch) sensor might have a different manufacturer name or part number engraved on it or it might have very little info. |
|
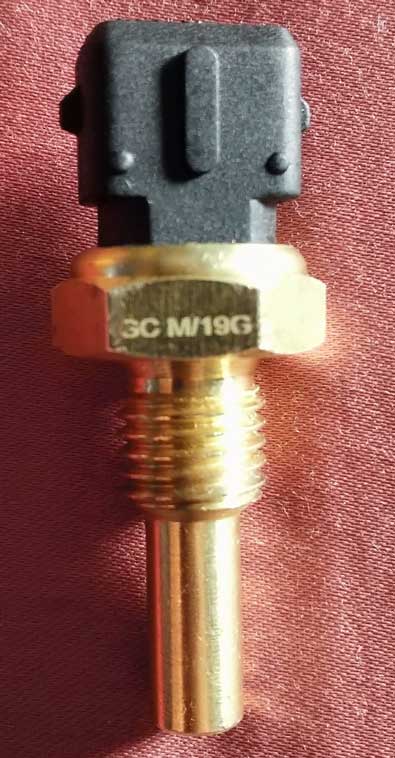
The reason for this post to make people aware that some aftermarket LH 2.4 temp sensors have been found defective or were believed to be defective when brand new. I have no idea if this is a wide problem or if it's isolated. I decided it would be useful to put this info together in one place after a customer of mine told me he got THREE defective sensors in a row from two different new parts sellers. These were URO PN 1346030 or URO PN 001251 and some other no-name brand, such as one from Rock Auto with PN 3C M/19G (photos below). The Uro branded sensor is on the left. The Rock Auto sensor is on the right. Both of these sensors below were found to FAIL TESTING. NO RESISTANCE READING could be found between any pin and ground. Weird, huh? 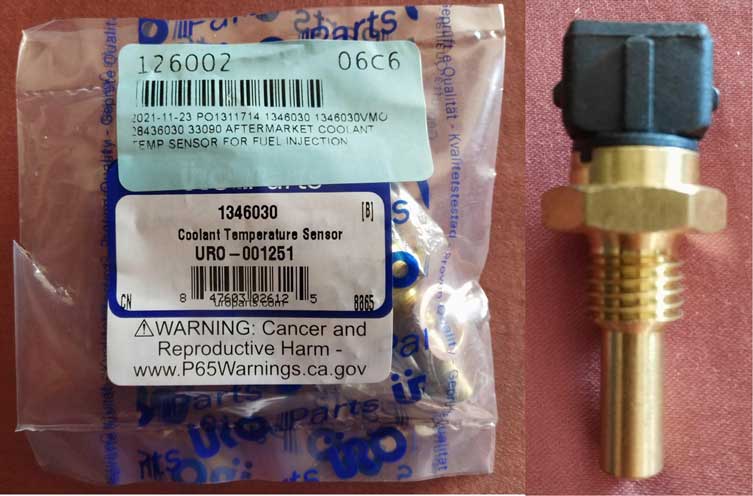
 HOW TO TEST THIS SENSOR: Check the resistance level between a sensor pin and GROUND (sensor body). If you have an aftermarket sensor for LH 2.4 and find NO RESISTANCE READINGS between one of the connector pins and the sensor body (ground), the sensor will not operate properly. Testing this way should normally reveal resistance readings (testing details further below). The typical problems you'll see if you're using a bad sensor can include POOR COLD STARTS and POOR MPG. IMPORTANT: NEVER test any LH 2.4 temp sensor by checking resistance between the two pins. That is NOT how this sensor is tested. Many people have made this error. If you encounter a similar NEW DEFECTIVE SENSOR, or if you have any comments to offer, please feel free to email me. CONTACT NOTE: I had an email exchange with ONE of the new part suppliers (where two of the bad URO sensors came from) and they did some random checks of their stock and couldn't find a problem. I put this info here in early 2024 and so far no one else has mentioned this same problem(?) |
|
| Hella Brand Sensor 1346030 Then I got an email from Nick L, who found a BRAND NEW Hella brand sensor to be defective. Nick was dealing with some rough cold starts in a 1991 740, where he had to turn over the engine for almost 10 seconds before it would begin to fire. He said it reminded him of the first time he had to replace a bad FAE brand sensor sensor a year earlier that a previous owner installed. He couldn't believe that a brand new sensor had gone bad. This latest one was a Hella brand sensor from FCP. When measuring the sensor at a moderate warm ambient temperature, it seemed to have good resistance readings. He decided to replace it with a Bosch part and it resolved the issue. Nick later tested the Hella sensor again and at first it seemed fine. He decided to put it in a cup of ice water to simulate some lower temperatures. The resistance on ONE PIN was fine, but when he checked the second pin there was no resistance at all. Warming it back up with tap water brought back normal functionality to the second pin, and another ice bath removed functionality again. Nick said the faulty pin seemed to lose all resistance readings right around 4.8 Kohms (kilo-ohms).   This stamped info above appears to be 6PT 009 107-50. Made in Spain 0623. |
|
| HOW THIS SENSOR IS DESIGNED TO WORK: An LH 2.4 temp sensor has two connector pins. Each pin uses internal resistance to vary the ohm output between the pin and ground. There are TWO resistors inside this sensor, both identical. Each resistor is connected to one pin. The other end of each resistor is also connected to the sensor body (GROUND). So then each pin provides a separate, but identical resistance output relative to the temp reading. One output goes to the Fuel Injection ECU and one goes to the Ignition ICU. 
Each pin will have identical ohm output in relation to resistance between the pin and sensor ground. |
|
Image below is from TP32053 LH 2.4, 3.1, EZ 116K Fault Tracing, page 27. If
you're curious about appropriate resistance test measurements for this sensor,
here it is. 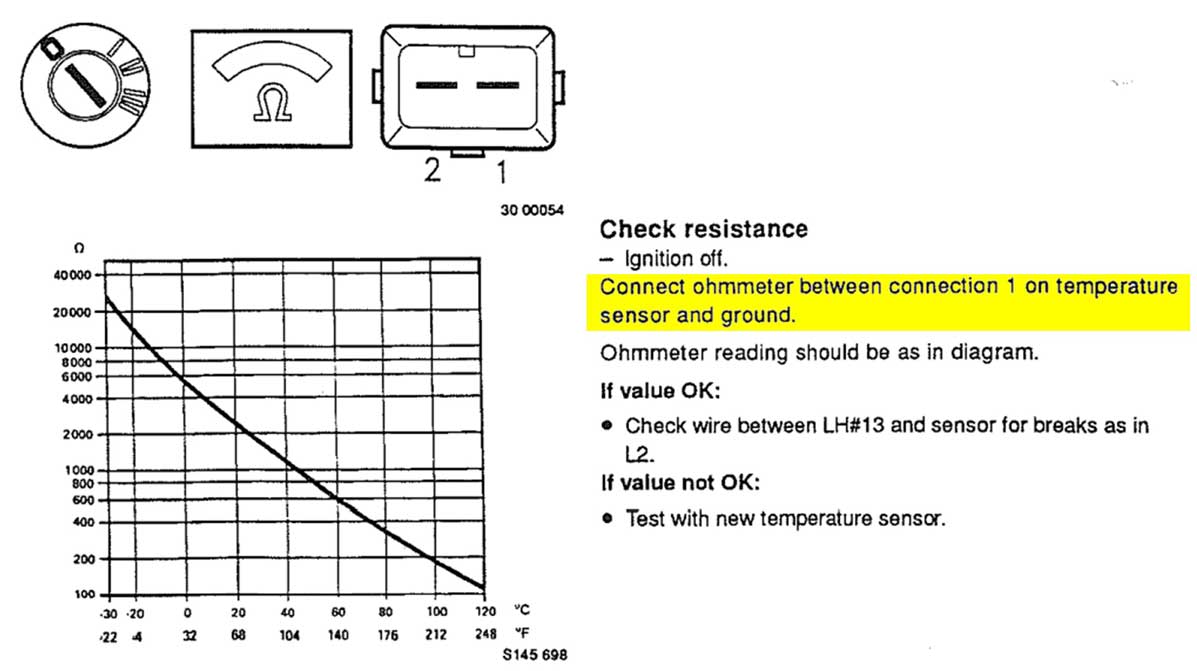 Resistance readings should be taken between PIN 1 and Sensor body (GROUND) or Pin 2 and sensor body (GROUND). Note that this test is a different method than for testing an LH 2.2 sensor: SOURCE: turbobricks.com/lh2-4-sensor.228130. So it's important to remember to NOT test an LH 2.4 ECT sensor by measuring resistance BETWEEN THE TWO PINS. And any OHMS test should be done with the sensor NOT connected to the ECU or any other circuit. Temp - Resistance -10 C (14 F) - 8260-10560 Ohms (8.26-10.56 kOhms) +20 C (68 F) - 2280-2720 Ohms (2.28-2.72 kOhms) +80 C (176 F) - 290-364 Ohms (0.290-0.364 kOhms) |
| BRUSHLESS COOLING FAN PAGE |
|
| DIY CURVED Rubber Hoses |
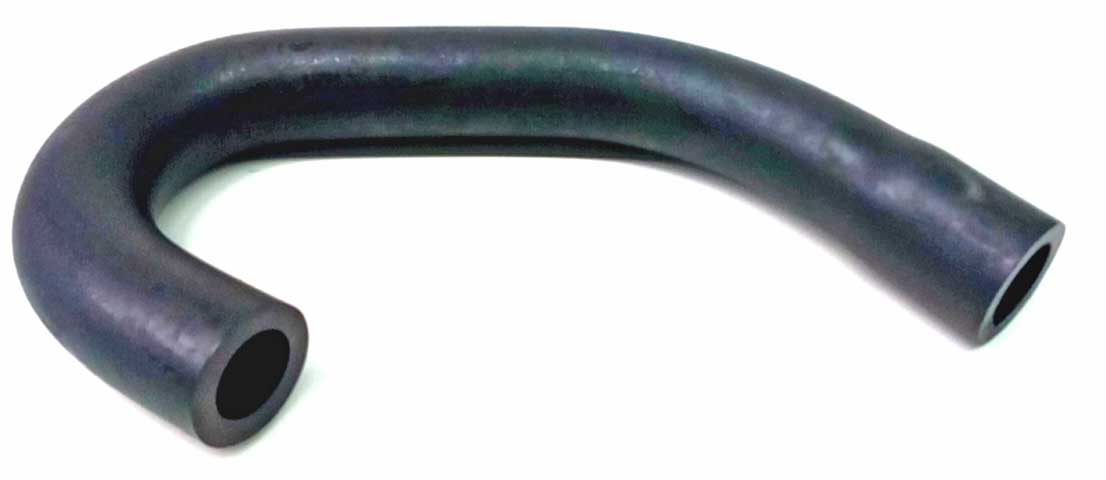 If you have a 240 (or other car) with curved or molded rubber hoses under the hood and you cannot find replacements, here's a DIY method for molding rubber hoses to your own custom shape. https://www.youtube.com/watch?v=FFDlGPLcK0o And another method you can look at. https://www.youtube.com/watch?v=br2zctTF2uQ |
| 240 Power Steering Pump Belt Tensioner |

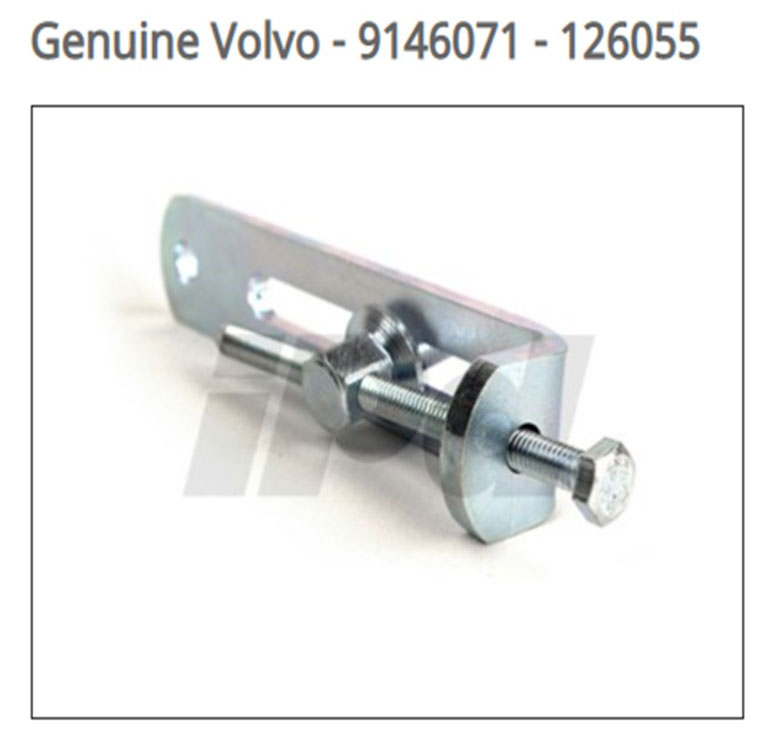 This broken bolt happened to me on my 240. This is the belt tensioner adjuster on my 240 power steering pump. That bolt above is not supposed to be broken. The thread is M6-1.0, about 80 mm long. This bolt has a 10 mm head. After it broke I thought I was pretty smart, so I ordered a new bolt with higher tensile strength. Then it broke again. I was accused by clown trolls of not properly tightening the locking nut. Yes it WAS tight. I've been working on 240s a while. 240s can vibrate things loose. No matter. This is getting FIXED!  The problem in my opinion is not the locking nut being tight or not tight. This skinny, weak-ass long M6 bolt above has no business being in that place. The bigger M8 bolt is a lot stronger. So I began looking for a solution which would have a larger, stronger bolt. Option #1: MITSUBISHI TENSIONER 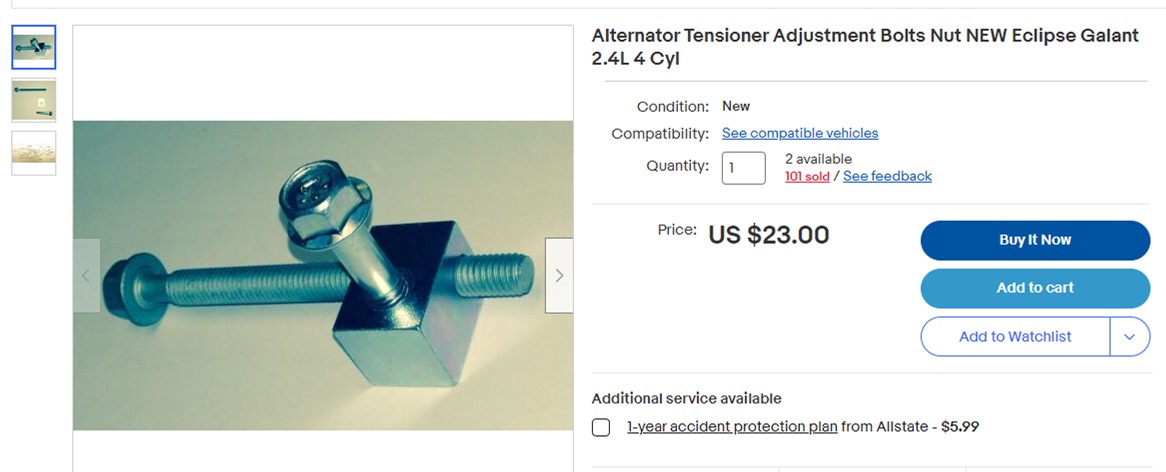 I bought this adjuster block above made for a Mitsubishi (2000-2005 Eclipse or 1999-2003 Galant). It uses a larger M8-1.25 bolt. The bolt head is 12 mm. This can usually be found on-line new or used by searching: "Mitsubishi alternator tensioning bolt." 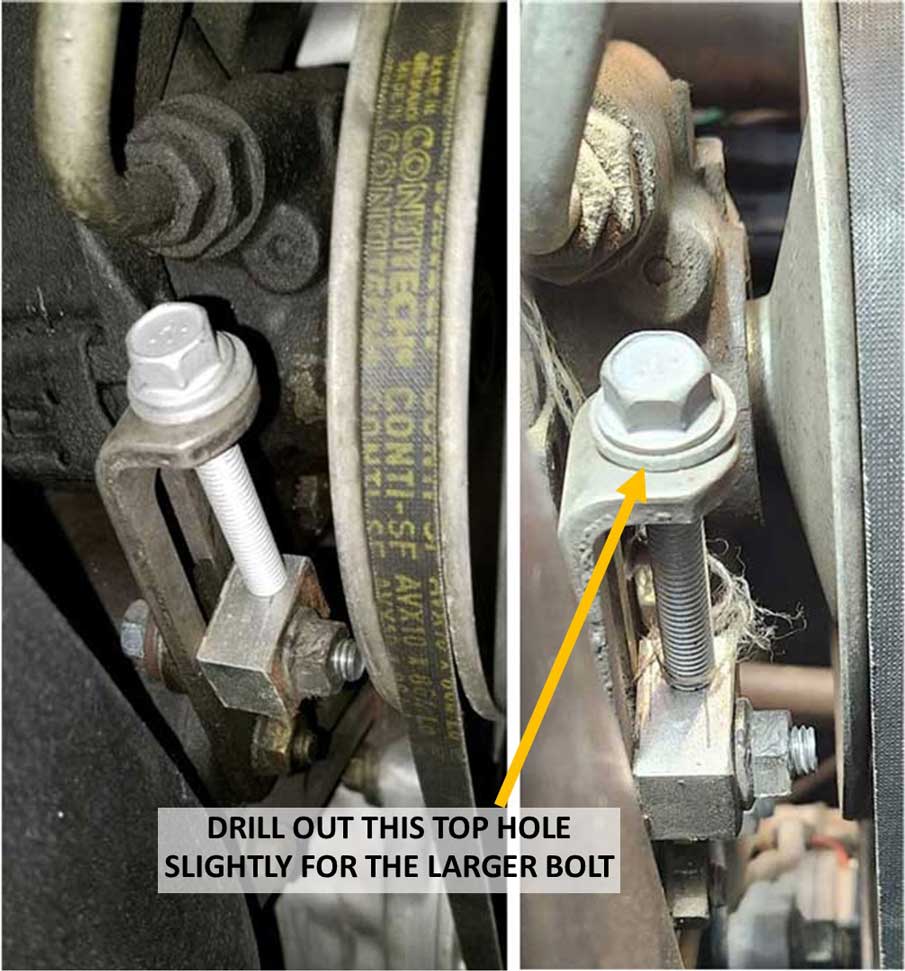
 Here are a couple views of the new Mitsubishi tensioner installed in my 240, compared to the broken one. You'll need to drill out the top hole of the new bracket for the fatter bolt. You can see in the above right image that the new threaded block will probably reduce clearance a little at the back of the pulley. This wasn't really a problem for me, but just something to check when you're assembling it. You can always grind that bolt end if clearance it too tight. Option #2: Here's a DORMAN ALTERNATIVE  Dorman PN 197-148 is shown above. I found it was less expensive than the Mitsubishi part. It fits the same size bolts. (Below image comparison): The Dorman threaded block has slightly different dimensions, so keep that in mind if clearance becomes tight.  |
| 242 Powered Rear Vent Window Project |
| in
2022 I completed the installation of power vent window actuators for my
242 rear vent windows. I had been thinking of ways to do this for many
years. You can see that project at: https://www.240turbo.com/ventwindow.html 
That page can be found at: https://www.240turbo.com/242cpillar.html |
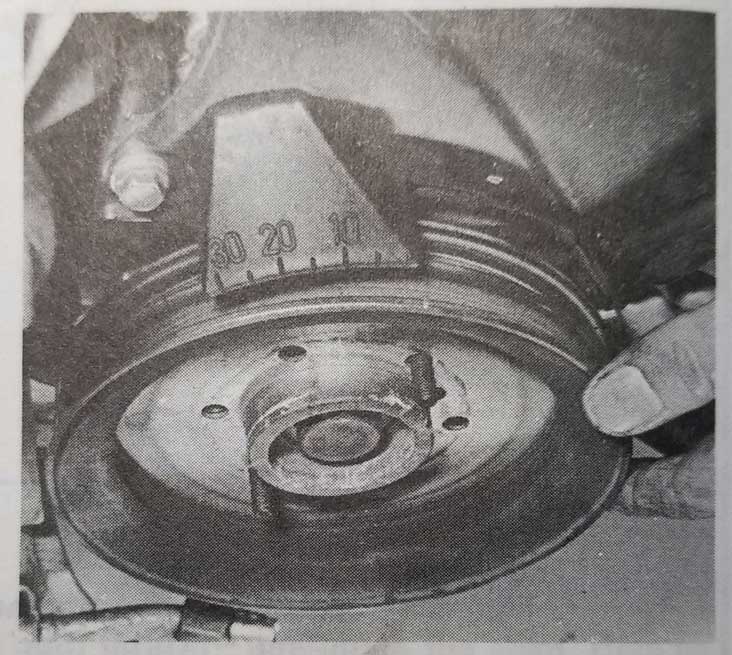
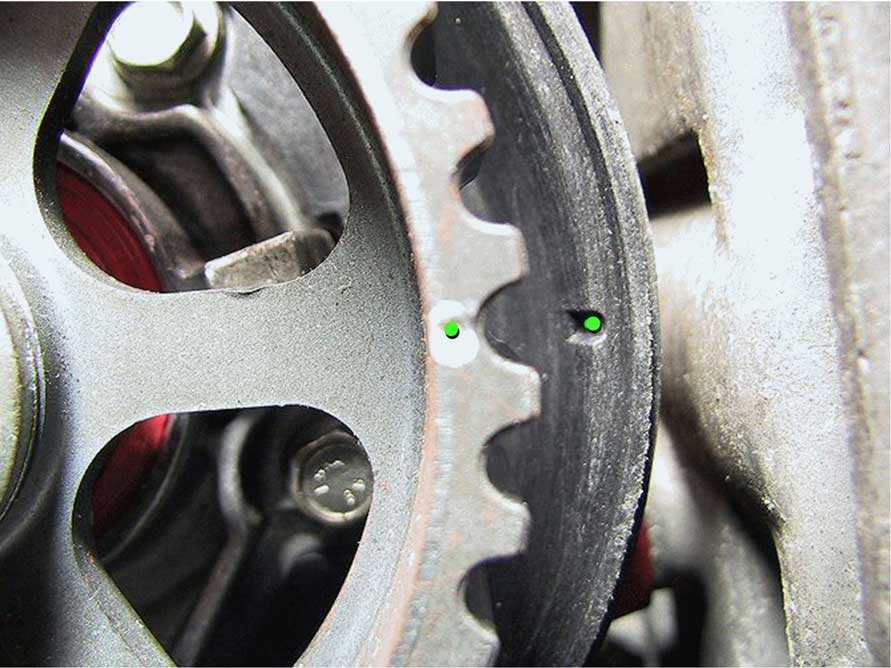
| Aligning your TIMING BELT Correctly |
| Installing a new timing belt on your B21, B23 or B230
is not an ultra-challenging task, but if you're not experienced, it's
good to have some useful reference info to keep from making mistakes. The last thing you need is WRONG INFO (image shown below), which I have seen in MANY technical manuals (including Haynes) and in many online images.
 Here are some more images below you might find useful. B21 or B23 NOTE: If you need the size of the big crankshaft bolt, it's M14-2.0 x 90 mm long, grade 10.9. It has a 22 mm bolt head. Volvo PN 970933.  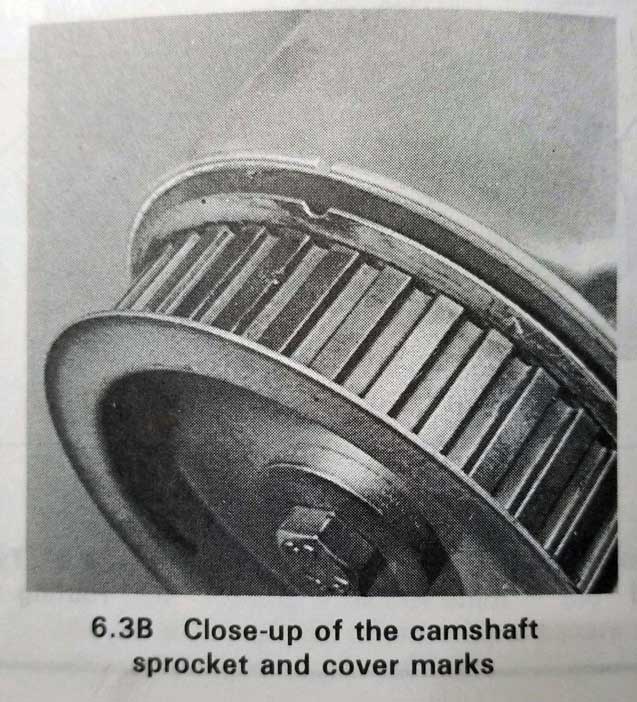

 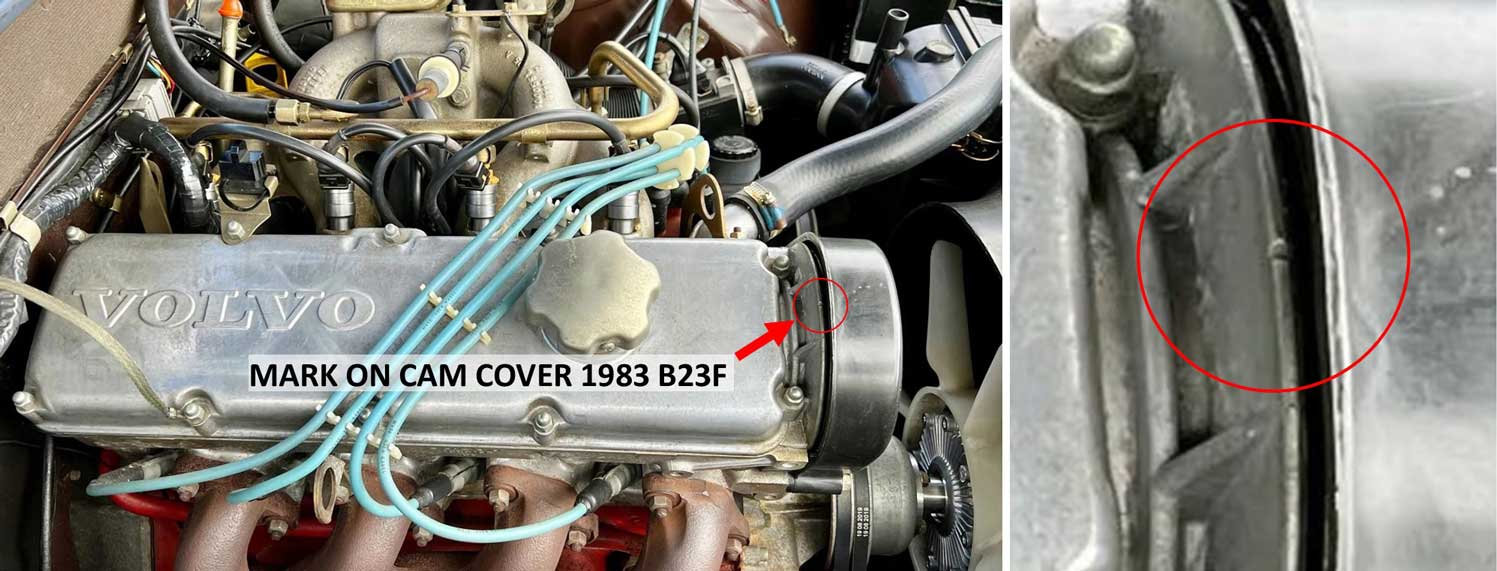 B230 
  In case you need info on the large crank bolt for a B230, it's threaded M14 x 2, 70 mm in length, with a 24 mm bolt head. It's Volvo PN 963319 available from iPd. The large, fat crank washer is PN 1336822, also available from iPd. And if you need a good video on replacing your timing belt, iPd made one. https://www.youtube.com/watch?v=7eIFWUbSZTw This video is specific to the later 240 with B230F. https://www.youtube.com/watch?v=APXKlGO1xeE |
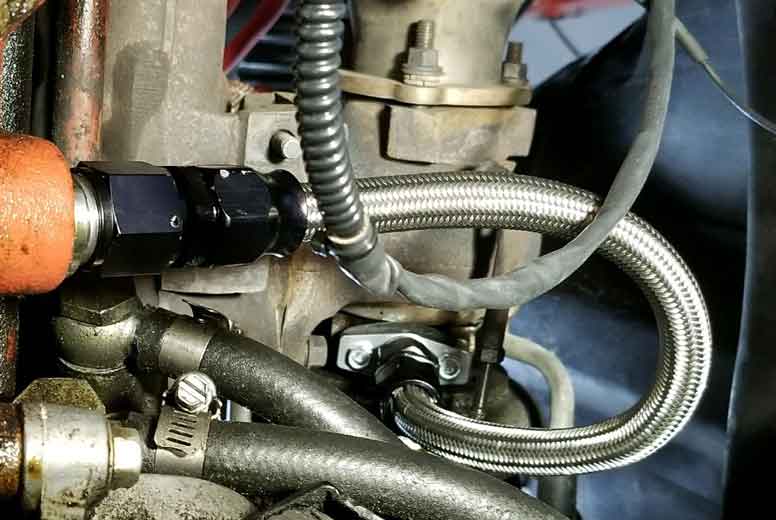
| BANJO (CRUSH) WASHERS versus BONDED SEAL WASHERS Old School vs. New School. |
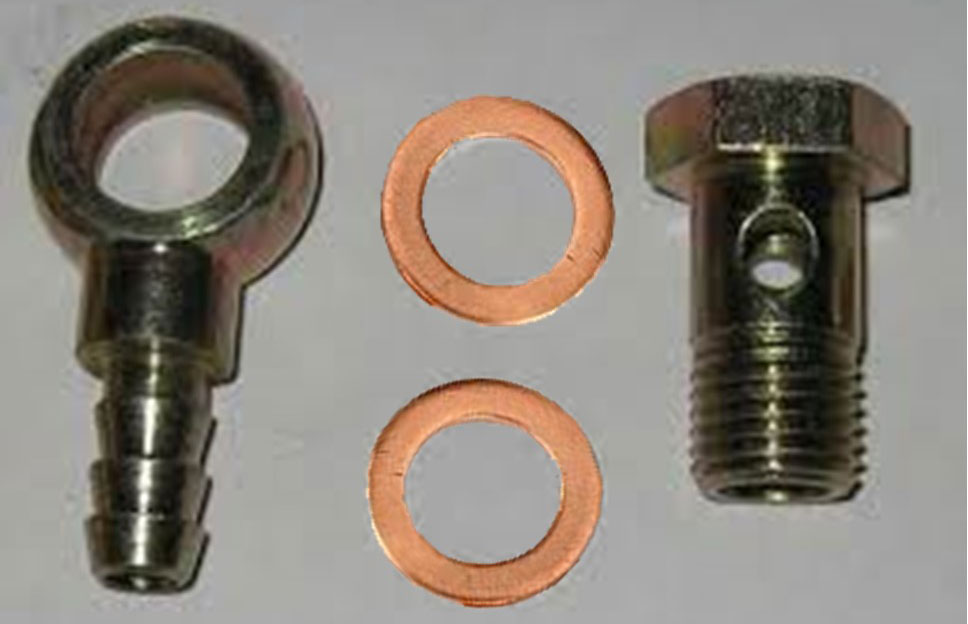
 If you have owned a Volvo that uses BANJO FITTINGS and copper washers, you might have shared my frustration with making them seal well after working on the connections. The factory copper washers, often called crush washers, where made to be "soft" and were designed to be used one time only. Volvo used these copper washers on oil lines, power steering racks, on fuel systems and of course on the OIL PAN drain plug. Being a cheap 240 owner, I would often try re-using these copper washers. Sometimes this resulted in leakage. Sometimes flat-sanding a copper washer would renew the surface, but even a brand new copper washer can leak. This often results in the temptation to OVER-TIGHTEN a fitting or a drain plug, which of course can have a really bad result. Over the years I have also tried aluminum crush washers. This seemed to work about the same. Maybe better, sometimes. Replace the copper washer every time? Do YOU put a brand new washer on when YOU change your oil??? I didn't. I can't count the number of times I've heard about someone over-tightening that drain plug, resulting in stripped threads and a ruined oil pan.
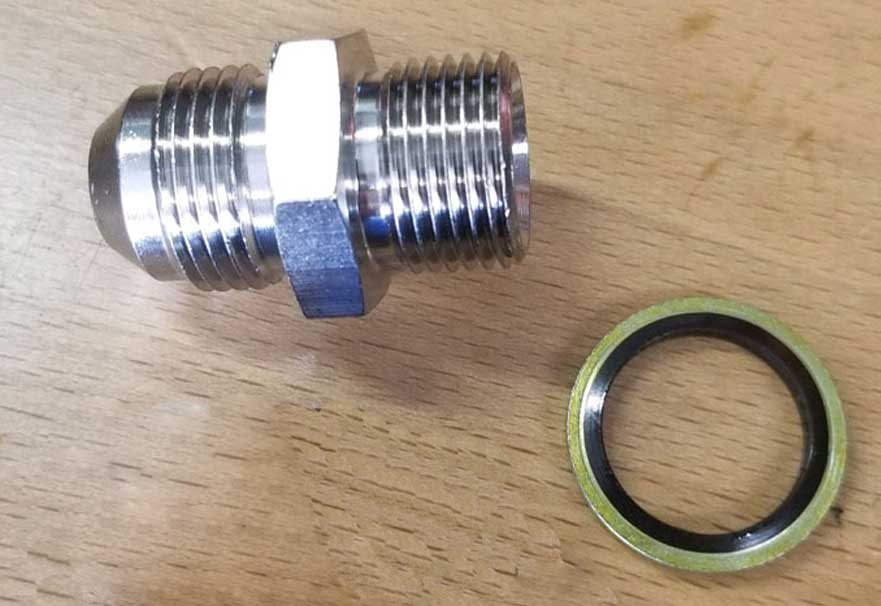
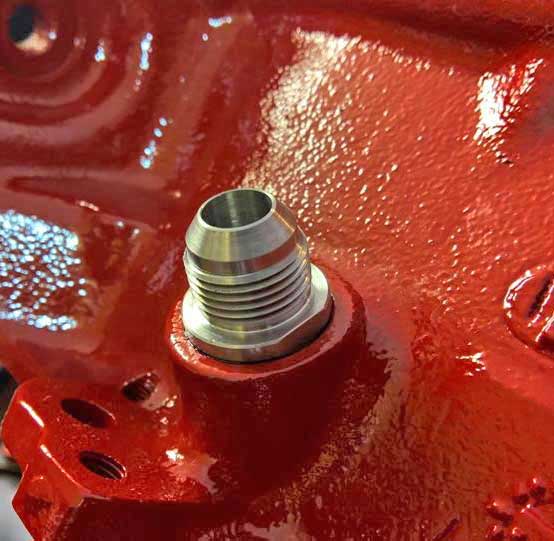
For those of you who don't want to use "rubber" on your high-pressure oil or fuel hose seals, these can easily be found with Nitrile rubber, also known as NBR or Buna-N, which is impervious to oil or fuel. Here are some sources below. mcmaster.com/metric-bonded-sealing-washers/ discounthydraulichose.com/bonded-seal-buna.html I bought this METRIC assortment below of metal-bonded sealing washers: amazon.com/gp/product/B07CKVYWD4/ 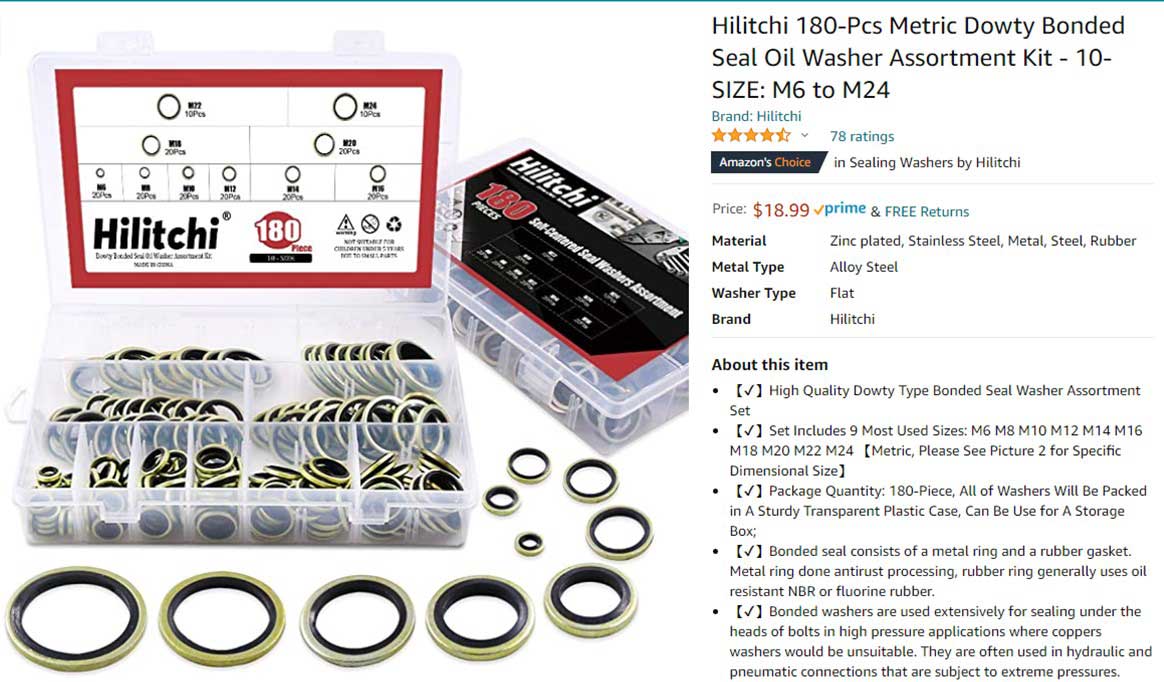 
I now use these bonded seal washers on my OIL DRAIN PLUG and on my OIL COOLER FITTINGS. The drain plug thread is 3/4-16 and a 20 mm bonded washer fits well. Perfect seal every time and no need to over-tighten, ever. 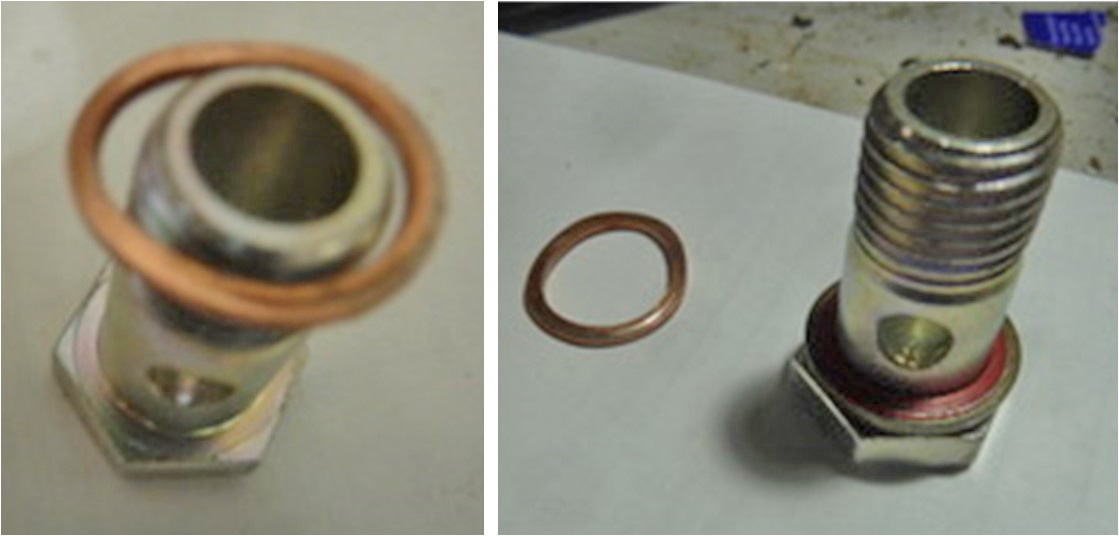
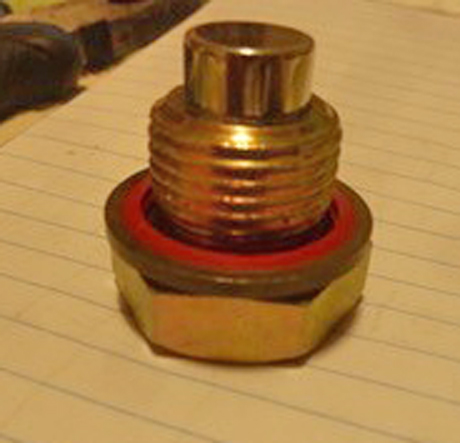
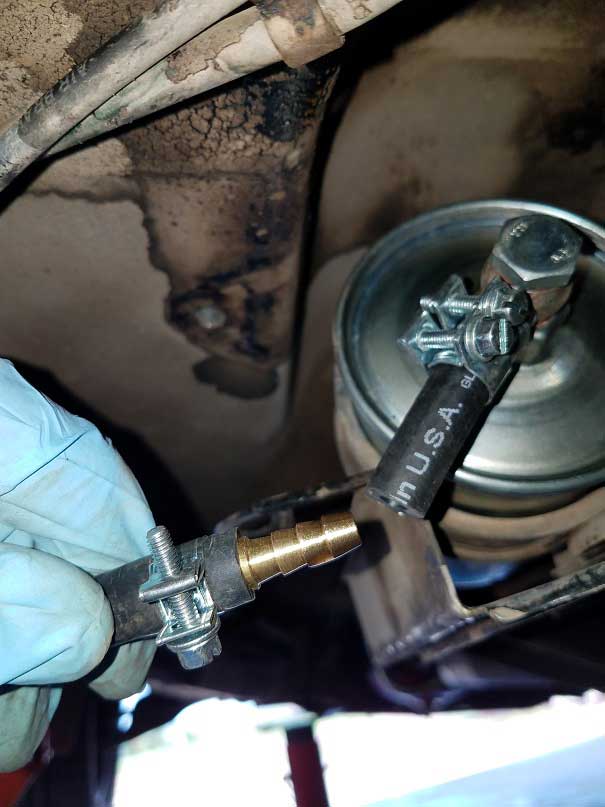
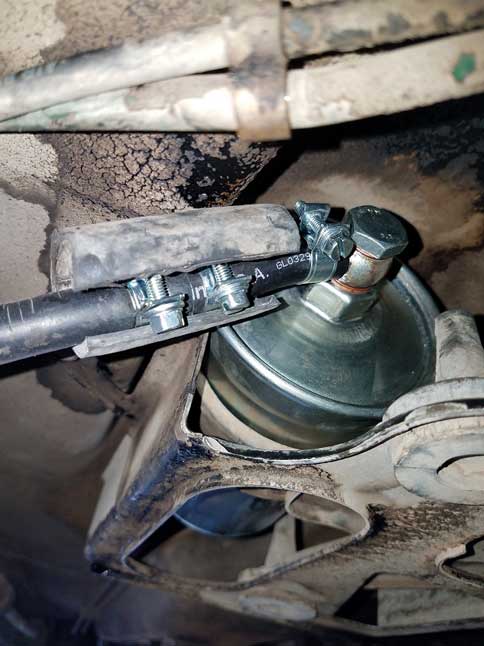
 Mike P. from Canada sent me some photos. He changed his fuel filter and had trouble. Trying to get a seal with normal copper washers, he over-tightened it and warped the washer, causing fuel to spray 4 to 5 feet! He then installed metal-bonded seal washers. After tightening snug by hand, he turned the banjo bolt 1/4 turn and got a perfect seal. The Volvo filter used two sizes: 14 mm on the INLET and 12 mm on the OUTLET. |
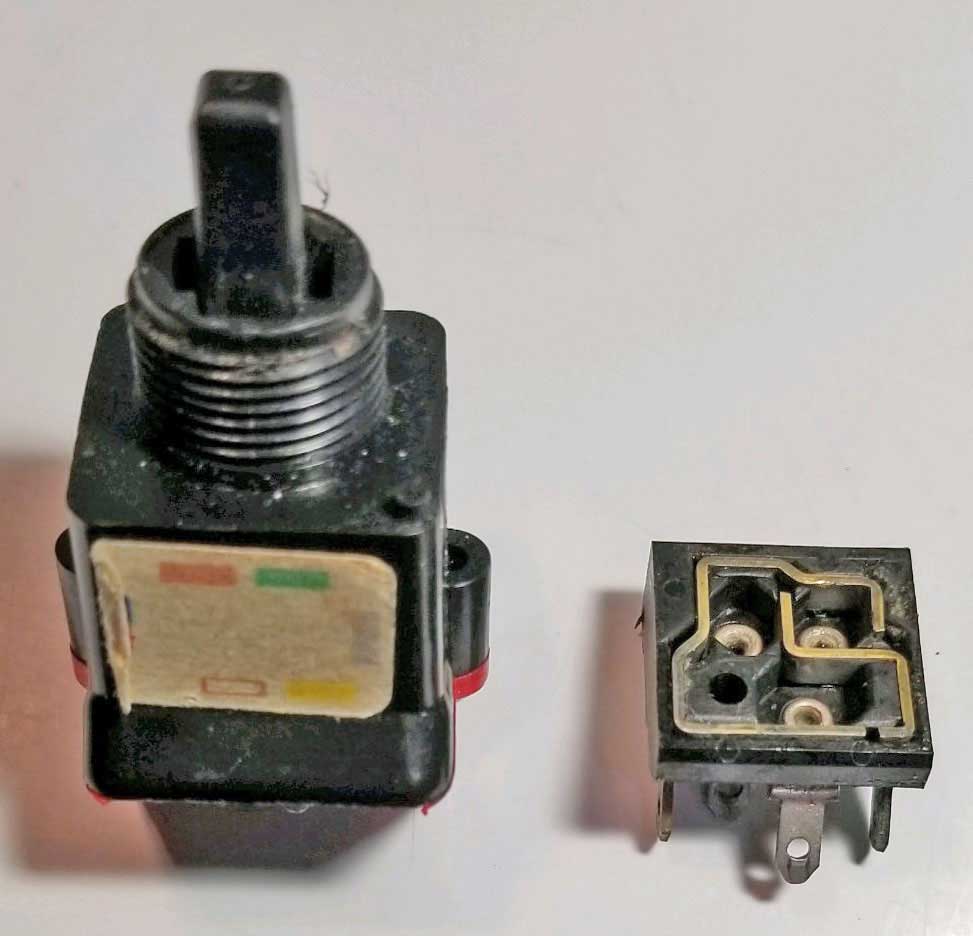
| Power Window Switch Info |
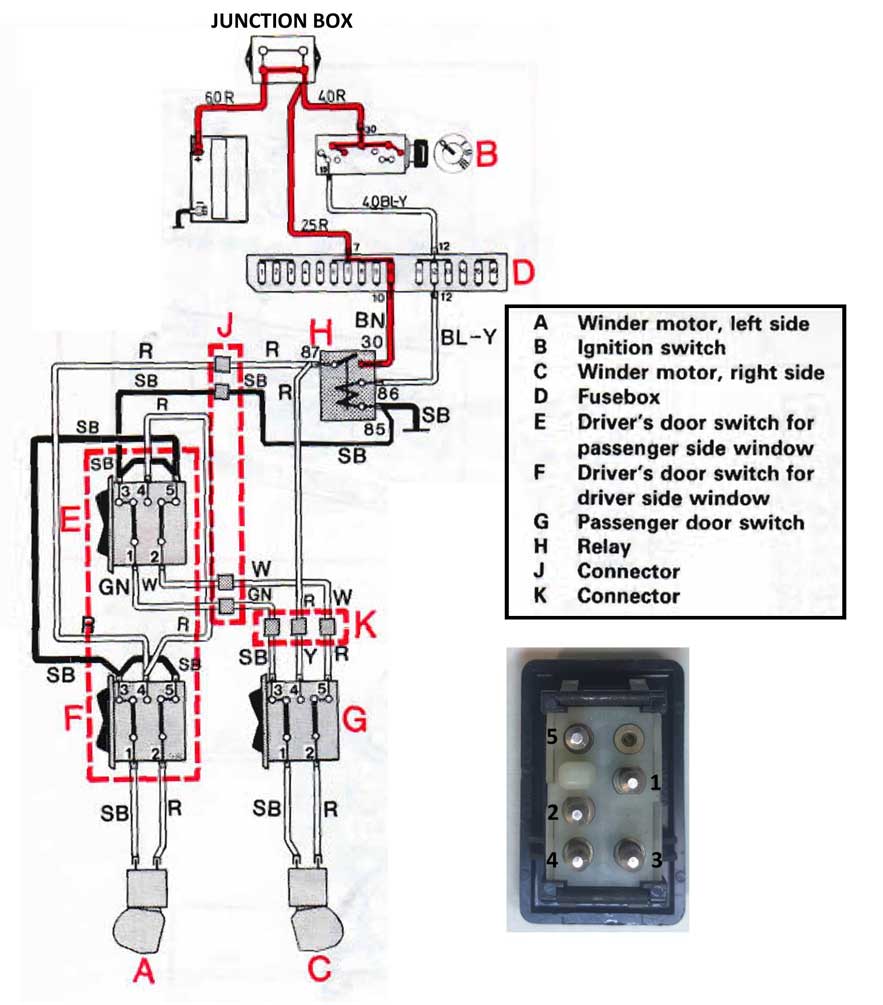
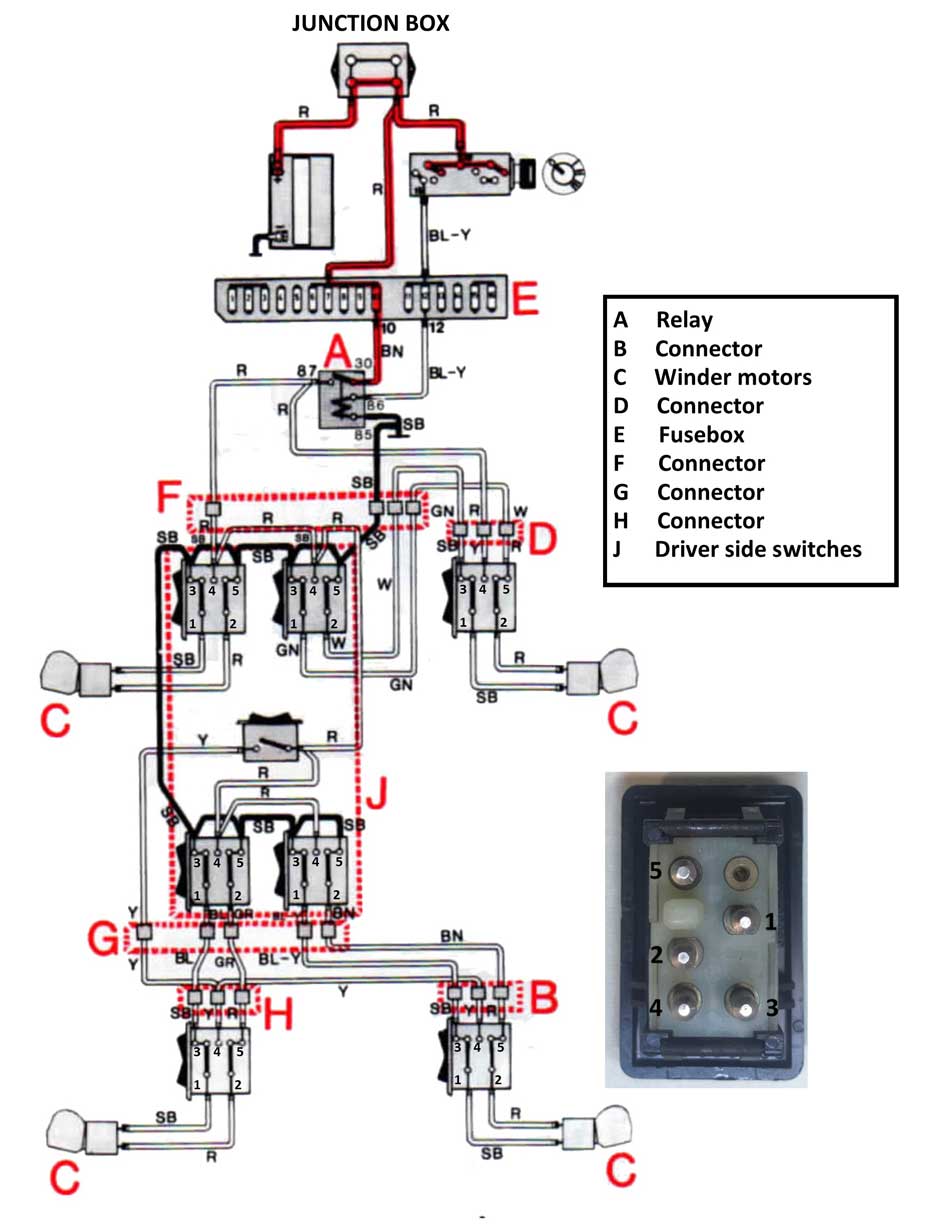 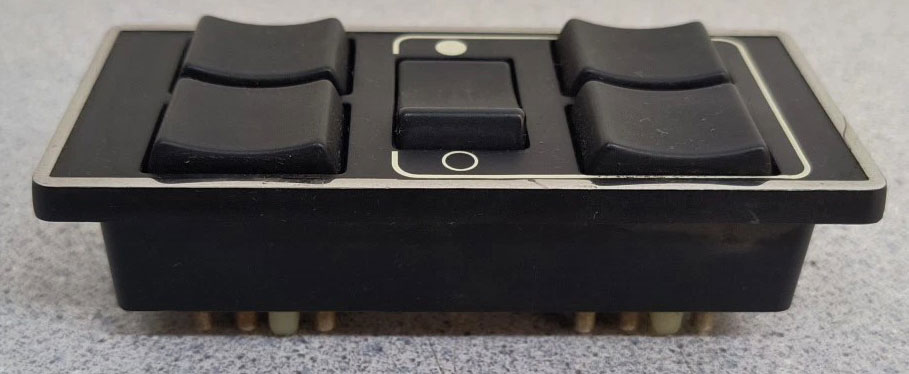 WARNINGS about some DEFECTIVE aftermarket window switches. In March 2026 I received an email from a 940 owner, Bill in MA, about a problem with some MTC aftermarket window switches which were made with UNDERSIZED electrical pins. This undersized pin problem can cause the switch to stop working. This problem was specific to 940 switches with the MTC brand, MTC PN VP326 (for Volvo PN 9148398). When he contacted MTC in California, he was told the same problem existed for MTC VP325, which fits 1985-93 240 (Volvo PN 1347045). So far it's not know if this error affects other brand aftermarket switches. So you should check any aftermarket window switch you have before installing. Email me if you have any comments: CONTACT The correct size for a factory MALE PIN on any 240, 740, 940 window switch should be about 3.59 to 3.60 mm in diameter (or about 0.1415 inch).  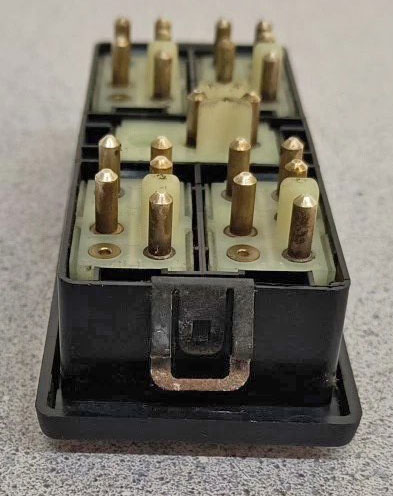 The MTC VP326 (940) switch below (for Volvo PN 9148398) was measured showing a smaller pin diameter of 0.1345 inch (3.41 mm). So it appears these pins are undersized 0.007 inch (about 0.18 mm). An undersized pin can create a loose circuit connection for the wire harness connector. 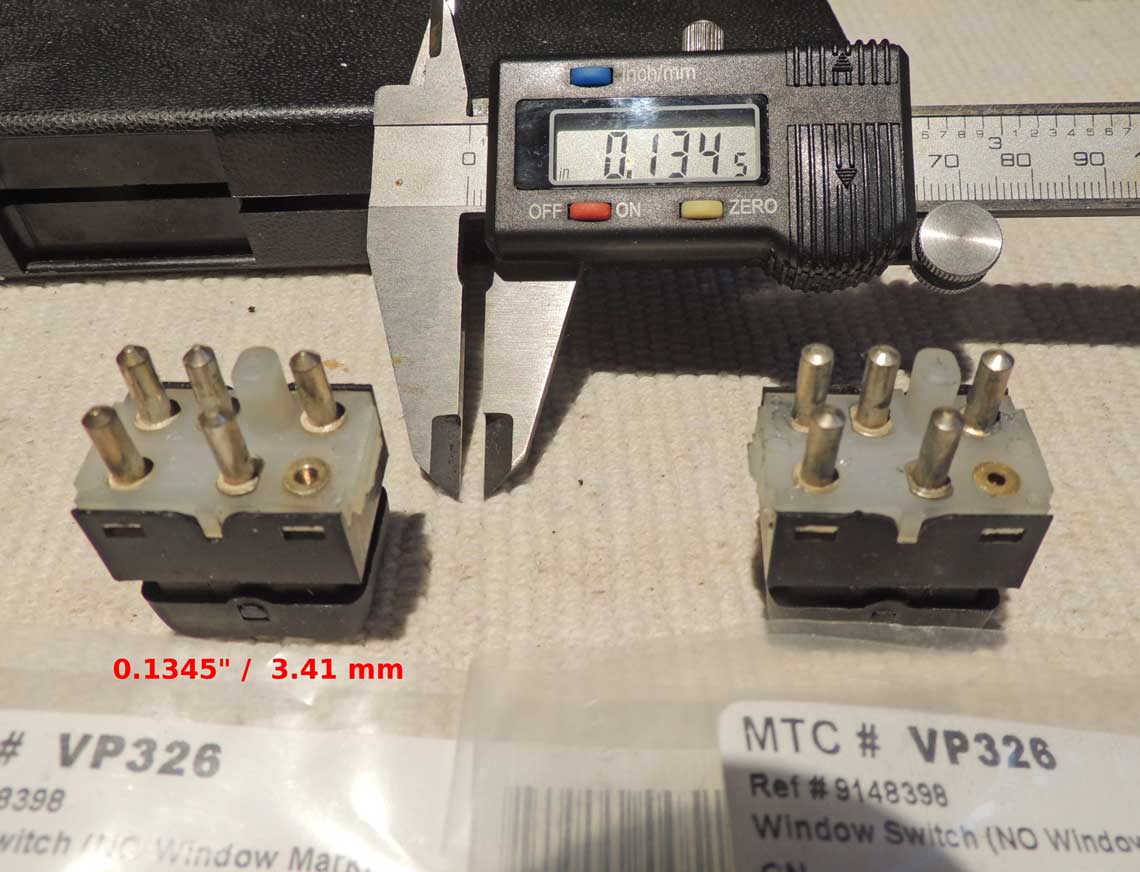 Making a Terminal Removal Tool for Volvo Window Switch Harness Connectors. Some time back I was working on a 240 door harness and I found the round bullet female terminals in the power window switch plugs were not easy to extract without damaging them. After some experimentation, I found a great solution. Here's a typical 240 power window switch. 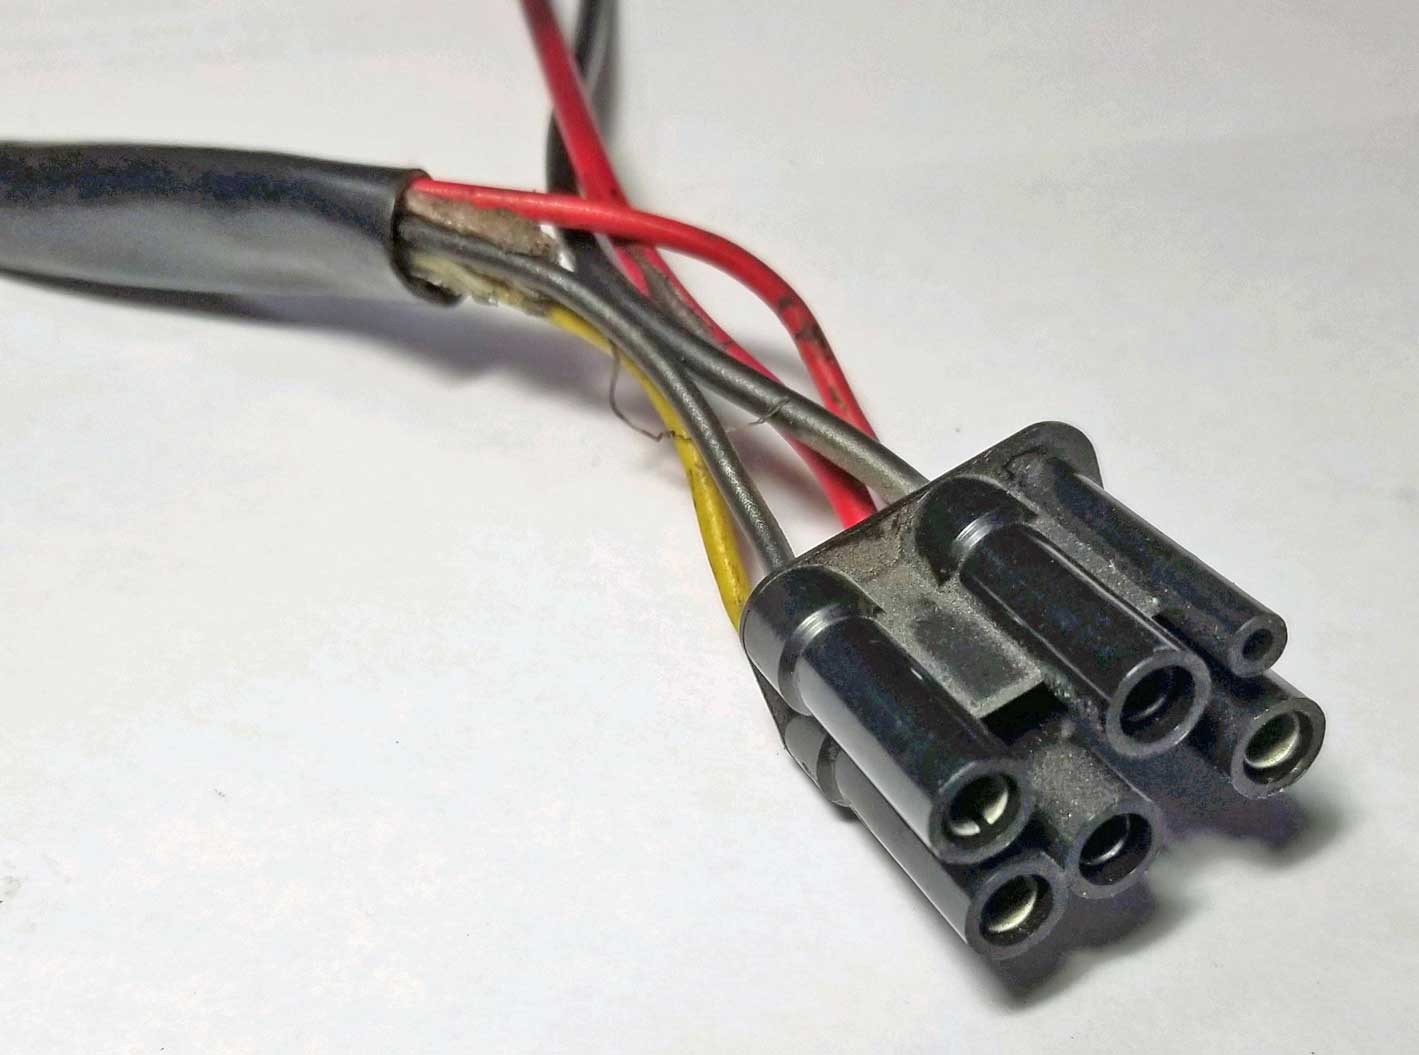 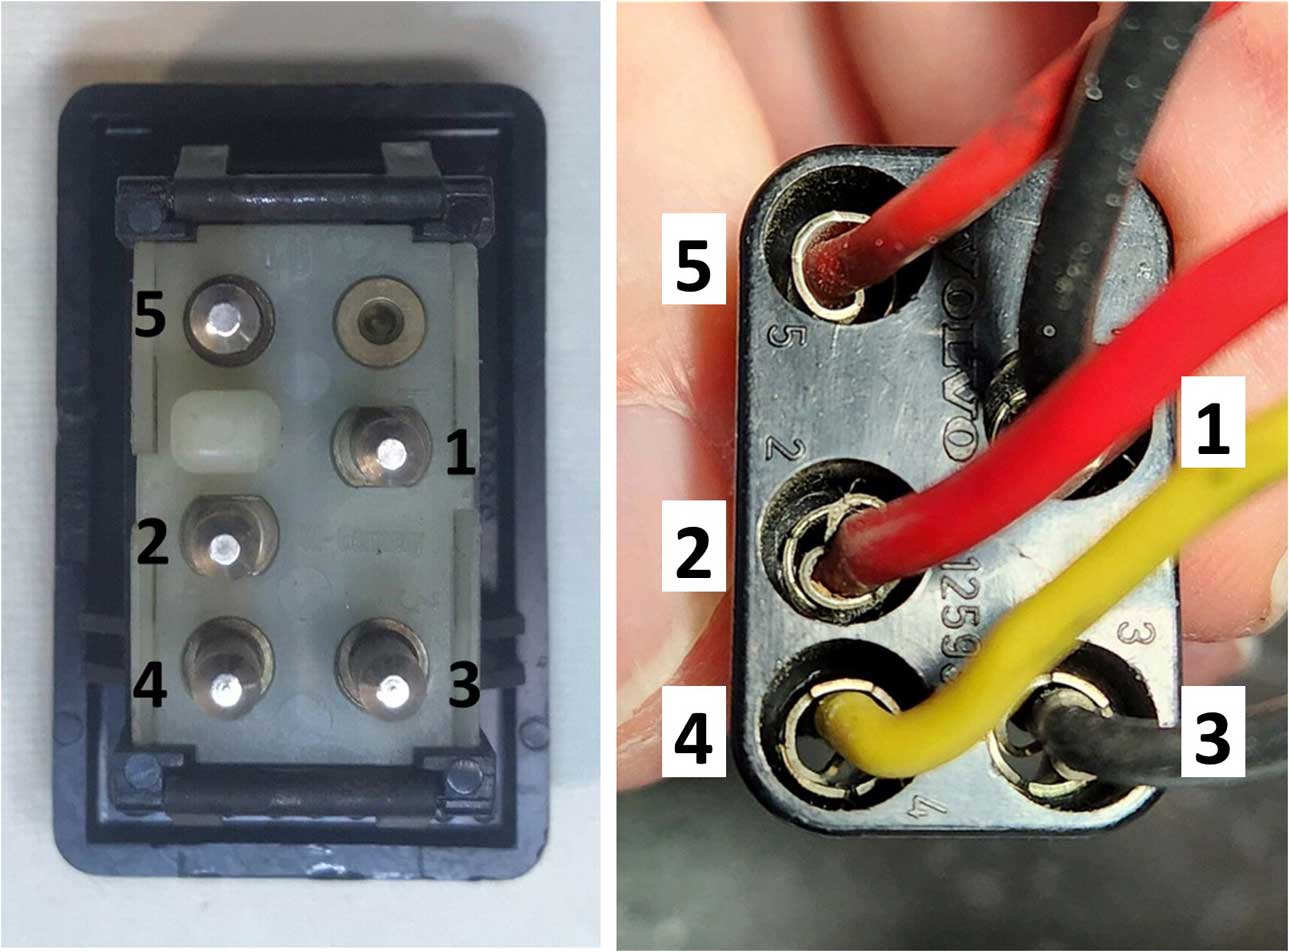 Releasing a terminal like this from a housing requires these barbs to be depressed, both at the same time. 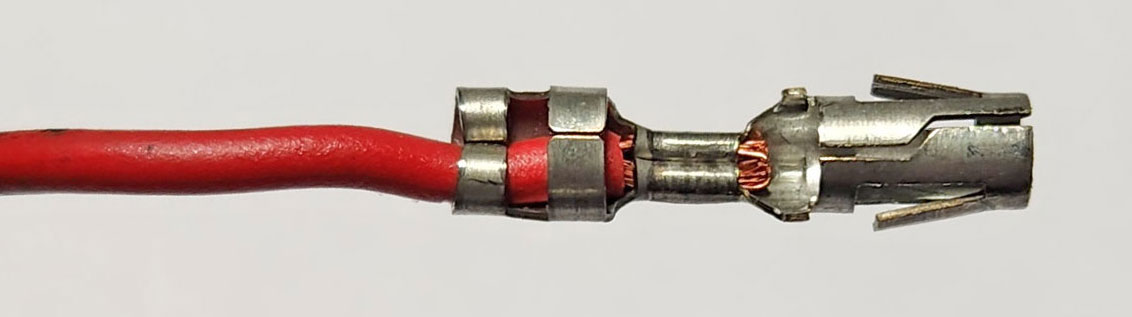 If new terminals are needed, they're available HERE. I found that THIN wall tubing in brass or stainless can work very well for this. The tubing needs to have an outer diameter of 4.5 mm, an inner diameter of 4.0 mm, and a wall thickness of 0.25 mm. This image below shows it's available at McMaster Carr, PN 8950K38 for 1/2 meter length. It's also available other places.  The tubing is inserted around the terminal as shown below. It needs to go in about 4 or 5 mm (about 3/16 inch) to depress the barbs. If it's done right, the terminal and wire can be pulled out the back. 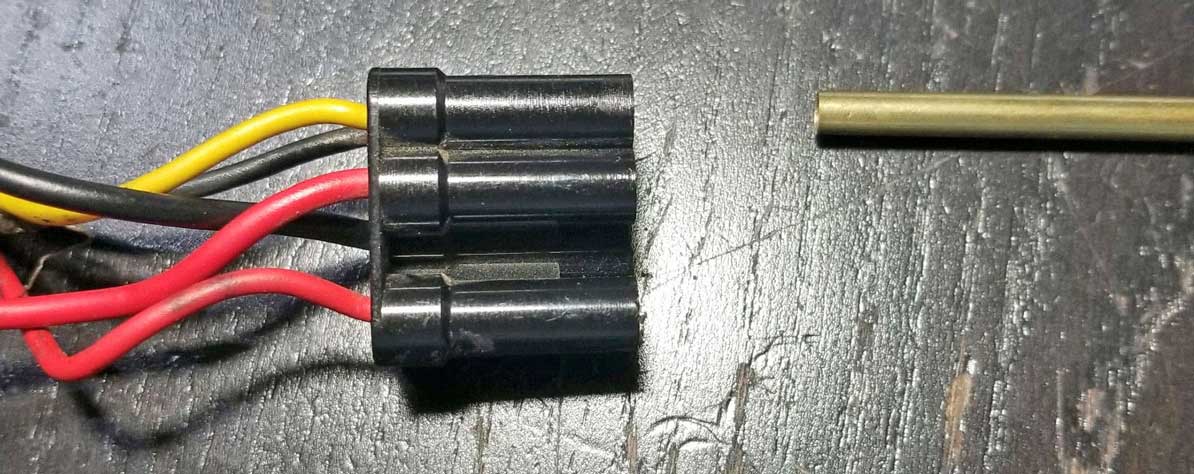 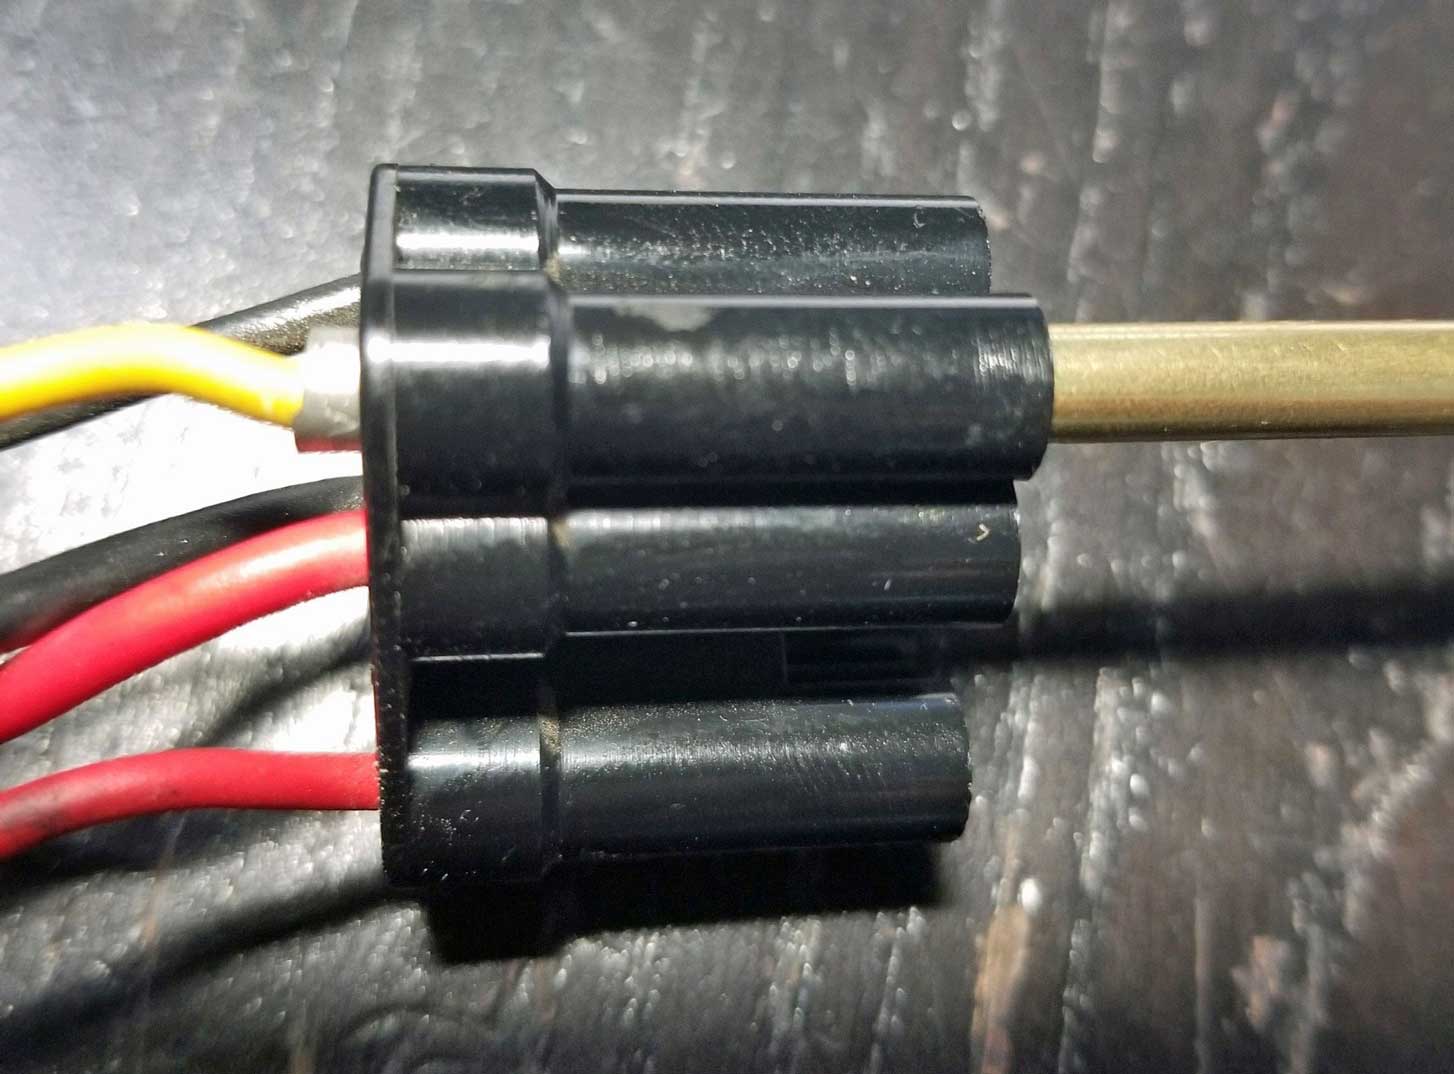 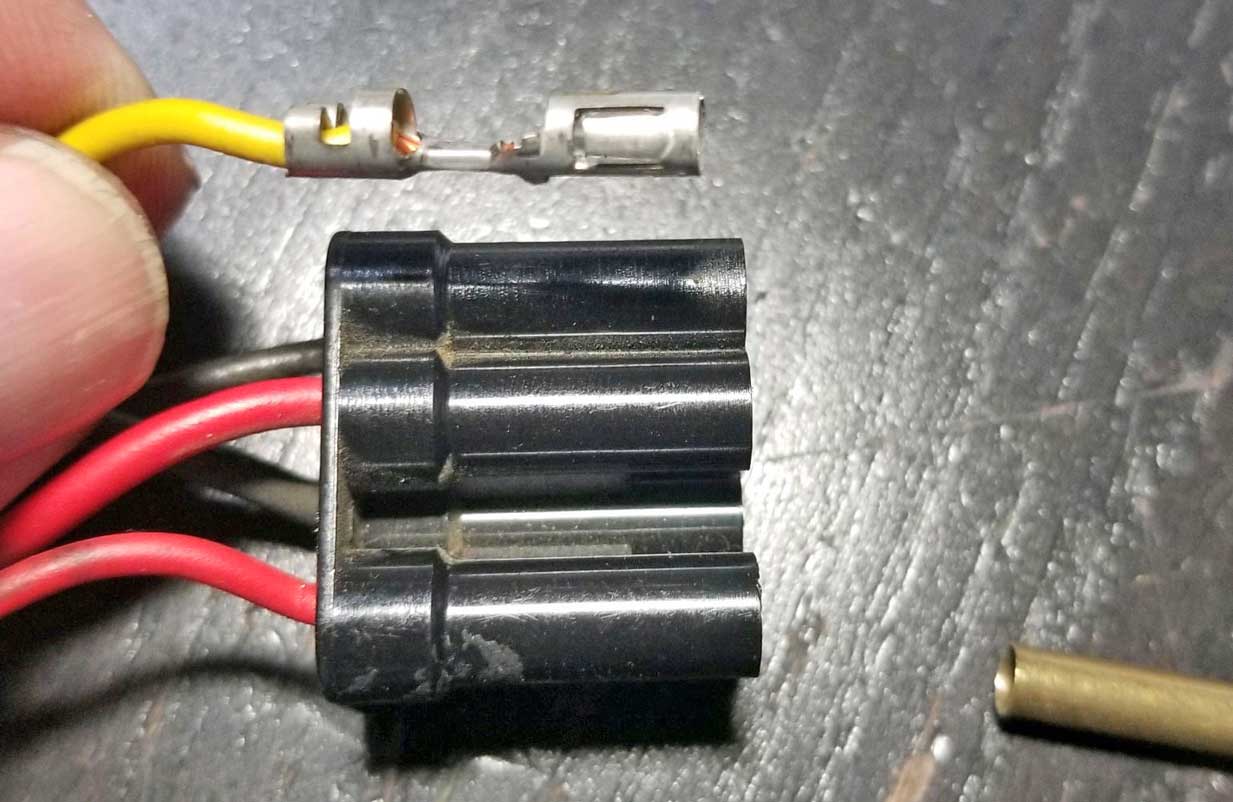 |
| DIY Engine PISTON and HEAD Cleaning Tips |
|
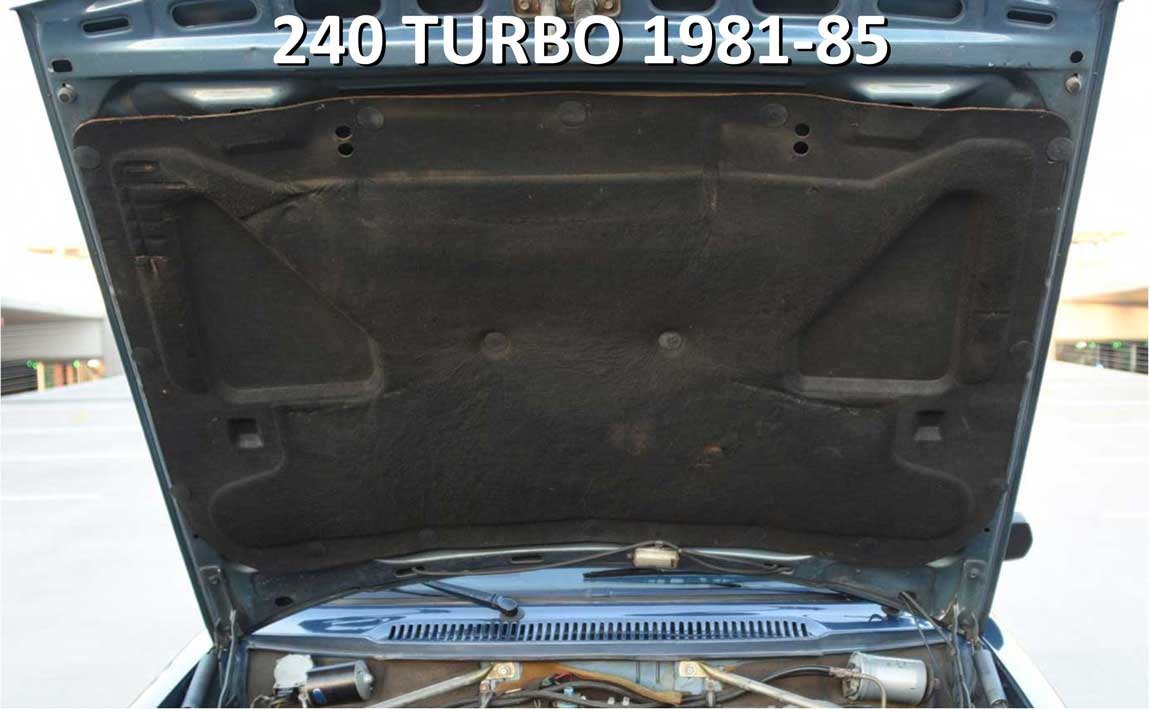
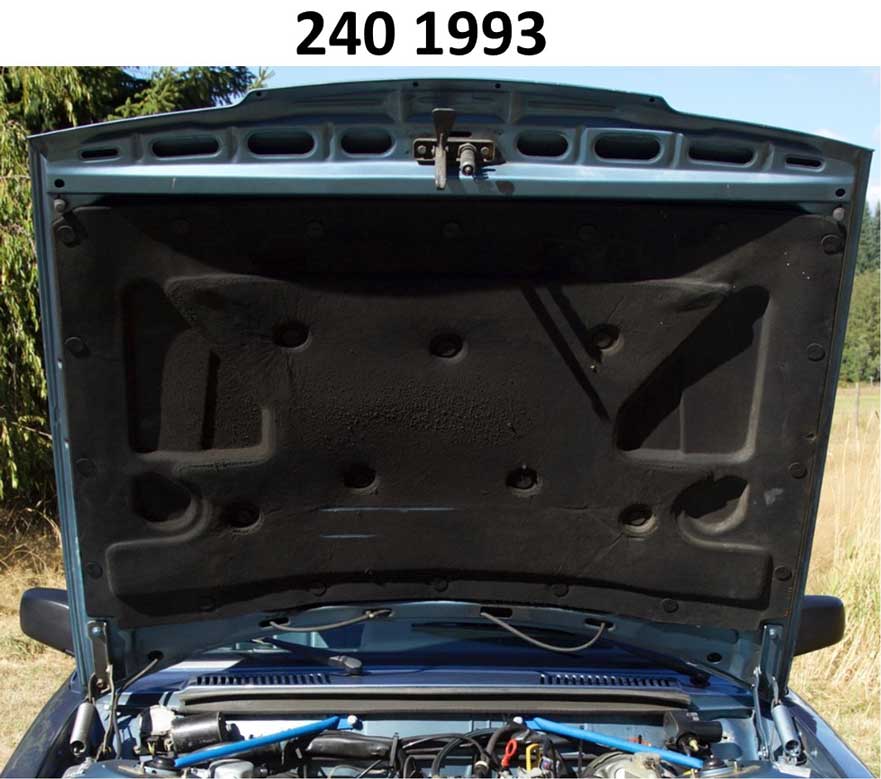
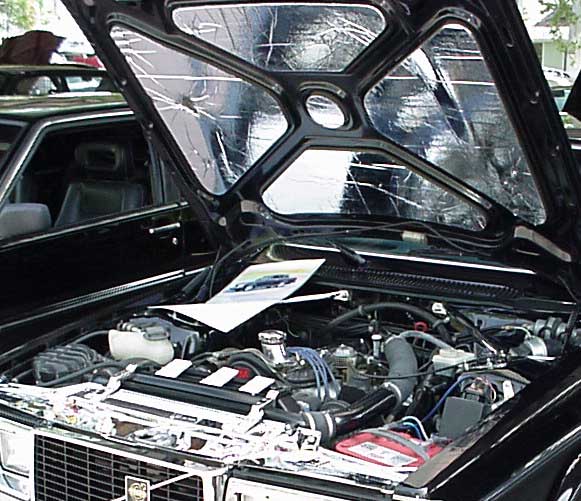
| 240 Hood Insulation |
   |
| HEADLIGHT PROTECTION FILM |
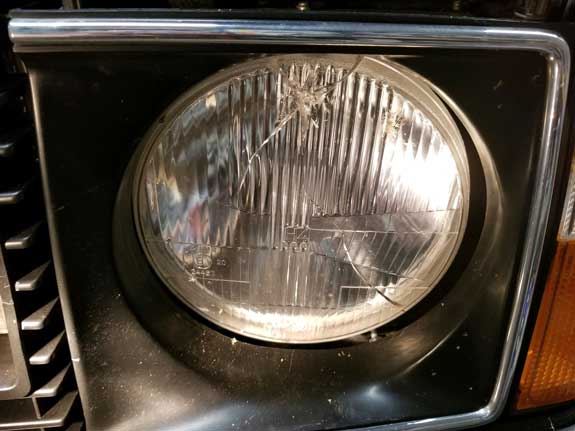 |
| 240 Exhaust Mods |
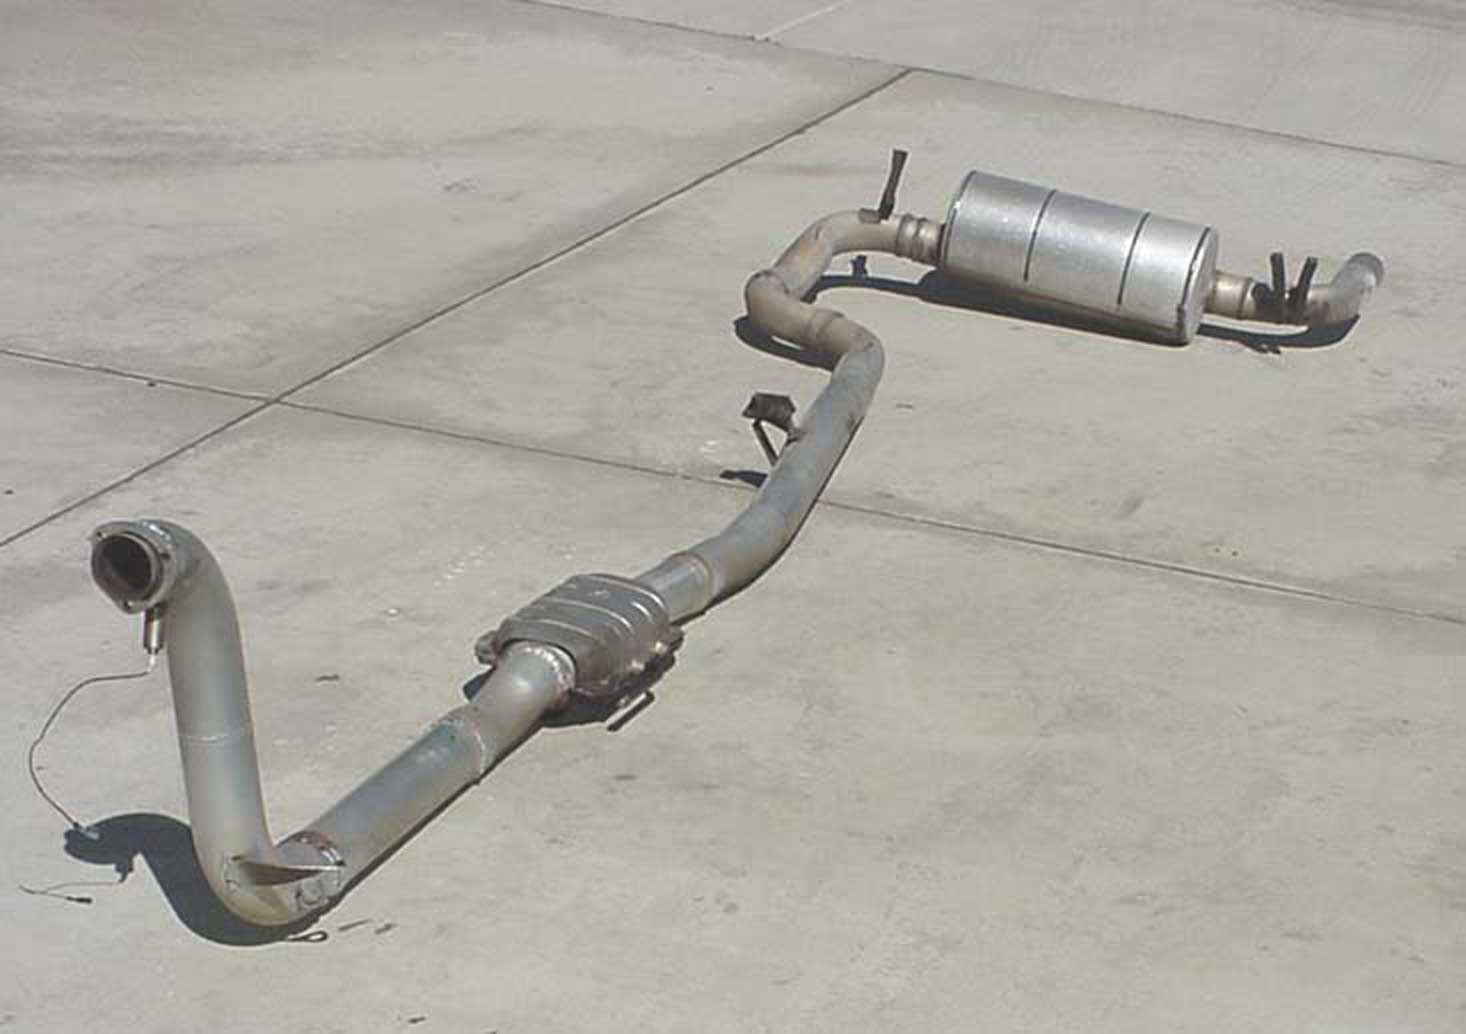 |
| Get Variable Interval Wipers for your 240 |
|
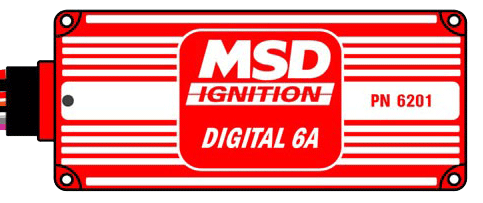
| MSD Ignition Spark Improvement for your 240 Turbo |
|
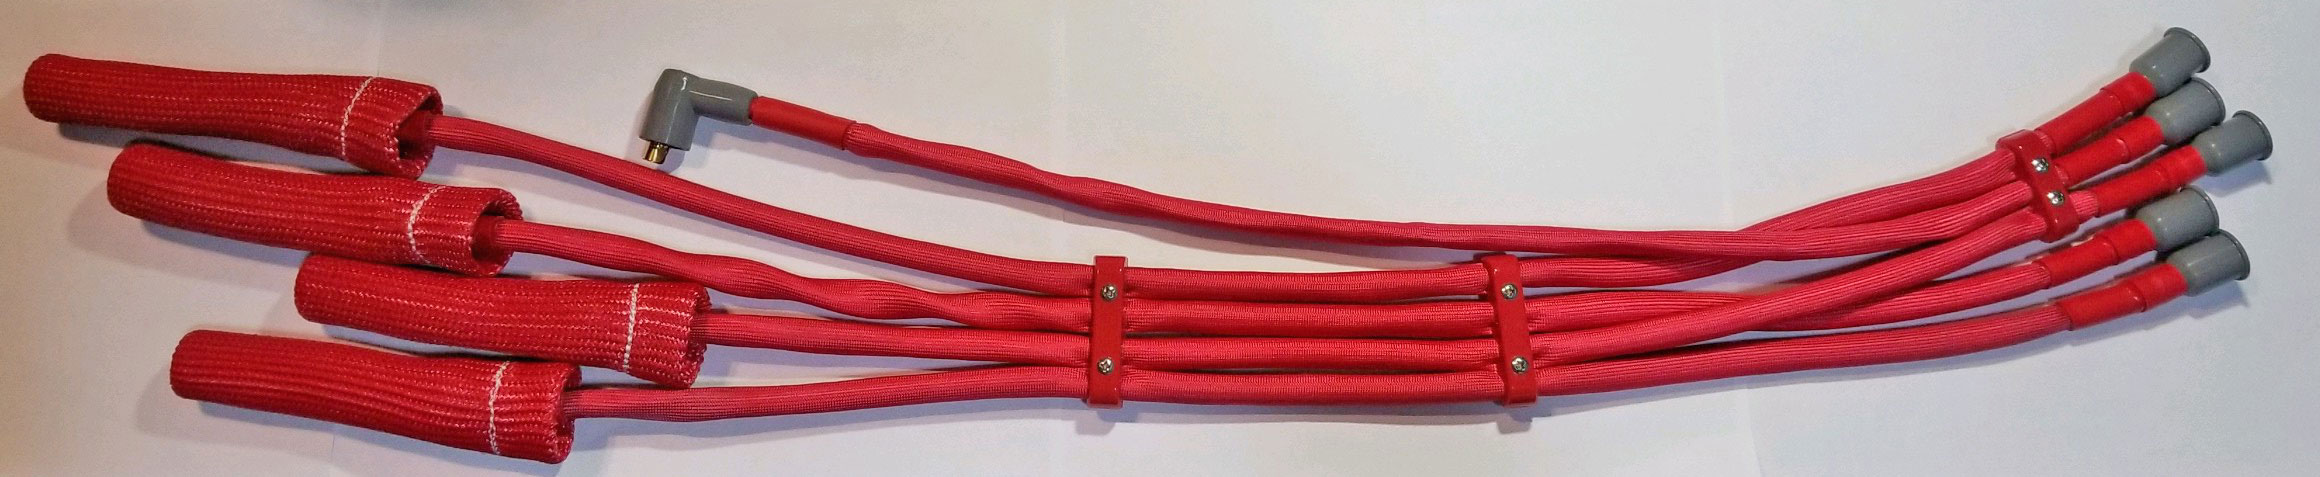
| Build your own custom 240 Spark Plug Cables |
 |
| 240 VIN Decoding Page |
 |
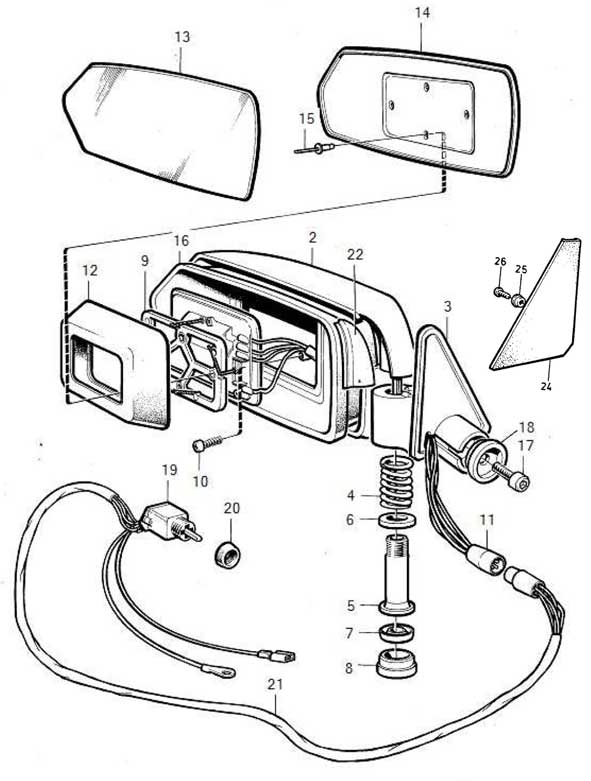
| 240 Power Mirror and Mirror Switch Page |
 |
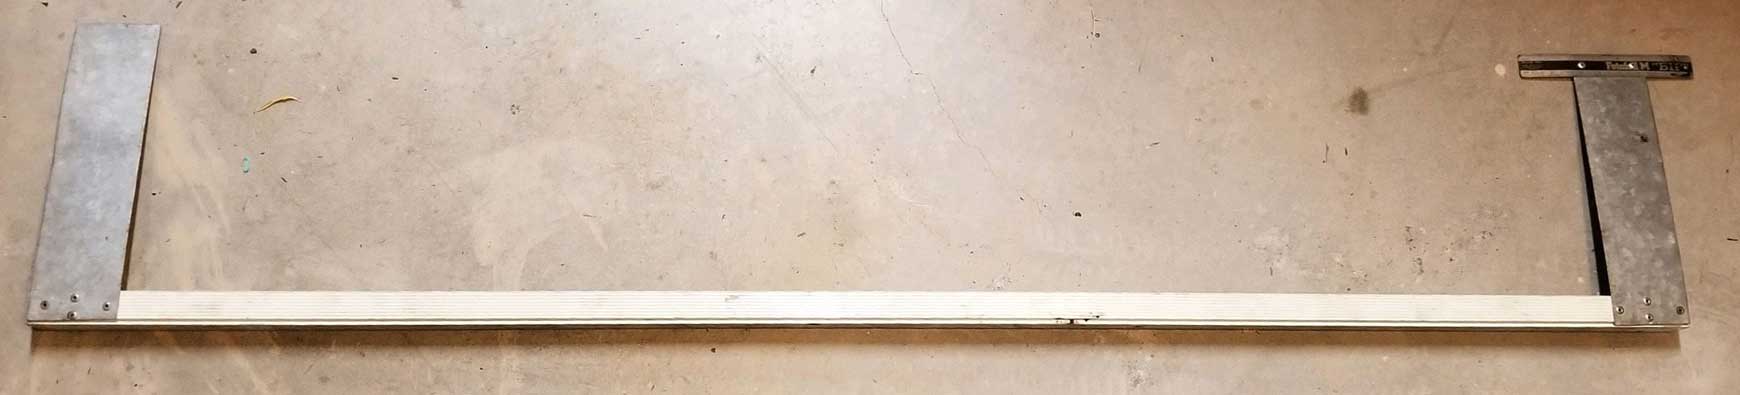
| DIY Front End Toe Alignment |
|
| 240 Fuse Panel Diagrams and Fuse Box Inner Workings |
|
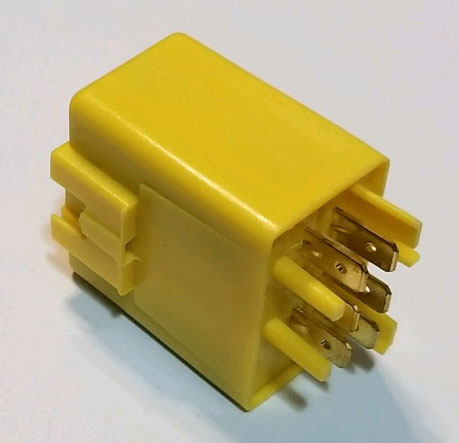
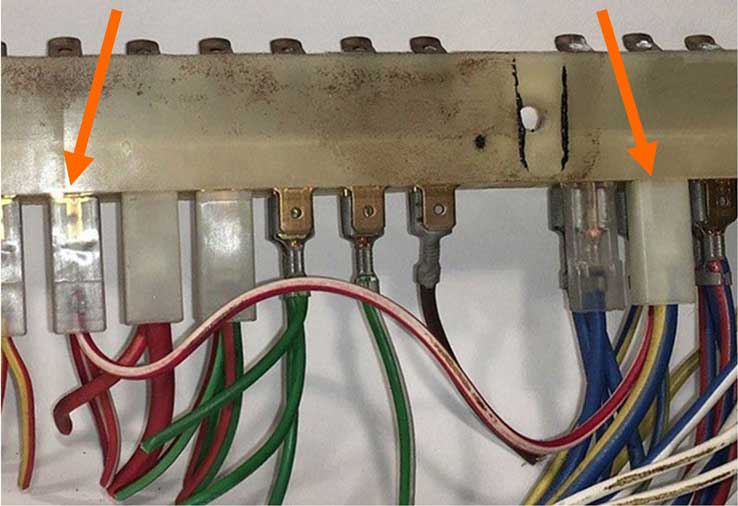
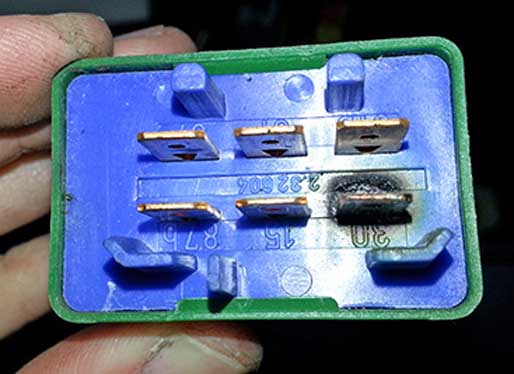
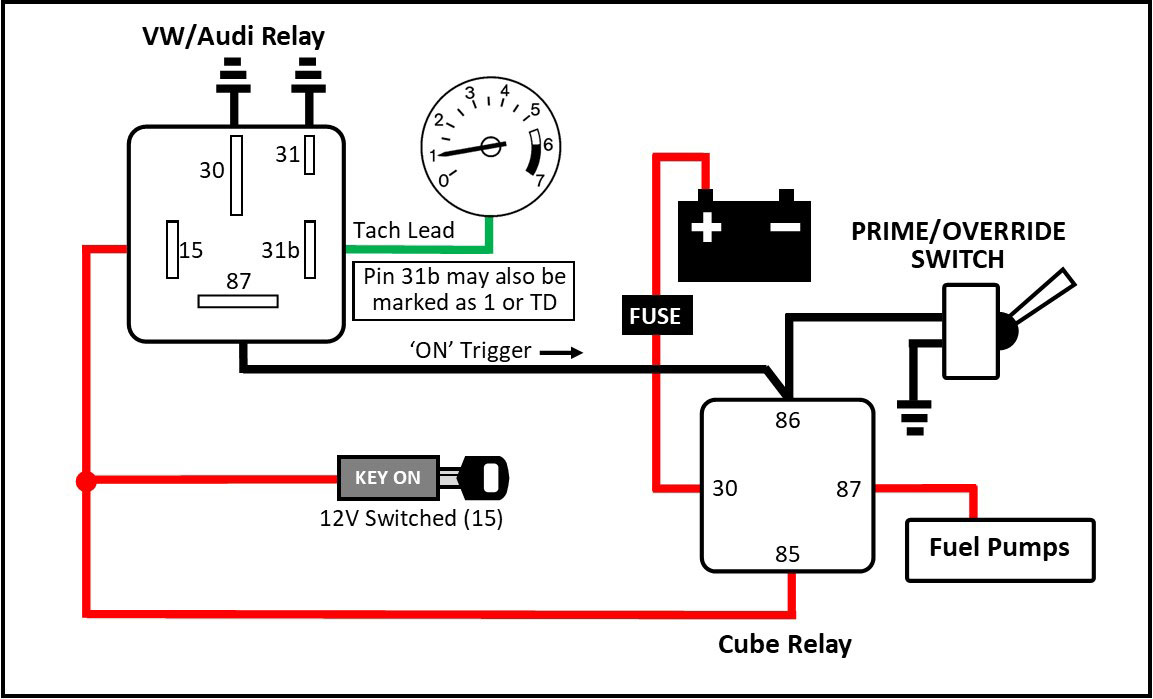
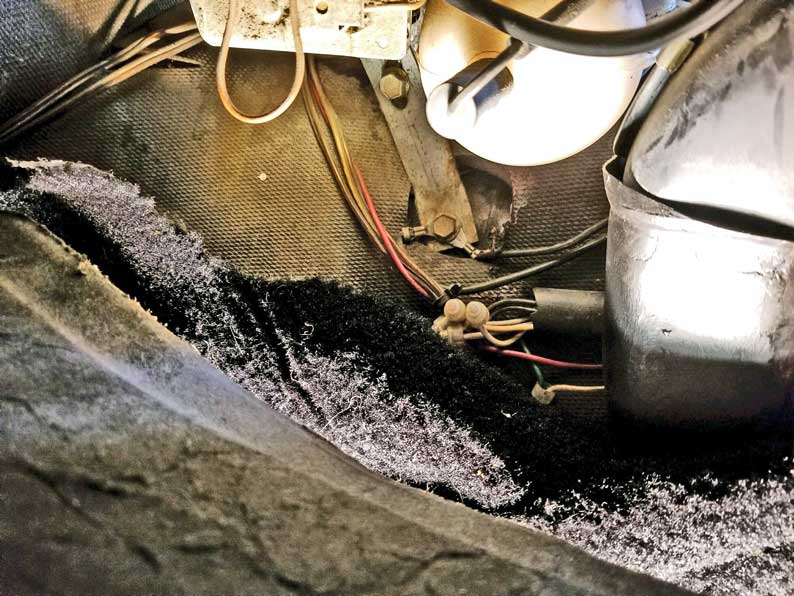
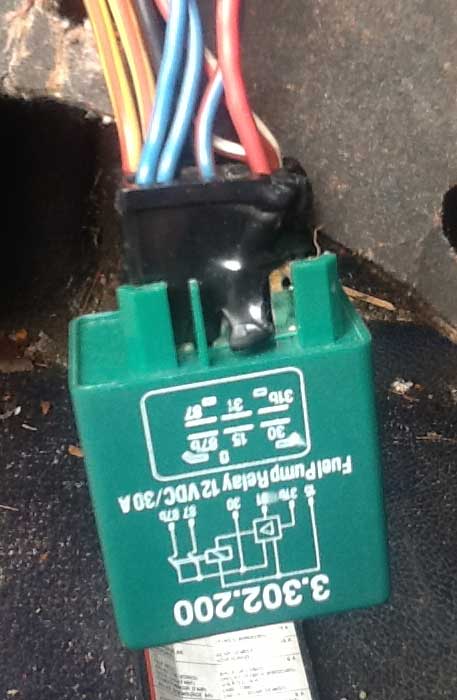
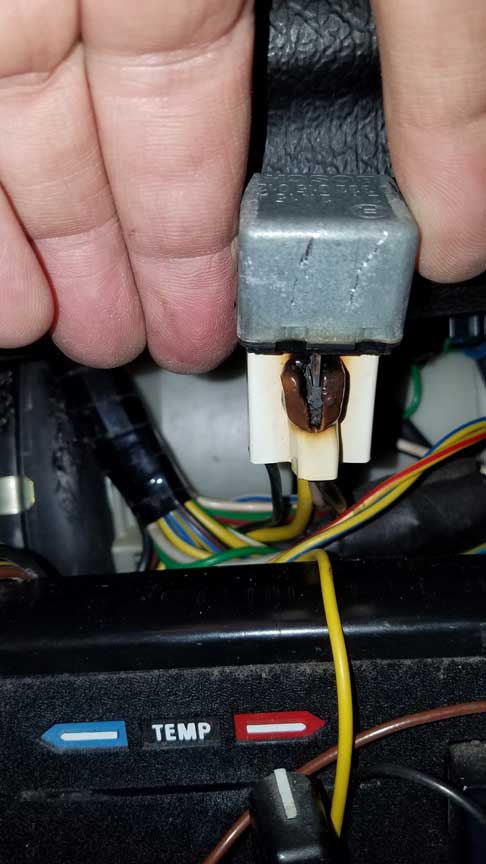
| Fuel Pump Relay Secrets, Mods and Fixes |
|
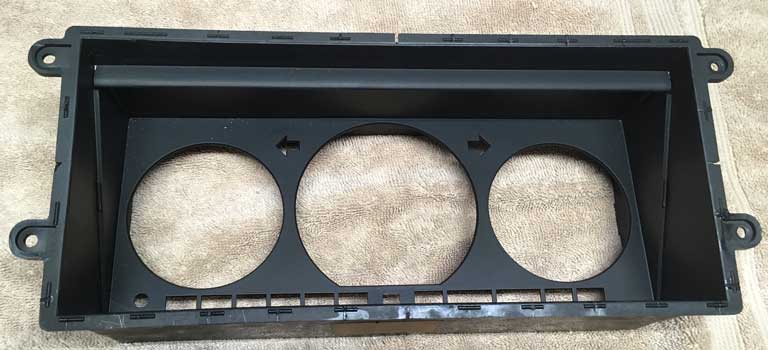
| 240 Dash Top Gauge Pod Project |
|
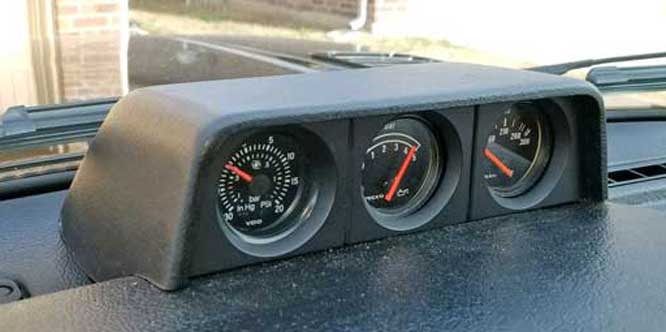
| 240 Gauge Cluster Mods |
A customer sent me some pics of his modified instrument cluster, so I thought I would share.
|
| Dealing with 240 Smog Emission Compliance |
 Since I
lived in California for most of my life, I have plenty of experience
working to make 240s emission compliant. This can be a huge source
of frustration and it can be very expensive if you have to resort to
paying someone every two years to work on the car for you. Since I
lived in California for most of my life, I have plenty of experience
working to make 240s emission compliant. This can be a huge source
of frustration and it can be very expensive if you have to resort to
paying someone every two years to work on the car for you. Don't give up. The below discussions threads are really good ones. It offers a lot of good experience from people who've ultimately been successful and the thread itself is a great success story. turbobricks.com/failed-ca-smog-high-nox-89-240.366734/ turbobricks.com/just-failed-ca-smog-high-nox.349573/ And a great article on this subject (also highlighted in this thread): dailyturismo.com/smog-test-making-it-legal.html |
| Improving 240 Gauge and Dash Lighting |
 |
| 240 Instrument Cluster Diagrams and Gauge Electrical Fixes |
|
Here's a growing collection of 240 gauge info that can come in handy if you're
doing your own work on your 240 gauges or instrument cluster.

 |
| 240 Rear Light Bulbs |
|
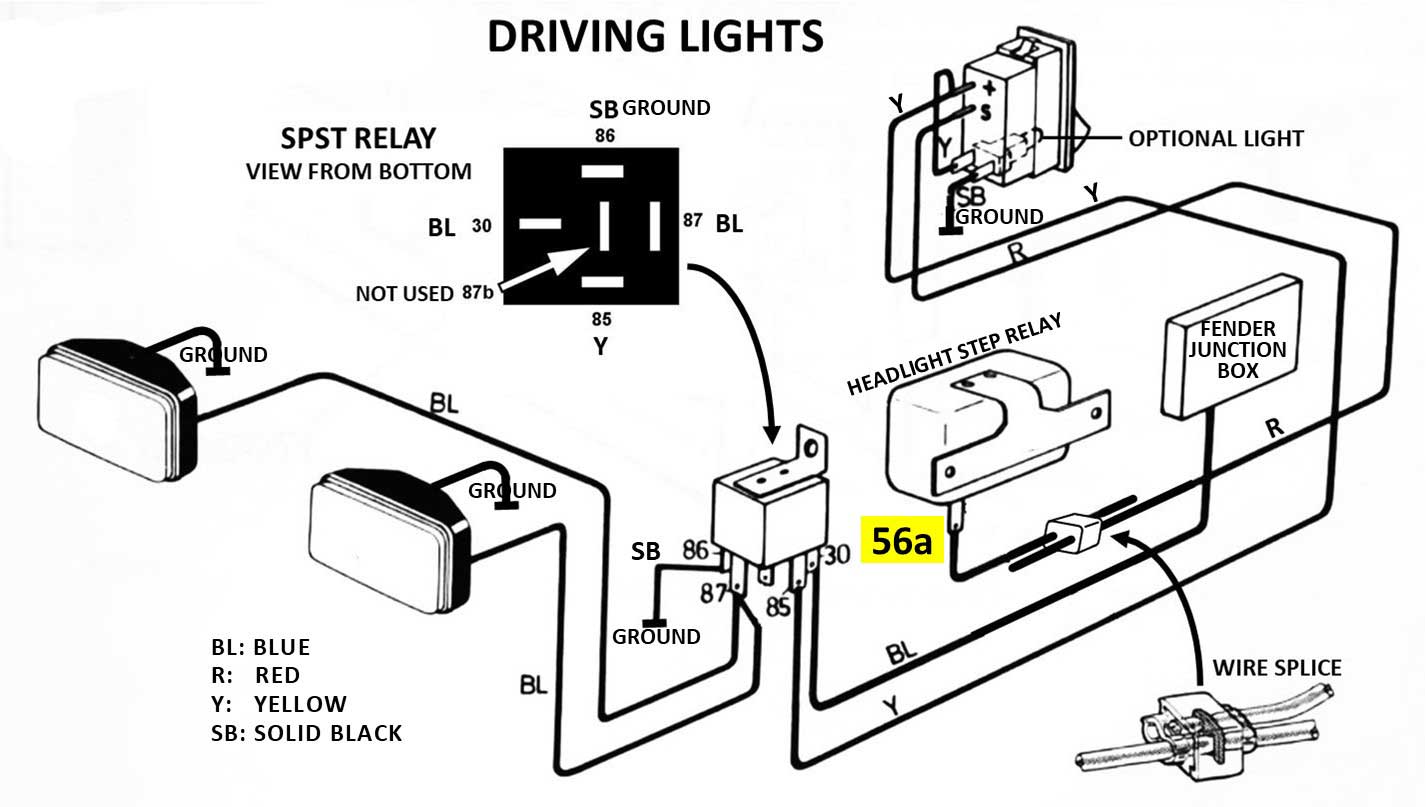
| 240 Fog Light or Driving Light Installation |
|

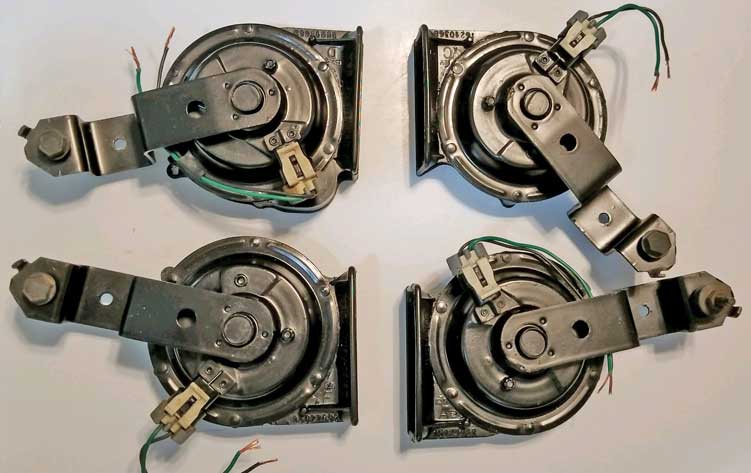
| Installing Big Cadillac 4-Note Horns in a 240 |
I did this on my 240.
|
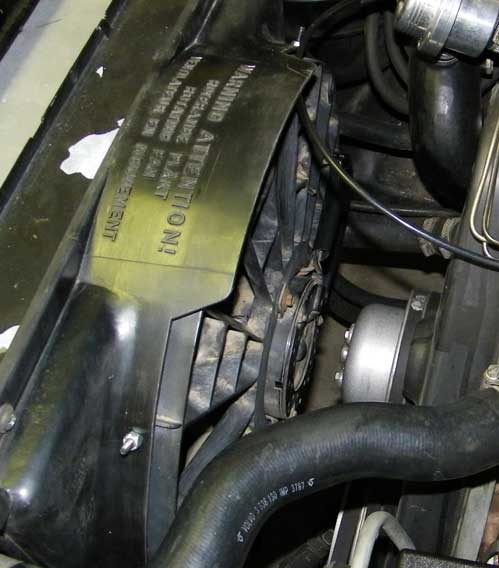
| Installation of a Primary Electric Cooling Fan for a 240 |
|
When in good working
order, the original
belt-driven clutch fan in your 240 can handle most
cooling needs. But if you have been
thinking that your 240 needs an electric primary
cooling fan, here is a page I put together on my
experiences with a number of electric fan
conversions over MANY years, from 1998 to present with small GM
fans, Volvo fans and big Ford or Lincoln fans. Plus I have a
variety of wiring diagrams for building
your own relay fan control systems if you like.
 |
| 4-Speed Cooling Fan Controller Project |
Click here: www.240turbo.com/fanharness.html 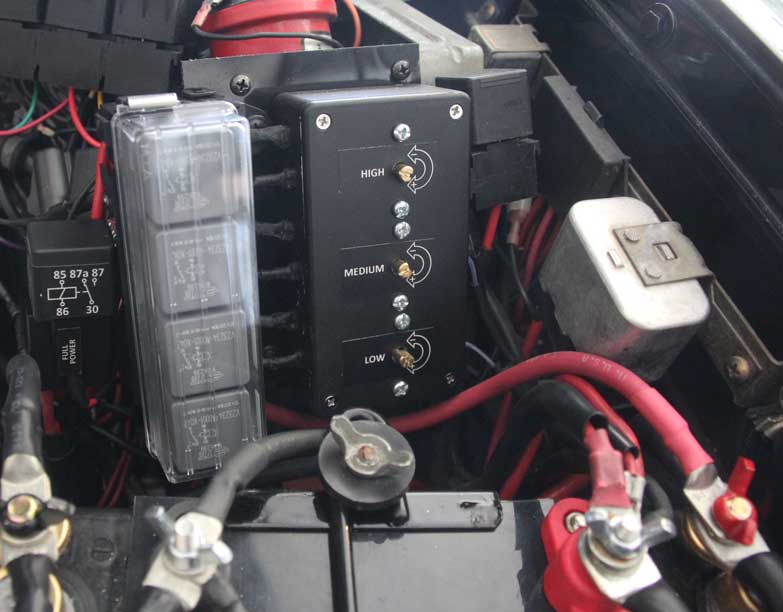
|
| AutoCoolGuy PWM Fan Controller Installation |
Click here: www.240turbo.com/autocoolguy 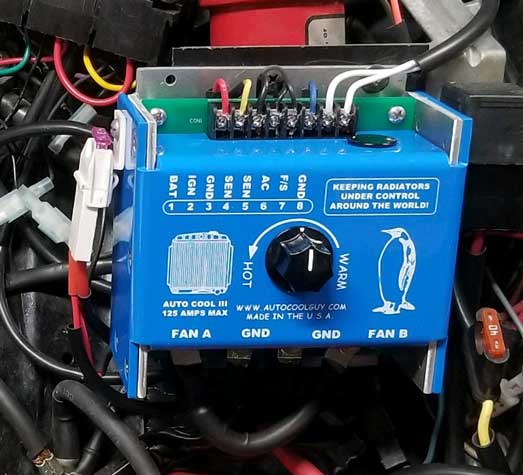
|
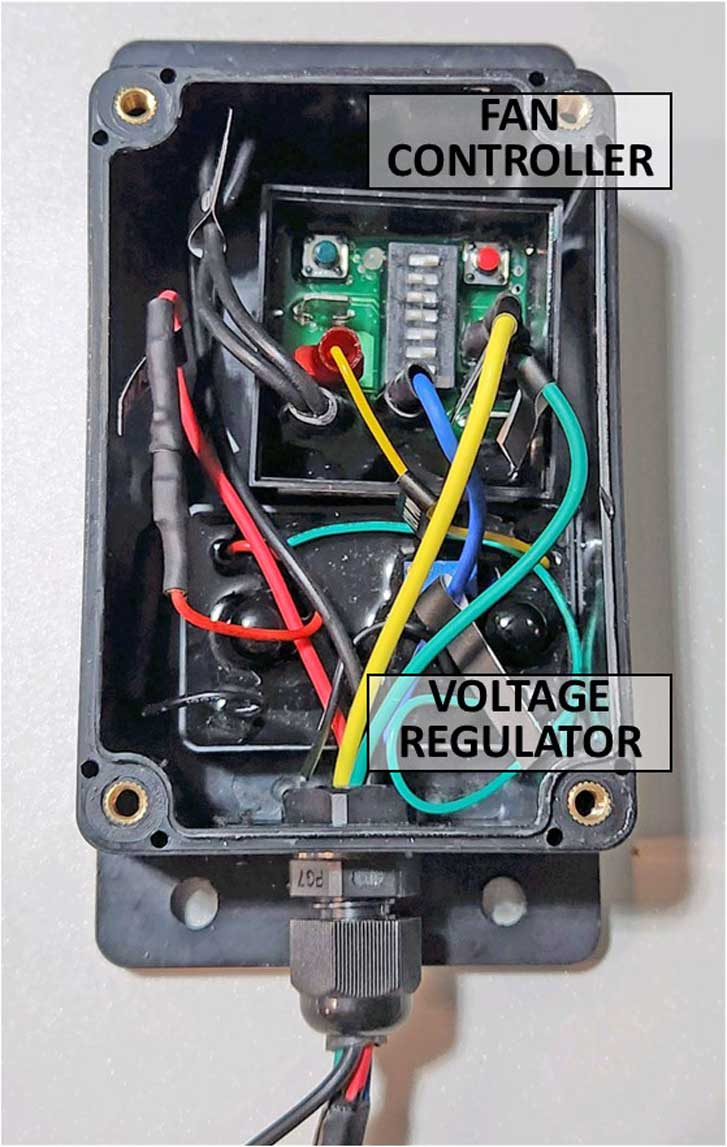
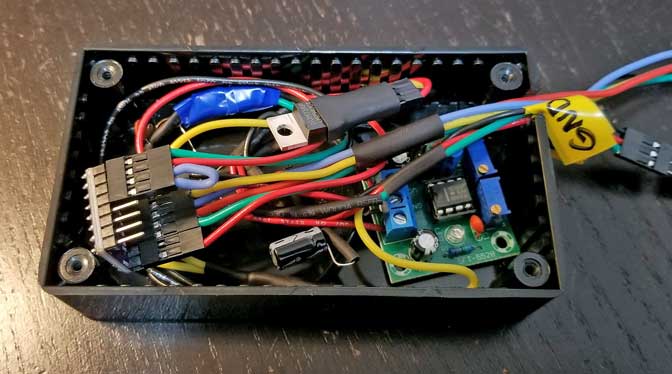
| WIDGET MAN Brushless Fan Controller Installation |
 |
| Painting 240 Taillamps |

|
| Stepper Idle Air Control Project |
 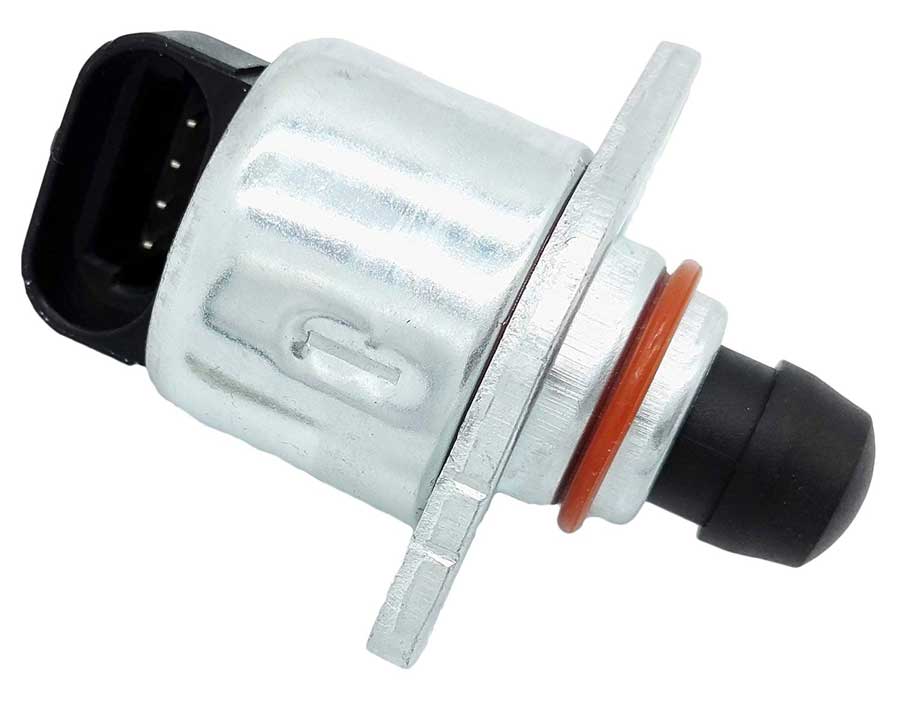 In 2018 I began working on a stand-alone manually adjustable idle control valve for my car using a GM stepper IAC motor. Click the above images or below link to see it. https://www.240turbo.com/idleaircontrol.html
|
| 240 Interior Renewal Project |
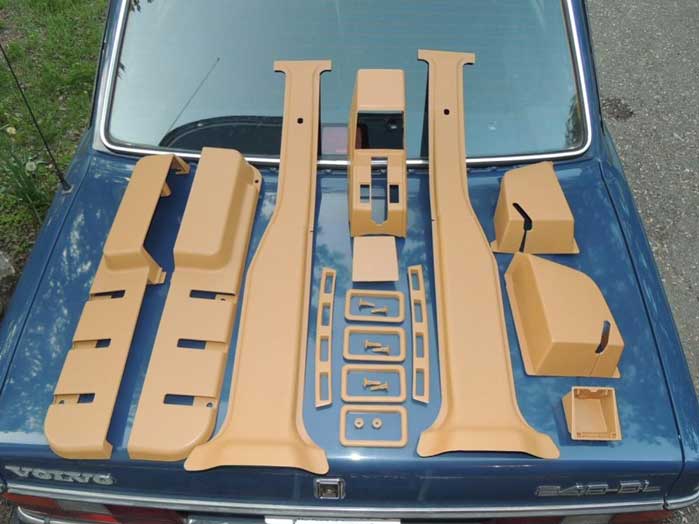 THIS NEEDED TO BE SHARED. This discussion thread below began in May 2018 and it's a goldmine for inspiration on making your old 240 interior look brand new again. It's a great resource for information on paints and interior parts too, so I had to share it here for those of you who haven't seen it. turbobricks.com/interior-refreshening-project.342177/
|
| 240 Door Panel Project |
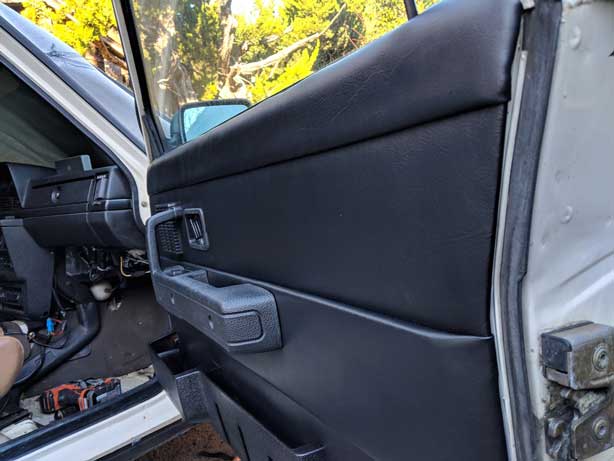 THIS NEEDED TO BE SAVED and SHARED. This 240 Door Cards from Scratch thread was shared in TB in December 2018. If you're patient and handy, it shows some great ideas for you to completely remake new 240 door cards to replace the old, warped or rotten ones in your 240. turbobricks.comdoor-cards-from-scratch.346785 UPDATE 2023: The above thread now has a lot of broken images. Luckily I saved a PDF of the original thread with all images, which should help if you're doing a project like this. https://www.davebarton.com/pdf/242doorcardbuildlo.pdf If you need to replace or re-create new plastic moisture barriers, lots of people have suggested using shower curtain plastic. turbobricks.com/door-card-backside-plastic.364707
|
| 240 Exterior Paint Renewal Project |
  This discussion thread below began in 2015 and outlines a 245 owner who went the distance in restoring his newly acquired 245 exterior paint to look exceptionally nice. His efforts paid off. It's a great inspiration to 240 lovers. turbobricks.com/my-240-story.305369
|
| Custom Yoshifab Turbo Oil Drain Hose for Volvo Turbo Red Blocks |
|
| Yoshifab Catch Can (breather box) Installation |
|
| Volvo Red Block OIL COOLER Information |
This information may come in handy when
working on oil cooler systems on red blocks. I compiled a new web page just for this info.
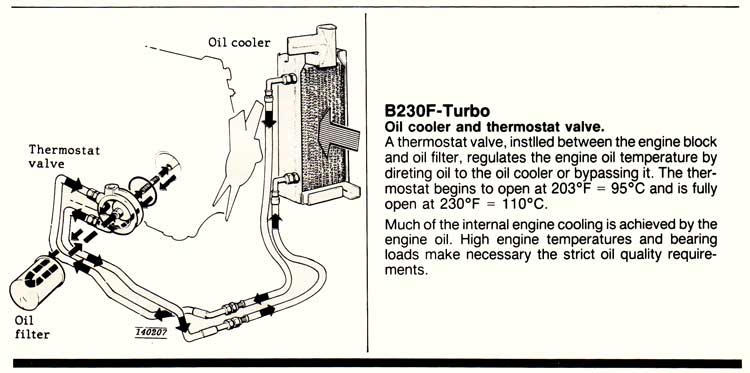 |
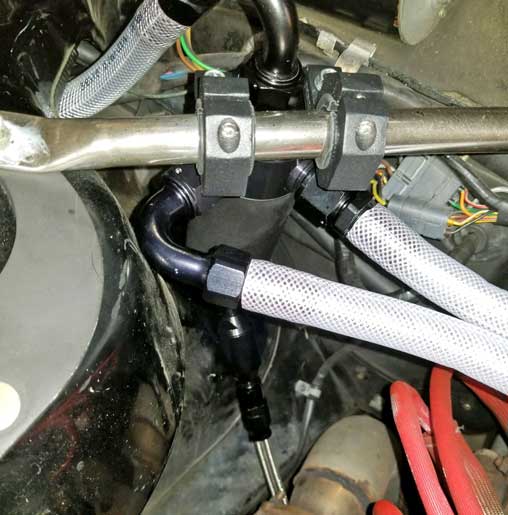
| Oil Cooler Thermostats |
The factory oil cooler thermostat in my
240 Turbo oil filter plate seemed to have stopped
working. My guess is it was stuck in the wide
open position, since it was taking forever for the
engine oil to come up to temperature. So I
decided to add an IN-LINE oil cooler thermostat in the
lines between the engine and the oil cooler.
|
| Removing or Replacing 240 Door Top Black Vinyl Trim |
|
I gets lots of questions about doing this kind of work
or where someone can buy these black vinyl trim
pieces. They have not been available for a lot of years from Volvo or any other source, but if you're persistent, good results are possible.
|

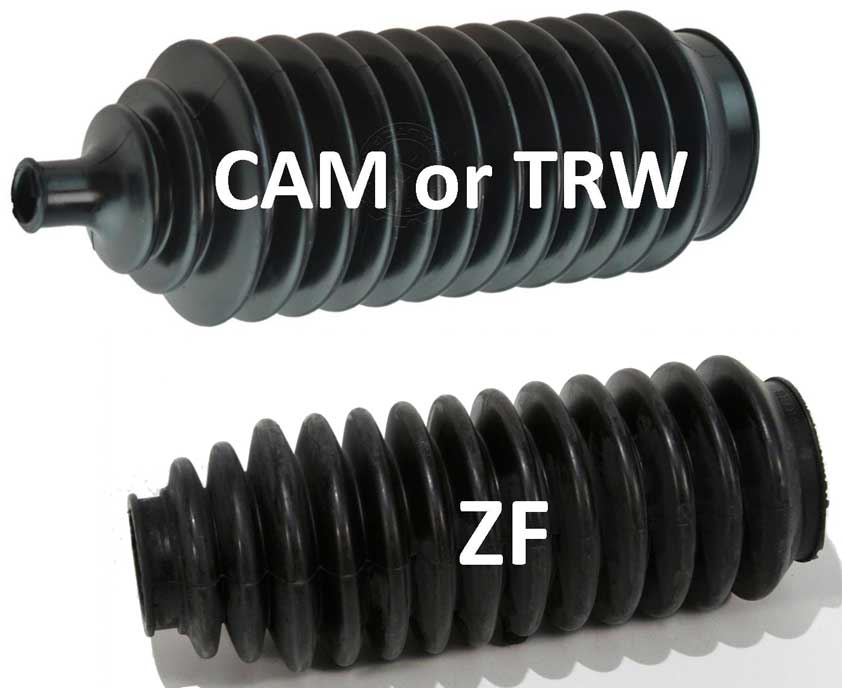
| Electric/Hydraulic or Electric Power Assist Steering |
|
If you like
having power steering, but for some reason the
traditional hydraulic setup isn't quite right
for your modified Volvo (or if you want to
convert an older manual steering Volvo to
power assist) here are some possible answers.
A number of years ago, Josh Sadler of Yoshifab converted his Volvo 242 to electric/hydraulic steering. Josh's system was fairly simple. It used the original Volvo power steering rack. He mounted an electric/hydraulic steering pump and reservoir from a Toyota MR2 in his trunk and had hydraulic hoses made to route all the way to the stock steering rack. The result worked pretty well. Here's a discussion thread on his installation: https://turbobricks.com/index.php?threads/electric-power-steering.135556/ See his YouTube video below. https://www.youtube.com/watch?v=iItsdzTMp9I
https://turbobricks.com/index.php?threads/electric-power-steering-2-series.247548/ Or here's a video below about someone who used a VOLVO electric/hydraulic steering pump to feed the power steering. He didn't install it in a Volvo, but this pump/reservoir is from approximately 2004-2013 Volvo C30, C70, S40, V50 variants. The pump/reservoir is Volvo PN 36050678.
It's a great question. It certainly appears you CAN. Several racing hose makers offer DIY hose and ends. And this video discussion using a Volvo electric/hydraulic pump to convert a Camaro. This video has a lot of detail and discusses using a DIY Arduino controller to regulate the pump so it's not just running at one speed all the time. Lots of really good info here. https://www.youtube.com/watch?v=FGHd-mirPdE Russell PowerFlex hose is advertised with a rating of 2500 PSI. https://www.jegs.com/p/Russell/Russell-PowerFlex Earls power steering hose is rated at 3000 PSI. https://www.holley.com/brands/earls/products/plumbing https://www.youtube.com/watch?v=M2wXKfOmvF0
And here's the next generation steering mod. Steering Column EPAS. Electric Power Assist Steering (EPAS) Units from a Saturn Vue, Chevrolet Equinox or Pontiac Torrent and other modern cars. The EPAS is mounted in the steering column, so the level of tech is much higher. See discussion threads here: turbobricks.com/epas-in-p1800.341174/ turbobricks.com/pump-on-a-740-t6.361224/ More info: VOLVO 240 Specific: turbobricks.com/electric-power-assist-steering.334886/ www.therangerstation.com/electric-power-steering/ www.hotrod.com/electric-power-steering/ www.super7thheaven.co.uk/epas/ forums.corral.net/electric-power-steering |
| Identifying a Power Steering Rack in your 240 |
|
| Classic Car Insurance for your Classic Volvo |
This is a bit of an
unusual subject for a mods page, but I know it will
be helpful to some Volvo owners out there.
|

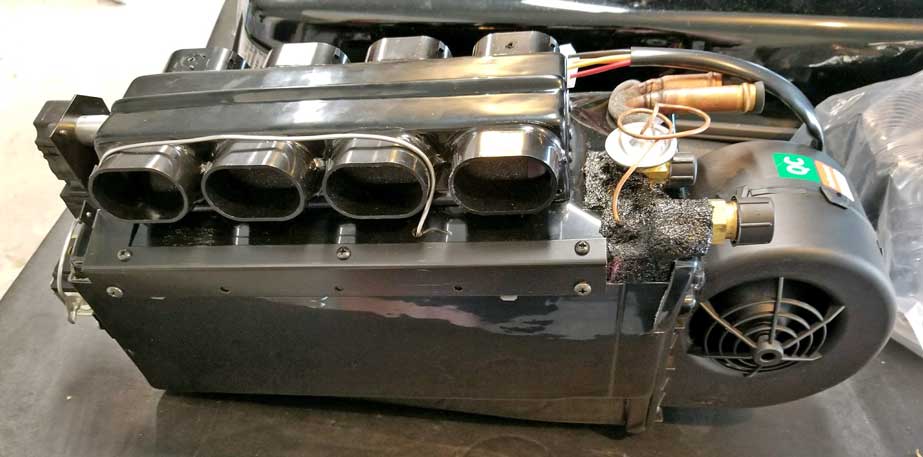
| Classic Auto Air all new Air Conditioning Installation |
|
I finally grew tired
enough of my mediocre Volvo AC in my 242 to explore an
extreme
option. This is a complete new AC system installation from
Classic Auto Air. I also spent the time
installing Dynamat
while the interior was out of the car. It was a
LOT of work, but overall a good project. I created a new web page all about the new AC conversion. CLICK HERE!
|

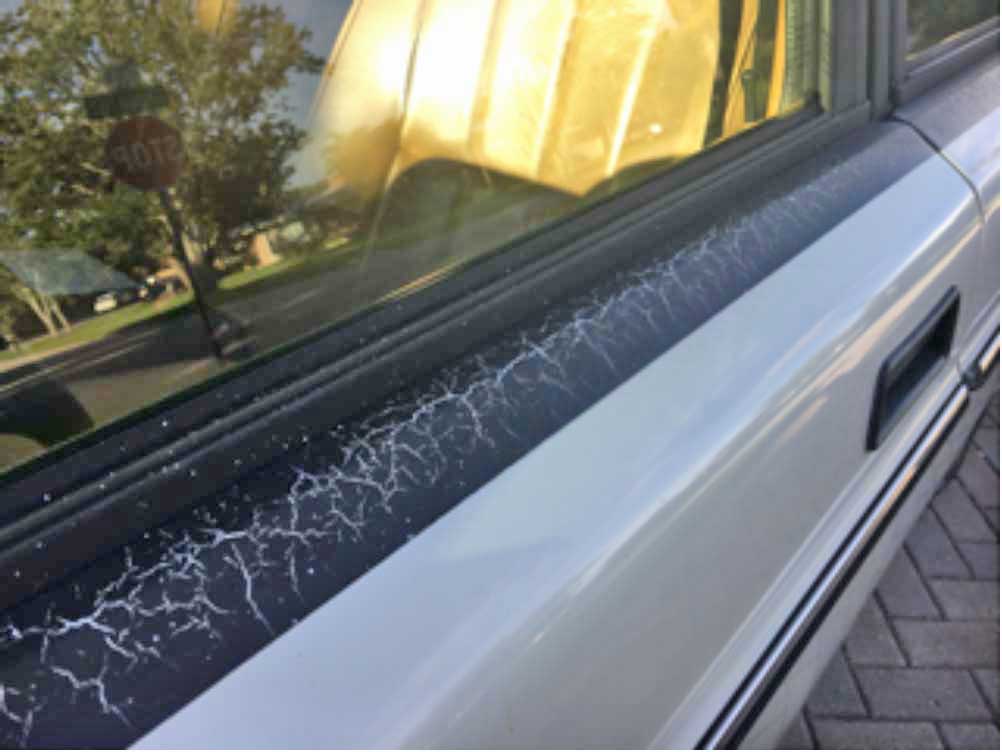
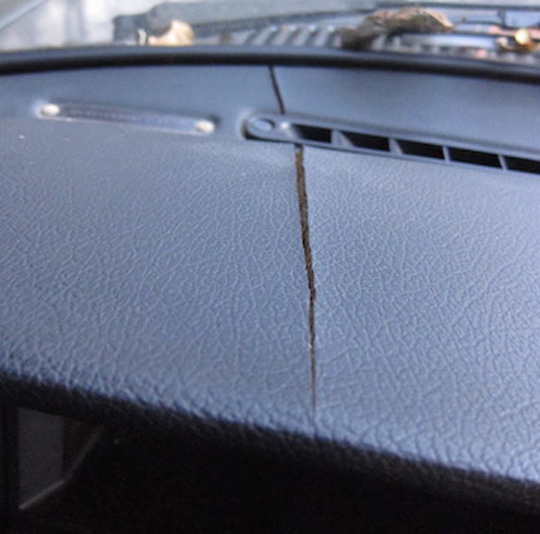
| Dealing with a Cracked 240 Dash |
Here are some VIDEOS:
#1 Unboxing and trying out. https://www.youtube.com/watch?v=_HO1LqFtFig #2 Installation. https://www.youtube.com/watch?v=ksmMu0wwhuY&t=2s Other threads to read:
|
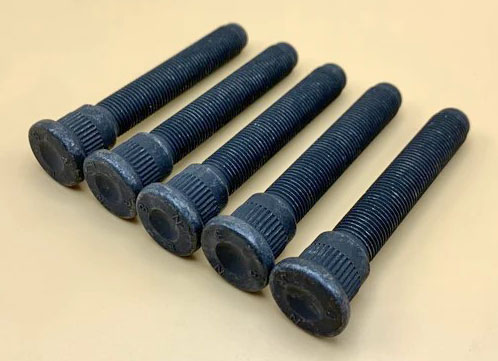
| Installing Rear Wheel Spacers - for Wider Track |
|
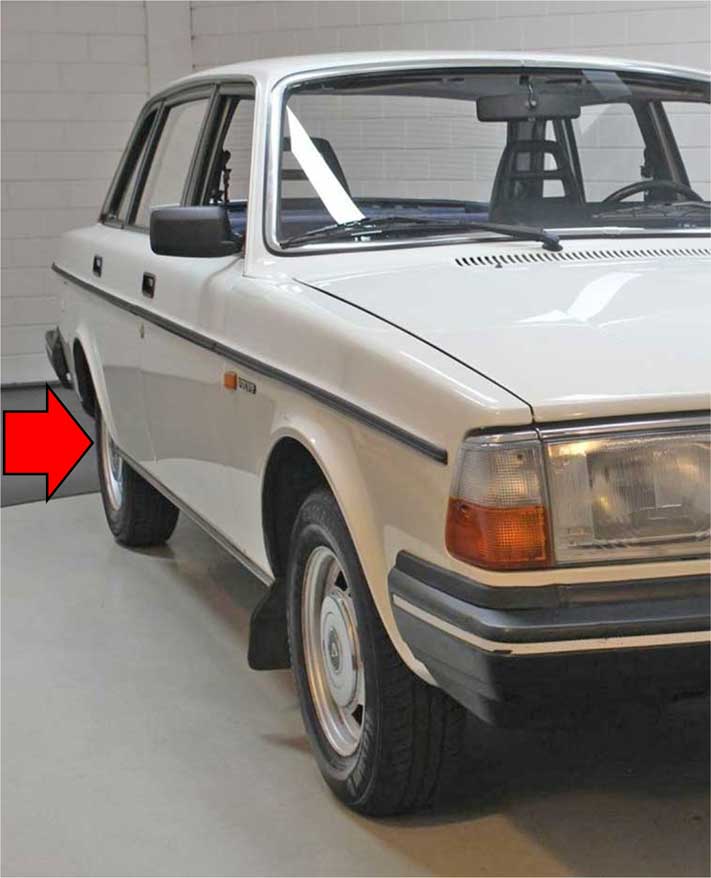
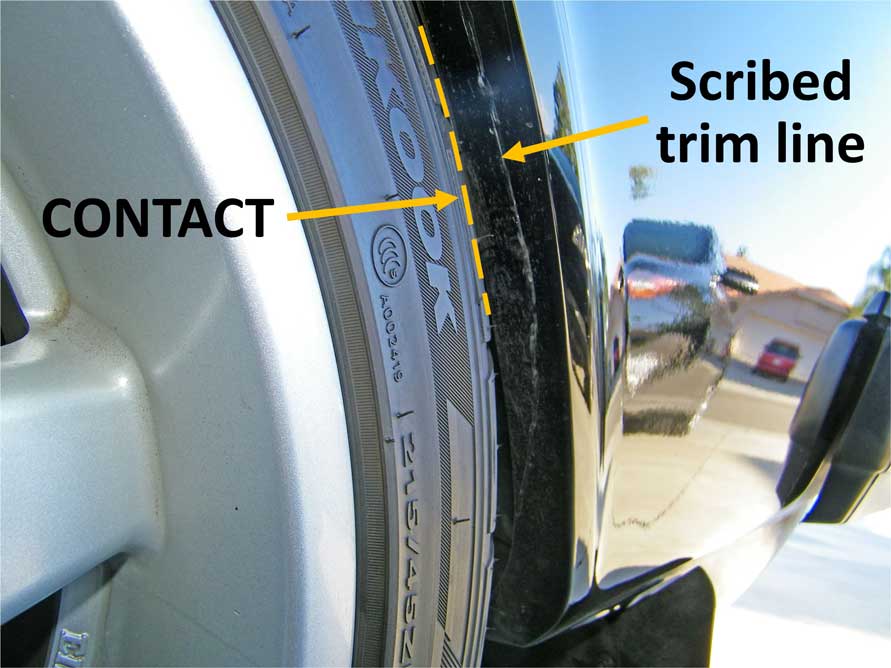

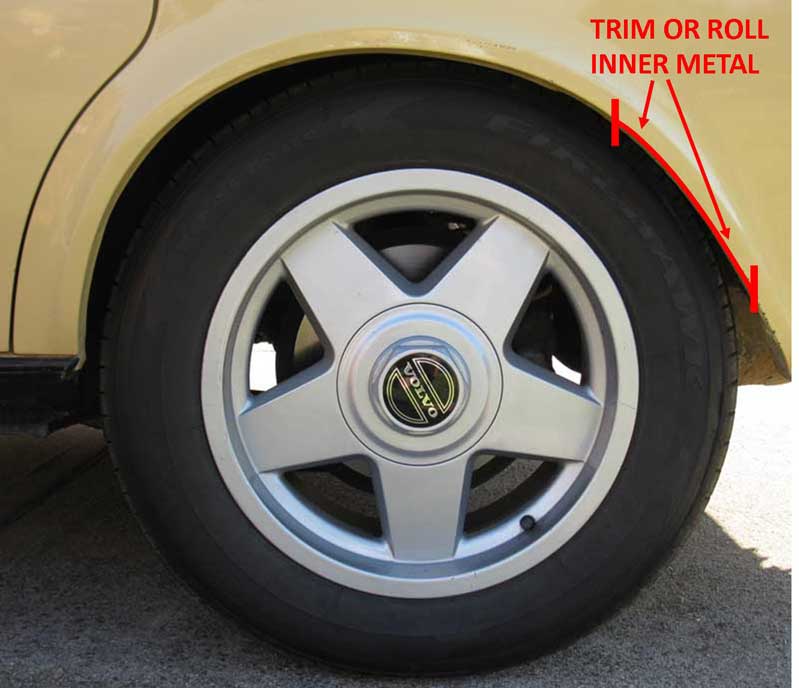
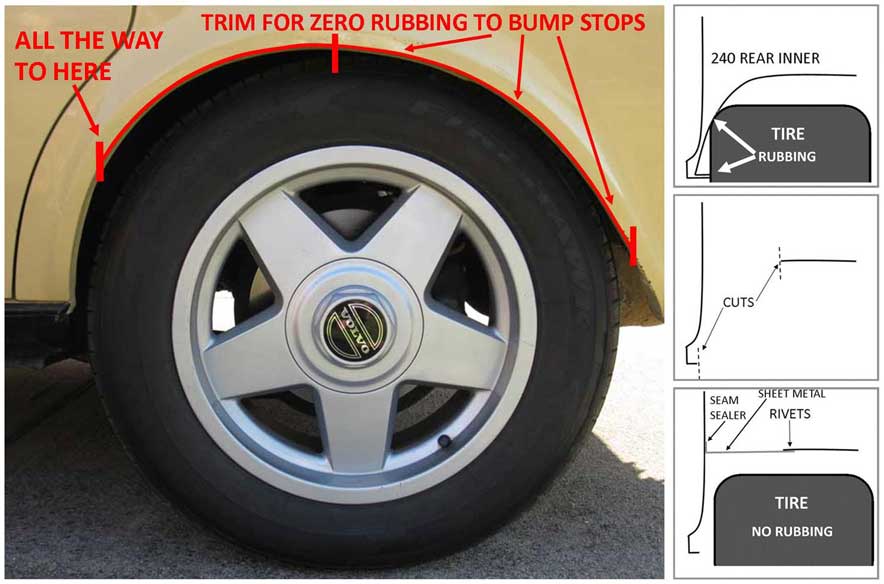
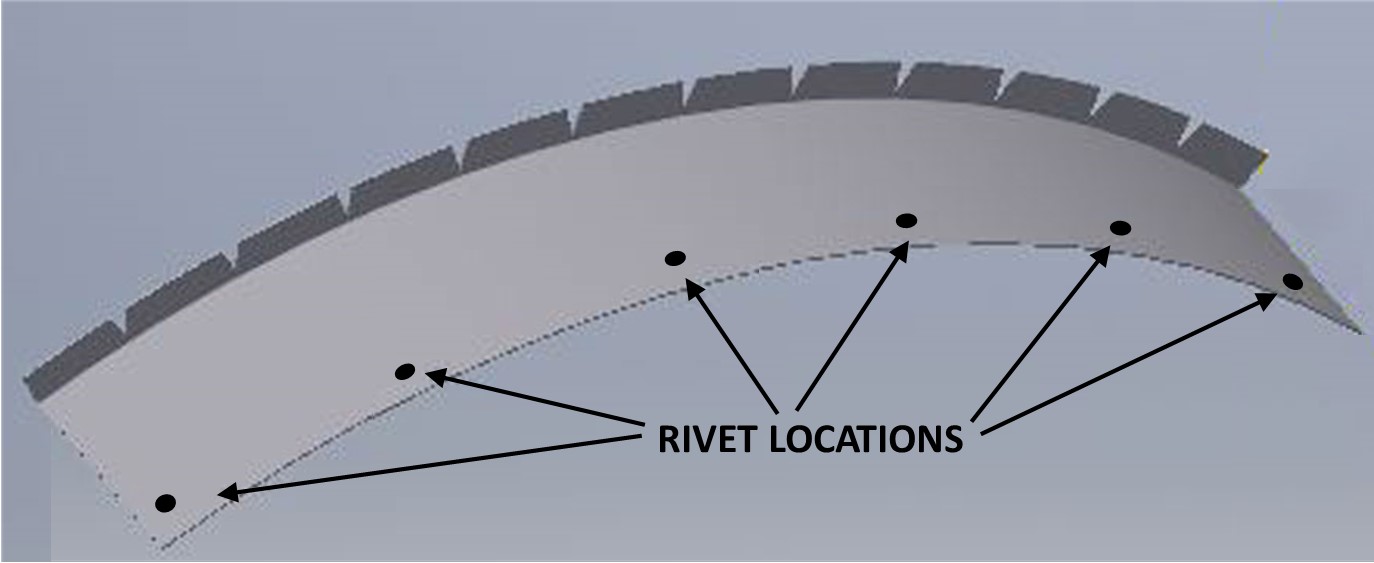
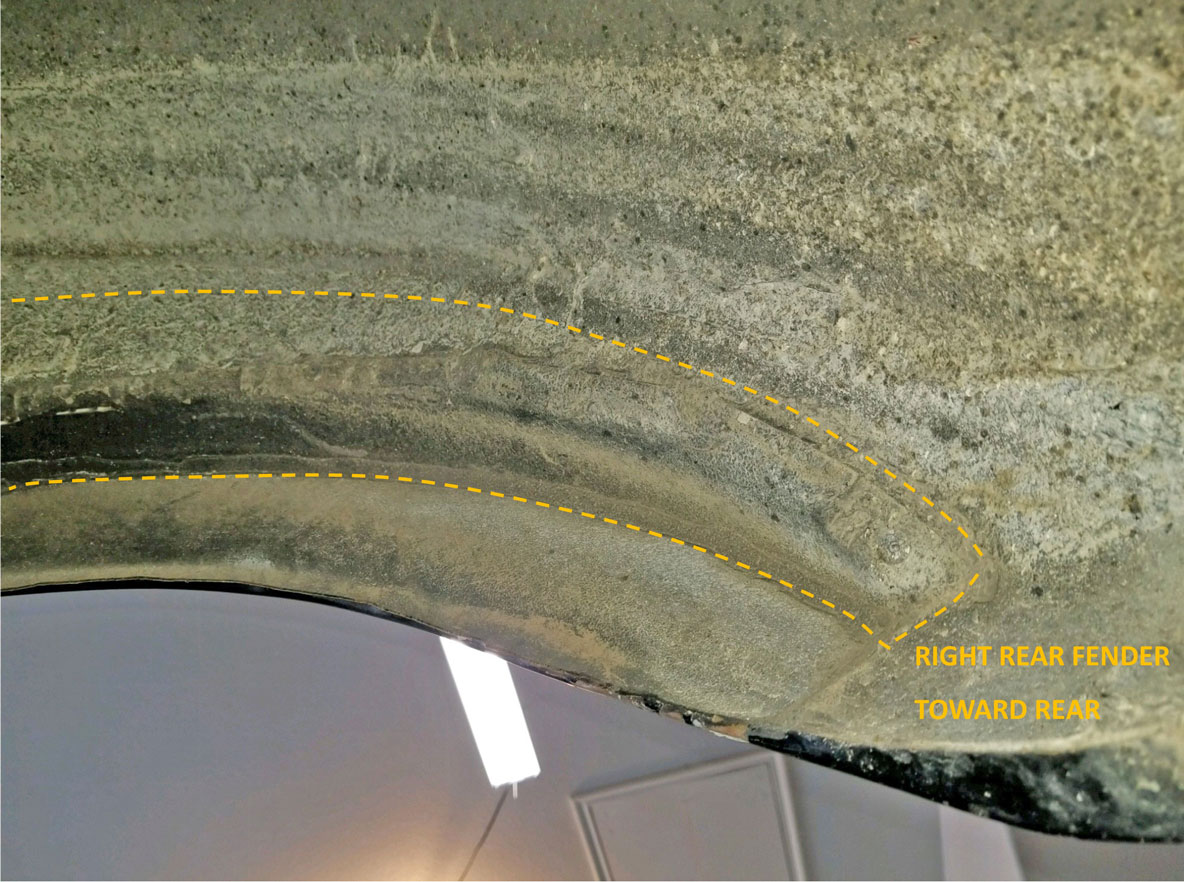
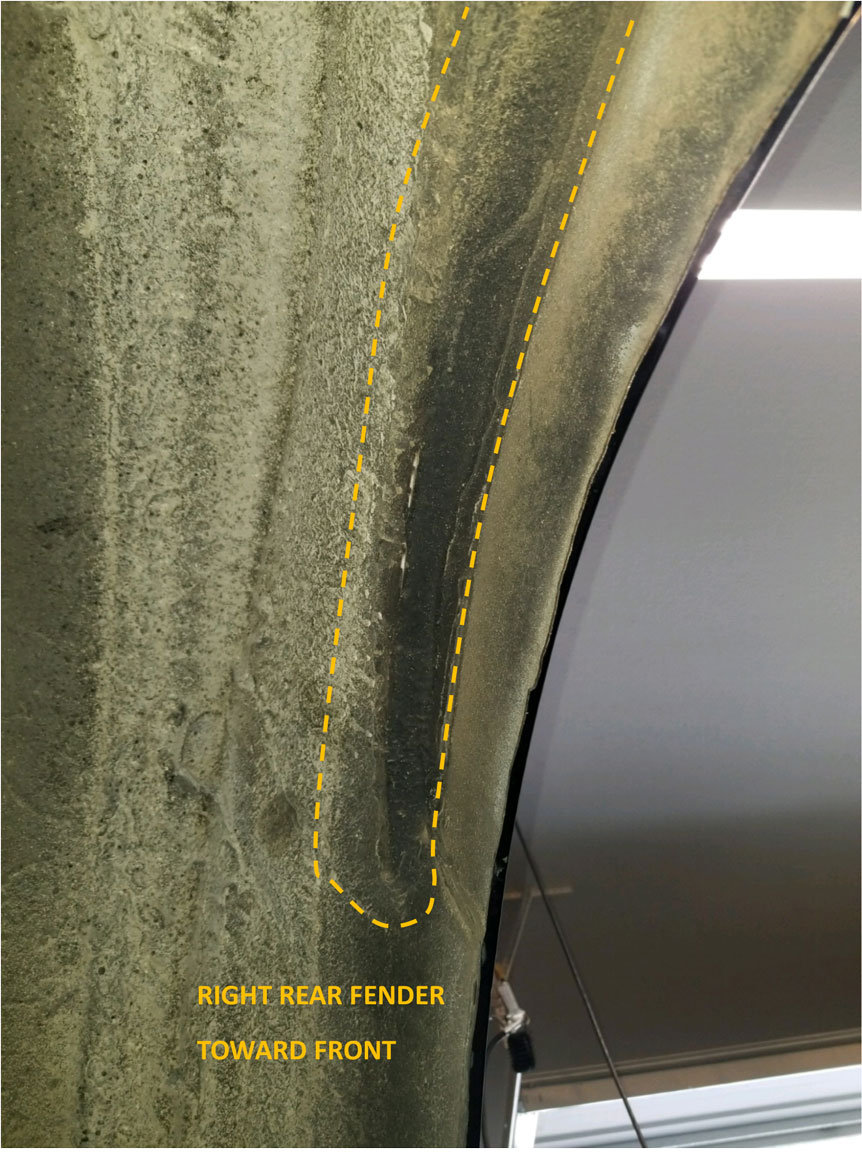
| Wider Rear Wheel/Tire FENDER CLEARANCE for your 240 |
This pic was the final result of my 242 after I completed the above inner fender trimming. I ended up with zero rubbing, even when bottoming out the suspension.  For more info on how I installed these wheels using custom adapter (Volvo to BMW bolt pattern), go to https://www.240turbo.com/index.html#bmw5x108. |

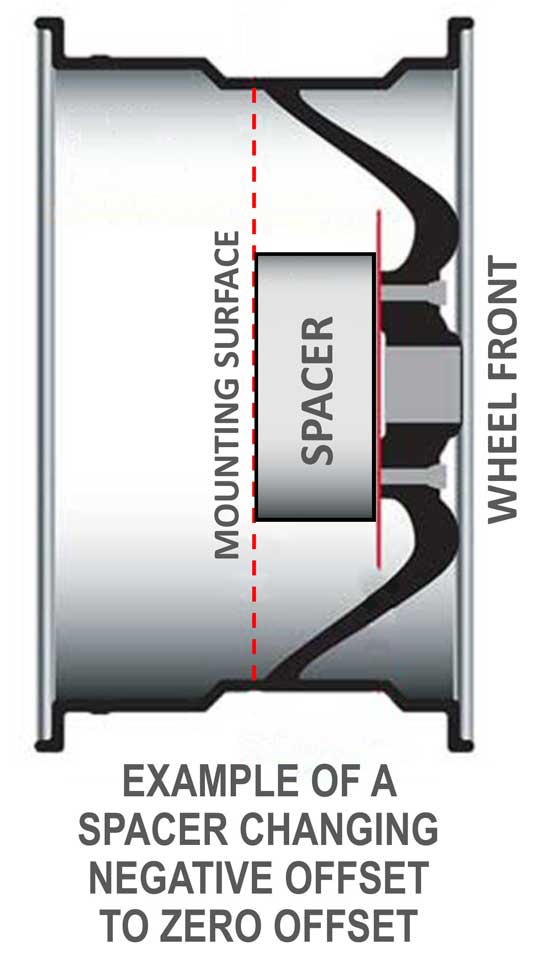
| Calculating Correct Wheel Offset for your 240 |
When I was shopping for wheels to replace the Eikers, I knew I would need to concentrate on something with more offset than the Eikers, since I would need the extra room to add an adapter behind each wheel. I eventually settled on wheels that were 7.5 inches wide with 35 mm POSITIVE offset.
The adapter maker I
chose was www.motorsport-tech.com/.
The minimum thickness they will make is 15 to 20 mm. I went with a 20 mm thick front adapter. Now draw yourself some
diagrams if it helps you visualize all
this.
Here's a good Turbobricks discussion thread with related info: turbobricks.com/corvette-sawblade-spacer-adapter-thickness-240.339645 Turbobricks Wheel Guide: turbobricks.com/factory-wheel-guide.72501
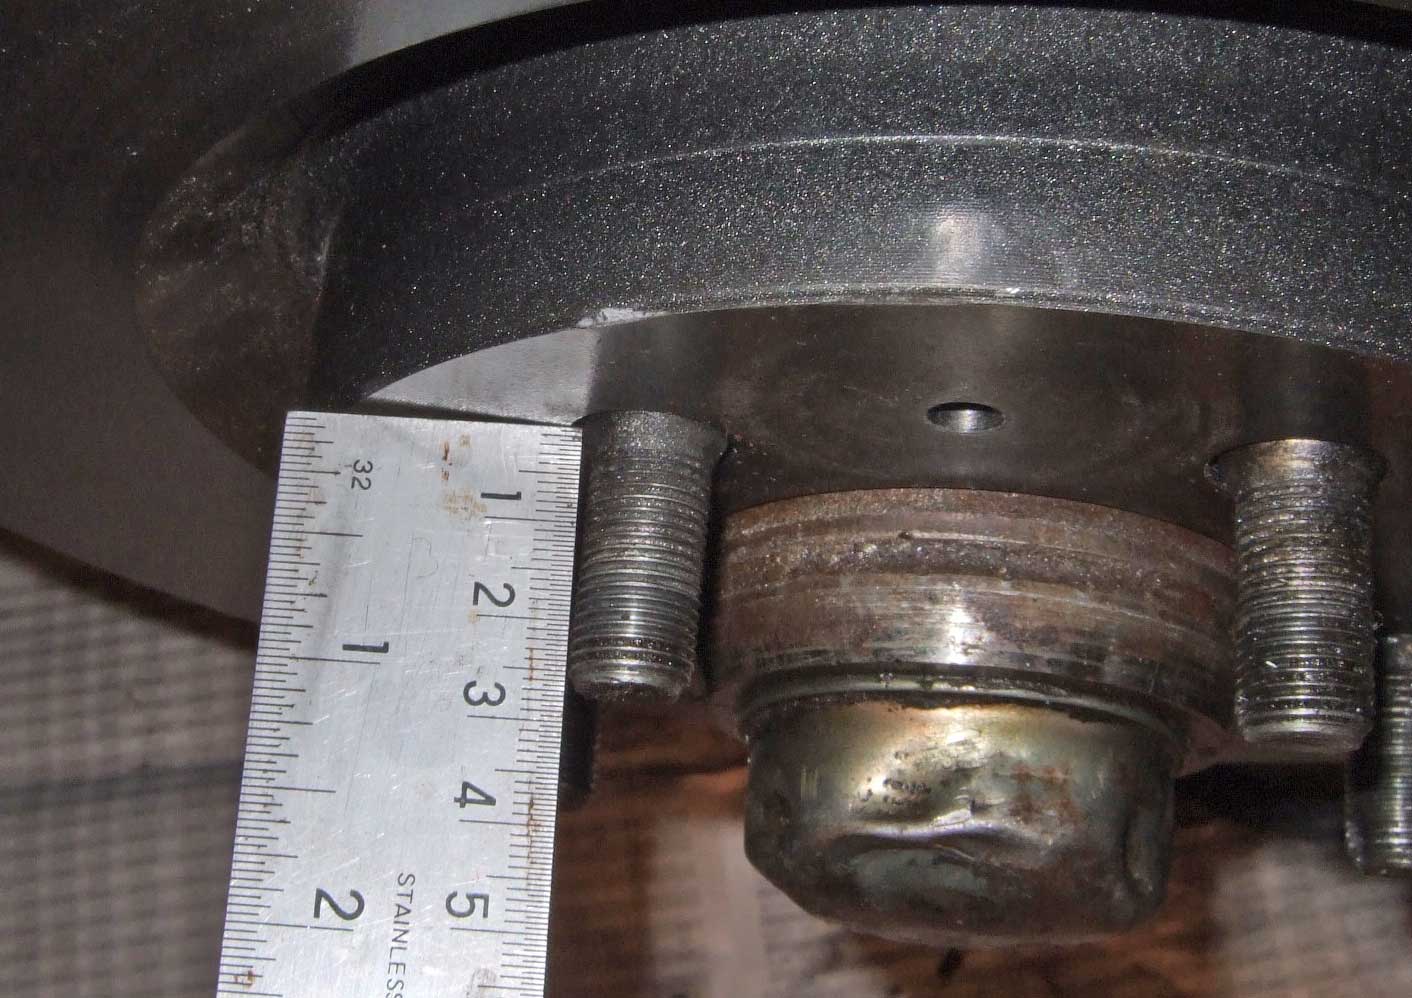
HUB-CENTRIC versus LUG-CENTRIC It's important to decide if you will be using a spacer or adapter that is either HUB-CENTRIC or LUG-CENTRIC. Hub-Centric means that the center raised lip that fits into the wheel center is present and will keep the wheel centered before you lighten the lugs. It means that the weight of the car is supported by the hub. Lug-Centric mean no center lip is present and the wheel must be centered using the lugs. And it means that the weight of the car is supported by the lugs. There are many generic spacers on line that are Lug-Centric. Here's a TB discussion for you: turbobricks.com/lug-centric-wheel-adapters.349054 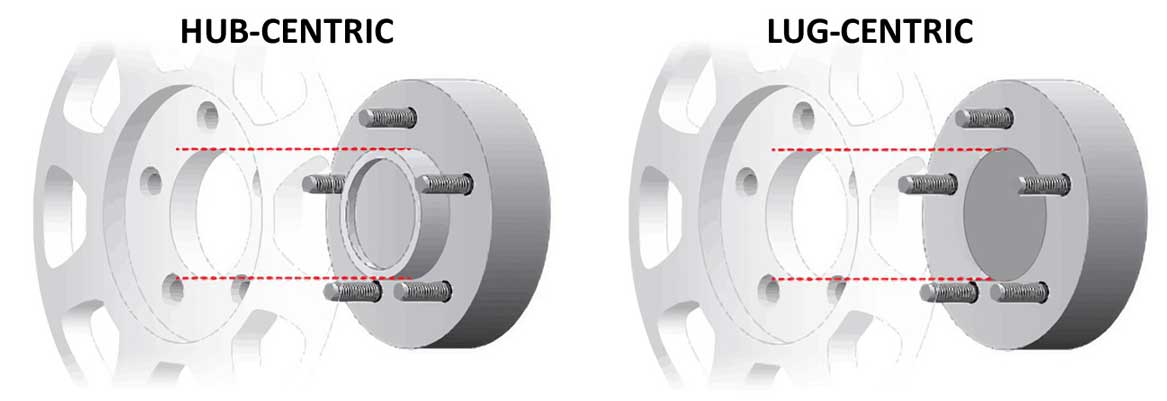 I recommend HUB-CENTRIC always. |

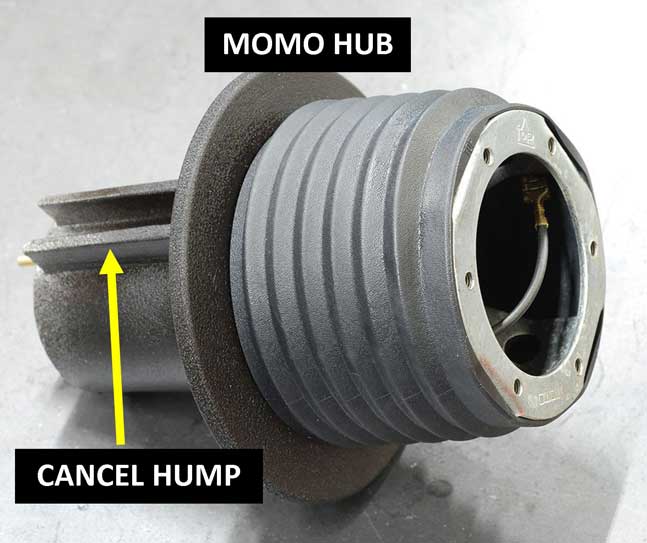
| Momo Steering Wheel Hub for the 240 |
You probably already know all this and luckily for you, that's NOT what this article is about.
|
| 240 V Belt Sizes |
I put this info together many years ago for my own 240 uses. I thought I would share it here. Here's a PDF printable version of the below table: davebarton.com/240V-Belts.pdf
|
| 1975-85 240 Headlight Switch Plug MELTING Problems |
|
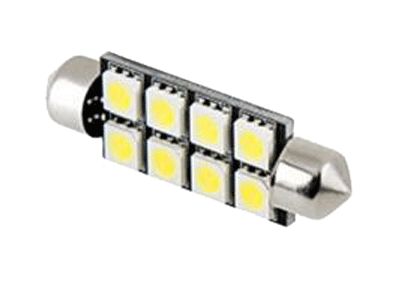
| Getting a Super Bright 240 Dome Light |
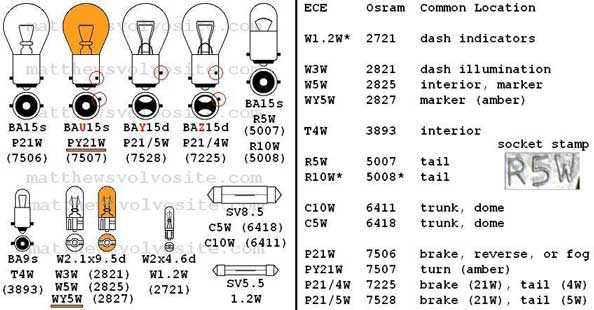
Other 240 interior and exterior bulb info in this Turbobricks thread: turbobricks.com/240-led-dash-light-qs.283706 iPd Bulb Reference: ipdusa.com/techtips/what-light-bulbs-fit-my-volvo Volvo has owner's manuals going back many years (bulb info is in "Specifications"): www.volvocars.com/owners-manuals |
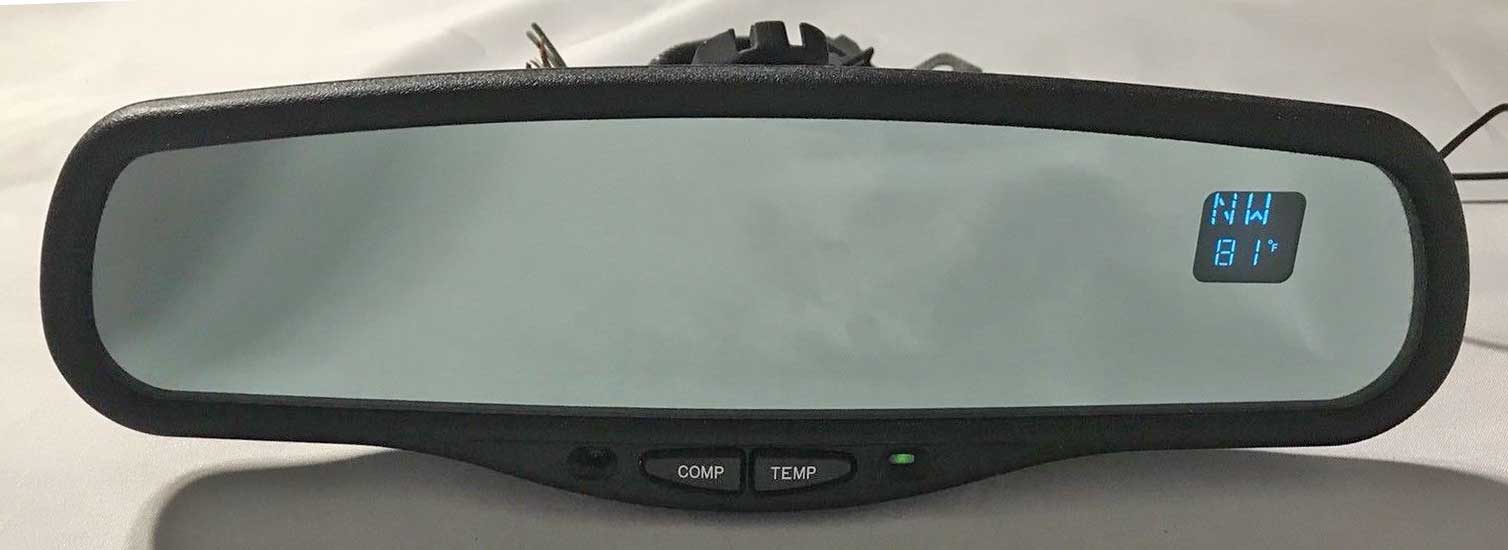
| Gentex Rear View Mirror Upgrade |
|
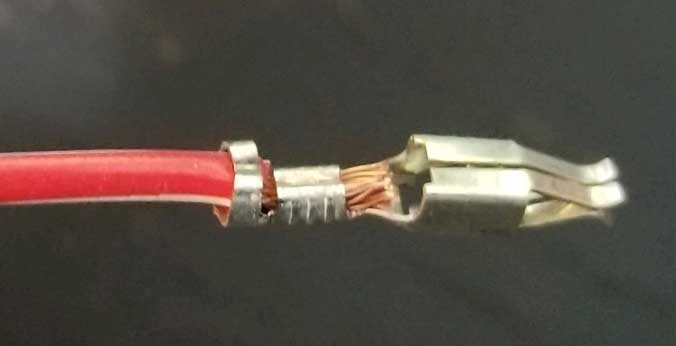
| Guide for Crimping Terminals |
I've put together a page with instructions
for crimping and assembling typical open barrel or
EFI crimp terminals and connector housings.
|
| Hydraulic Clutch Info Page for your 240 |
I have
a pretty heavy clutch in my 240. Back in 2011 I got
tired of stretching, adjusting, stretching and then
snapping clutch cables, so I installed a hydraulic
setup for the clutch. I recently updated the
master cylinder from the Volvo unit to an aftermarket
one and created a web page to help keep track of the
parts and information for others to see.

|
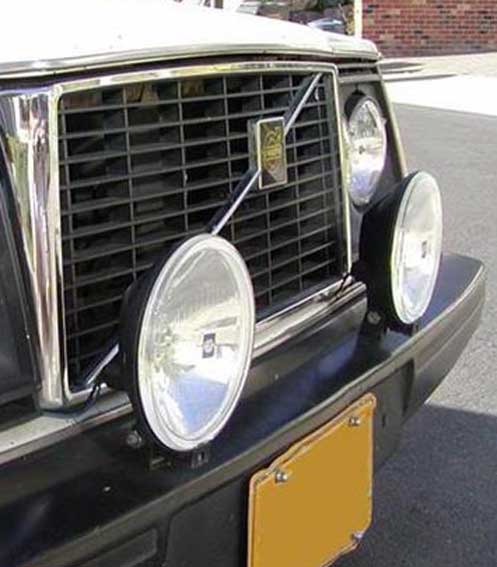
| Mounting Driving Lights on your 240 without Drilling your Bumper! |
|

| Making a Custom Cup Holder for your 240 |
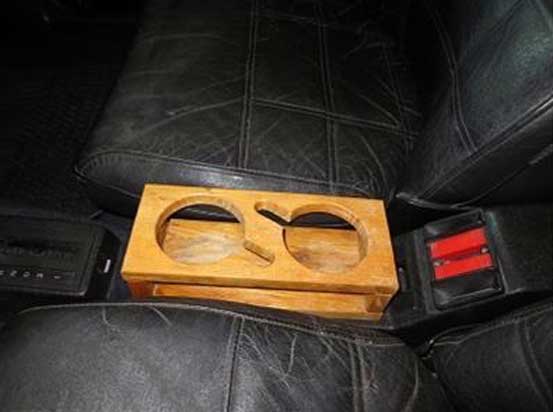
We all know our beloved 240s never came with cup holders. There have been a number of cup holder projects in the internet over the years. When I saw this one in the Turbobricks forum, I felt it really needed to be shown. The thoughtful design allows it to be securely anchored over the e-brake handle, using the e-brake handle button to help pin the front against the shifter hump. It's a nice design feature to keep in mind when you build (or adapt) such a thing for your car. See more photos and dimensions here: turbobricks.com/custom-wooden-cupholder.328054 And new for 2021, here's something new and ingenious for an early 240 (1975-1980). They say they are also working on something for later 240s.
|
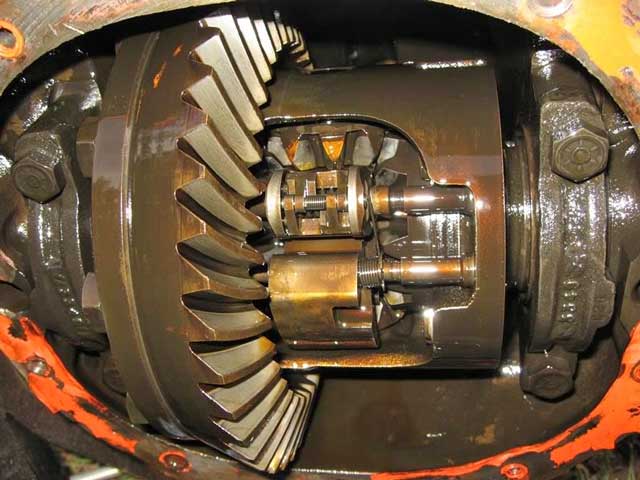
| Installing a G80 Locking Differential (from a 700/900) into your 240 |
|
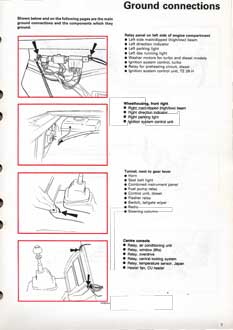
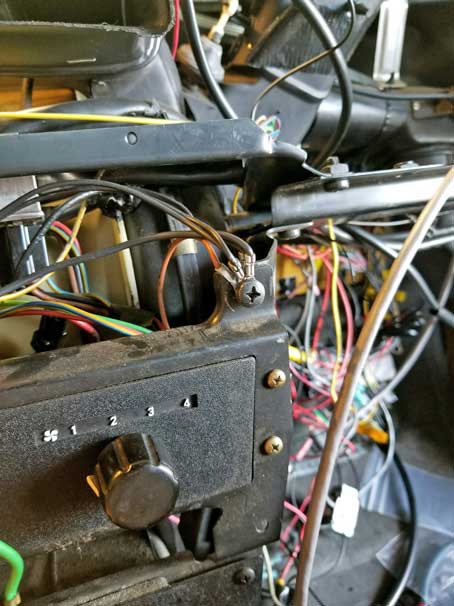
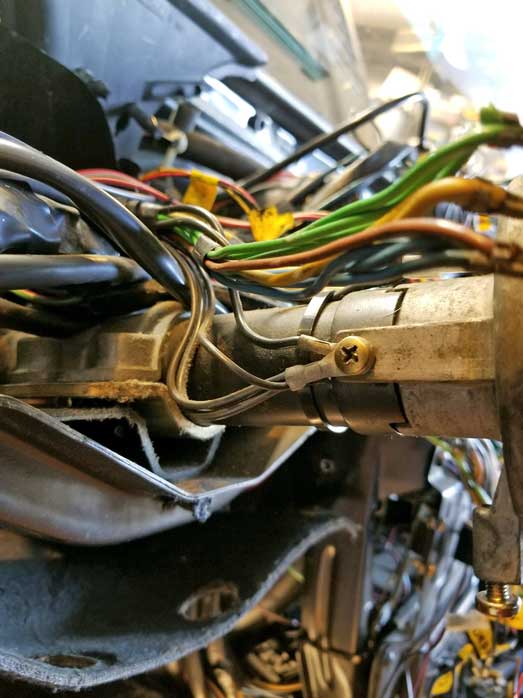
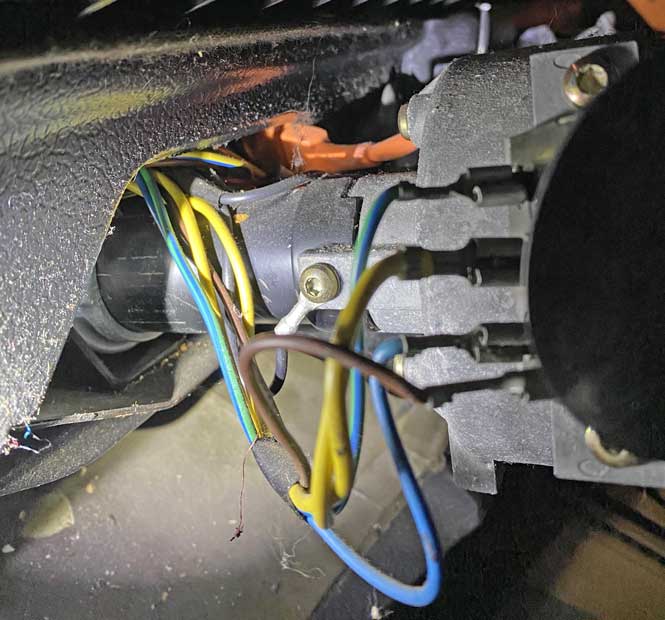
| Fixing Common Corroded Ground Points (and power connections) In Your 240 |
I hear about strange intermittent electrical
problems from frustrated 240 owners quite often. These
problems occur so often because of a few good reasons
. . . .
|


| Hardwiring your 240 Taillights |
|
| Lowering Your 240 |

|
| Installing a Later Windshield in an early Volvo 240 or 140 |
|
|

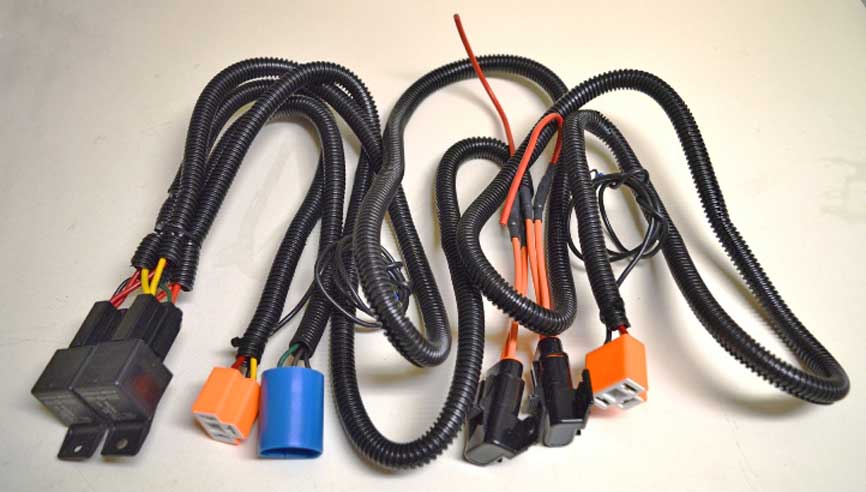
| Build a Badass HEADLIGHT RELAY HARNESS |
| This
is a good project for anyone with any older Volvo,
especially if you have or want to to upgrade to
brighter bulbs or headlights. Find this info in my Headlight Relay Page: 240turbo.com/headlightrelay.html#relayharness
|
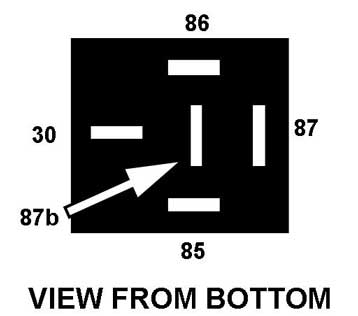
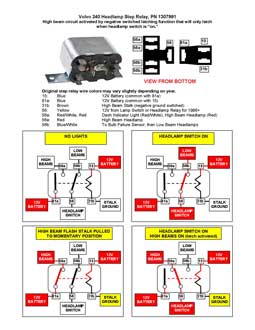
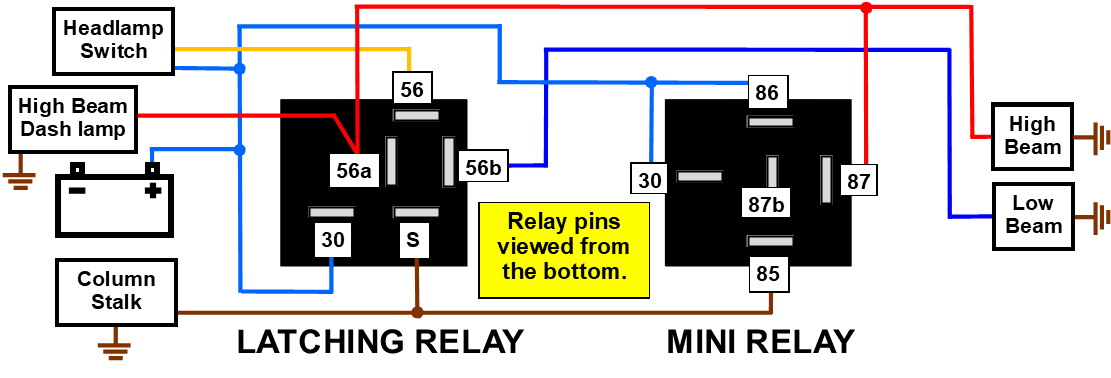
| Unlocking
the Mysteries of the 240 Headlight Step Relay And Test Procedures |
| This
relay is rather special in that it has a LATCHING
function. A latching function is where you can
click and release a momentary button or switch (such
as a high/low beam stalk) and the relay will LATCH
(or lock) in the ON or OFF position until the switch
or stalk is clicked again. For this Volvo relay, one
click latches it "ON" and another click latches it
"OFF." I have created the diagram PDF
for anyone who wants to better understand how these
relays work.
I have also added a test procedure on page 2 if you think you might have a broken one.
 |
| How to Substitute
Available Relays to ELIMINATE your Volvo 240 Headlight Step Relay |
|
| 240 Electric Speedometer Custom Re-Calibration |
|
|

| Understanding and Dealing with a Volvo Bulb Failure Sensor |

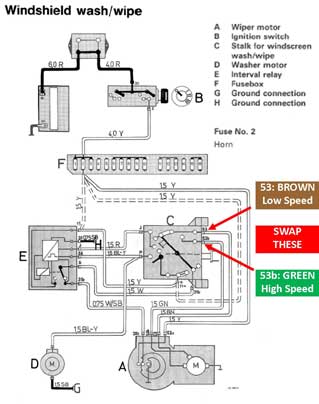
| Better and Faster Wipers |
|
|
| Understanding Relay Functions and Uses |
 I'm putting this here
because having an
understanding of simple relay functions can
help any DIY Volvo mechanic in so many places for your
car projects. Many of the suggestions in this 240
modification page rely on relays. Not too many
years ago my relay knowledge was limited to installing a
pair of fogs lights. The internet has helped a lot
in this area and most of you can now be really
successful with relays. I'm putting this here
because having an
understanding of simple relay functions can
help any DIY Volvo mechanic in so many places for your
car projects. Many of the suggestions in this 240
modification page rely on relays. Not too many
years ago my relay knowledge was limited to installing a
pair of fogs lights. The internet has helped a lot
in this area and most of you can now be really
successful with relays. This Relay Guide is not Volvo specific, but it's a great resource for expanding your general auto relay knowlege and offers some interesting diagrams. https://www.davebarton.com/pdf/RelayGuide.pdf (3.3mb PDF) Here are some other pages with more relay explanations and configurations: http://www.the12volt.com/relays/page5.asp http://www.12voltplanet.co.uk/relay-guide.html danielsternlighting.com/relays.html <<< And this is the best site I know for improving your auto lighting with added relays. If you know of any other useful resources that would be a good fit here, please email me. |
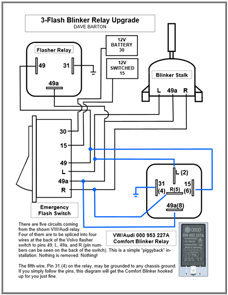
| 3-FLASH "Komfort Blinker" UPGRADE for your Volvo. |
|
| 240 M46 Overdrive Wire Harness Design, Construction, Mods |
|
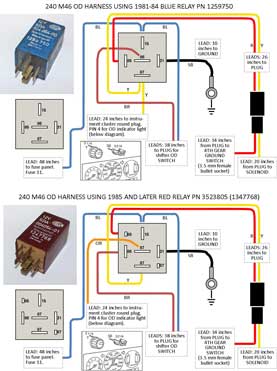
| Creating an M46 OD Relay Function using Ordinary Relays |
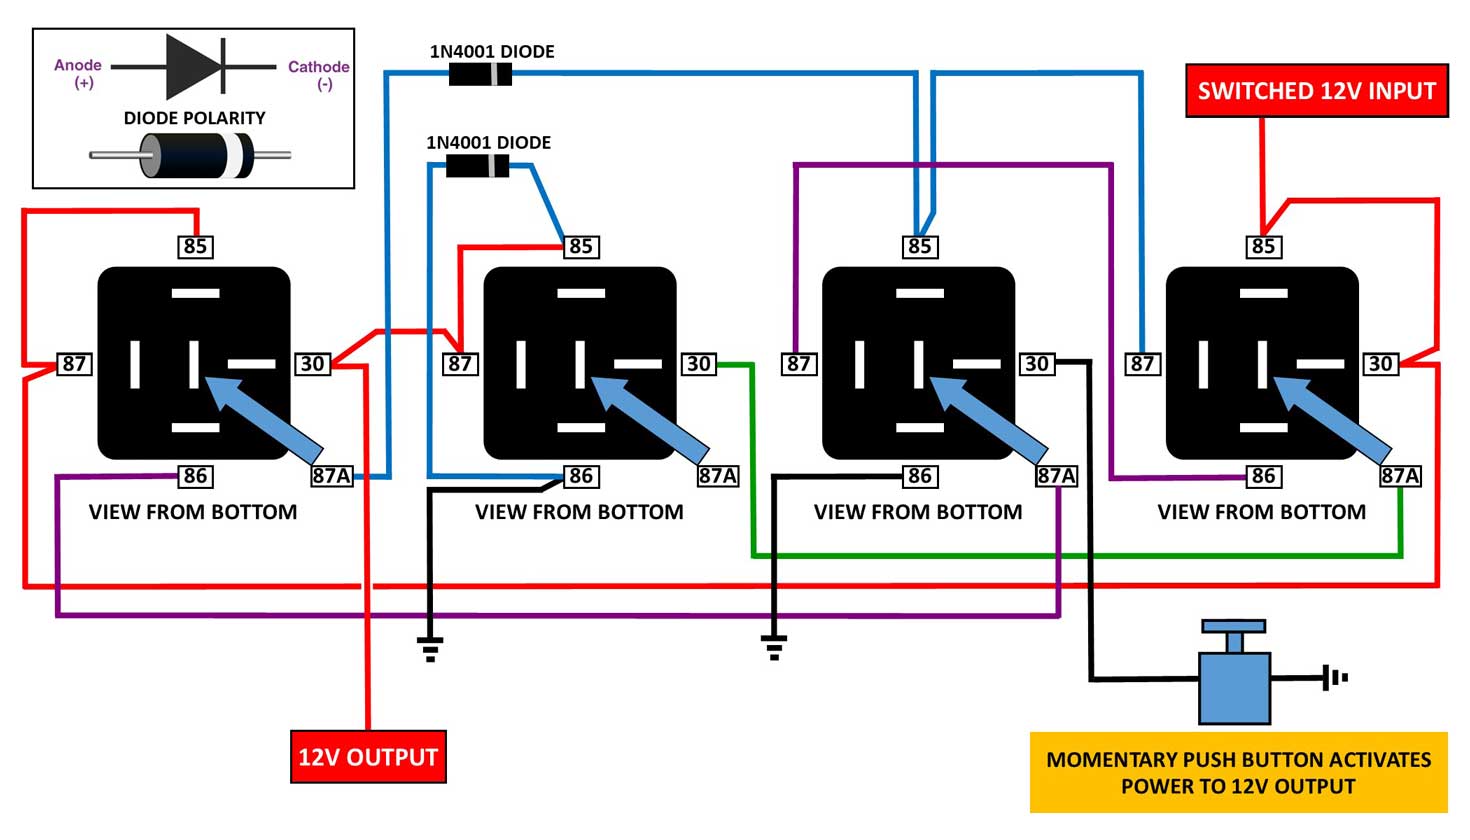
| A mod like this is not for everyone, but just in case this helps someone someday, here it is. An M46 overdrive relay might get hard to find or too expensive to replace. That has already happens with a lot of relays. If you need to create a circuit that replicates an M46 overdrive relay, you can use this below. This uses four standard SPDT (Single Pole Double Throw) relays and a couple diodes. A simple SPDT relay will have center pin with 87A. The momentary push button (which can be your shifter button) connects to ground and when pushed, this setup will ultimately activate power to the 12V output. That output can be connected to your OD solenoid. Then another momentary push will deactivate it. Turning off the power (shutting off the car) will deactivate it also and it will revert to default OFF.
|
| 240 Auto Transmission Overdrive Wire Harness Design and Construction |
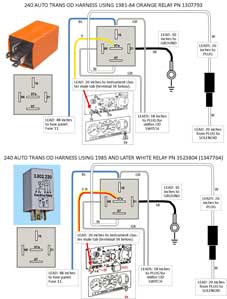 Since I made the above M46
diagrams I thought it would be good to illustrate how
the 240 auto trans ORANGE
and WHITE overdrive relays work too. There is
almost no difference in the relay circuits between the ORANGE and WHITE relays. They are
essentially interchangeable, EXCEPT that the OD
light on the dash seems to come on opposite of when it's
supposed to if the incorrect relay is installed. Since I made the above M46
diagrams I thought it would be good to illustrate how
the 240 auto trans ORANGE
and WHITE overdrive relays work too. There is
almost no difference in the relay circuits between the ORANGE and WHITE relays. They are
essentially interchangeable, EXCEPT that the OD
light on the dash seems to come on opposite of when it's
supposed to if the incorrect relay is installed. |
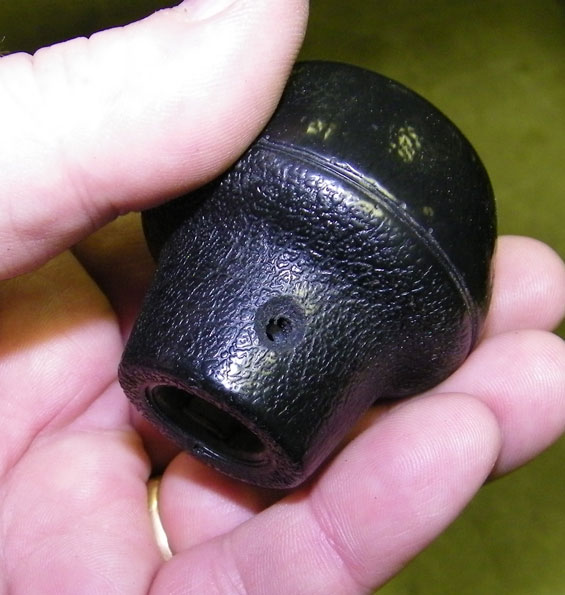
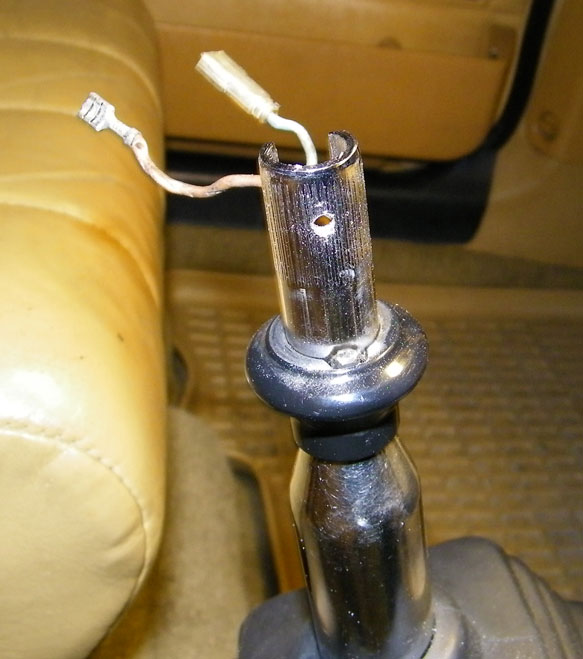
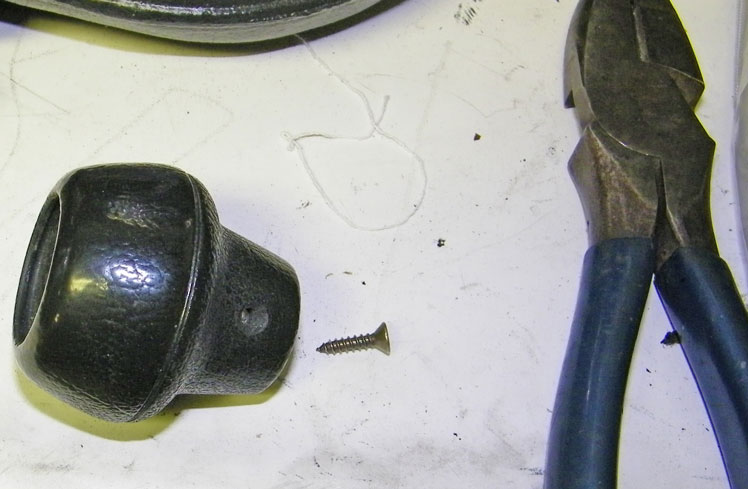
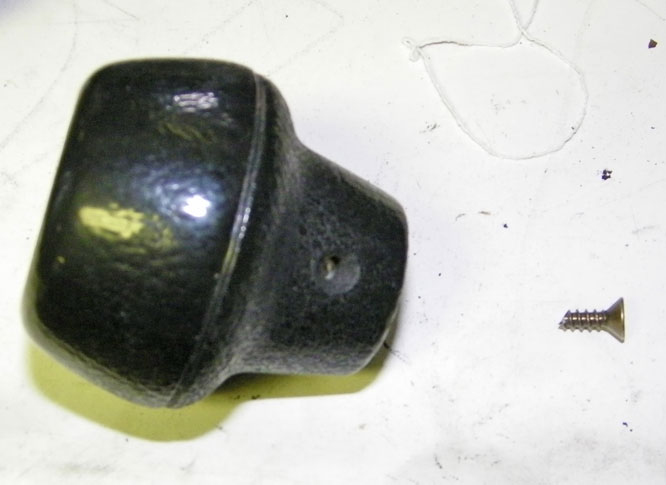
| Shifter Knob Fix (M46 or M47) Manual Transmission |
|

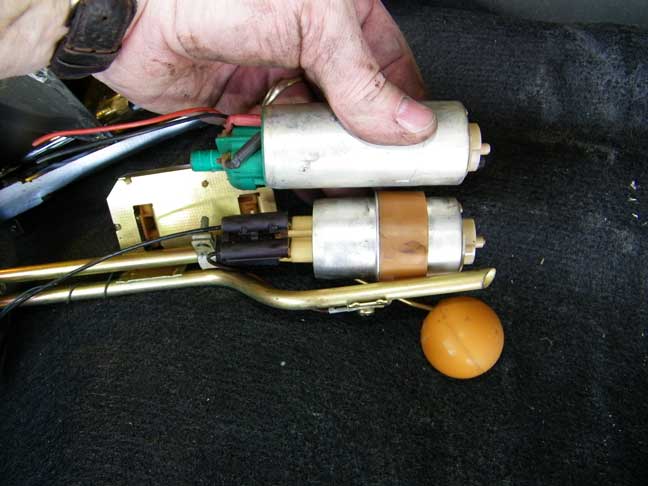
| Upgrade the In-Tank Fuel Pump in your 240 with a Larger 740 Turbo Pump |
The 740 Turbo pump I used for
this conversion, which was used in 1986 and later 700 and 900 Turbo models (and 960), is PN
3517845.
|
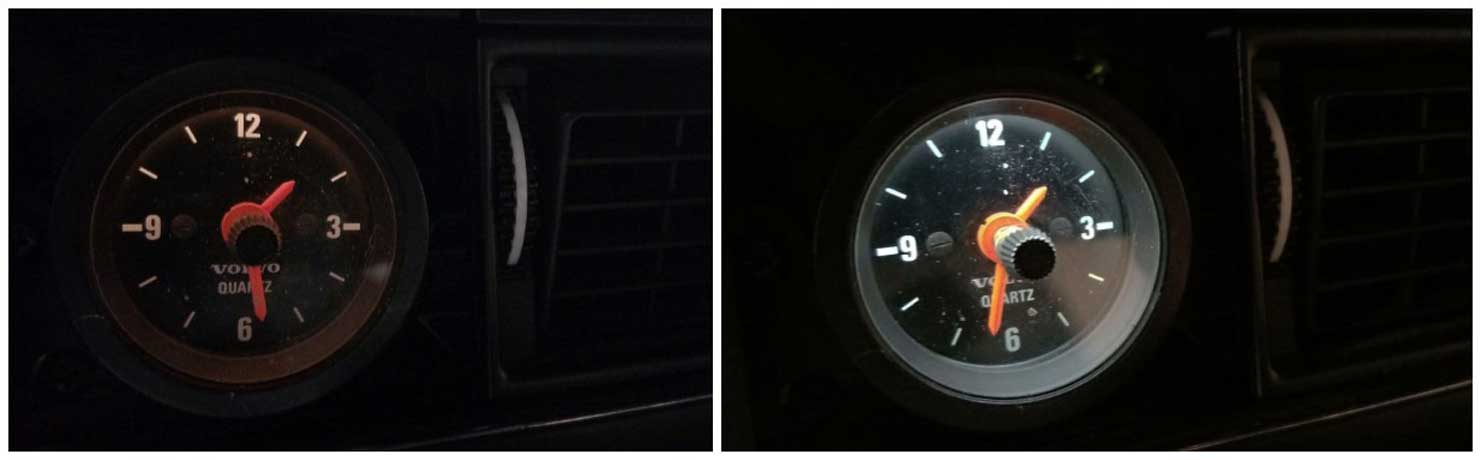
| Adding a Large Tachometer to your Volvo 240 in place of the Large Clock |
|

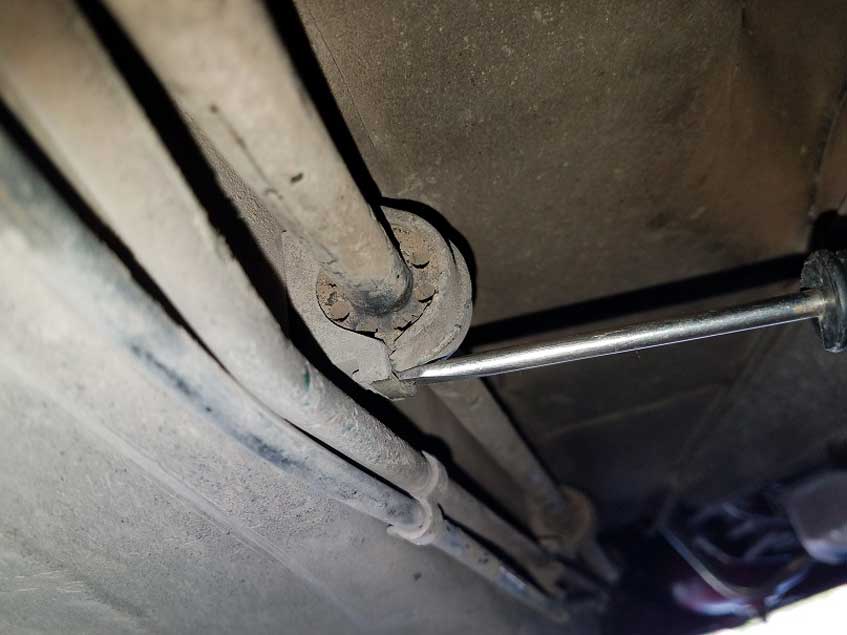
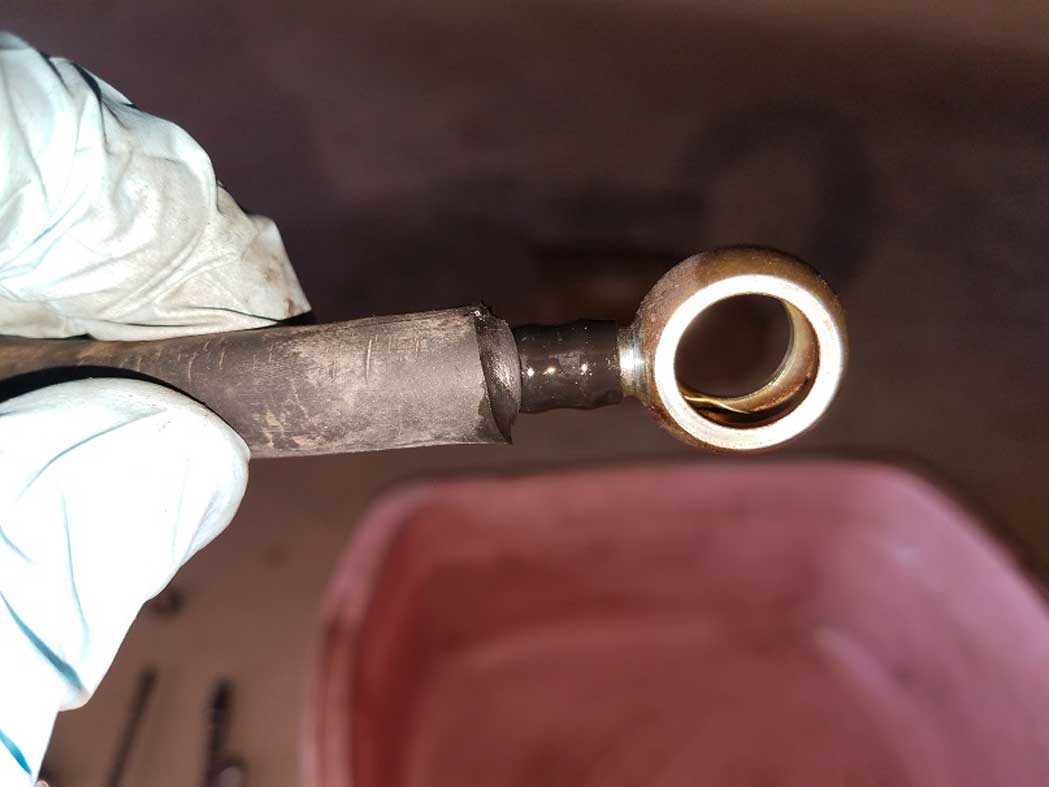
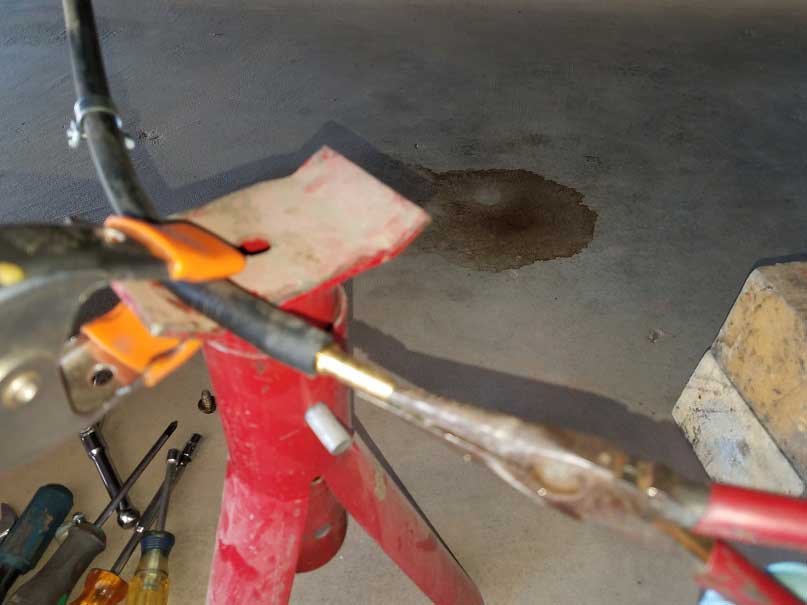
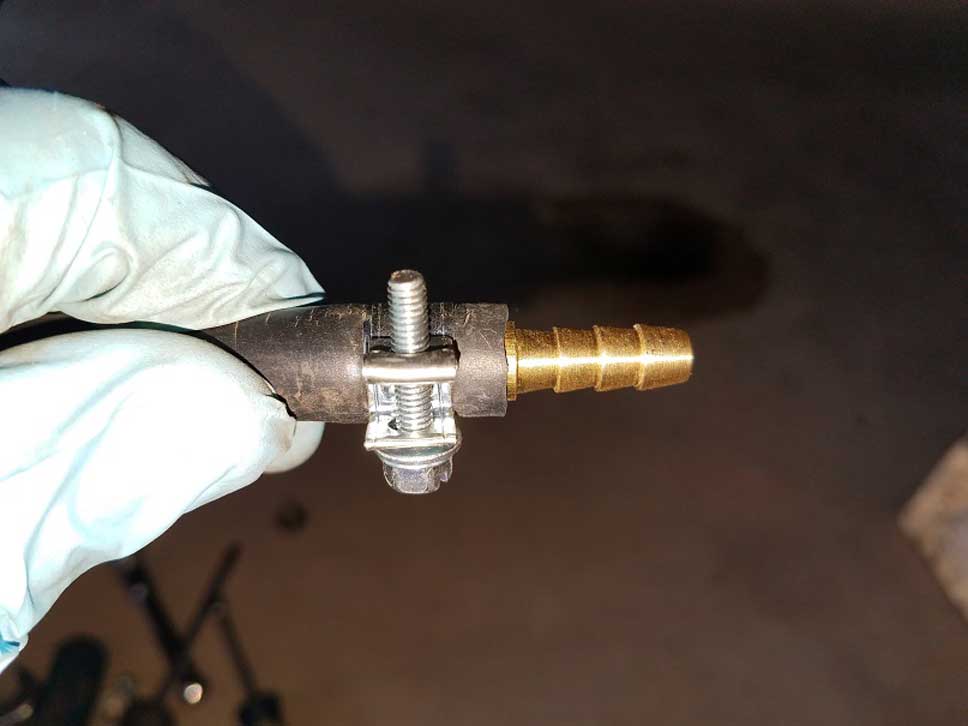
| Plastic Fuel Line Repairs |
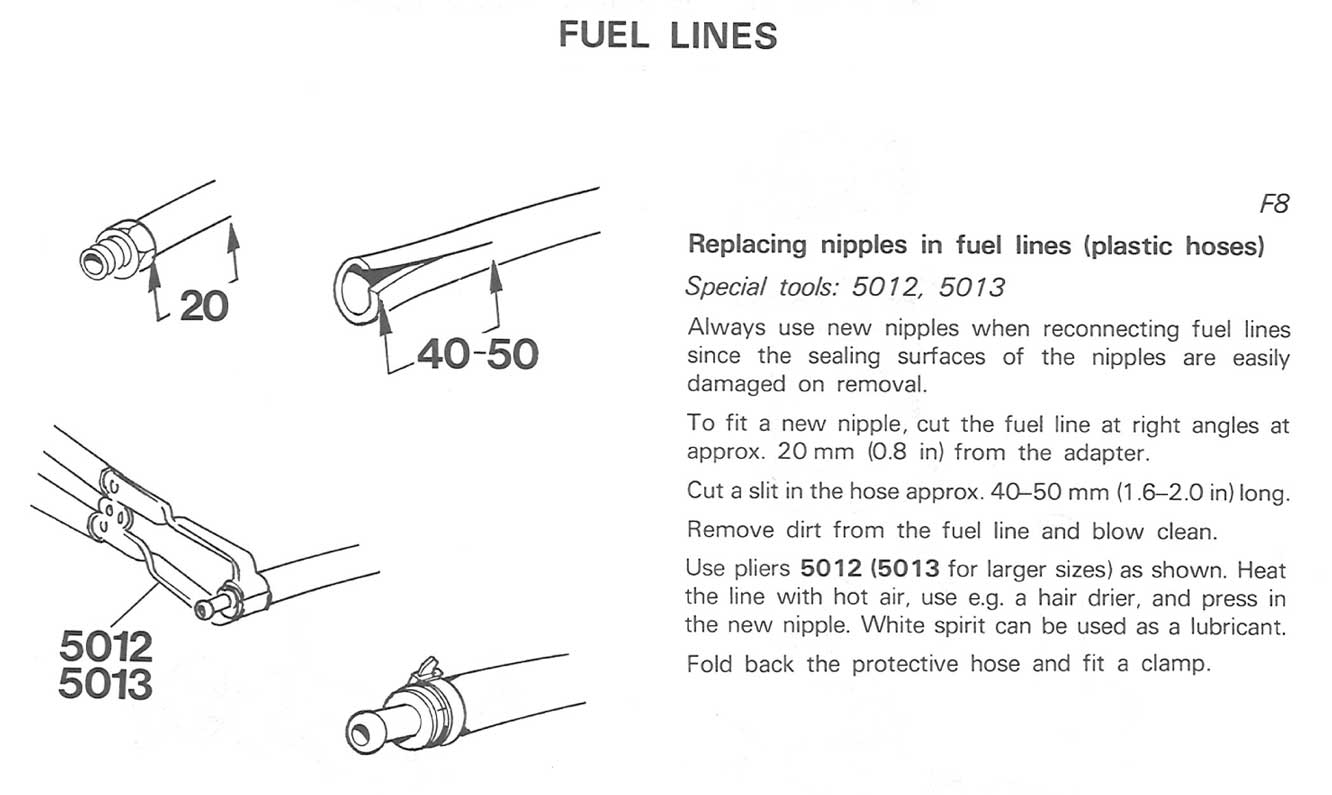 Volvo used semi-rigid plastic fuel lines on all 200, 700 and 900 series. Maybe more models, but I'll deal mainly with cars made in the 1980s and 1990s for this article below. Special thanks goes to Roger Brown of Pueblo, Colorado for the photos and details from his own fuel line repair. The photos below are of 740 fuel lines, but the principle is the same for 240s. You'll find that the plastic hoses used in these cars are fitted to fairly standard brass or steel barbed nipples. Volvo fitted them when the hose or nipple or both are heated to a point the plastic becomes more flexible. Removing these hoses from existing nipples can be difficult and you may find that cutting or slitting the hose at the barb is the best method. HERE ARE SOME VIDEOS THAT MAY HELP. https://www.youtube.com/watch?v=4xK0m4jvC84 https://www.youtube.com/watch?v=mT8Sne0q_2g https://www.youtube.com/watch?v=s4OknTBOoNM If you need a source for METRIC plastic fuel line hose, Belmetric sells it by the foot. belmetric.com/cohline-series-3100-polyamide-hard-plastic-hose
|


| Adding a Small 52 mm VDO/Volvo Tachometer to your 240 |

| Fixing Bad 240 Driver Door Lock or Switch Wires |
| I
have seen a fair number of emails like this one: "I own a 1993 Volvo 240 Sedan. It has about 100,000 on it and runs beautifully. The only problem is that the central locking system seems to be malfunctioning. It makes a fast clicking sound when driving and sometimes goes up and down when one tries to unlock the other doors from the drivers side. In the past two days the battery died due to something being left on. I pulled the #8 fuse (courtesy lights, clock, trunk light, glove box light, central lock system, power antenna, radio) and today the battery was fine." This is an extremely common problem that literally affects ALL YEAR 240s equipped with CENTRAL DOOR LOCKING. How do I know this problem is common in all year 240s? Because when I discovered this years ago i spent time at junkyards pulling off door panels on a lot of 240s up to the 1993 model year. They are all the same. All had BAD WIRES!  
The problem is old, flaking wire insulation inside the
driver door. Specifically, the wires going to the key lock switch ("F"
in the diagram shown at left) and also the door lock plunger switch
("A" in the diagram shown at left). It should be
pretty obvious once you pull off your door panel and
look closely at these wires. The insulation on these
wires will crumble and fall off, allowing the wires to
short. This causes the rapid lock-unlock to occur
randomly. And when the car is parked, the shorted wires
may allow the locks be stuck in UP or DOWN mode, which can drain your
battery in a few hours. The solution is
to cover the bad wires with heat-shrink tubing, liquid
electrical tape, etc., or cut them out and crimp or solder in new
wires. You will probably only have to do this to
about 8 inches of wires, but keep an eye out for
more than that.
|
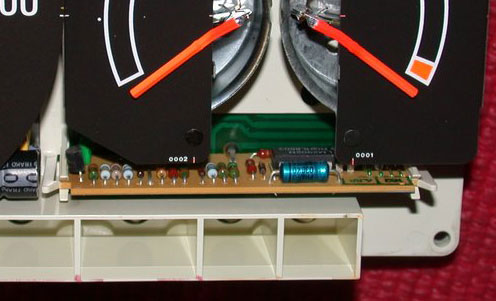
| Dealing with the Temperature Compensation Board in your 1986-93 240 |
|
|
|
||||
| davebarton.com |
prancingmoose.com |
240turbo.com |
Special Emblems |
|
| Prancing
Moose Stickers |
Volvo
Stickers |
Body/Chassis/Engine
Labels |
240 MODS and FIXES Page | |
| Other Car Brand
Stickers |
Steering
Wheel Labels |
Center Cap Labels/Overlays |
Cool Volvo
Products |
|
| Grill Labels/Overlays |
Volvo Wire
Harnesses |
Conversion Harnesses |
Harness
Parts/Connectors |
|
| Volvo Relays |
Coil Repair
Harnesses |
240 Window
Scrapers |
740/940
Window Scrapers |
|
| Adjustable Voltage
Regulators |
Horn Buttons |
240 Odometer
Repair |
740 Odometer
Repair |
|
| Volvo Gauge
Faces |
740
Turbo/Boost Faces |
240 Black Door Vinyl |
850 Odometer
Repair |
|
| ALTERNATOR Page |
240 Power Mirrors - Switches |
240 Oil Cooler Page |
240 Fuse Panel Page |
|
| Group A
Racing 242 Turbo Page |
240 Hydraulic Clutch | Fuel Pump RELAY Page |
240 Headlight RELAY Page |
|
| Used Parts & Extra Stuff for sale |
CRIMPING Page |
240 Ignition Page |
240 Headlight Page |
|
| 240 Gauge Electrical Diagrams | 240 REAR END Page | Yoshifab Catch Can Install | 240 TAILLIGHT Page | |
| Side Marker
Lights Page |
Gentex Mirror Upgrade | Yoshifab Drain Tube Install | Modified 240 Favorites | |
| SoCal Salvage Yards | Unleaded Racing Fuel | B26FT Stroker | Dave's 245 Spec Page | |
| 240 SUSPENSION Page | 240 Lowering Page |
240 Windshield Page |
240 WIPER Page | |
| 240 BRAKES Page |
240 Dash Top Gauge Pod | Cadillac 4-Note Horn Install | 240 DYNAMAT Installation | |
| 4 Speed Fan
Controller |
Electric Cooling Fan
Page |
BRUSHLESS Cooling Fan Page |
Tropical Fan
Clutches |
|
| 240 AC Page | "KOMFORT BLINKER" Upgrade | T5 Trans Conversion Page | 240 Engine Mount Page | |
| 240 VIN Page | Stepper Idle Valve Page |
Vacuum Diagrams | 240 HOOD Page | |
| 240 Exhaust Page | 242 Power Vent Window Project |
EFI Volvo Pin Function Diagrams |
Favorite Links | |
| R-Sport
Apparel |
Prancing
Moose Apparel |
Volvo Meet Photo Albums | Texas Volvo Meets and Events | |
| Ordering Instructions | Policies | PAYMENTS Page |
Mojave Road Trail Map Page |
|
| Returns | Shipping | Shopping Cart Troubleshooting | Contact Us |
|