This page illustrates some cool brake upgrades for the Volvo 240.
Hopefully it will helps you if you
decide to do some similar mods.
If you have done something like this for your 240, I would
really like to hear about it and see some photos.
Contact me if you have comments or can help improve this page: CONTACT
Before putting Big Brakes on my 240:
I owned my '84 245 Turbo for 6 years before doing the big R-caliper
upgrade below. I had plenty of experience with stock 240 brakes
and trying different pads and lots of experience trying different things to improve
them. Stock 240 brakes are OK for most "normal" driving. In
my opinion they are really not good enough for
track or high-performance driving.
I was a customer and a fan of IPD going back to the 1980s. I tried some
of the pads they were offering over the years. I tried the PBR Deluxe. I discovered they had a badtendency to fade after a few hard stops. The fading wasn't subtle... it was really bad. The braking came back once things cooled down. PBR Deluxe pads
are really good when cold... lots of bite, and very little brake
dust. Just don't expect much out of them after when hot hard
stops are needed. They'll fade fast.
Then I tried PBR Metal Masters. These pads are designed for much heavier use. I never got them to fade, but thecold stopping was good at all. One time while on the freeway during a long road-trip, where I hadn't touched the brakes in a while and they were COLD, all the traffic in front of me came to really quick sudden STOP.
I hit the brakes and found I had very little braking power. I
mashed the brake pedal using every bit of strength I had and I baaaaaarely stopped just a few inches from the car in front. The PBR Metal Masters went in the TRASH as soon as I got home!
MINTEX BECAME MY FAVORITE
Many years ago a fellow 240 owner, Clay Dewan, suggested Mintex (red box) pads in the photo below.
I was a skeptic, because they were pretty inexpensive and I didn't know the
brand. I tried a set and absolutely fell in love with them.
They had GREAT COLD and WET stopping. They had excellent braking power
when really hot too. I used Mintex pads for years and also
during a number of track days. I even boiled my brake fluid at the
track once and then later changed to higher-temp DOT 4 brake fluid. Even
so, the Mintex pads never failed me. I highly recommend them for
your 240 if you can find them.
These used to be widely available in the U.S.A, but now It seems these
pads are either no longer available or harder to find (at least for a 240).
Nowadays
the internet can find almost anything. Here's a list of performance 240
brake pads, but I cannot offer any personal recommendations. carid.com/1984-240-performance-brake-pads
BNE Dynamics (Kaplhenke Racing) now offers HAWK performance pads for Volvo 240. I have not tried these for 240 brakes, but they're excellent for others. https://www.bneshop.com/collections/240
Volvo 240 FRONT 4-piston CALIPERS (for ventilated rotors) Front caliper: 38 mm pistons (four pistons), 1976-1993 using Girling versions.
Left caliper PN 1273430, 1330306, for VENTILATED rotor. Right caliper PN 1273431, 1330307, for VENTILATED rotor.
FRONT (late 240): 24 mm (0.945 inch) thick VENTILATED rotor. 263 mm (10.35 inches) diameter. PN 1228153, 1359131, 270739-6.
Early Volvo 240 4-piston FRONT Calipers (for solid or non-ventilated rotors) Be
aware of some early version 240 calipers made for thinner SOLID,
non-ventilated front rotors.
The last year these appeared was on some 1983 240 DL or other lesser
appointed models. Different calipers were used for these solid rotos and
they are NOT interchangeable. Left caliper PN 1221957, 1330303, for NON-VENTILATED rotor. Right caliperPN 1221958, 1330304, for NON-VENTILATED rotor. Brake line ports are all M10 x 1.0 bubble flare (European).
FRONT (early 240):14.3 mm (0.563 inch) thick NON-VENTILATED rotor. 263 mm (10.35 inch) diameter. PN 1228942, 270737-0.
Volvo 240 2-piston REAR Calipers: Rear rotors were all solid or non-ventilated for all years.
Rear caliper: 38 mm pistons (two pistons). Manufactured by ATE or GIRLING.
Left caliper GIRLING PN 1229547, 1330308.
Right caliper GIRLING PN 1229548, 1330309.
Left caliper ATE PN 1229551.
Right caliper ATE PN 1229552. Brake line ports are all M10 x 1.0 bubble flare (European).
ATE versus GIRLING REAR Caliper Differences ATE brake calipers will always have the "CROSS style" metal spring retainer. GIRLING calipers will always have the thin METAL WIRE spring clips. Volvo 240 REAR Brake Rotors (all years): REAR: 9.6 mm (0.378 inch) thick rotor. 281 mm (11.06 inches) diameter. Non-ventilated PN 1205782, 270736-2.
Volvo 240 Master Cylinder Info: Dual circuit braking systems (AKA: dual or tandem master
cylinder): A tandem MC like this has
been required on all cars in the U.S. since 1967.
In 1966 Volvo introduced their new
triangle-split dual circuit brake system (diagram shown HERE).
Beginning in
1975, Volvo
introduced the new STEPPED BORE master cylinder (shown above). More info on STEPPED BORE master cylinders Click HERE.
Above MC: Non-ABS type. This MC has a STEPPED bore: 22.3
mm (0.878 inch) primary bore (REAR), 15.75 mm (0.62 inch) secondary bore (FRONT). FRONT and REAR here refers to the master cylinder only. It does not refer to front or rear brakes. The PRIMARY BORE at the rear is designated for the FRONT brake circuit. Beginning in 1989: ABS typemaster cylinder: This has also a STEPPED bore: 22.3
mm primary bore (REAR), 19 mm secondary bore (FRONT). Brake line ports for all Volvo 240 brake systems are M10 x 1.0 bubble flare (European).More detail HERE. Volvo Master Cylinder Part Numbers:
240 non-ABS Brake line ports on left side PN 8111005-8.
240 non-ABS Brake line ports on right side PN 8111006-6. 240 with ABS PN 3530972, 8251131, 8602015. Volvo Vacuum Brake Servo Boosters: This section is below the Master Cylinder section. Click HERE for BRAKE BOOSTERS.
Volvo 240 Brake Pedal Ratio: About 4.3:1 The brake pedal ratio of 4.3 to 1 represents the leverage increase
your brake pedal provides between the foot pad and the master cylinder
pushrod. This
measurement above was taken while my pedal box was in the car and I had to
contort myself and dislocate all my limbs to get it. So it you have a
brake pedal OUT OF THE CAR and can verify these measurements, please let
me know.
As far as I'm aware, all 240s were equipped with power brakes.
If a factory manual brake 240 ever existed, it would likely have been
designed with a different pedal ratio, possibly as high as 6 to 1
or 7 to 1. The brake pedal ratio can be altered or modified if it's required. Near the bottom of this page you can read about Dick Princes racing 240. He created an altered pedal ratio for using racing brakes (with dual master cylinders with a balance bar).
Volvo 240 Brake Line Routing and Bleeding Sequence Triangle-Split Dual Circuit Brake System (non-ABS) 1975-1989 (for ABS brakes CLICK HERE).
PLEASE . . . DON'T USE YOUR BRAKE PEDAL FOR BLEEDING YOUR BRAKES. The above image is from Bleeding Brakes for Dummies and it suggests it's OK to use your brake pedal to push brake fluid through your lines when bleeding your brakes. Advice based on MY experience: 1. Do NOT use your brake pedal to bleed your brakes unless you have absolutely no other choice (road-side emergencies, etc.).
2. If you must use your pedal, do not push it in any further than it would normally be pushed during normal braking.
This is because the cylinder seal can become damaged when pushed into a
position not normally used because of corrosion that forms on the cylinder wall.
3. The 240 has a Triangle-Split Dual Circuit Brake System, which has a lot of lines to get air out of.
Often when using the pedal to push fluid, you cannot move fluid fast enough to evacuate all of the air that may be trapped in higher bends. This can result in frustrating and time-consuming repeated bleeds, over and over until getting all the air out. GET ONE OF THESE When it comes time to bleeding brake or
hydraulic clutch lines, I highly recommend the Motive Power Bleeder. I've used one for 20 years and it allows thorough DIY bleeding with no need for a
helper.
VIDEOS ON USING THIS ITEM: https://www.youtube.com/watch?v=JWJIYeourjY
MORE Power Bleeder SEARCH QUERIES: https://www.youtube.com/results?search_query=motive+power+bleeder ABS BRAKES The Volvo Anti-Lock Braking System (ABS), beginning in 1989 for a 240, was a
three-channel system using a Bosch electronic control unit and hydraulic modulator to monitor and compare
signals from three wheel speed sensors (one on each front wheel hub and one in the rear differential). Note also that with ABS there is only ONE brake line for each front caliper, instead of two lines on the earlier cars. It should also be noted that the distribution manifold seen below the master cylinder is also a REDUCTION VALVE
for the single brake line going to the rear of the car. Earlier non-ABS
cars have TWO lines going to the rear, and those go through reduction
valves before reaching the rear calipers. This ABS system will not have
reduction valves in the rear of the car.
ABS BRAKE LINE BLEEDING.
Details about STEPPED BORE MASTER CYLINDERS
All 240's came with stepped bore master cylinders.
A stepped bore means the REAR (primary) bore has a larger piston than the FRONT (secondary) bore.
When using the factory Volvo triangle-split braking system, brake line
pressures reportedly remain identical from either outlet port. "FRONT" and "REAR" on the MC refers to the master cylinder bore only. It does not refer to front or rear brakes. The PRIMARY BORE is the rear bore on the MC and designated for the FRONT brakes.
The SECONDARY BORE is the front bore on the MC and designated for the REAR brakes. Non-ABS Volvo 240 REAR bore: 22.3 mm Non-ABS Volvo 240 FRONT bore: 15.75 mm ABS Volvo 240 FRONT bore: 19 mm ABS Volvo 240 REAR bore: 22.3 mm. Normal Bore (non-Volvo) versus Volvo Stepped Bore An explanation from Volvo:
By Ante Larsson; Lars Larsson, AB Volvo, 1975. STEPPED BORE MASTER CYLINDER -- A WAY OF IMPROVING DUAL BRAKE SYSTEMS
Dual brake systems are required in motor vehicles in the United States.
These systems increase the safety of motor vehicles by overcoming the
loss of braking effect which occurs when a brake pipe or hose in a
single-circuit system breaks. However, a disadvantage of the dual system
is the extra pedal movement and increased pedal force which are
required when one circuit has broken down. Since the maximum
deceleration which can be obtained is dependent on the largest pedal
force that the driver can produce, or the maximum friction force which
can be exerted at the braked wheels, a deterioration in deceleration
normally occurs when one circuit breaks down. A dual brake system which
includes a tandem master cylinder was introduced on the Volvo 144 in
1966. This system still caused rather large pedal stroke losses when one
circuit broke down, resulting in a feeling of unresiliency in the
pedal. A new type of master cylinder was introduced on the Volvo 244
model for 1975. The function of this new cylinder is based on the use of
two pistons, loosely connected with one another, and with different
diameters, in one cylinder. When the brakes are applied with an intact
system, the pressures in both circuits are the same. The pressure
equalization necessary to obtain the same pressure in both circuits is
achieved in the stepped bore master cylinder with a secondary piston,
which floats within certain limits. The stepped bore master cylinder
gives high brake fluid pressure with a moderate pedal force with one
circuit out of function. It is probably most suitable when used with
disc brake systems. With drum brakes, a good automatic adjusting device is needed.
From Rept. No. SAE-750385 ; 1975 ; 8p
Presented at the the Automotive Engineering Congress and Exposition, Detroit, Mich., 24-28 Feb 1975.
Pretty good video on disassembling a Volvo 240 front caliper. This person is discussing a modification of the caliper to change from dual circuit to single circuit front brakes. https://www.youtube.com/watch?v=HHEqs4mdXE8
.
240 BRAKE BOOSTERS
The Volvo 240 came with a couple different options for Vacuum Brake Servo Boosters.
10 inch SINGLE diaphragm: GIRLINGsingle diaphragm booster, found in black or yellow chromate, PN 1229928, 1272159, 3516654. Assist Ratio: 3.5:1 (source: Volvo Greenbook). 10 inchBENDIX DBA single diaphragm, usually in galvanized gray, PN 1272159. Assist Ratio: 3.5:1 (source: Volvo Greenbook). Note: The finishes or colors noted above have been found in Volvo
literature, but this info has been found to NOT always be accurate.
8 inchBENDIX DBAdual or "tandem" diaphragm, PN 1229336 (unpainted). Assist Ratio: 4:1 (source: Volvo Greenbook). 8 inch GIRLING dual or "tandem" diaphragm, black, PN 1229493. Assist Ratio: 4:1 (source: Volvo Greenbook). Note: The finishes or colors noted above have been found in Volvo
literature, but this info has been found to NOT always be accurate.
Choosing a SINGLE or DUAL Diaphragm Booster.
Most 240s I have seen came with dual diaphragm boosters. I think there was a period
where some models in the 1970s came with a single diaphragm booster, possibly for carburetor models.
The dual diaphragm booster offers more assist, but the single diaphragm
can move the master cylinder toward the firewall a few inches, which can offer some extra
clearance for the intake manifold. More assist can be helpful for
an engine that has lower manifold vacuum, such as a B21FT with 7.5:1
compression ratio, or if you have a larger camshaft. When Volvo calculated the assist
ratio of 3.5:1 or 4:1, it means that with 3.5:1 ratio, if you push the
brake pedal with 100 lb. of force, the booster translates to 350 lbs. And with 4:1 ratio it translates to 400 lbs.
POWER ASSIST RATIO The
Assist Ratio is said to be partly derived from the
valve
assembly inside the booster combined with the size or area of the
vacuum diaphragm. I don't have a good understanding of the valve design,
but I can offer an explanation how assist is relative to engine vacuum
combined with the DIAPHRAGM AREA. The larger the diaphragm area, the more
vacuum assist will be available. A dual
diaphragm can double that assist, but since most dual diaphragm boosters
are
smaller in diameter, it comes down to the total combined diaphragm
area. Mathematically speaking, the area of a circle is calculated as: Area = pi r². Putting
this into relative booster sizes can help.
Example: A 10 inch diameter single diaphragm booster has a diaphragm area of 78.5 square inches.
Compared to a more common 8 inch dual diaphragm, which has 100.54 square inches. So when considering vacuum diaphragm assist, the 8 inch dual diaphragm should offer about 28% more assist than a 10 inch single diaphragm.
TESTING YOUR BOOSTER FOR LEAKS
There are a lot of "TIPS" on-line for testing a booster. Almost all of them
discuss testing by pressing the brake pedal and declaring the part good or bad. That's not a real
test. A REAL test of a booster is done by first checking to see if it actually holds vacuum.This is
best done by using a hand-held vacuum pumpor an electric HVAC vacuum pump.
The below video offers a quick summary. It's not complicated. A
good booster should hold a steady vacuum for a good long time. An older
booster can slowly leak past the edges of the diaphragm or through the
valve inside the booster. When testing with a hand pump, you'll find
that a dual
diaphragm booster can take a lot longer to pull a vacuum than a single
diaphragm. If you buy a new booster and if it doesn't hold vacuum very well, return it. https://www.youtube.com/watch?v=h0Z4WPqhLqc
INSTALLATION TIP Installing a New Booster? Checking Pushrod Length and Adjustment if needed. Dual diaphragm type shown below. When I installed a new booster in my 240, I took to a
few photos below of how I checked the pushrod length. I did this because
I was installing a NON-genuine Volvo part and I found that the pushrod end lock-nut had not been tightened by the aftermarket manufacturer. So
I wanted to make sure the pushrod end length was set correctly. If it's
set correctly, then the push rod should be very close to touching the
master cylinder with little or no gap when the brake pedal is at rest. The pushrod end is this rounded nut above, which is threaded into the front thrust rod in the booster.
This is what pushes into the rear of your master cylinder. These two photos above are from an original Volvo booster. I removed this pushrod above from my old genuine Volvo booster and I kept it in my toolbox.
Here's an image below of the pushrod on the new aftermarket NON-Volvo booster I bought. This pushrod was a little different that the Volvo one. The rounded nut and the thread pitch were not the same, but the length was still adjustable if it needed adjustment.
This is a back of the master cylinder below. The flat mounting surface on the back of this flange
will bolt to the front of the booster. In the second photo below I'm measuring that chamfered part and I found it will go into the front of the booster about 16 mm from the mounting surface.
Using my spare pushrod to help measure, I inserted it into the back of the master
cylinder and I measured how much of it went in. That measured between 17
and 18 mm.
So then I made sure to set the push-rod end length on the new booster so that is was protruding about 1 to 2 mm from the booster (SEE BELOW).
The goal was to close any gap or to remove any play between the booster
rod and master cylinder when the brake pedal is at rest.
Brake lines are a mystery for
many DIY car enthusiasts, so I thought it would be a good idea to make a
section about DEALING WITH 240 BRAKE LINES. FIRST PROBLEM: Due to the age of your car, your brake fittings are probably a bit crusty. There may be some corrosion and the fittings may be very tight.
Those original brake line "nuts" use an 11 mm wrench.
If you try to use a simple open end wrench on them or maybe some poor
fitting adjustable wrench, you're asking for trouble. These
fittings are usually made from soft BRASS on a 240 and it's very, very
easy to accidentally round off the corners. They're made from brass because brass resists corrosion better than steel. Buy yourself some brake line wrenches,
or at least buy one 11 mm line wrench. Sometimes called a FLARE NUT wrench. Then BEFORE you use your new wrench, look closely at it.
You'll probably have one like the first or second wrench shown ABOVE. Notice these wrenches have a bit of a rounded shoulder
where the wrench surface touches the fitting nut surface. That rounded
shoulder will probably cause you some trouble if the nuts are extra tight, because it prevents
the wrench from sliding fully on and grabbing as much of the nut flat surface as possible. I MODIFIED the BOTTOM wrench above.
I used my bench grinder to grind the surface face down, flattening the shoulder on both sides.
The reason for this grinding will be easy to understand.
In many of these circumstances you're going to have only one chance to grip the brake line nut well enough to actually crack it loose.
Rounding off the corners is so easy to do, especially if that nut has
never been loosened before. If you round off the corners, you may be out
of luck you'll have to cut off the line and then use a socket or locking pliers to remove the
nut. Grinding the wrench flat
like I did will give you a small extra bit of gripping surface between the
wrench and the nut.
NEXT PROBLEM:
Looking at this photo BELOW, you need to get that wrench to slide onto and grip as much of that nut as possible.
If you only get the wrench partially on the edge of the nut, then the corners
are going to round off and you're done. On this fitting shown below there's a small sheet metal retaining clip. And you can see what's left of one of those clips in my pliers. Those clips
can interfere with you getting your wrench onto the fitting nut far enough
to NOT round off those corners. So if you think your fittings are probably going
to be stubborn, you can MAKE A CHOICE to sacrifice those metal clips if necessary.
They're not easy to rip off, but you can break them with some force and
wiggling back and forth.
The fitting nut on the flexible hose going upward should be held by you with an open end wrench to keep it steady. It will probably be 14 mm. Or sometimes you can also do what I did in this photo below.
If you look closely you can see I just bent the wings
of the clip outward a little. That moved it out of the way so
that it would no longer interfere with the wrench sliding ALL THE WAY
onto the nut.
If you destroy your metal clips and you're not sure how to secure the brake
lines when reassembling, that's what zip ties were made for. In
either circumstance it's always a good idea to look closely at your new
or re-assembled brake lines and make sure there are no chances for a line to rub or vibrate against another hard surface. I've seen brake lines vibrate enough to chaff a hole in only a few thousand miles, soagain, ZIP TIES are your friend.
USING PRE-ASSEMBLED BRAKE LINES If you don't have the skills or tools to create andflare your own new brake lines, you can usually find pre-made ones in the correct length. Most people use pre-made lines.
If you need any
new pre-assembled brake lines, Belmetric has a selection in the correct
fitting size for Volvo with a variety of lengths from 10 inches to 120 inches long. You may use metric 4.75 mm or 3/16 inch brake pipes for any and all Volvo 240 applications.
Original Volvo lines are 4.75 mm copper lines, but 3/16 inch equals 4.76 mm, so there's no difference. https://www.belmetric.com/475mm-brake-line-with-ends-c-17_186_1168/
PROPER BRAKE FITTING THREAD FOR A VOLVO Don't confuse 10 mm Asian fittings with 10 mm Volvo fittings. The standard brake fitting thread for Volvo is 10 x 1.0 mm (ISO or DIN) Bubble Flare - or "European."
The "European" part is important too, because it's possible to accidentally buy Japanese/Asian versions of
this size fitting (which uses a double flare). A double flare will NOT fit your Volvo. (Most non-Volvo brake lines around the world use a DOUBLE FLARE, AKA: Inverted Flare (45 degrees). Volvo decided to be different. All VOLVOS use ISO/DIN BUBBLE FLARE ONLY.
Here are brake flare technical
drawings for those of you who want more info. If you have a question
about flare angles, you should know that when that matters for double flares, the flare angle for a brake line is always 45 degrees.
However, this does not apply to bubble flares, because a bubble flare
will have its own set of angles as shown below. If you hear about 37 degree flare fittings
(not shown here), those are specific to non-brake lines and are for
gas, oil or fuel lines, and included in those will be 37 degree AN racing hose
fittings.
BRAKE LINE UNIONS or COUPLERS
If by chance you find a need to join two pre-assembled lines together, you can safely
use a BRAKE UNION or COUPLER. This might be needed because the pre-made lines you bought aren't long enough as one piece. That's OK.
Brake Union fittings are available in brass or steel in the correct 10 x 1.0 mm Bubble Flare (European).
Belmetric offers them: https://www.belmetric.com/bubble-flare-c-17_564_1107_1108/.
SHOULD YOU USE BRASS OR STEEL FITTINGS AND LINES?
Volvo 240s used BRASS. Brass fittings and lines have an advantage against corrosion. Brass doesn't rust,
but brass is not as strong as steel, so stripping threads or rounding off corners
is easier with brass.
Steel fittings and lines are strong, but can rust. Good steel fittings will probably come with
corrosion resistant plating, but they can still rust over time if the
environment is corrosive enough. Volvo originally used brass.
DIY FLARING AND BENDING NEW BRAKE LINES You may use metric 4.75 mm or 3/16 inch brake lines for any and all Volvo 240 applications.
Original Volvo lines are 4.75 mm, but 3/16 inch equals 4.76 mm. So there's no difference.
There are a number of tools out there for flaring brake lines.
This video is a review of the TGR brake line flaring tool. This is the tool I use and it works very well. https://youtu.be/QmK2h8FXEoQ
Tools like these can be available at different prices
depending on how much it can do. This tool in the video is on the lower
end of the price scale. It's available on Amazon here: https://www.amazon.com/TGR-Professional-Brake-Flaring-Degree/dp/B01HOXH242/ref=sr_1_1_sspa This tool can handle 3/16”, 1/4”, 5/16”, and 3/8” tubing. (Volvos use 3/16"). Copper or steel brake tubing. It will create Single Flares, Bubble Flares, and Double Flares (Volvos use Bubble Flares).
FLEXIBLE STAINLESS BRAIDED BRAKE HOSES Braided stainless brake lines
can improve brake system feel and pedal response because the Teflon
inner core will not expand under pressure like rubber lines can. These
can be found for a 240 from several sources. https://yoshifab.com/store/240-rear-ptfe-brake-line.html https://www.ipdusa.com/products/5123/Stainless
Most people buy pre-made flexible brake hoses, but if you have ever
thought about making your own or seeing how they're made, here's a video
below.
.
FRONT STRUT BRAKE LINE BRACKET If you agree with me that there
needs to be a better way to secure your brake lines to the front strut,
then you may like the below alternative.
I had my struts off of the car when I did this.
My cordless reciprocal saw took the old brackets off in just a few
seconds. Then a bit of grinding with a bench grinder smoothed them
nicely.
Then some new paint and the new Kaplhenke brackets went on. My car is happier now.
240 BIG BRAKES: Chapter
1 Front R-BRAKE Installation
I began this project in December
2003 when I first purchased a set of
new S60R (BREMBO) front calipers.
These calipers were made for the new 2004-2007 S60R and V70R and would
be combined with large 13 inch (330 mm) brake rotors.
The R front caliper is an aluminum 4-piston type made for Volvo by Brembo.
The caliper weighs 7 lbs. 6 oz. (about 3.3 kg). They are different on the right versus left side.
This caliper has 4 pistons, which have staggered or
offset piston sizes. Two pistons are 42 mm diameter and two are 38 mm
diameter. For this project FRONT CALIPERS ONLY were fitted to my 240. For installation of Front AND Rear R-Brakes - CLICK HERE for a different article.
These R calipers were brand new in 2003-04 and this kind of adaptation had never been done before on a Volvo. My original
plan was to design a custom caliper bracket to
fit these calipers onto the front of my
245. Before I got very far, I
received an email from Travis
Kijowski of Strictly Volvo Racing
(SVR) in Maryland. Coincidentally, he was
already in the process of developing an
aluminum bracket for these
same calipers to fit a 240 strut housing,
which he would later adapt for his
Volvo 940.
ROTORS: I originally planned to have a custom 2-piece
rotor set made using Wilwood hats and
rotors, but when I found out about the SVR
brackets, which could use the stock S60R
rotors, and the rotors would then bolt right up to the 240 with
no modifications, I put off the
idea of custom rotors for a while and
bought a set of S60R rotors to save
some time and money.
Keep in mind that stock S60R or V70R rotors mounted on a 240 will push the outer rotor surface about 1/2 inch further outward
than the factory original rotor. This means your caliper will be more
outboard and this should be considered when planning for your wheels if the clearance is close. I completed this project in March 2004 using caliper adapter mounts from SVR and it turned out to be one of the best mods ever.
IMPORTANT: Factory R Calipers MUST BE SWAPPED LEFT TO RIGHT when installed on a 240 so the bleed nipple is at the top. The below LEFT image shows how these calipers are normally mounted on an S60R, V70R, FORWARD of the center hub.
The below RIGHT image shows how these calipers are mounted on a 240, BEHIND the center hub.
When installing factory R calipers on a 240, the rotor direction needs to be reversed in relation to the caliper, which
means the small leading piston will become
the following piston. This may not be a perfect setup if you're worried about that, but it's necessary
unless you can re-work the calipers so the bleed ports are changed to
the opposite ends. AFTERMARKET CALIPER NOTE: As of 2021 new aftermarket R calipers became available, which had bleed valves on BOTH ENDS.This meant that these aftermarket calipers can be used on the LEFT OR RIGHT sides and you'll always have a bleed valve at the top.
The below video offers a good explanation of why a caliper can have two different (staggered) piston sizes.
FLUID VOLUME NOTES
The front R calipers will use MORE FLUID VOLUME that stock 240 brakes, but just HOW MUCH more? 240 calipers FRONT: (38 mm x 4) x2 (right+left) equals 9072 mm² total piston area. R calipers FRONT: (42 mm x2 plus 38 mm x 2) x2 (right+left) equals 10090 mm² total piston area. So the FRONT R calipers combined have 11.2% more area. My conclusion: Upgrading to a master cylinder with more volume or a larger bore is not necessary.
This installation below in my 240 used the STOCK 240 master cylinder (non-ABS). The front rotor (also made by Brembo) is 13
inches (330.2 mm) x 1.25 inch (32 mm).
These are quite a bit larger than
the original 10 inch brake rotors on a
240. The rotor weighs approximately
20 lbs (about 9 kg). I had the slots shown below
custom machined at the cost of
about $25 per rotor.
(BELOW PHOTOS)
The first photo below is the original
240 brake (RIGHT SIDE)... stock rotors (except
for custom drilling/slotting).
The
second photo shows the R caliper and rotor
after installation on a 240.
The natural finish aluminum bracket below was the
first prototype bracket used to test and confirm the fit for an R caliper. It allowed the R
calipers to bolt to the 240 struts tubes with no other
mods. The later
versions were black anodized with laser-etched
"SVR." These brackets weighed in at 15 oz. each
(about 425 grams).
UPDATE November 2008: These brackets became
no longer available from the above source.
New sources have come along and may be found in my Cool
Volvo Products Page.
The brackets from SVR were designed to allow the R
caliper to be mounted in almost the same place as the
stock caliper. You can see in this pic how
the R caliper is moved outward (away from the strut
tube). This was done intentionally so it would correctly fit
the position of the R rotor, which places the brake surface further
outward than the 240 rotor.
To put this in
perspective, when measuring from the outer brake surface of the rotor, the R rotor will be about 5/8 inch (about 16
mm) more outward than a stock 240
rotor.
The outside face of the larger R
caliper will be about 24mm (just under an inch)
FURTHER OUTWARD than a STOCK 240 caliper, so you
should consider this when determining possible interference with wheels.
The stock sheet metal brake backing plates were
useless for this upgrade and were removed.
Notice that you only need ONE brake line per
wheel instead of two brake lines as my 240 originally
had.
FRONT R BRAKE PARTS
LIST:
Front
R CALIPERS. Volvo
PN 8602682 (right) and PN 8602683 (left). Front R ROTORS. Volvo PN 30645222 (same left or
right). The grooves in mine were custom machined.
The
SPRING CLIPS/RETAINERS are Volvo PN 30645137
(2 sets required).
VOLVO
front brake pads are PN 30645135 or 30748957. I opted for EBC
GREEN STUFF pads on front instead, EBC PN DP21210.
BOLTS USED FOR
THIS CONVERSION:
Minimum of Grade 10.9 hex head or 12.9 black
socket head is recommended. Metric Bolt
12 x 1.75 mm x 40 mm (4 required)
Metric
Bolt 12 x 1.75 mm x 60 mm (4 required)
Hardened 12 mm washers recommended (8 needed)
You'll notice
two new metal hard brake lines in the below picture (about 12 inches long).
These pre-made hard lines were used to
replace the original copper hard lines going from the
calipers to the flexible lines (I already had
stainless front flex lines that I bought from
iPd years before, so I used one of those for
each side also).
The old original
240 hard lines can be re-used, but I found the old original brass end fittings often become damaged when removed if they're tight, so I decided to buy new
ones.
FCP Groton used to carry them (PN AA0320), but they seem to no longer have them.
A variety of lengths of pre-made correct hard lines can still be found at Belmetric:https://www.belmetric.com/475mm-brake-line-with-ends-c-17_186_1168/
NOTE Regarding Brake Shims and Brake Squeal:
Some people have had trouble with brake squeal
with these front calipers. Many have complained that they find it
impossible to locate brake pad shims, like those shown above. The above
shims came with the factory pads I bought back in 2004.
I used EBC Green Stuff pads with the shown shims. I never had brake squeal noise. But for those who need help, this info below may help.
Back in 2004 when I was researching these calipers and available brake pads, Brembo listed this caliper as their type "B62" or "62" family.
I found that the same Brembo B62 FRONT calipers and pads were used in some other cars. 2004 Subaru Impreza STI (2004-17) 2004 Mitsubishi Evo (2003-15) 2004 Alfa Romeo (I can't recall the model, but I recall it was available in Europe and NOT in the U.S.). And a few others.
HAWK BRAKE PAD DIAGRAM for Brembo B62 front caliper. And there's MORE. I found the below FRONT PAD image in an EBC Racing Pad catalog. It lists more uses of the Brembo B62 caliper: https://ebcbrakes.com//EBC_RACING_PROD_BRO_USA.pdf More BRAKE SQUEAL
Volvo had a campaign at one time to combat brake squeal complaints in the R calipers. This image below is Volvo PN 30748514 Anti-Vibration Damper Set.
These are made to mount between the front caliper and mounting bolt heads. I don't know how well they worked.
If you need to also find alternative vehicles using the S60R REAR pads, this image below is used by Hawk brake pads sites for the S60R REAR pads.
The calipers used by Volvo on the rear were Brembo B11.
So it appears there are some Lotus, Jaguar, Mustang and Viper models using the same Brembo B11 rear calipers.
HAWK BRAKE PAD DIAGRAM (REAR) for Brembo B11 caliper. Here are the S60R REAR pads from the EBC Racing Pad catalog, listing more cars using the rear B11.
BRAKE JUNCTION ROUTING for Front R-Brakes
First let's look at the ORIGINAL
FACTORY 240 SETUP:
The
240 non-ABS
brake junction block (manifold) shown here
has 8 ports. This first photo below illustrates the
original 240 brake line configuration when using the original 240 front
calipers in my '84 240, which originally used two
brake lines per front caliper.
The front
Brembo R calipers useonly one line per
caliper. For this conversion, two of the front caliper ports on the
junction block (manifold) will need to be
plugged.
MODIFIED PLUMBING. ALTERNATE
1:
This is how
I originally made this work back in 2004 when
I installed the front 'R' brakes on my 1984
245. I simply removed one front brake line
from the right side and one from the left.
I then PLUGGED the two empty holes.
This method worked fine for years. I did receive some grief from a few 240
enthusiasts who felt it was unsafe. They felt
that if one front caliper suddenly lost
pressure, hitting the brakes would shoot the
car off to one side out of
control and it would be a disaster. I suppose it's possible, so use caution and you're own judgement.
ALTERNATE
1A (photo not shown of this one):
If you're OK with Alternate 1, but are
shaking in your boots about the potential
problem mentioned above, this may be a
solution. This method uses the same
configuration shown in Alternate 1, except
for one change. As shown in
Alternate 3, you would remove
the inner piston assembly. This will
convert the two-chamber junction block into a
one-chamber junction block. Any fear of the car
shooting off left or right should be gone
now. Be aware that if you lose pressure
with this configuration, you lose all brakes. So choose
your poison.
I have not tried this
method and to my knowledge no one else has either.
Plastic Sender Note: If you remove the inner piston, I think it
might be a good idea to remove the plastic sender
and plug that hole with a metal plug (M12 x 1.0 thread).
The internal pressures may be too much for
the plastic sender after removing that
inner piston assembly. Not sure. Just saying to think about it. More on this is discussed a little below in the "Plastic Sender" section.
ALTERNATE 2:
This
is a method suggested by a someone
who was concerned about Alternate 1. If
you choose to do it this way, you will need to
either bend the existing brake lines to fit
(if possible) or make new ones.
This method is very similar to how the ABS 240 was plumbed.
The safety aspect of this method is as follows:If
pressure is lost somewhere, then you will lose
either front brakes or rear brakes, but not
all of them at once.
In September 2022 I received an email from Steven B. in Oslo, Norway. He mentioned that he had originally tried Alternate 1
for his front R brake installation and had some intermittent trouble.
He was using a standard master cylinder, brake junction manifold and rear brake
reduction valves from a 1979 265. The source of the trouble remained
a mystery for a while. He believed the trouble seemed to be related to
the piston inside the junction manifold, which he believed may have been moving
to one side during repeated brake use. This was slowly causing a
pressure imbalance, which would happen after using the brakes a number
of times. Soon the brakes would begin pulling to the left after using
the brakes through the day. This issue would resolve by itself if the
car sat unused overnight, but then would gradually repeat when brakes
were used repeatedly. He could find no defect in any part. Steven decided to try Alternate 2 configuration and the problem was resolved.
Steven also said in order to get upgraded brakes approved in Norway, a DUAL SYSTEM must be retained. Using Alternate 2 was sufficient for that approval.
I would
certainly appreciate some feedback if you
have done an R brake conversion.
What method did you use? CONTACT
ALTERNATE 3:
This
is a proposal for those of you who would
choose Alternate 2, but would like to
eliminate the internal piston.
I have not tried this
method and to my knowledge no one else has either.
That inner piston separates the two chambers,
but is designed to freely move forward or
rearward depending on brake pressure
differentials. By removing the piston,
the junction block is converted to a
one-chamber block, instead of two. Be aware that having a one-chamber
junction block means that if any part of the
brake system looses pressure, then all of it
will.
Plastic
Sender Info:
If you remove the inner
piston, I think it might be a good idea to
eliminate the plastic
sender. There's a lot of pressure in there and I don't know if trusting a plastic threaded sender is the best idea. The thread for this port is M12 x 1.0.
There are fittings available with M12 x 1.0 thread, but so
far I have only seen this fitting as a JIC or AN fitting with a flared sealing end. If you look
under that white plastic piece inside the port, it's just a flat bottom
with a small hole in the center, so a flared fitting might not seal there as intended.
There is, however, a chamfer for an o-ring in this junction, seen below, because the factory sender uses an o-ring there. So I think there is a very good chance of creating a seal using anM12 x 1.0 o-ring plug, such as this:https://www.onehydraulics.com/products/9030m-12x1-0. Or PN 9151K245 fromMcMaster Carr, which was used successfully in this discussion thread: turbobricks.com/octopus-block-sensor-thread.362998
If you do something like this with your project, please email me. I'd like to know. CONTACT
ALTERNATE JUNCTION BLOCK (Later BRAKE LINE MANIFOLD) If you want a brake
junction block (manifold) without a warning sender and without an inner piston, you could look for Volvo PN 3540084
from a 1991 240 (now no longer available new).
This manifold It will operate as two separate
junction blocks with no shared internal port.
Another Alternate (custom) If the above VOLVO junction block is not found, then there's a way to use two existing non-Volvo junction blocks as shown in this Turbobricks discussion below. These junction blocks are custom made for Nissan cars and are available from us.gktech.com/4-way-brake-union. These are specially made so that they correctly fit the European bubble flare fittings used in a Volvo. turbobricks.com/diy-brake-junction-block.373513/(April 2024)
WILWOOD ADJUSTABLE PROPORTIONING VALVE
You may want to consider re-configuring your brake lines to use a
proportioning valve like this one. It's a much bigger step and will
require you to install some new brake lines. You can read about one of these installed on a 240 here at https://www.240turbo.com/volvo240bigbrakes.html#proportioning
WHEEL SIZE IS
CRITICAL with bigger brakes:
When planning an upgrade like the front R calipers, it is very important to carefully consider the need for larger wheels AND
more room to the outside of the original
brakes. As far as wheel diameter, if
you use these 13 inch rotors, there
are SOME 17 inch wheels that still will not
clear and some that will clear.The wheel shown in these
pics are 18 inch.
So far I have been told the 17 inch Volvo R wheels
will clear just fine and I have been told the Volvo Tethys
will also. Both are FWD or AWD type wheels and will need
custom spacers to fit a 240 properly.
The popular EIKER (Polaris
replica) is 17 inches and WILL NOT FIT
as is because the caliper hits the inner wheel barrel.
The outside surface of the new,
larger R caliper will be further outboard (in
the direction of the wheel spokes). My
measurements show the R caliper be about 24 mm further
outboard when compared to the stock 240
caliper. So if your wheel spokes
are already pretty close to your original front
calipers, you will either need new wheels or
some wheel spacers to move them outward. Many more
discussions from others who have worked out this
installation can be found in the Turbobricks forum.
FRONT/REAR
BRAKE
BIAS
For braking to be
effective when you get near the limit, you need a
pretty good balance between the front and rear.
If any brakes begin to prematurely lock up, it
is preferred that the front brakes lock just slightly
before the rear brakes. When I tested the front R caliper installation
initially with no adjustments or changes to the
front/rear bias (which included a track day at
Thunderhill Raceway in May 2004), I found the
front brakes to have a little too much strength and would
easily lock if I wasn't careful. This required
some concentration and discipline at track speeds.
I found if I was gentle on the pedal I could prevent it,
but still it needed to be fixed. For a better
balanced setup out of the box, I suppose anti-lock
brakes might work ok at leveling things, but adding ABS to
my 240 wasn't an option. If I
were to use add an adjustable proportioning valve,
the imbalance could have been solved with an easy
adjustment. My first thought was to
see what would happen if I REMOVED the rear brake reduction
valves (to increase rear brake bias). If that
wasn't enough of a fix, then I could install an adjustable proportioning
valve. So I
did the first step and removed the rear reduction
valves.
After
the
reduction
valves were removed, I needed some way to re-connect the
brake lines and found that an extra standard early 1980's 240 junction block I had (shown
in photo) worked perfectly in place of
the reduction valves. It fit just fine. Four of the open ports on the
block needed to be plugged (so four more brass plugs were needed). Alternatively, a more proper brake union setup below would work. More info about that is in the Brake Line Section.
After testing the brakes with the rear reduction
valves removed, I discovered the front/rear bias was nearly
perfect for a wagon. Much better than expected. I then had a very nice front/rear balance which
took full advantage of the improved brake system.
Much stronger front brakes (because they're big)
and stronger rear brakes also (since removing the
reduction valves).
So
now we know this can work for a 245. What about a
242?
....After Doug Kauer (Hank Sporpio) did his R brake install
on his 242, he then tried this method above and found
the result to be perfect for his car: turbobricks.com/update-on-s60r-brakes-holy.22183.
Yes, many mods like these can be considered amateur, but many Volvo owners have greatly
improved the performance of their cars over the years through such experiments. This isn't
the end-all solution and it might not be for you, but
for the money, it was one of the best modifications I
have ever done to any Volvo. I want to thank
Travis Kijowski at Strictly Volvo Racing for designing
and producing the caliper brackets. They turned
out very nice.
Experimentation is key
to improving modifications.
Here is an R caliper installation that was done a
little differently and the results. -from Matt Dupuis (added
07-16-06)
Here's some feedback on my conversion, and what I've
done differently than (I think) everyone else:
The piston
dimensions on the S60R calipers when
mounted on a P2 car (S60R) are 34 mm for the leading
piston and 38 mm for the trailing one.
For a staggered piston design to work as designed,
the trailing piston must always be larger than the
leading piston. This is done on calipers with
long pads to keep the pad twist under control and to
keep the pad wear (and heat) even across the length
of the pad.
It occurred to me later that the P2 chassis has the
calipers mounted in front of the axle centerline,
and that the leading (smaller) pistons would be on
the top, and on the same end of the caliper as the
bleed nipples. When rotating them around to the rear of
the axle centerline, as on the 240 chassis, the
smaller piston would remain the leading piston.
This would be the correct way to installed them,
however it places the bleed nipples pointing
straight down. Furthermore, the high pressure
line, as it comes out the caliper, would also be
angled down, making it difficult to route the line
away from the suspension control arm.
I pondered these problems when I was doing my
installation, and I attempted
to remove the blanking plugs from the trailing
side of the caliper so I could move the bleed
nipples to that side so they'd be pointing up.
They would NOT come
out. I tried heat, I tried chemicals
(thread unlocker), and I tried force.
Eventually I stripped a couple of the plugs' socket
hexes (not to mention the paint from around one of
the plugs with my propane torch), so I gave up trying to
move them.
I came to the conclusion that I'm only going to need
to bleed these brakes once or twice, so I might as
well remove the calipers and hang them "upside down"
from the struts to bleed them. I shoved a
piece of metal between the pads to keep them from
compressing, and bungee'd them to the spring, and
they bled out just perfectly.
As far as the brake hose issue, I solved this by
using a regular 240 hose and hose-to-caliper
hardline. The hardline threads into the
caliper properly, and allows one to quickly bend
upwards and clamp to the strut (being removable is
necessary, so the caliper can be removed and bled
again if needed).
And to my pleasure, these calipers fit just fine behind a Volvo
Tethys wheel when using a 25mm spacer.
They're not very visible back there behind all those
spokes, but they fit just fine.
I used Hawk pads for an Subaru STi as Hawk doesn't
list them for the R, or at least they didn't when I
bought the pads (The STi Brembo caliper shares the
pad dimensions with these calipers). I'm
not sure if I'd use them again - they squeal when
lightly applied and the dust is pretty dark, and on
the Tethys the dust accumulates quite quickly.
So far they're the most confidence-inspiring brakes
I've ever driven. I'm not 100% happy with the
balance yet - the fronts are too powerful, even
though:
a) my car's not lowered;
b) my car's got a heavy V8 in the nose; and
c) I removed the rear brake limiting valves, but boy
does the car stop!
I do prefer a bit more rear bias, and I don't spend
any time on a road course, so I imagine I'm not the
utmost authority on brake setup, but I wish I had a
bit stronger rear brakes. Next step MIGHT be
converting to different rear calipers... maybe Rs
and vented rotors as well?
As a
follow-up to Matt's submission above...
On the
subject of Potential
Uneven Pad Wear due to the offset piston sizes
and reversed calipers.... I
pulled and inspected my Green Stuff pads after a
few years of use and found nothing that
suggested they were wearing unevenly.
Also, of all the other people running R calipers
in the wrong direction on 240's, so far I have
heard of no abnormal or uneven pad wear.... just
great braking! Take this for whatever it's
worth, but I suspect the issue is not a big
one.
And a side note regarding comments I have read
about EBC
Green Stuff pads after I bought
them. I read several forum posts
supposedly written by "experienced"
people, who said the Green Stuff pads were
"horrible" because they were not aggressive
enough for the track, but too aggressive for the
street. I have found after a few years
with these pads (with some very aggressive track
days) that I completely disagree with their
opinions. These pads have worked great for
me. No squealing, great stopping when
cold, no fading when hot, and very little
dust! And others have since reported that
Hawk pads are horrible when they get a little
wet. I haven't seen this problem with EBC
Green Stuff. And Hawks, as it turns out,
are considerably more expensive than EBC
pads. My
considered opinion is that Green Stuff works
fine in this combination.
- Dave B.
240 Front R BRAKES: CHAPTER 2
2006 Update:
Wilwood 2-piece front rotors were added to front R-Brakes. I wanted to
upgrade to a two piece Wilwood rotor assembly, so I
had the above pictured 2-piece rotor set made up.
It was done by Todd Cook at TCE
Performance Products in Tempe, Arizona, http://tceperformanceproducts.com.
And since a
custom hat/rotor combo means that I could alter the rotor offset (within limits of course), I decided
it was time tomove the rotors inward
.500" (1/2 inch).
This would give me broader wheel options
in the future. This
is
where the modified caliper adapters
below came into play. I had the
raised pads on the below adapters shaved .500" (1/2
inch) where they met the caliper. The other
areas you see where aluminum was removed were necessary to clear
portions of the caliper body.
You may compare
the first photo below (original SVR caliper mount
bracket) to the second one showing the modified
SVR bracket in place, which moved the caliper
inward 1/2 inch.
Now you might ask... If
I could move the calipers inward 1/2 inch, then why
not move them in further? As mentioned above,
there are limits. The limiting factor with the
240 is the steering arm, which is normally less than
1/2 inch from the stock rotor. That's about
where my new setup put the Wilwood rotor.
240 R-Brakes
FRONT and REAR R Caliper Installation
The S60R front caliper is an aluminum 4-piston type made for Volvo by Brembo.
The caliper weighs 7 lbs. 6 oz. (about 3.3 kg). The factory calipers are different on the right versus left side.
This caliper has 4 pistons, which have staggered or
offset piston sizes. Two pistons are 42 mm diameter and two are 38 mm
diameter.
The below photos show a 240 Turbo owned by Aris from Greece. This car is featured in my Favorite Modified 240 Page HERE.
It has been fitted with FRONT and REAR S60R (Brembo) calipers and rotors. WHEEL SIZE: Aris uses 18 inch wheels with these brakes. These big brakes will normally require at least 17 inch wheels. The FRONT rotor, made by Brembo, is 13
inches (330.2 mm) x 1.25 inch (32 mm).
The REAR rotor, also made by Brembo, is 13
inches (330.2 mm) x 1.1 inch (28 mm).
Here are the rear calipers in place below. The rear dust shields needed some minor trimming near the top of the caliper.
IMPORTANT: Factory R Calipers MUST BE SWAPPED LEFT TO RIGHT when installed on a 240 so the bleed nipple is at the top.
FRONT CALIPERS
The below LEFT image shows how these calipers are normally mounted on an S60R, V70R, FORWARD of the center hub.
The below RIGHT image shows how these calipers are mounted on a 240, BEHIND the center hub.
The R
front caliper is an aluminum 4-piston type made
for Volvo by Brembo. The caliper
weighs 7 lbs. 6 oz. (about 3.3 kg). They are different on the right versus left side. The caliper has 4 pistons, which can be said to have staggered or offset piston sizes. Two pistons are 42 mm diameter and two are 38 mm diameter.
AFTERMARKET CALIPER NOTE: There are new aftermarket FRONT and REAR calipers available (as of 2021) that have bleed valves on BOTH ENDS. This means that these calipers can be used on the LEFT OR RIGHT sides and you'll always have a bleed valve at the top.
. REAR CALIPERS The below LEFT image shows how these calipers are normally mounted on an S60R, V70R, FORWARD of the axle.
The below RIGHT image shows how these calipers are mounted on a 240, BEHIND the axle. This caliper has 4 pistons. Two are 28 mm diameter and two are 30 mm diameter. This configuration reverses the rotor direction in relation to the caliper, which
means the smaller piston, which used to be the leading piston, will become
the following piston.
ROTORS
The FRONT rotor, also made by Brembo, is 13
inches (330.2 mm) x 1.25 inch (32 mm).
The REAR rotor, also made by Brembo, is 13
inches (330.2 mm) x 1.1 inch (28 mm).
240 REAR PARKING BRAKE The
S60R REAR brake rotor has no provision for an internal parking brake,
like the 240 does. So the 240 parking brake function is retained by
using a custom drum portion taken from a standard rear 240 rotor with the disc area
machined off.
The
240 custom drum is installed first. Then the new rotor is placed over the 240 drum.
In the second photo below, the rear rotor is in place, along with a
wheel adapter.
A standard 240 wheel stud length normally protrudes out about 25 mm past the brake disc.
The below photos show standard 240 studs on a stock front and rear hub. The rear studs are the same.
The custom drum is about 5 mm thick, so adding the new S60R REAR rotor PLUS the 240
drum BEHIND IT will reduce the wheel stud length by about 5 mm. A stock LUG NUT will usually engage about 15 mm of the thread on the
stud.
740 MASTER CYLINDER Aris
installed this 740 master cylinder below into his 240. He reports that
the brake pedal feel with front and rear R-brakes is very good and needs
no improvement. This is Volvo PN 1273243 or 1359693, for a 1986-88 740 without ABS or 1991 940 without ABS. This MC has a stepped bore very similar to the stock non-ABS 240 master cylinder. REAR bore dimension: 22.225 mm (0.875 inch), primary bore for FRONT brakes. FRONT bore dimension:, 15.875 mm (0.625 inch), secondary bore for REAR brakes. M10 x 1.0 bubble flare (European) brake line ports. Rear port on right, front port on center front.
The front and rear R calipers will use MORE FLUID VOLUME that stock 240 brakes, but just HOW MUCH more? 240 caliper FRONT: (38 mm x 4) x2 (right+left) equals 4536 mm² area per caliper. 9072 mm² total area. 240 caliper REAR:(38 mm x 2) x2 (right+left) equals 2278 mm² area per caliper. 4536 mm² total area.
R caliper FRONT: (42 mm x2 plus 38 mm x 2) x2 (right+left) equals 5045 mm² area per caliper. 10090 mm² total area. R caliper REAR: (30 mm x2 plus 28 mm x2 rear) x2 (right+left) equals 2645 mm² area per caliper. 5290 mm² total area. So the FRONT R calipers combined have 11.2% more piston area than a 240.
The REAR R calipers combined have 16.6% more piston area. Piston Diameter to Area Calculator: https://coolconversion.com/geometry/circle/area/
11.2% MORE AREA for FRONT and 16.6% MORE AREA for REAR. What does this mean? This means that if you think you MUST use a
bigger master cylinder with more volume, it may not need to larger at all. If the brake system is divided up into one FRONT system and one REAR system (which you will see in the next section), then we can calculate the volume differences more accurately. If
I were giving advise, I would tell you to try the 240 MC first (or the
above 740 MC). If the
MC felt like it was too small, it could result in more pedal travel or
it might make it feel like the brakes will grab too fast. If it bothers
you, then you can start looking
for an alternative.
LET'S TRY A HYPOTHETICAL EXAMPLE.
For this example, let's use the 240 MC. We'll use the REAR bore (22.3 mm) for the FRONT brakes only. A 22.3 mm piston has an area of 390.6 mm².
Then we'll assume the 240 MC FRONT bore (15.75 mm) feeds the REAR brakes only.A 15.75 mm piston has an area of 194.8 mm².
Regarding Ford Mustang MC Recommendations: I know that a number of people have recommended or have installed a "Mustang master cylinder" for use with this R brake (front and rear) conversion. There
has been some confusion, because there are several very different Mustang master cylinders; 1994-95
Ford Mustang GT, 1993 Mustang SVT Cobra and 1994-95 Cobra MC, all of which have different piston bore
sizes. Details on all three of these can be seen HERE.
If we can assume the Volvo 240 design engineers knew what they were doing,
perhaps we can expect a REASONABLE choice for a larger master cylinder to be
somewhat PROPORTIONAL to the increase in the brake caliper volume size.
For this comparison below, I'll concentrate on the popular Mustang GT 27 mm master cylinder specs:
1994-95
Ford Mustang GT Master Cylinder with 27 mm Piston Bore. This MC has a piston size of 1.0625 inch (27 mm) for both front and rear. This MC has a piston area of 572.6 mm² x 2 = 1145.2 mm².
The 240 MC with its stepped
bore (22.3 and 15.75 mm) can be said to have an average bore of 19 mm (piston area of 390.6 mm² + 194.8 mm² = 585.4 mm²).Using this info, this means a Mustang 27 mm MC with a piston area of 1145.2 mm² appears really, really big in comparison (a 95.6% increase). This is an extreme increase, not a proportional one. So I do not agree with using this.
More detail about this 27 mm master cylinder can be seen HERE.
BRAKE PEDAL RATIOS
The 1994-2004 Mustang brake pedal ratio appears to be about 4.5 to 1.
Compare that to a 240, which is about 4.3 to 1. So the Mustang pedal seems to have a
little more brake pedal leverage. What if we divide this Mustang GT MC into FRONT and REAR circuits as if we're dividing it with a proportioning valve.
Each piston in a 27 mm Mustang GT MC has an area of 572.6 mm².
Feeding the FRONT brakes, I find that the Mustang MC primary bore appears to provide 46.6% more volume compared to the 22.4 mm 240 primary piston. Feeding the REAR brakes, the Mustang MC seems to provide 93.9% more volume over the 15.75 mm 240 secondary piston. Keep in mind that
much volume increase could make for a very hard pedal, which
could require extra leg effort.
So
let's say for example we're going to try a smaller Mustang master cylinder instead. So now let's look at the 1994-95 Mustang SVT or Cobra master cylinder with a 23.8 mm bore. A 23.8 mm (15/16 inch) piston bore has an area of 444.9 mm².
This would provide a 13.9% increase of area for the FRONT calipers compared to the stock 240 MC.
It would provide a 28% increase of area for the REAR calipers compared to the 240 MC. This seems like a more reasonable change. A small change in piston bore size can make a significant difference in how the pedal feels. So
one can argue that even a 23.8 mm SVT master cylinder might proportionally be a bit too big for a front/rear R
brake conversion, but I suspect it will be hard to notice a negative affect. I
have seen some comments that the 2004-07 S60R/V70R had a larger
master cylinder than a 240. Well yes, it had a 25 mm bore. I don't know how useful this
comparison is. The master cylinder for the R is Volvo PN 8602365. It has a standard 25 mm bore front and rear (not a stepped bore).
OTHER FACTORS TO CONSIDER ONE MORE FACTOR you should think about is how efficient your VACUUM BOOSTER is. If
you have an engine which offers lots of vacuum to your brake booster, then that
booster will be stronger and will offer MORE POWER ASSIST.
If you have a lower vacuum engine, such as a B21FT (7.5 to 1 static
compression ratio) or if you have a bigger than stock camshaft, which
reduces the vacuum to your booster, then you'll have potentially LESS POWER ASSIST.
And a factor which I have not yet mentioned here. This is the
increased braking leverage that a bigger diameter brake rotor provides. I don't know
how much difference this makes in choosing a master cylinder, but it will be a factor of some sort in your decisions.
WILWOOD PROPORTIONING VALVE
Aris from Greece took a big step when installing his bigger brakes. He eliminated the original brake junction block in his 240. Instead he installed a Wilwood Adjustable Proportioning Valve, PN 260-11179.
More on his R caliper front and rear installation is detailed HERE.
This Wilwood Adjustable Proportioning Valve uses 3/8-24 Inverted Flare ports (Inverted Flare is the same thing as a Double Flare). The original Volvo brake lines had fittings threaded as 10 x 1.0 mm
Bubble Flare. Aris cut the original lines and re-flared them to a double flare using new
3/8-24 brake line nuts for all of the lines going to the proportioning valve. The Volvo brake lines are the correct size for
the change in fitting size like this, so there is no need to change to a different size hard pipe. Just new end fittings are needed if you'll be DIYing the flares. Here's an image below showing the BRAKE LINE ROUTING to the proportioning valve.
If using a stepped bore MC, using the smaller front bore for the rear calipers is a
good choice. The rear calipers need less fluid volume than the fronts.
Since a pre-ABS 240 has two lines going from the junction block to the rear calipers (going through
factory pressure reduction valves), Aris
removed the rear reduction valves and changed to one line
going rearward to a simple tee junction near the rear end, which then splits to both rear
calipers. Here's a video below about the Wilwood Proportioning Valve. https://www.youtube.com/watch?v=1oahuttkEws
240 WILWOOD BRAKES
Learning
brake voodoo can be overwhelming. I came across this brake pressure
chart from Wilwood, which may offer just a small bit more understanding of
pedal effort and its relationship to master cylinder bore size. A PDF of this chart can be found at: https://www.wilwood.com/PDF/Flyers/fl162.pdf
Installing the Wilwood Front Caliper Adapter Kit
by
Avalanche Performance The kit featured here is no longer
available. In 2010 Avalanche
Performance Technologies came
out with a 240 adapter
kit for installing Wilwood brake calipers and
Wilwood rotors on the front of a Volvo 240. This
chapter will show installation on my 1984 242
Turbo.
This
brake kit was designed to offer an inexpensive
solution for 240 owners who wanted larger
front brakes. While less expensive than the R-brake
conversion, it allowed for more wheel
options, since this brake package used smaller 12.2 inch rotors and would fit inside
smaller wheels compared to the R-brakes with big 13 inch
rotors.
Referring to the photo ABOVE, the Avalanche kit came
with two custom aluminum adapters with
mounting bolts, two custom aluminum rotor hats, and
the brake line pieces shown, which go from the
caliper to the flexible line junction at the
240 strut tube. Also included were two M10-1.0 plugs for
the brake line junction block. ROTORS and CALIPERS: The customer would then purchase rotors and calipers from Wilwood. This kit was made for any Wilwood12.19 x 1.25 inch (309 x 32 mm) rotor
with 8 bolts, 7 inch bolt circle for hat mounting.
I opted for
Wilwood
Ultralite 32 fin curved vane rotors,
LEFT: PN 1602895 and RIGHT: PN 1602894.
Here are
the Wilwood calipers (left and right respectively)
bolted up to the adapters.
These Wilwood calipers are LUG MOUNTED
I used the following Wilwood Calipers: WILWOOD Billet Forged Superlite (FSL), LEFT: PN
WW120-7431L and RIGHT: WW120-7431R
Be
aware that Wilwood discontinued this caliper, which is made with an
EXTERNAL CROSSOVER TUBE (side by side photo comparison below). New Internal Crossover calipers (right image) are now available as the replacement.
The new model with INTERNAL crossovers (right image above) is named Wilwood Forged Superlite (FSL) Internal.
These are available with 1.25 inch bore, 1.38 inch bore, 1.62 inch bore,
or 1.75 inch bore or they may be ordered with staggered piston sizes.
WILWOOD Billet Forged Superlite (FSL) WW120-7431 Specs. Four pistons, all 1.38
inch (35 mm) bore.
Made for rotor with 1.25 inch (32 mm) thickness.
For
more detailed info on this caliper, click here to search the Wilwood page or click here for
the Wilwood FSL pdf. The brake line port on this caliper is threaded 1/8" x 27 NPT(female).
These hard brake lines with the kit were constructed as follows:
90 degree fitting, 1/8 inch x
27 NPT male at the caliper to female on other end (Wilwood calipers use 1/8 NPT brake ports).
Adapter: Straight 1/8 inch x 27 NPT male to 3/8 inch x 24 double flare female
brake fitting.
3/16 inch brake line (4.75 mm).
3/8 x 24 brake nut with double flare.
Other end to Flex hose: Standard Volvo 10 x
1.0 mm bubble flare male (Europe).
Flex hose (one per side), stainless braided, 10 x 1.0 mm bubble flare (Europe) female on both ends.
BRAKE LINE NOTE:
You may use 3/16 inch brake lines for all Volvo 240 applications.
Metric brake lines in this size are 4.75 mm. 3/16 inch equals 4.76 mm. FITTING NOTE regarding 10 x 1.0 mm Bubble Flares: Make sure you get fittings that are designated as 10 x 1.0 mm EUROPEAN Bubble Flare. There are JAPANESE 10 x 1.0 Bubble Flare fittings out there, which will not fit.
A good source for correct Volvo threaded fittings: Belmetric www.belmetric.com/bubble-flare.
NOTE ABOUT BRAKE LINE ADAPTERS:
Constructing brake
lines using multiple adapters is not the best solution if it can be
avoided. Keeping adapters to a minimum will reduce the chances for leaks.
In a perfect world, this caliper would have come with standard Volvo 10 x 1.0 mm
bubble flare ports. They don't. Whenever possible, do
some careful research with
an effort to keep adapters to a minimum. This adapter setup used for
this kit was originally recommended by Wilwood, however fewer adapters
would have been better and I found it's possible.
If you search, you will find that there
are more proper adapters which will adapt a 1/8 x 27 NPT port DIRECTLY to 10 x 1.0 mm (European) bubble flare. For example, here are some made for VW by Empi:
Empi 18-1107 90 Deg Male 1/8" NPT to Female 10mm X 1.0 Bubble Flare https://www.amazon.com/dp/B07979K5TH.
Empi 18-1102 Straight Male 1/8" NPT to Female 10mm X 1.0 Bubble Flare https://www.amazon.com/dp/B0748NNSZR. Using one of these adapters at the caliper would eliminate the need for the middle adapter in the above photos.
BRAKE PADS for Wilwood 7420 Caliper This Wilwood caliper uses Wilwood pad type 7420. This caliper is sometimes called a BRIDGE BOLT Superlite.
I read up on the pad compounds available in
Wilwood's website
and I chose the BP-10 Smart Pad (formerly
called PolyMatrix D). This pad seemed to be a
pretty good choice for high-performance mostly street use.
I used these pads for years. They performed great, but for some reason they tended to squeal very loud when very hot.
More choices recommended by other Volvo owners for mostly street use: Wilwood Poly Matrix Q for 7420 caliper. I have not tried these. Porterfield R4S pads for 7420 caliper. I put these on my car in 2023 and I've been happy with them so far. Hawk HP Plus for 7420 caliper. Hawk HPS for 7420 caliper.
The rotor
to hat fasteners were not supplied with the adapter kit, so I ordered Wilwood socket
head bolts, 5/16" x 24, PN 230-0150
(8 pieces with washers, 2 sets needed).
I cannot
over-emphasize the importance of test
fitting parts like these before committing
yourself to the full installation.
The
first thing I found (I expected this would
happen) was that the brake backing plate
interfered with the new adapter and
caliper. The main interference was found
near the bottom of the adapter bracket.
Trimming the backing plate
is a solution, but I chose to
remove it instead. The hub needs to be
removed to get the backing plate off.
The second photo below show the backing plate removed. This will be a good opportunity
to re-grease the bearings. Also, the
rubber seal on the inside end of the spindle
would be a good thing to replace, since they are
cheap and still available.
Here I'm
test-fitting the caliper bracket after the
backing plate was removed. Here's something to be cautious of. If you're using caliper mounting bolts that
have an un-threaded shoulder (like the
original Volvo bolt in this photo), check to
make sure the bolt threads all the way
in. I've seen more than one type on cars
from the factory. The kit came with a washer to use here between
the bolt and adapter (it's important to use a washer when
bolting to aluminum), but since the adapter
bracket is a little thinner than the original
240 caliper mounting arm, the original bolt would not
seat completely. Simple fix: One
additional washer was added, which solved it.
Here is a snag that stopped my
installation for a while.
I knew ahead of
time that there could be interference between
the deep spokes on the Eiker (Polaris replica)
wheel and the Wilwood caliper.
There WAS interference.
In this
photo ABOVE, I did another fit test by placing an 8 mm spacer behind the wheel to move the wheel away from the caliper 8 mm. This allowed
a comfortable clearance distance of about 1.5 to 2 mm
between the wheel spoke and caliper. So these wheels
would not fit on a 240 with this kit, unless the wheels were spaced outward about 8 mm.
A 240 wheel stud
normally protrudes about 25 mm out and the
stock LUG NUT will usually engage about 15 mm of thread on the
stud. Using an 8 mm spacer would have
reduced that
engagement too much. Longer wheel studs
would have been a solution, but I put off installation for a
while. MORE BELOW. I then bought different wheels, which had a bit more room behind the spokes.
These wheels are the same size as the last ones, 17 x 7.5 inches. They fit these brakes better. I have more details about these wheels at https://www.240turbo.com/
More Big Brake Conversions
Wilwood
Caliper Adapter and Rotor Hat Kit by Kevin
Hawkinson. A VERY SIMILAR kit to the above Wilwood kit.
This kit shown was being offered at one time many years ago in a Turbobricks thread.
BREMBO Four Piston 240 Front Caliper Adapter Kit from BNE Dynamics (Kaplhenke Racing). This is a kit which Includes new calipers and adapters for your choice of THREE rotor diameter options: 11.25 inch (286 x 26 mm) / 11.88 inch (302 x 26 mm) / 12.44 inch (316 x 28 mm). This allows you to find a larger brake kit which will fit under a number of differently sized Volvo wheels. This
4-piston caliper keeps the same stock 240 sized 38 mm piston diameters,
so that there is no need to upgrade your master cylinder. https://www.bneshop.com/collections/240/products/240-medium-brake-kit-brembo-calipers https://www.bneshop.com/collections/240-medium-brake-brembo-kit
These Brembo calipers are LUG MOUNTED
RX7 BRAKE
CONVERSION
The brake conversion
below was originally introduced by DVS Performance Parts in Australia at http://www.dvs.net.au.
The conversion uses
an adapter bracket and a
front caliper from an 86-91 Mazda RX7 Turbo II, GXL,
GTU or convertible (using 5 stud
wheels).
LARGER ROTORS: 11.25" diameter (286 x 22 mm)
rotor from a Volvo 7/9 series. This adds almost one inch of diameter over a stock front 240 rotor. Supposedly
this
adaptation will fit inside most 15 inch wheels,
although a small (~5 mm) spacer may be needed for a
240 Turbo (15 inch Virgo) wheel.
Additional discussion
about this can be found at turbobricks.com/mazda-rx7-series-ii-turbo-caliper-adaptors-for-volvo-240.68630
An RX7 kit may be found in the USA at https://yoshifab.com/store/rx7-brake-adapter-bracket-kit.html
In
January 2013 I received an interesting email from
Willy Reerink in the Netherlands.
Hello Dave, I am
working on the ultimate Volvo 240 to
Mazda RX7 brake upgrade. My story is as
follows: In 2011
I bought a Ford Taunus dragrace car in
Sweden and bringing it to the
Netherlands where I live. As the car was
built in Sweden they used Volvo 240
spindles and calipers. But when the car
was built years ago it was much slower
then with its current engine. I bought
it with a 1.000 HP Chevy Small Block
engine in it. It never raced with this
engine and brakes. Last year we made the
first runs, and brakes seemed not to do
anything at all. So I first overhauled
the brakes, and used ECB race pads.
Brakes work now but the car is reaching
250 kph (156 MPH) and that makes braking
even more exciting then accelerating! Anyway,
I looked for a brake upgrade and decided
that to me the best solution was the RX7
upgrade. Cheap, easy to mount, and much
lighter then the 240 ones. I am
still working on it because I do
encounter some problems and I am not a
mechanic. I do this for the first time.
But I
can make a good comparison. The Volvo
240 ones did have just enough capacity
to stop the Taunus, but nothing left (I
prefer braking with the chute now). So
lets see what happens this summer when
the RX7 brakes are installed and how
they manage high speeds. We will see. You can
follow my brake upgrade on my blog
at: http://turbotaunus.wordpress.com/brake-upgrade/
Front
calipers:
17Z left and right 6-piston calipers
from a circa 2004-10 Porsche Cayenne / VW Touareg / Audi Q7 Models
using large 330 x 32 mm front rotors.
This caliper has a staggered piston design. Pistons are 34 mm, 36 mm and 38 mm(6238 mm² piston area per caliper). NOTE: This caliper has 37.5% more piston area than a 240 factory front caliper.
Rear calipers: 17Z left and right 4-piston calipers from
same vehicle
using 330 x 28 mm rear rotors.
This caliper has a staggered piston design. Pistons are 28 mm and 30 mm (2645 mm² piston area per caliper). NOTE: This caliper has 16.1% more piston area than a 240 factory rear caliper.
Rotors used: Standard Volvo S60R (Brembo), 13 inch (330 x 32 mm) front and
13 inch (330 x 28 mm) rear. Pads: OEM style Pagid pads for Porsche were used in this project.
These Porsche calipers are LUG MOUNTED
REAR CALIPER and adapter.
Because of the staggered piston
sizes on these calipers (similar
to the Volvo R calipers) and the fact that on the Cayenne
they were originally mounted on
the front of the rotors (and these are going behind them
on the Volvo), Jacob flipped the
crossover pipes and bleeder screws to swap them.
Having the staggered pistons in
the proper order will be best for eliminating potential uneven pad wear.
FRONT
CALIPER and adapter.
Front
caliper in place.
This is the
drum portion of a stock 240 rear
rotor.
The
disc
part has been cut away. This drum is then placed on the hub, then the S60R
rear rotor is placed on. This will retain the stock
240 parking brakes.
Rear rotor in place over parking brake drum.
This large 27 mm bore MASTER CYLINDER
is from a 1994-95 Mustang GT.
The Porsche calipers need more
fluid volume to move the brakes than stock
calipers do. The installer
felt that a smaller master
cylinder would not be adequate and
would probably create a longer
pedal travel. He has commented
that the larger master cylinder has kept the brakes from becoming too
grabby and they're easier to modulate.
The master cylinder used for this conversion was identified as: 1994-95 MUSTANG GT MASTER CYLINDER Ford PN 130.61062, Centric PN 13061062, Raybestos PN MC390185, Dorman PN M390185. Bore size: 1.0625" (27 mm). Standard bore, same front and rear. Push rod depth: 1.4 inches (35.5 inches). Rear brake line port is M10 x 1.0 mm bubble flare, so the Volvo brake line fits this.
Front port is M12 x 1.0 mm bubble flare so an adapter or new flare is needed. Brake Line Thread Adapter, Male M12 x 1 Bubble to Female M10 x 1 Bubble: Here's one: https://www.ebay.com/itm/Brake-Line-Thread-Adapter-Male-M12-x-1-Bubble-Female-M10-x-1-Bubble-/331605500736
More variations of this Mustang master cylindercan be seen HERE. Also
if you don't care for the strange looking tilted reservoir, a stock Volvo
reservoir can be fitted to this MC with a bit of effort. Reportedly,
some extra care must be taken to ensure a tight seal.
This link discusses that: turbobricks.com/mustang-brake-master-cylinder.349379 A plug pigtail is available to fit the Ford low fluid sensor: Dorman PN 645-920
To correctly fit the Ford master cylinder properly, the push rod on
the original vacuum booster needed to be extended
approximately 0.8 inch (20 mm) so the rod just touches the MC piston end when the brake pedal is at rest.
The stock position (LEFT) and the extended position (RIGHT) is shown below.
By
Edison Bender, November 2014
This
adaptation uses Cadillac ATS front
4-piston calipers and 13 inch
rotors from an S60R/V70R. It
will fit with most 17 inch wheels.
An advantage of this caliper is
that they are only about $120 each
new. The calipers may be
purchased from various OEM
suppliers and even Rock Auto
has them under the AC Delco
brand. They use the same
brake pads as the S60R/V70R, STI
or Evo, which uses 4-piston Brembos.
These calipers are LUG MOUNTED
Dick Prince 240 Race Car Brakes
This
information was compiled many years ago, but it's certainly still
very useful. Dick Prince in Australia included a lot of useful data, which
went into the making of his racing 240 dual master cylinder (non-boosted) brake system.
Certainly some of this info will
be of limited use for a street car, but that's OK. Click here for his page: http://www.ovlov.net/page.php?page_name=brakes Volvo 740 front hubs to receive rotor hats. DBA069 Mustang rotors 330mm x 28mm (left and right hand). AP Racing 6-piston calipers CP5570 (Pistons: 27.0 mm x 2, 31.8 mm x 2, 38.1 mm x 2). 17mm thick competition disc pads. Machined alloy caliper mounting adapters from Brunton Engineering. Two 5/8 inch (15.875 mm) bore Girling master cylinders with reservoirs. Master cylinder balance bar and adjuster cable. Removal of factory split circuit brake lines and factory reduction valves. Modifications to Volvo pedal box (brake pedal ratio changed from 4:1 to 4.5:1). Clutch master cylinder with integral fluid reservoir. Volvo brake upgrade calculations: Car plus driver = 1250kg (2755 lbs). Static weight distribution: 55% front = 690kg, 45% rear = 560kg. Braking at 0.9g with vehicle
centre of gravity 0.5m above road, produces a rotational moment about
the tyre contact patch of 0.9 x 1250 x 0.5 = 560kg.m. For Volvo wheelbase of 2.77m
this creates a weight transfer of 560/2.77 = 205kg, that is +205kg at
front axle, -205kg at rear axle. Front axle load under 0.9g stop = 690 (static) + 205 = 895kg or 447.5kg/wheel. Rear axle load under 0.9g stop = 560 (static) - 205 = 355kg or 177.5kg/wheel. Tyre radius (Yokohama A032R, 245x45/17) = 0.32m (approx. 12.8"). Front brake torque required = wheel load x 0.9g x tyre radius,= 447.5 x 0.9 x 0.32 = 129kg.m (approx. 930 ft.lb). Competition disc pad coefficient of friction = 0.45 approx. Rotor O/D = 330mm Approx. radius to centre of pad = 0.155m, thereforeClamping force to generate brake torque = 129/(0.155 x 0.45) = 1,850kg (=4,070lb). Front calipers: CP5570 6-piston: total piston area 50.1cm2. Area of 3 pistons 27.0 mm, 31.8 mm, 38.1 mm (per side) = 25.05cm2 = 3.883 sq.inch. Therefore hydraulic pressure = 1,850/25.05 = 73.85 kg/cm2 (1,048psi). Master cylinder 5/8" ID (15.875 mm), area: 1.98 cm2, so rod force for 73.85kg/cm2 = 73.85 x 1.98 = 145kg.
For rear, similar calculations to those above: Rear brake torque required: 177.5kg wheel load x 0.9g x 0.32m tyre dia.= 51kg.m. Clamping force req'd = 51/(mean disc radius 0.125m x coeff.of friction 0.45) = 905kg (1,991 lb). Rear calipers: standard ATE 2-piston each 1.49" dia. = 11.25 cm2 per side. Hydraulic pressure req'd = 905/11.25 = 80.4 kg/cm2 (1,140psi). Master cylinder 5/8" dia. area = 1.98 cm2. Rod force for 80.4kg/cm2 = 80.4 x 1.98 = 159kg (350 lb). Brake pedal: Volvo standard pedal ratio = 4:1. For this car, modified to approx. 4.5:1 Total rod load on twin master cylinders = 146kg (F) plus 159kg (R) = 305kg. So for new pedal ratio of 4.5:1 the foot pedal force for 0.9g stop is = 305/4.5 = 68kg or 150lb. Note that rod force for the
two master cylinders are similar (146kg, 159kg) which means that the
bias balance bar will be near centered.
Depending on your F/R caliper areas, you may need to select a different
master cylinder diameter to achieve approximately equal rod forces. I have found that in the Volvo racecar, a pedal force of 150lb is quite OK and in keeping for this application.
For a lighter road application, a pedal force of 100lb (45kg) will be more
suitable. This can be achieved with an aftermarket pedal box, like
Tilton with a pedal ratio of 6.2:1 SPECIAL NOTE: The calculations above are provided for the interest of motorsport enthusiasts only. Not for road use.
Info from Morten F. of Denmark October 2022
This
adaptation uses 4-piston calipers from a Renault Megane III RS.
Rotors are 336mm XC90 Discs. Front wheel adapters are only spacers to push the wheels further out +5 offset.
Brake lines
are plugged off in the same manner as shown in Alternate 1 HERE. Works great, though the balance needs some work. Front brakes grab a bit harder than rears.
Brake lines are
homemade with AN Stainless fittings and PTFE Hoses.
ADAPTERS:
These calipers are radial mounted and the adapters needed to convert
them to a lug-mounted type to fit the 240 spindle. Morten designed and
3D printed adapter prototypes first, until he was satisfied a good fit
was
achieved. The adapters were designed in
Inventor and then CNC milled from an S355 steel block. Morten did not trust aluminum
enough, though the weight saving would be significant. The caliper to
adapter bolts are M14x1.5 fine threaded grade 10.9 bolts. Adapter to strut bolts also
grade 10.9 bolts.
Misc. Master Cylinder Info I have begun compiling some useful
alternate master cylinder info.
These are alternate master cylinders that some
might consider using or comparing to when looking for for alternate piston bore
sizes in a master cylnder that might fit a 240.
These can be compared to a 240 MC with the following specs: Non-ABS240 tandem master cylinder has a STEPPED bore: 22.3
mm (0.878 inch) primary (REAR) bore, 15.75 mm (0.62 inch) secondary (FRONT) bore. (Average bore size: 19 mm). ABS240 tandem master cylinder has a STEPPED bore: 22.3
mm primary (REAR) bore, 19 mm secondary (FRONT) bore. (Average bore size: 20.65 mm). M10 x 1.0 bubble flare (European) brake line ports. 240 Master Cylinder Part Numbers:
240 non-ABS Brake line ports on left PN 8111005-8.
240 non-ABS Brake line ports on right PN 8111006-6. 240 with ABS PN 3530972, 8251131, 8602015.
Volvo 740 1986-88, 760 1986, 780 1987, 940 1991.
Volvo PN 1273243, 1359693, Dorman PN M39641. STEPPED BORE:22.2
mm primary (REAR) bore, 15.875 mm secondary (FRONT) bore. M10 x 1.0 bubble flare (European) brake line ports ON LEFT/FRONT or on BOTTOM.
Volvo 940 1992-95, 960 1992-97, S90-V90 1998.
Volvo PN 3530352, 6819771, Dorman PN M390090. STEPPED BORE:23.8
mm primary (REAR) bore, 20.65 mm secondary (FRONT) bore. M10 x 1.0 bubble flare (European) brake line ports ON LEFT or on BOTTOM.
Dodge Dakota 1987-93.
Dodge Chrysler 4294311, 4294312, 4294721, 4897208AA, Dorman PN M39638. STANDARD BORE:24
mm. Rear port: 1/2-20 thread. Front port: 9/16-20 thread. Outlets on LEFT.
Dodge Plymouth Colt 1987-89, Hyundai Excel 1987-89, Mitsubishi Mirage 1987-88, Mitsibishi Precis 1987-89. Hyundai PN 58510-21301, 58510-21302, 58501-21303, Mitsubishi PN MB238691, MB238700, MB316242, Dorman PN M39639. STANDARD BORE:0.813 inch (20.65
mm). M10 x 1.0 double flare (Asian) brake line ports ON LEFT.
Dodge Plymouth Colt 1989-92, Eagle Summit 1990-92, Mitsubishi Mirage 1989-92. Mitsubishi PN MB534019, Dorman PN M39722. STANDARD BORE:0.813 inch (20.65
mm). M10 x 1.0 double flare (Asian) brake line ports ON LEFT and REAR TOP.
Ford Mustang SVT Cobra 1993 Ford PN F3ZZ-2140-A, Raybestos PN MC390125, Dorman PN M390125 STANDARD BORE:1 inch (25.4 mm). REAR brake line port: M10 x 1.0 mm bubble flare. FRONT port: M12 x 1.0 mm bubble flare. Ford Mustang SVT Cobra 1994-95 Ford PN F4ZZ 2140-B, Raybestos PN MC390217, Dorman PN M390217 STANDARD BORE:15/16 inch (23.8 mm). REAR brake line port: M10 x 1.0 mm bubble flare. FRONT port: M12 x 1.0 mm bubble flare.
Ford Mustang GT 1994-96 Ford PN 130.61062, Centric PN 13061062, Raybestos PN MC390185, Dorman PN M390185. STANDARD BORE: 1.0625 inch (27 mm). REAR brake line port: M10 x 1.0 mm bubble flare. FRONT port: M12 x 1.0 mm bubble flare.
Ford Fiesta 1988-93 FORD PN E8BZ-2140-A, Dorman PN M39720. STANDARD BORE:0.750 inch (19 mm). M10 x 1.0 brake line ports on RIGHT.
Ford Ranger 1987-89 FORD PN E7TZ-2140-D, Dorman PN M39633. STANDARD BORE:0.938 inch (23.83 mm). REAR brake line port: M18-1.5. FRONT port: 9/16-18. Ports on RIGHT. Mercury Tracer 1988-89 FORD PN E8GY-2140-B, Dorman PN M39742. STANDARD BORE:0.875 inch (22.22 mm). REAR brake line port: M10-1.0. FRONT port: M10-1.0. Ports on RIGHT.
Nissan Pulsar NX 1985-86, Nissan Sentra 1984-85, Nissan Tsuru 1982-85 Nissan PN 46010-04B05, 46010-04B06, Dorman PN M39555. STANDARD BORE:0.750 inch (19
mm). M10 x 1.0 double flare (Asian) brake line ports ON LEFT and REAR TOP.
Nissan 280ZX 1982-83 Nissan PN 46010-P9100, Dorman PN M39408. STANDARD BORE: 15/16 inch (23.8 mm). M10 x 1.0 double flare (Asian) brake line ports on BOTTOM.
Saturn 2000-2002 GM Saturn PN 21013195, Dorman PN M630056. STANDARD BORE:0.875 inch (22.22 mm). REAR brake line port: M12-1.0. FRONT port: M11-1.5. Ports on RIGHT.
Miscellaneous Stuff:
OTHER INTERESTING
BRAKE PHOTOS
These
are
interesting.
Pretty simple design.
I found these pics on a Porche 944 site. Anyone
want to make some sets for 240s??
The below
photos are Porsche calipers adapted by a European
240 owner for an '81 244 Turbo. These
calipers are considered radial
mount.
Custom two-piece rotors were used, however the
rotor size is not known. Nice, simple
adaptation. These pics were located in
the following Turbobricks thread: turbobricks.com/porsche-brembo-monoblock-conversion.22070 These calipers are RADIAL MOUNTED
Using an Electric Vacuum Pump
to Improve Low Brake Booster Vacuum
In 2024 I began studying this idea this after seeing it discussed in some TB forum posts.
Volvo began used this idea in the early 2000s to improve brake booster
response in FWD cars. I'm using Volvo parts and info below. This info
should help if you want to use these Volvo parts on your older car too. These components
shown below were
originally installed by Volvo in the early 2000s for FWD and AWD cars.
Many BMWs and Mercedes in the same era got very similar parts. Apparently the Volvo whiteblock engines needed some supplemental manifold vacuum to keep the brake systems
happy. I think a big part of this for VOLVO was related to the Dynamic Stability Traction Control (DSTC),
which used the ABS brake system to enhance handing in extreme handling
situations. Since the DSTC needed brakes to fully function, even when at
full throttle or under turbo boost when normal manifold vacuum might not be available, it needed a way to provide full
vacuum to the brake booster, independent of engine vacuum. So Volvo
installed a Hella vacuum pump to keep the booster fully charged with
vacuum at all times. These were apparently eventually phased out when
manufacturers began using electric brake systems and I think vacuum boosters
have became a thing of the past. WHY USE ONE IN A 240?
My low compression B21FT with 7.5:1 CR doesn't make very much vacuum on it's own. For a while
I used a high-performance Unitek cam, which made even less
vacuum. At times vacuum was BELOW an acceptable level that the brake
booster needed, so brake assist might work ok or it might not. I
changed to a milder cam and the brakes were better, but then I
missed the bigger cam. Useful Volvo Part Numbers
31317530 (31317525, 30793053)
Vacuum Pump, Genuine Hella "UP 28" (believed designated for 2004-12 S40, V50). Probably also used other Volvo part numbers.
31400692
3-way vacuum switch, Genuine Volvo (same as one I bought).
926-887 (Dorman)
3-way vacuum switch. Alternate aftermarket Dorman PN 926-887. Identical to Volvo switch 31400692 (I also bought one of these).
31400693
3-way vacuum switch, Genuine Volvo. Slightly different. Same function. Hose nipples are pointed differently.
30665071
Retainer-clip for vacuum switch to hold it in position somewhere. I did not buy one.
8683264
Bracket for vacuum pump. Same as the bracket I used (for 2004-12 S40, V50). Mine came with the used pump.
30648920 (8633631)
Bracket for vacuum pump. Different mounting style (for 2004-09 S60).
30636534
Rubber isolator for pump mount. Same larger isolator pictured below. One for each side (for 2004-12 S40, V50).
30636535
Rubber isolator for pump mount. Same smaller isolators pictured below. Two for each side (for 2004-12 S40, V50).
30648921
Special M6 shoulder bolt with flange. Two needed. Same as shown below.
985866
M6 lock nut with flange. Two needed. Same as shown below.
30620537
Rubber isolator for pump mount (this is a different style isolator, which I didn't try).
While this is not the only model of vacuum pump Volvo used, this seems to be the most common by far.
THIS is the Hella UP 28. So I decided to try out a UP 28. I bought a used one.
Other Hella pumps that you might read about are UP 30 and UP 5.0, which are larger.
Volvo assigned a
lot of different Volvo part numbers for the Hella UP 28, since this pump was used
for a number of Volvo models over a number of years. A new pump can be
expensive, especially if you buy one from Volvo ($300-$400 or more). If you're shopping for a new "genuine" Hella pump from an unproven source, use caution. There are definitely some Chinese low-cost knock-offs, so
there may be some counterfeits being sold as genuine Hella. If you see a
really low price for a new "geniune Hella," I would be careful. I saw
one on Amazon which said it was a Hella, but the price was really low.
The reviews gave it away. A number of people complained how their
new pump failed in a month. Nope!I decided to try a used one below from eBay. It came with a bracket and rubber isolators, which I used and I'll show in detail further below. The Hella UP 28 is rated to pull about 14.7 Hg (inches/Mercury) of vacuum within about 4
seconds
or (if needed) up to about 20 Hg of vacuum within 11 seconds at
13 volts. It sucks from that front nipple and exhausts from an exhaust port on the back side. It uses 15 amps max,
or about 10 amps average between thresholds.
Sources: https://myhellalights.com/up28, https://www.hella.com/10069076a_AM0.pdf If you're curious how one one these sounds when on, here's a short video: https://www.youtube.com/watch?v=qzGbMzJ7bPk&t=85s If this sounds LOUD to you, YES it can sound that way when your
ears are close to it and the engine is off, but I find that it's pretty hard to
hear it come on when the engine is running and the hood is
closed and I never, ever hear it from inside my car.
.VACUUM SWITCHES and VALVES
A vacuum switch or vacuum sensor is needed to trigger the pump ON or OFF so it doesn't just run all the time.
I've seen a few videos where people had wired these pumps in cars (not
Volvos) wired to run FULL TIME.Don't be a dumbass. Running it full
time will probably just wear it out fast. It's only rated to run about
1000 to 2000 hours total. Using a vacuum switch to make it run only when
the brake booster needs a burst of vacuum makes a lot more sense.
This image below shows one of the ways Volvo would plumb vacuum hoses
between the brake booster, intake manifold and this vacuum pump. This method
uses three separate parts, which all include one way check valvesto
allow vacuum to flow only where it's needed, but keeping out boost. I am not
planning to use all these separate devices. My plan was to use a different
style switch Volvo also used.
The vacuum switch I chose is BELOW. It's an all-in-one switch with all of the check valves built in.
The function arrangement I used is a little similar to the arrangement above.
The switch needs to sense
the vacuum from the brake booster, which this switch below does. If
vacuum is below a specific
level, it'll trigger the pump to "recharge" the booster, so in theory it
should be ready at all times for when you need to push the pedal.
While a genuine Volvo switch is available, the FIRST switch I bought was a less expensive replacement version made by Dorman, PN 926-887. Cost was $36.
INITIAL PLUMBING ARRANGEMENT (my first attempt) The PN for a genuine Volvo switch is 31400692 (I think Hella probably made these too). This switch was used in many 2003 to 2009 S60, V70, XC70, and S80 models.
The genuine Volvo switch is also available from FCP: www.fcpeuro.com/31265825. I bought one of these later, after first buying a Dorman aftermarket one. More about both of those in the Installation Section.
PLUMBING ARRANGEMENT #1
"ARRANGEMENT #1" shown above, drawn up based on my interpretation of factory Volvo diagrams. One such diagram is shown below, and it was reinforced by these videos which show the same:youtube.com/Ifx5z8hQqEI, youtube.com/PRbWD2OGytk. So it's pretty clear to me I had a "proper arrangement" of this switch, HOWEVER, nowI DO NOT recommendthis arrangement.
Keep reading and you'll see why I changed it to "Arrangement #2" in the Installation Section BELOW.
This 3-way switch is designed to be placed in the hose between the
manifold vacuum port and brake booster. This way your booster is still directly
connected to manifold vacuum for safety and if you're vacuum pump were to fail, vacuum can
still be available from the manifold.
This
switch has several one-way check valves buit in. One check valve is at the manifold vacuum barb, so turbo boost cannot enter it from the manifold.
The barbed nipples are made for 3/8 inch ID hose. A fairly stiff hose that will not collapse under vacuum is recommended. Simple fuel hose seems to be fine for this.
A SLIGHT MODIFICATION TO THE SWITCH A "proper" connector for this switch is a special one made to fit theseTWO RAISED Ridges below.
If you don't have that special plug, a common2-pole EV1 fuel injector plug can be used, but first you will need to TRIM OFF thetwo raised ridges from the switch as shown below.
VOLVO VACUUM SWITCH ON-OFF BENCH TESTING:
I did some vacuum switch testing with a Mityvac vacuum hand pump. This switch is normally closed (NC), which means it's ON at normal ambient pressure. So if you wire
it like the my RELAY diagram below, it should come on as soon as you turn the key
to 'RUN'. The switch then OPENS (shuts off) at about 14 Hg (inches/Mercury) vacuum. Then as vacuum drops, it comes back on at about 13.25 Hg.
I tested BOTH a NEW DORMAN switch and a NEW genuine VOLVO switch. The results were identical. It must be noted that this switch appears to have a very, very small LAG threshold where its
turn-ON setting is slightly lower and very close to its turn-OFF setting, but only about 0.75 Hg apart.
I think these settings are a little too close together, but it's not adjustable. Having them so close
together can create a problem. Definitely you need to make extra certain
there are no leaks anywhere after installation. I have a VIDEO below in the INSTALLATION Section showing the initial problem I had when I was first using "Arrangement 1" plumbing.
WIRING DIAGRAMS This first wiring diagram below comes from
Volvo diagrams (TP3976202, 2005 S60/V70 series, page 102), which shows the vacuum
pump and switch I'm using. According to this diagram, Volvo wired DIRECT POWER through the vacuum switch to the pump, INSTEAD of using a RELAY. Apparently Volvo thought a relay wasn't needed or maybe it saved a couple dollars. I strongly disagree with this idea. Perhaps this is why I've heard from Volvo techs that this switch wasoften a failure point in these cars.So my advice is don't be stupid. USE A RELAY and your switch will probably last longer.
I wired this system using the diagram BELOW I made.
Polarity is not important for the vacuum switch connector. The switch
can be wired to trigger power or ground. I my diagram I chose to have it
trigger a
ground to activate the relay. Then the relay can handle the heavy load and activate
the pump.
If you bought a Hella pump with an electrical plug, it will probably be the same as the
aboveYazakiFEMALE plug. If you need terminals or a mating connector,
they're Yazaki 2.8 type. I didn't have a matching MALE Yazaki plug, so I changed it to an AMPHENOL ATP connector shown BELOW (rated at 25 amps). I really like Amphenol AT connectors. More info about AMPHENOL ATP connectors is detailed in my Crimping Page athttps://www.240turbo.com/crimps.html#deutsch.
Some more useful documents maybe. . .
Rubber Isolator Detail
The steel mounting bracket is mounted between the bushings show by the arrow below. FULL INSTALLATION BEGINS HERE I decided I didn't need some of the extra mounting arms on this bracket, so I trimmed off some metal to make it more basic.
The best place I found to mount this with decent room under my hood seemed to be a flat spot on the left inner fender,
below the brake booster and master cylinder, just above the frame. It's
awkward getting in there and I needed to use a 90-degree drill. I
installed three thread inserts in the sheet metal and you can see those poking out on the back side, just
behind the front left strut.
RELAY and FUSE I wanted the fuse and relay to be easily accessible, so I used a
rubber-lined harness mount to attach them to my diagonal strut brace.
INITIAL TESTING FAILURE (and then CHANGES)
As mentioned earlier, this pump was installed first using the Dorman vacuum
switch and using "Arrangement #1" hose routing. This video below was a static test with the key ON and engine NOT running. It shows how this was clearly not working yet as I had hoped. https://www.youtube.com/watch?v=3mortR_pzr8
I began thinking that CLICK-CLICK CLICK, ON-OFF issue might be partly due to the vacuum switch OFF and ON internal setting being so tightly close together, thatthe switch might be having trouble shutting off and staying off after charging the brake booster. For this reason I think it would have been better if the OFF and ON setting were farther apart? That would
probably cure this, but ADJUSTMENT is not an option with this switch.
After trying the Dorman switch, I then also tried a new genuine Volvo switch in case it was better.I
tested that too and it was exactly the same.OFF at about 14 Hg and ON again at about 13.25 Hg.
I then vacuum tested my old original brake booster using a hand-held vacuum pump
and I found some slight leakage. Even though it was working pretty well, it was not holding and keeping vacuumquite as perfectly as it should. Thinking I might have discovered the problem, I hooked up a brand new booster to the switch and the ON-OFF Click-Click-Click CONTINUED. Dammit!
Then, finally, after a suggestion from another 240 owner, I changed the
hose plumbing arrangement and things improved (see BELOW).
If you need to VACUUM TEST your BRAKE BOOSTER, I have added more info in the Brake Booster Section. CHANGING THE PLUMBING ARRANGEMENT I had chosen ARRANGEMENT #1
after seeing it done that way in factory Volvo diagrams and in a couple videos showing where the
hoses from this switch normally go on Volvos. After suffering through this issue for a few days, I found that someone (T8fanning in this TB forum thread) had also installed this same pump and vacuum switch in his 240, but he had plumbed the hoses
differentlyand it seemed to be working for
him.
So I swapped two hoses on the switch to make it like ARRANGEMENT #2 above. It suddenly began to work better for me too. I can't explain why and I don't like it
when something works for no explainable reason, especially when I have
seen so much info showing I had the "proper arrangement" before. Testing has continued using this new arrangement and
it's still working well after a few years. The BELOW photos show Arrangement #2. And I made a new video demonstrating how it's working so much better now. https://www.youtube.com/watch?v=a76cz8jDZN0 I added captions so it's easier to understand (you might need to click the CC button).
Optional Retainer (clip) for mounting the above Vacuum Switch.
This retainer is Volvo PN 30665071. It was used in Volvos which used
this vacuum switch. If you need a way to mount this switch, at the
time of writing I found it was available new for about $5.00.
ALTERNATE ELECTRONIC ADJUSTABLE VACUUM PUMP CONTROLLER
For a while I strongly considered assembling an adjustable electronic
controller for the pump. This was considered especially after I had the problem with Arrangement #1. The below controller was fully designed, but never actually built, because the project eventually began working fine with Arrangement #2 before I built this. This diagram design was developed
with help from Gene at Widget Man Parts. The function of this controller should be good, so if you try building one, please let me know how it works. EXPLANATION OF FUNCTION
The FDM DC Universal Fan Controller in the diagram is offered by https://gkgoodcheapparts.com and can beFOUND HERE.
It was originally designed as a DC cooling fan relay controller. I
haven't used one of these fan controllers before, but I'm using some other
items from Widget Man Parts in my Brushless Cooling Fan Project Page.
In the normal use as a cooling fan relay controller, the FDM Relay Driver
Output would be a normally open (NO) signal. For this to be used as a vacuum
pump controller, this signal is now used as normally closed (NC), because the Vacuum
Sensor used above is positive coefficient, unlike a coolant sensor, which is negative
coefficient. This Relay Driver Output signal will be used to activate
Relay K1 above, which will come on as soon as your system power comes on. This will run the Vacuum
Pump until the high vacuum setting is reached. The in-lineVacuum Sensor requires 5
volts. To supply this, the resistor and zener diode form a 5.1V voltage regulator. Note
that a zener diode is not the same as a diode. It's different. The
zener diode sinks any voltage above 5.1V and the resistor limits current
through the zener diode (It's necessary. It would blow if simply connected to
12V). The in-line Vacuum Sensor acts like a potentiometer. It supplies a
low voltage output signal, which slowly increases in voltage as vacuum
to the vacuum sensor increases. After the power is turned ON and the Vacuum Pump makes
its run up and shuts off, Relay K2 becomes active and it supplies
5V to the 10k Ohm Potentiometer.
With the Potentiometer output wired this way to the
FDM Sensor Input, it performs as a variable resistor (0~10K). When
set at a lower resistance setting, it will pull the voltage signal
higher by adding current to the FDM Sensor Input. If turned to a higher
resistance setting, it will reduce current. Adding more voltage to
the
FDM Sensor Input fools the FDM into registering higher vacuum than
there actually is. This will delay turning the Vacuum Pump back on as
vacuum slowly drops off from peak. So then you can set the TURN-ON point as
a customizable setting
somewhere below the high TURN-OFF point. Then once vacuum dips to your low TURN-ON point, Relay K2
switches off and the extra voltage is removed. Relay K1 then
activates again, repeating the cycle so when needed, the pump can run back up to the high vacuum setting. NOTE: It might be a good
idea to put a small inline check valve in between the pump and the sensor, so
if the pump "bounces" on shutdown and the sensor is sensitive to that,
the sensor won't be affected by the bounce. If the sensor was affected
by a bounce, then it might do a rapid ON-OFF thing, which would be
annoying.
Hydroboost Conversion for 240
If
you want to keep your power assisted brakes but for whatever reason you
cannot fit or cannot use a vacuum brake booster, then this Hydroboost
conversion might interest you. This has been done a couple times on a 240. I
thought it deserved to be shown here in case this can be useful for
any of you modded 240 owners brave enough to go this far.
If you're doing a
modification like this in your Volvo, please contact me. I'd really like to
hear about it.
The Hydroboost unit installed into this 240 came from a 1999 Ford Mustang Cobra. This information does not come from my personal experience. This information comes
from Aidan H. of State College, PA, and his 1990 240 wagon. He installed a massive Ford 4.6L 32V DOHC V8 from a 1998 Lincoln Mark VIII.
Aidan's build thread is very detailed with a lot of photos. He offers a
large amount of easy to understand explanations for many of the unusual mods
he did. Aidan's reason for installing a hydroboost was there was
just no room left for a vacuum booster with this humongous engine. Aidan's build thread: https://turbobricks.com/index.php?threads/4-6-32v-240-wagon.343681.
This system uses the existing
power
steering hydraulic pump to feed pressurized power steering fluid to the
Hydroboost unit. The Hydroboost system then uses that pressurized fluid
to boost the brake pedal. The Hydroboost does not use or need a vacuum
source.
This is why it's the preferred system used for diesel engines or any
other engine with a low vacuum source. and of course it has also been used in cars with no room for a vacuum booster, like the Mustang. If you're wondering what that external cylinder is that can be seen of any Hydroboost. It's a gas pressure cylinder that acts a pressure reservoir. It will hold hydraulic pressure in the unit
after the engine stops, which can perform as a safetly device, allowing
the brakes to retain some power assist for one or two pumps if the
engine dies which moving.
General Hydroboost Hose Plumbing Diagram
The above diagram is focused on the Ford Mustang Hydroboost
unit. Other Hydroboost units are out there and there seems to be some
small differences between this one and Ford truck units. Plus there are GM and
Mopar versions and also some aftermarket versions designed for custom
installations. I'll show more info further down about the differences that I've found.
Note in the above diagram that there are THREE hose ports on a Hydroboost unit. Two are
high pressure ports and one is a low pressure output that returns fluid
to the reservoir (this low pressure hose tees with the low pressure return hose from
the steering rack hose to the reservoir). There are other hose diagrams online which
show options, such as filters and coolers, if you think that's also needed.
Mounting the Hydroboost.
Here's are some side by side comparison photos between the Mustang Hydroboost and the 240 vacuum booster.
The above photo shows how the 1999-2004 Mustang Hydroboost looks when mounted in a Mustang. Notice in this photo that the master cylinder reservoir top is LEVEL and the firewall mounting plate is VERTICAL,
but everything else is at an uphill angle. This style of mounting was specific
and unique to the Mustang. Many Hydroboost units are mounted LEVEL in
many other vehicles. It appears only a few vehicles have them at an angle.
Since it's best to mount this unit level in a Volvo, Aidan removed the mounting plate and flattened it using a press.
The plate can be separated by removing a large nut (1 15/16 inch) on the
back, which secures the Hydroboost to the plate. Flattening a used plate is one option. If
you're willing to buy (or create) a different mounting plate,
you'll find a variety of Hydroboost mounting plates online with
different configurations, or make your own like discussed below.
Mounting the 240 Brake Pedal Box Behind the Hydroboost The firewall bolt pattern for the Hydroboost and the existing holes for the vacuum booster are not in the the same place. Aidan drilled new holes in his firewall for the Mustang Hydroboost mounting plate.
The brake pedal box in a 240 is normally held to the firewall by the
four studs on the vacuum booster. The Volvo 240 bolt pattern measures142 x 90 mm (5.6 x 3.54 inches).
So as seen ABOVE, Aidan tack-welded four bolts into the existing holes so the brake pedal box could be bolted in under the dash.
According to https://lmr.com/products/
(source of above photo) Ford Mustang Hydroboost units came with two different bolt patterns as shown above,
which are reportedly 3 1/4 inches high and 4 1/4 inches wide.
If you have some fabrication skills, you might consider making your own NEW CUSTOM MOUNTING PLATE for the Hydroboost with bolt pattern spacing of 142 x 90 mm, same as the existing firewall holes for the Volvo firewall and brake pedal box. The large center hole for the Hydroboost is reportedly 1 5/8 inch.
Mounting the Master Cylinder
As you can see above, the 240 master cylinder has a horizontal
mounting flange. Mustangs that used Hydroboost use a vertical flange.
One is 90 degrees and the other is 70 degrees. The actual Hydroboost
unit may be the same. Just clocked differently. A Mustang Hydroboost is
not the only option, but it's the one Aidan used. There are other
Hydroboosts that are mounted so the master cylinder flange is
horizontal.
Aidan decided to design and make his own adapter. He found that both
the Volvo and Ford Mustang master cylinder flanges had the same bolt spacing of
3.2 inches.
I added a couple more dimensions to Aidan's drawing above. It rotates the master cylinder 70 degrees.
If you're not capable of making or having such an adapter made, check
online. There are existing adapters already being offered for
custom Hydroboost installations that can re-clock a master cylinder.
The pushrod from the Hydroboost to the master cylinder needed to be
shorter, so Aidan ground it down until it would fit just right.
Next I'll show the push rod for the brake pedal. Here's the problem above. The Hydroboost push rod is quite
different from one that will work for a 240. While there is more than
one solution, first I'll show how Aidan addressed this below.
The hole in the Mustang Hydroboost push rod was 5/8 inch. Adain used a
piece of 5/8 inch steel to fashion a spacer to fit in the hole. He then
cut a slot in the leading edge of the 240 brake pedal arm.
This seems to work fine, however there may be other solutions that can
be created to use an existing clevis and pin that might be more similar
to the type used in a 240.
So there are replacement push rods that can be found for a Hydroboost, some with clevis devices that might be usable.
If you're wondering if or how the Hydroboost push rod can be removed, I found a couple videos showing how. It's pressed in and needs a little force to pull it out. Seems fairly simple to remove it. https://www.youtube.com/watch?v=XQpiRcgBfjI https://www.youtube.com/watch?v=eZi5O30f5GU&t=68s
Comparing a Ford Hydroboost to GM.
The above photos shown some basic differences. The obvious difference is
that the GM Hydroboost is mounted in a different clocked position. The
reservoir cylinder is below the unit and master cylinder flange is
horizontal. The length of the GM unit may be a little different,
but that's hard to tell from a photo.
Something different to stare at and wonder.
For mostly entertainment purposes. This is a GM Hydroboost that's been
mounted
REMOTELY in the trunk of a 1966 Ford Fairlane, which was owned by Dick
Hedman (son of Bob Hedman of Hedman Hedders). There was a pretty good
reason for doing this. No room under the hood. You can check the car out
at the below
link. The brake pedal pushes a small master cylinder under the dash,
which feeds to the slave cylinder in the trunk, which pushes the
Hydroboost, etc. The instrument cluster opens or folds out to view the
fluid level. Check it out. You won't be disappointed: https://bringatrailer.com/listing/1966-ford-fairlane-29/
iBooster Conversion for Volvo
If
you want to keep your power assisted brakes but for whatever reason you
cannot use a vacuum brake booster, then this ALL-ELECTRIC conversion info might interest you.
Here's
an article detailing how to install an electric brake booster from an
EV in a 122. The process would not be very different for a 240. Electric
brake boosters are being used in performance applications with low
manifold vacuum, hybrid and electric car conversions or to save on space
in the engine bay.
This
is an electric REMOTE
brake booster. It's remote because it can be mounted in another
location away from the master cylinder. This is useful if your firewall
lacks the space for a vacuum booster or an alternative booster, like
those above. In the below image and video, it can be seen mounted in a car BEHIND
an inner fender just forward of the left wheel. Dimensions of this booster are 7 inches long x 5 inches wide x 8 inches high.
It appears that the master cylinder from this company is proprietary, so it's my belief their master cylinder must be used. The above images come from the Jegs instruction Guide, which can be found at: https://www.jegs.com/InstallationInstructions/500/555/555-631252.pdf


 alternators are known for poor voltage.")


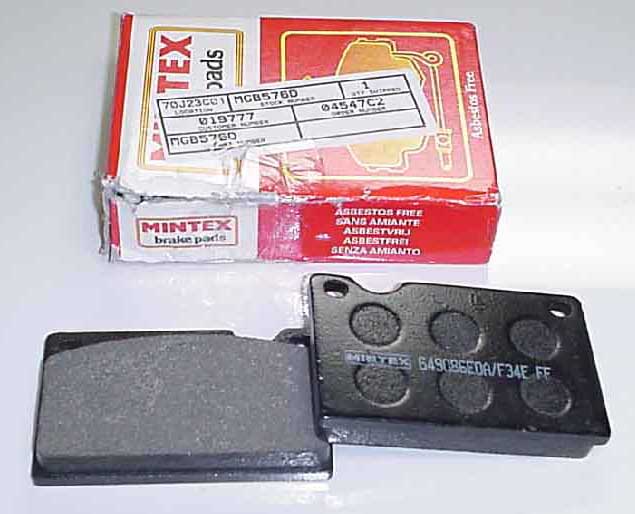
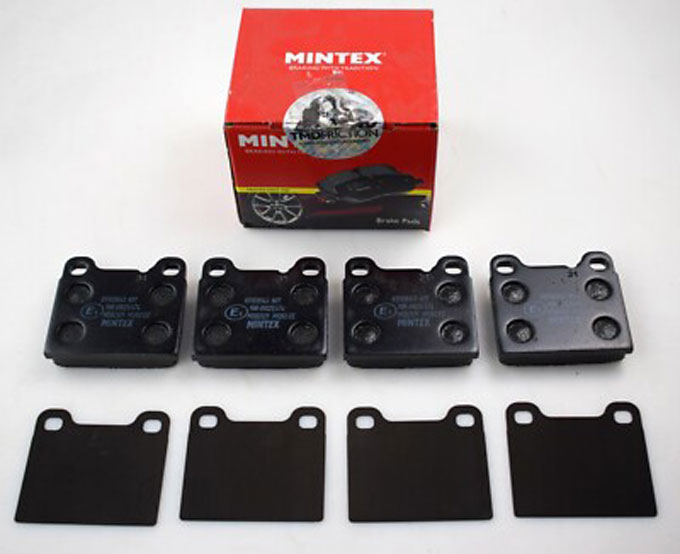


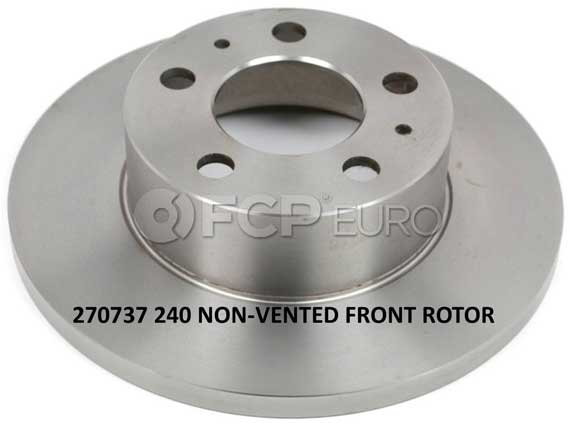


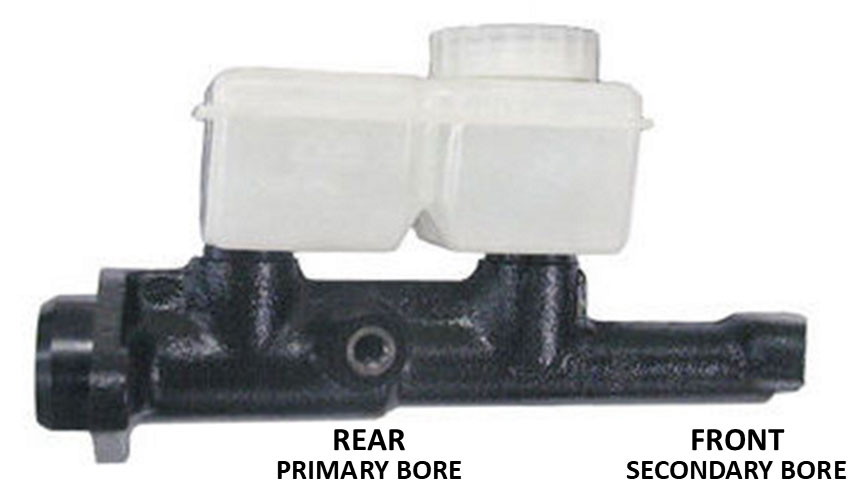

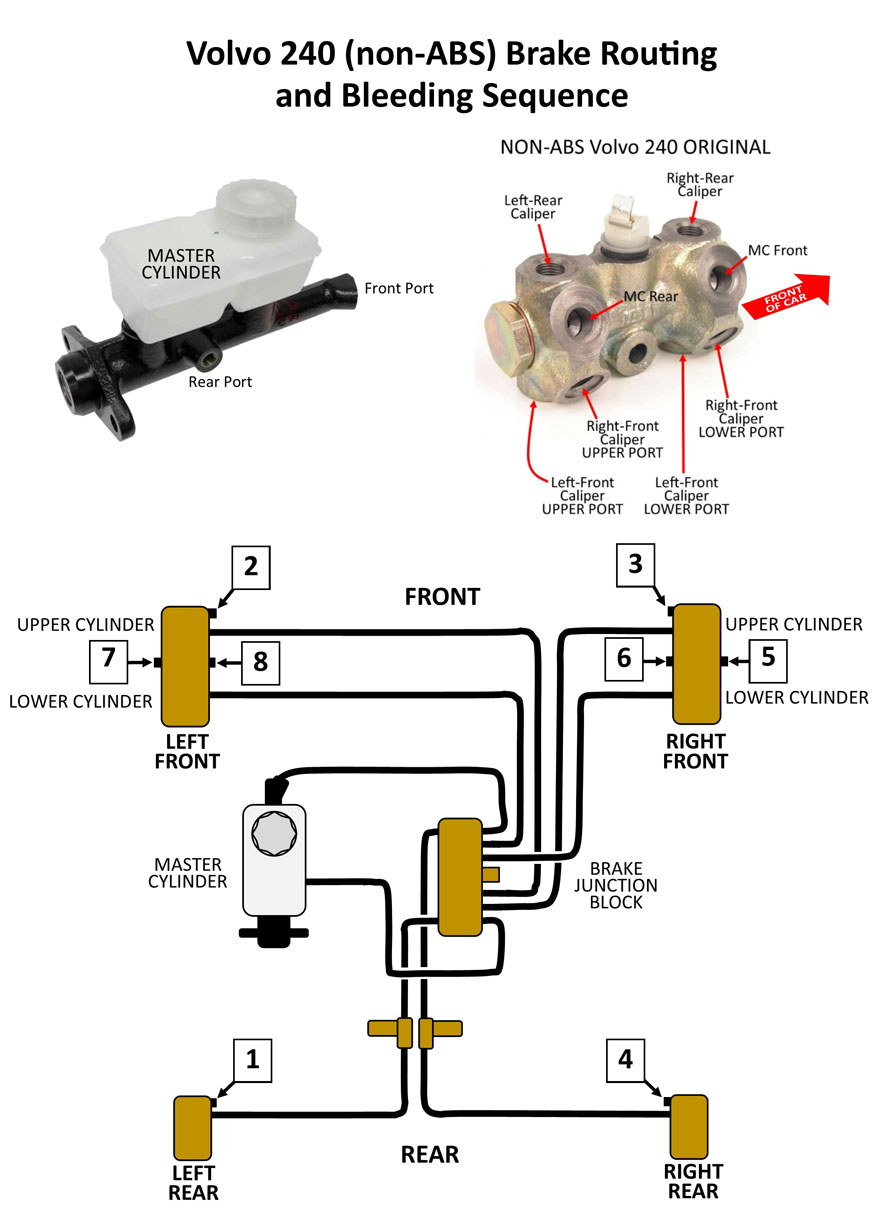

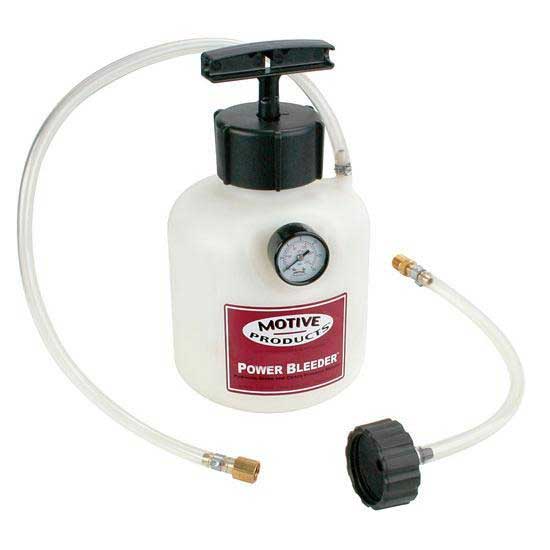
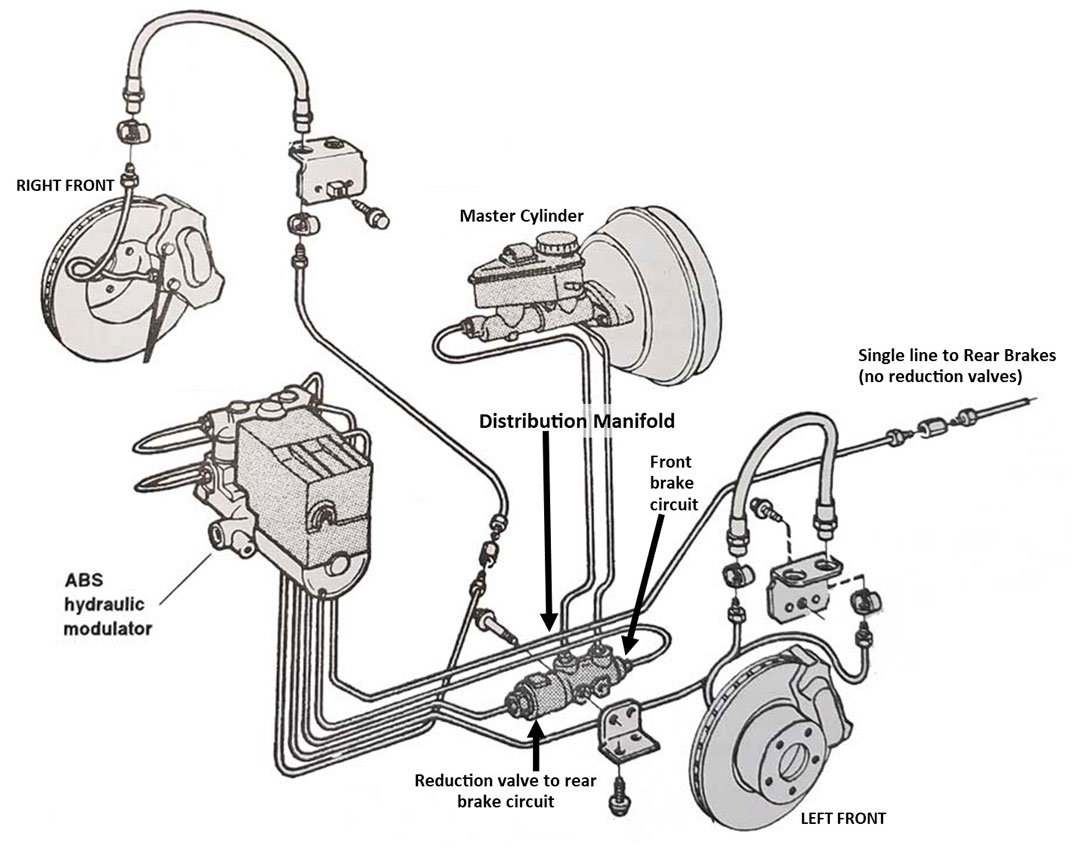
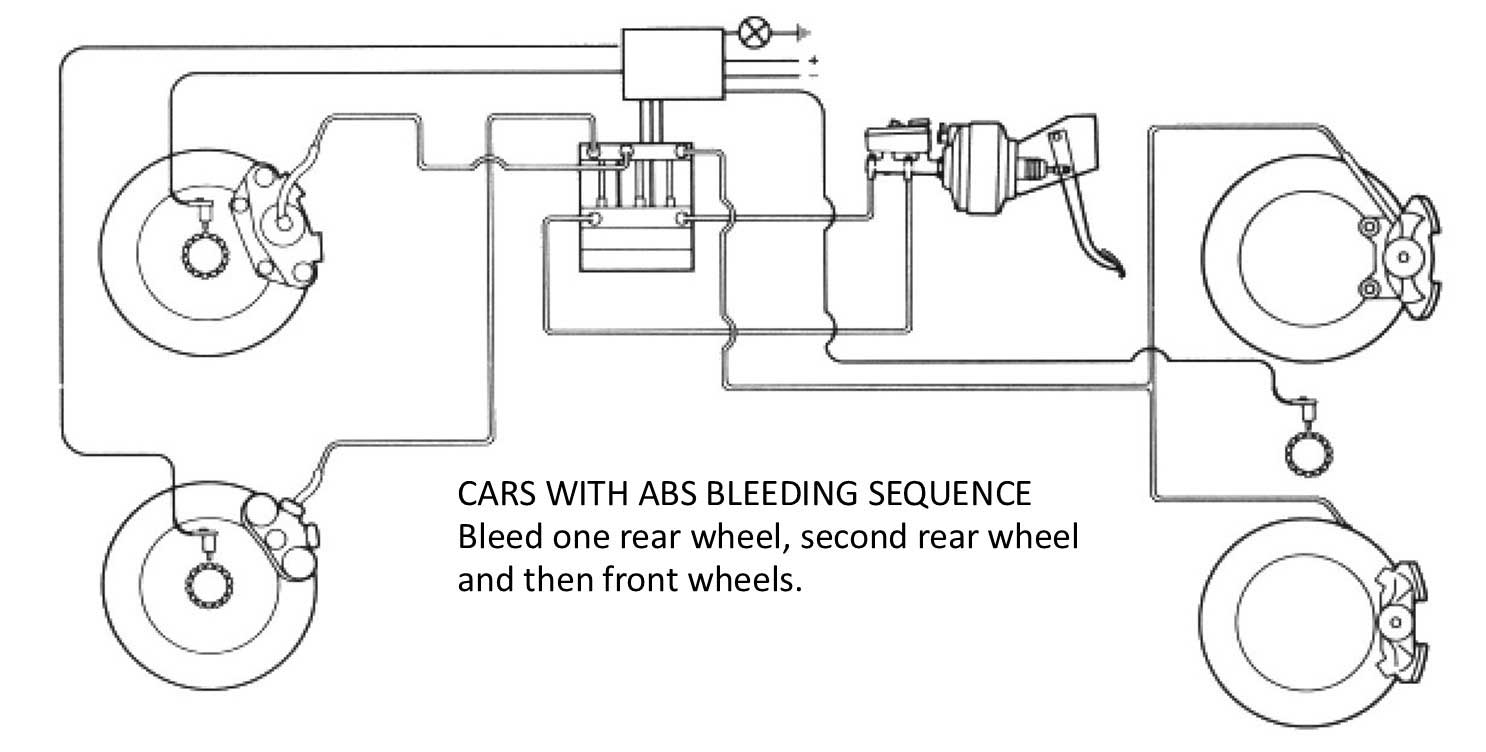


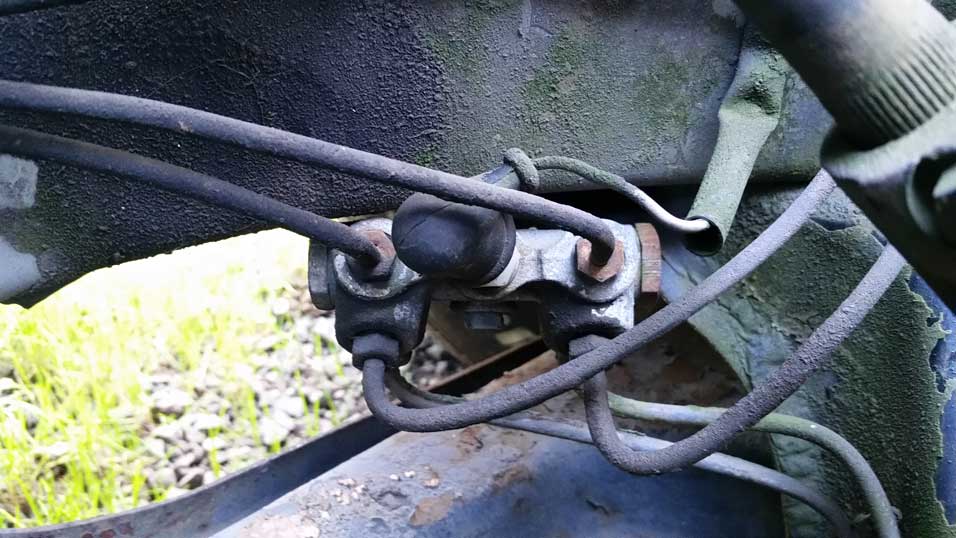
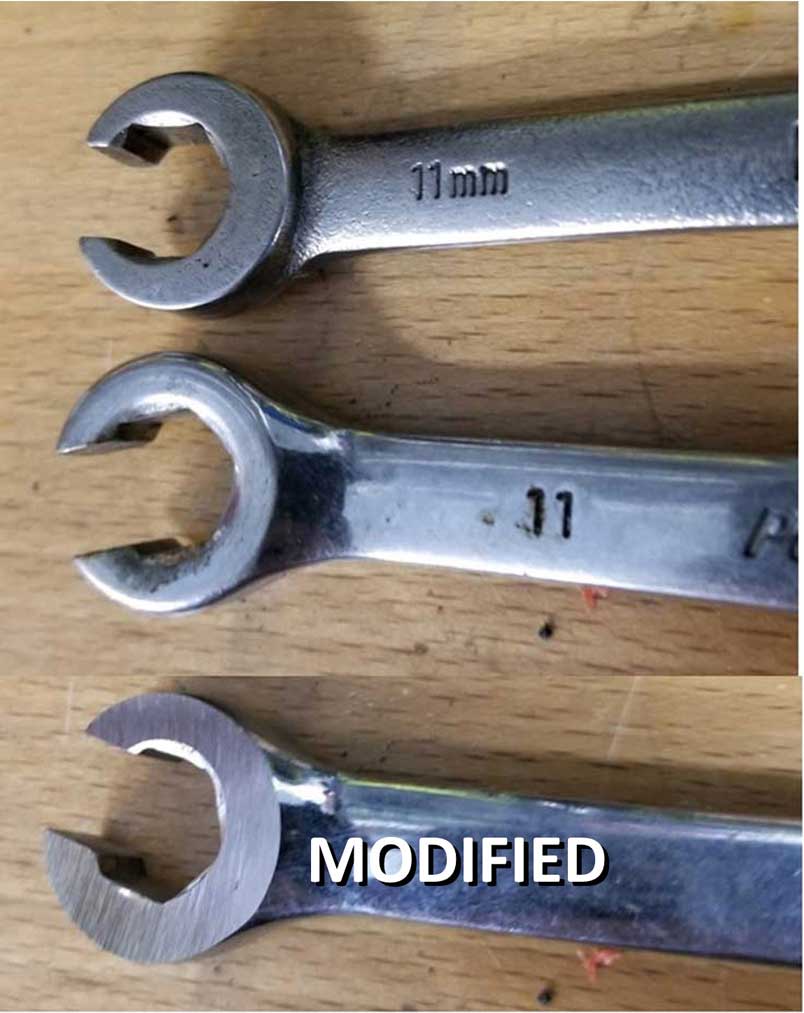
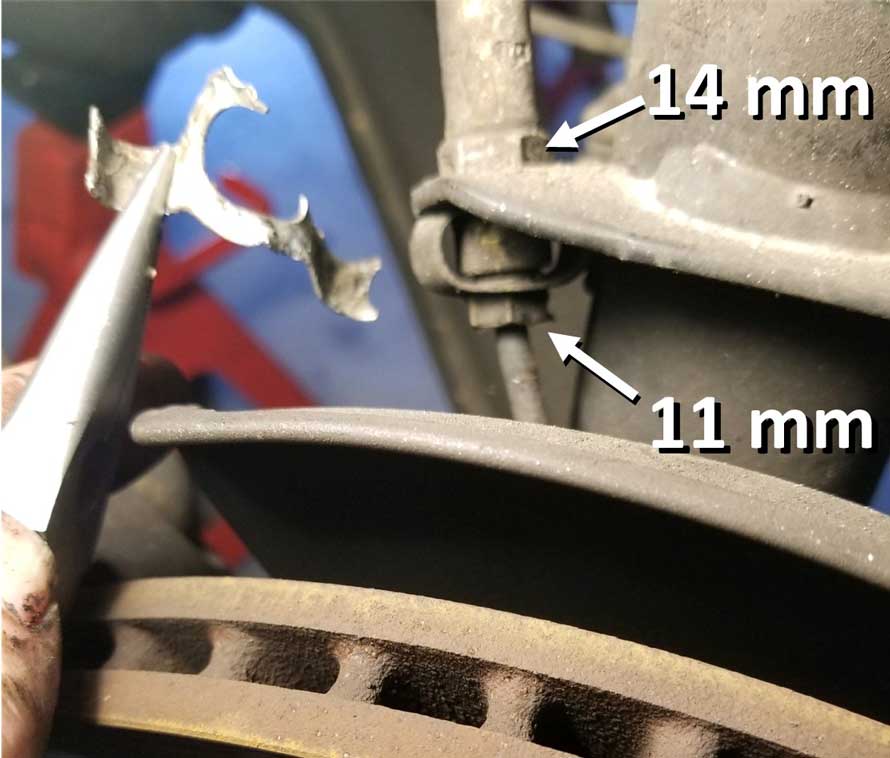

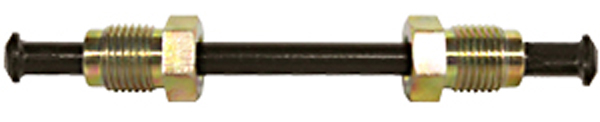
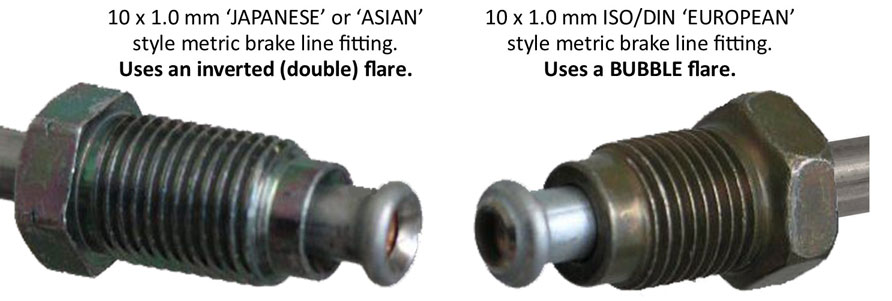
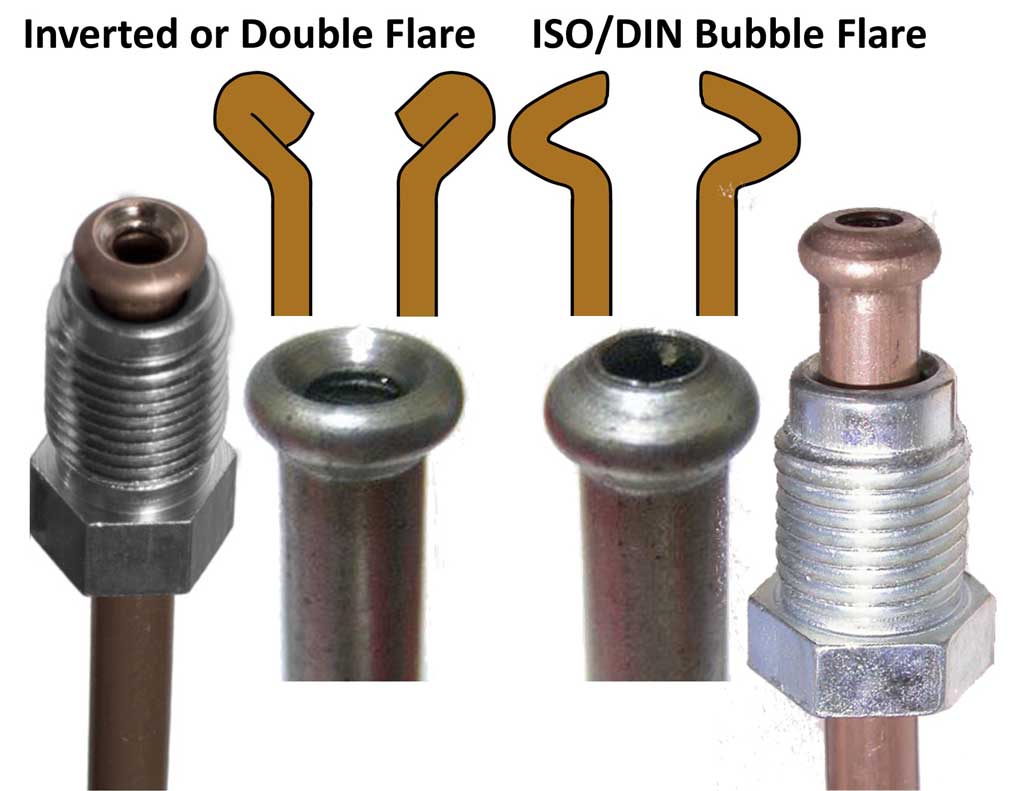

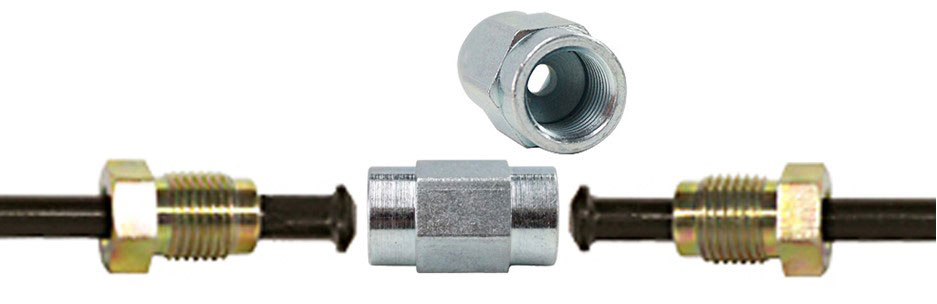
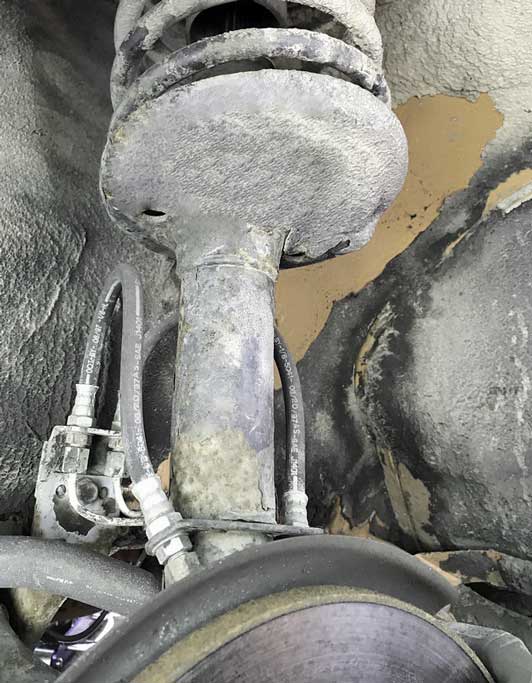
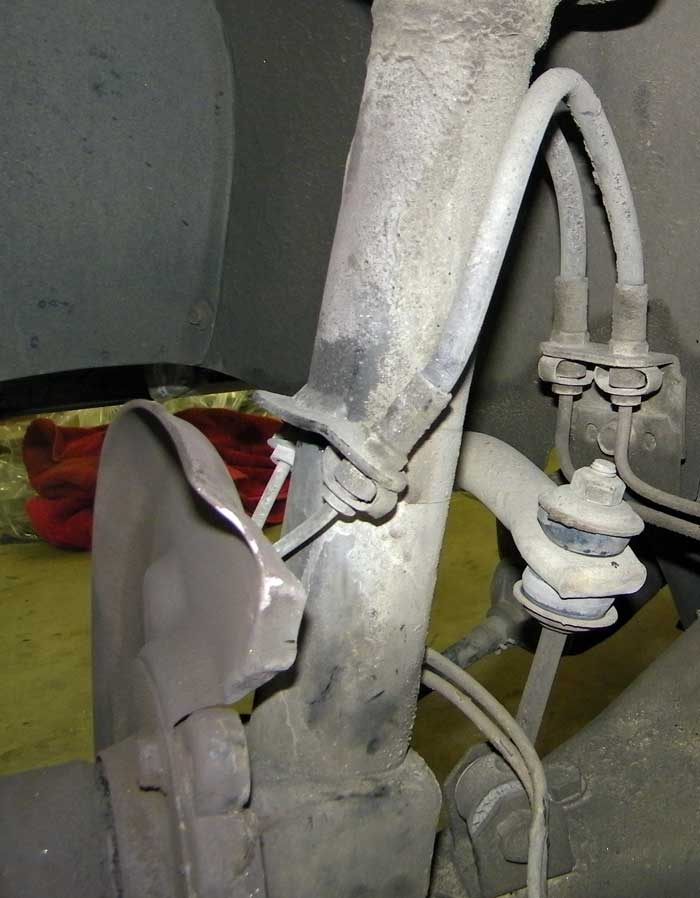
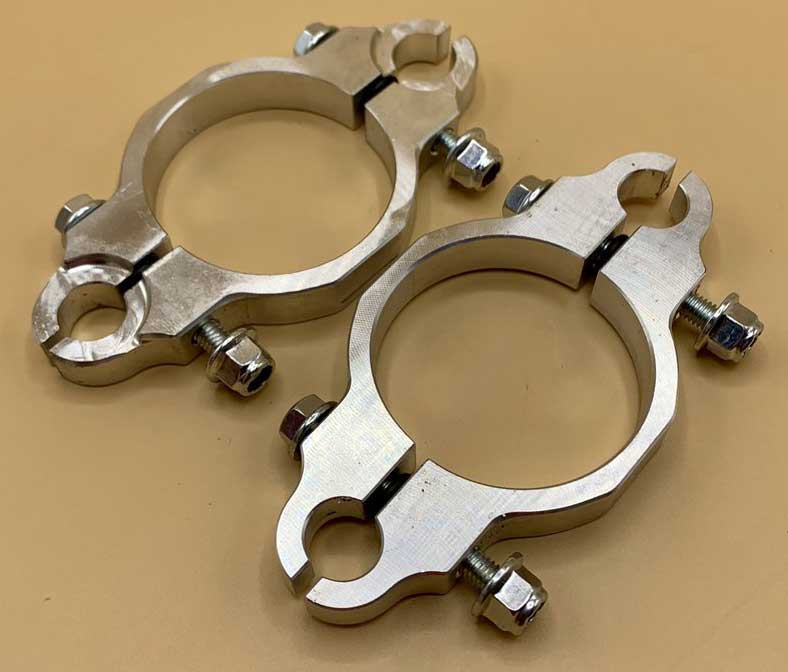


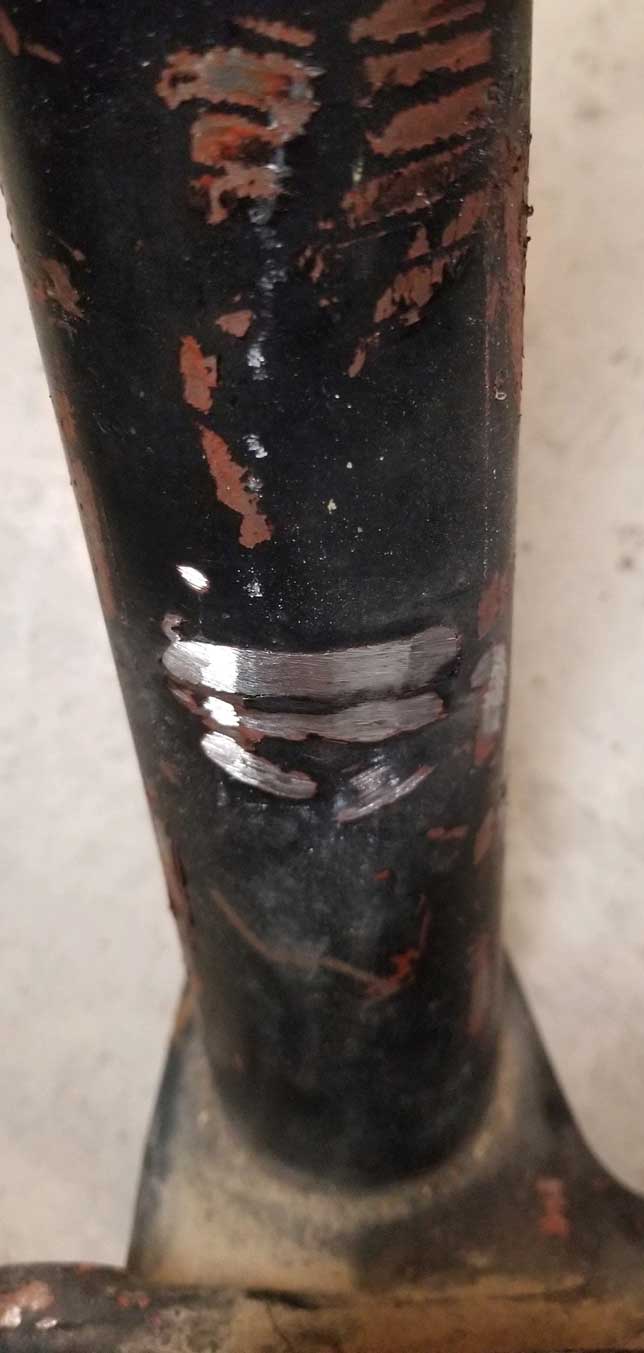

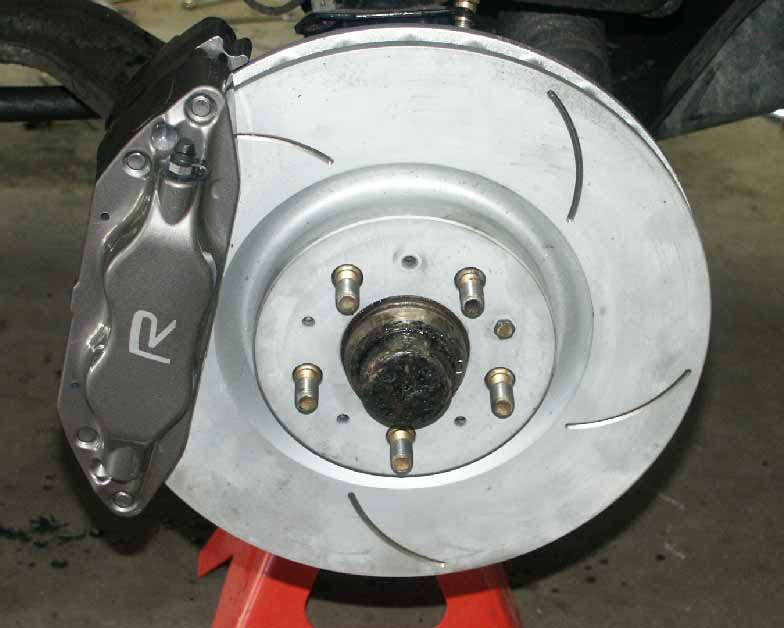
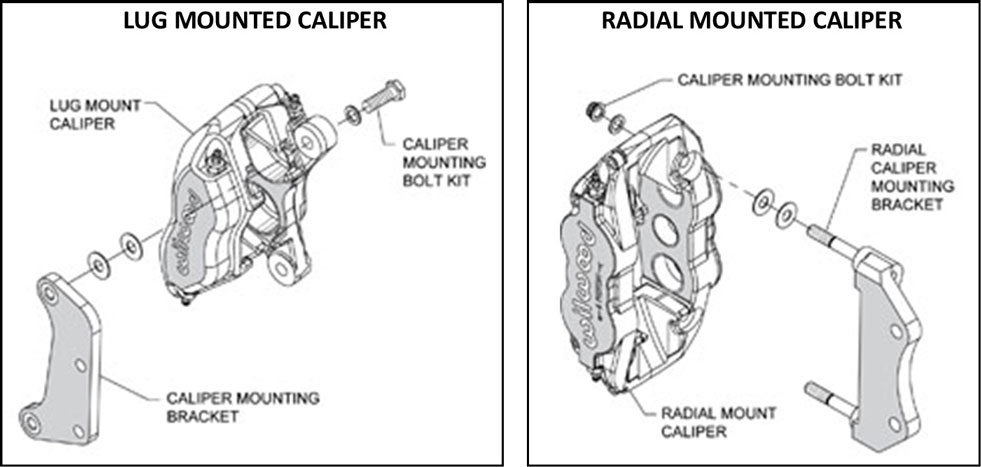
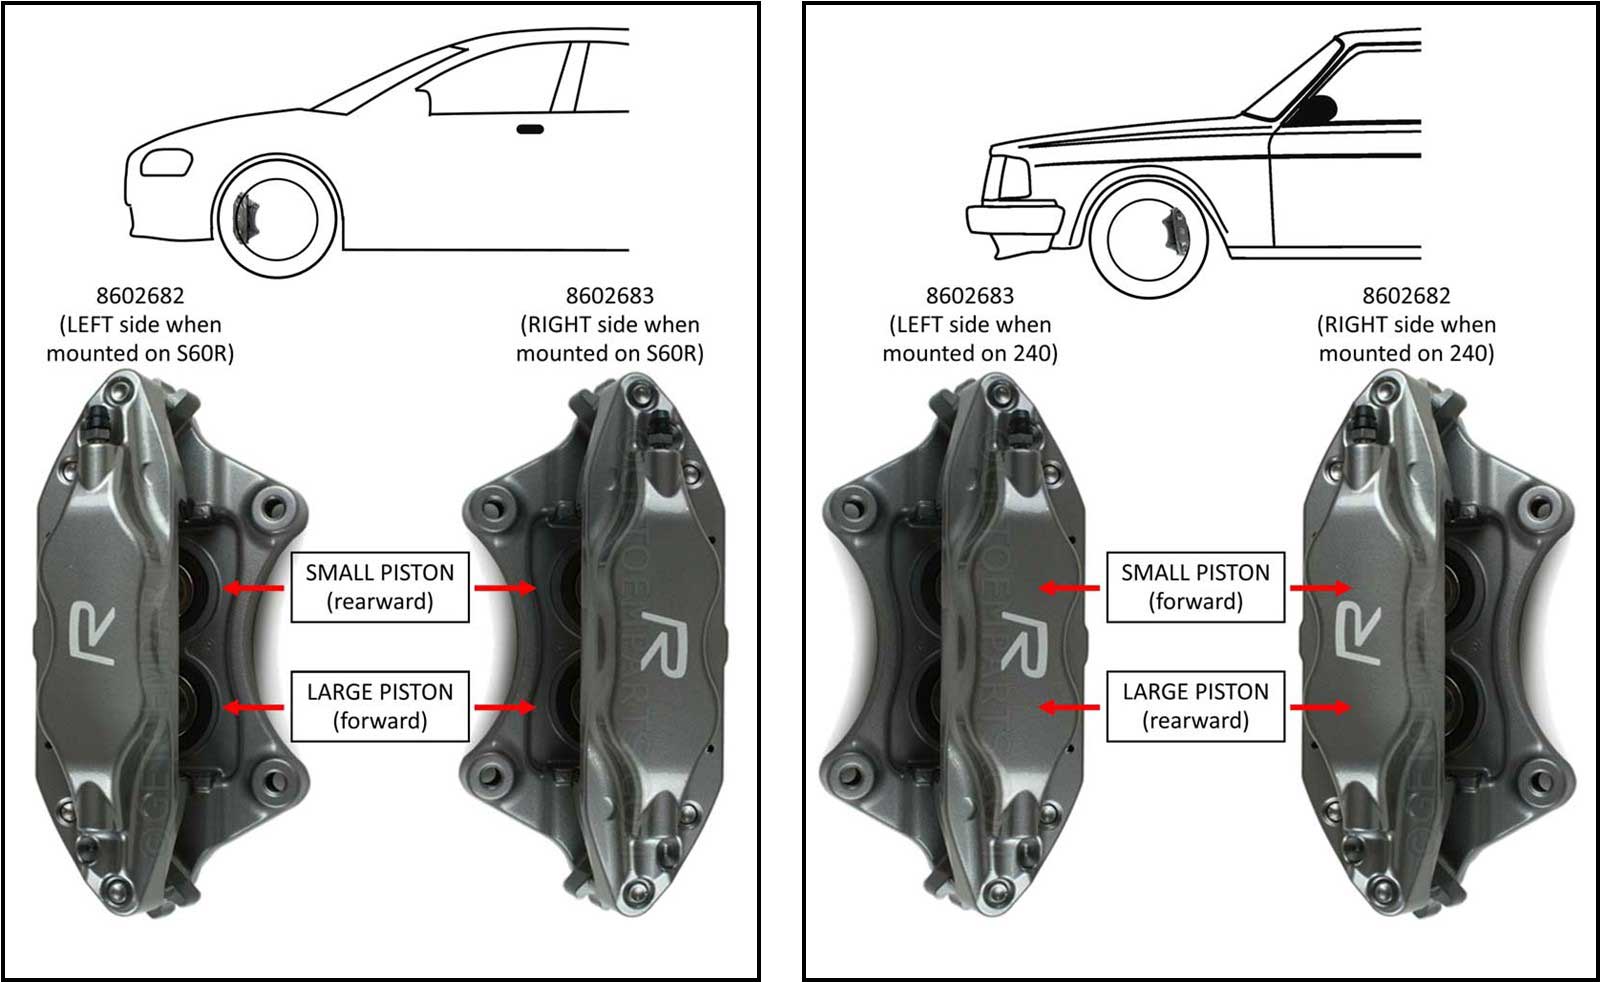

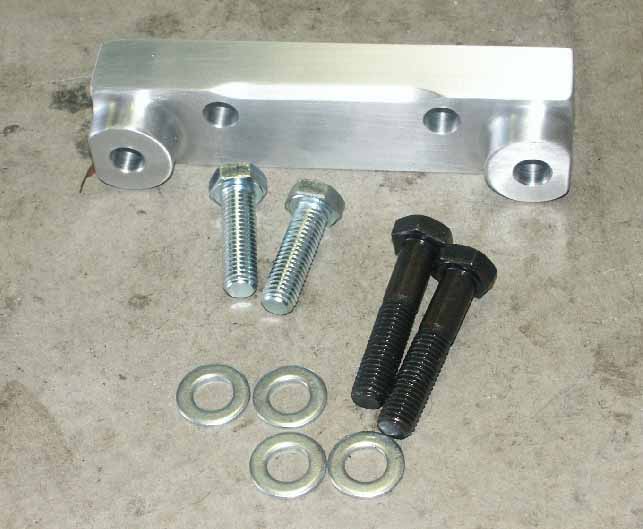


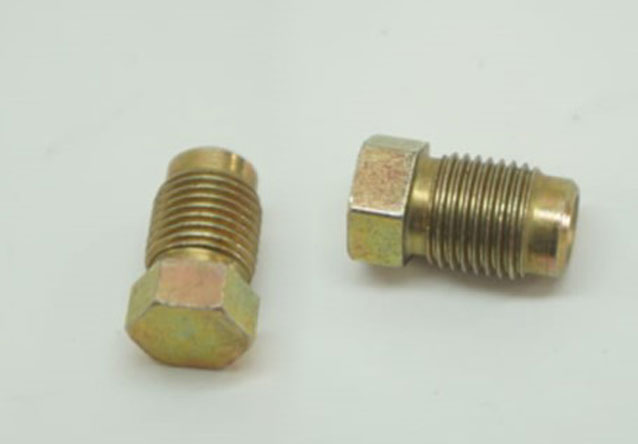

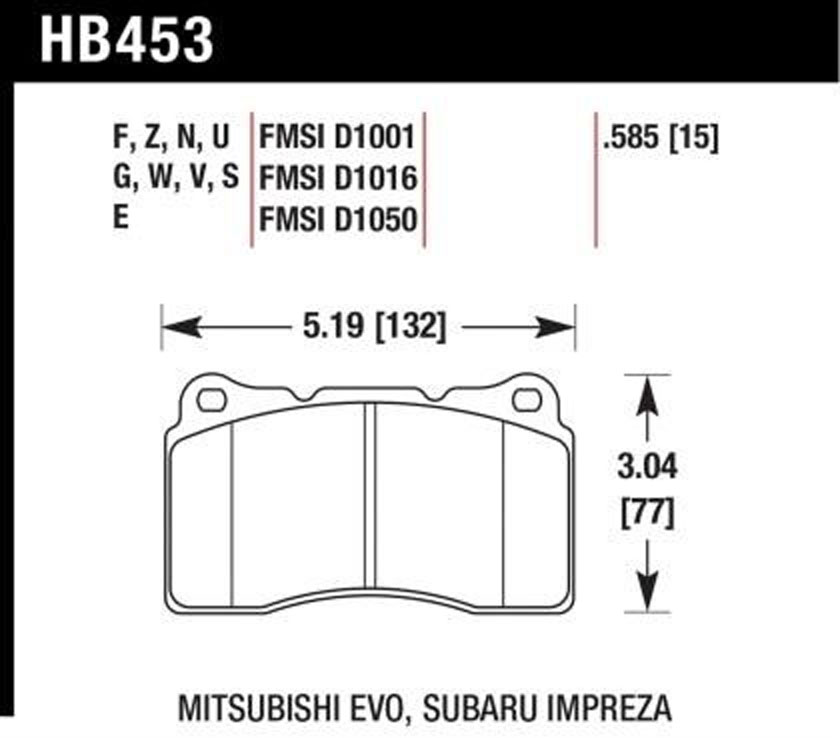
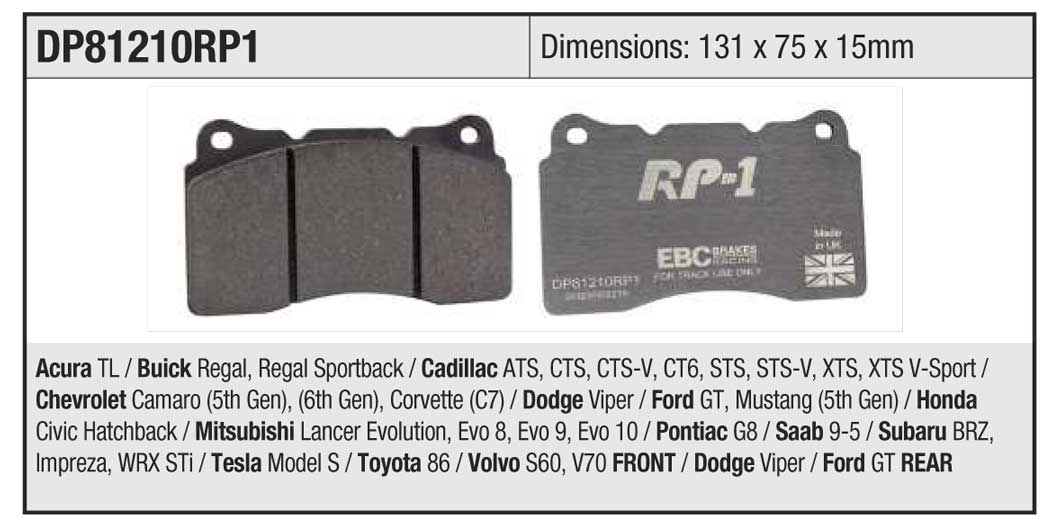
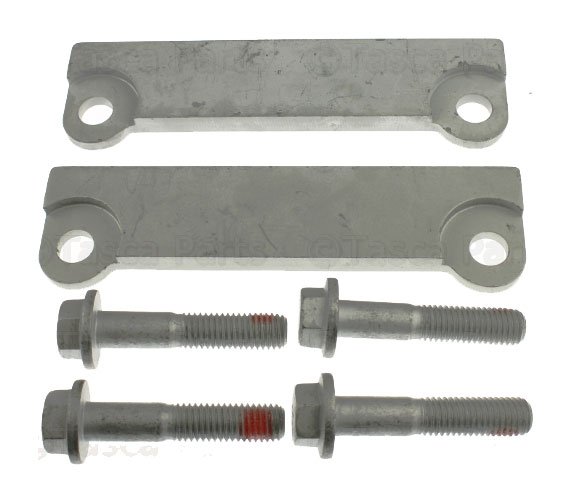
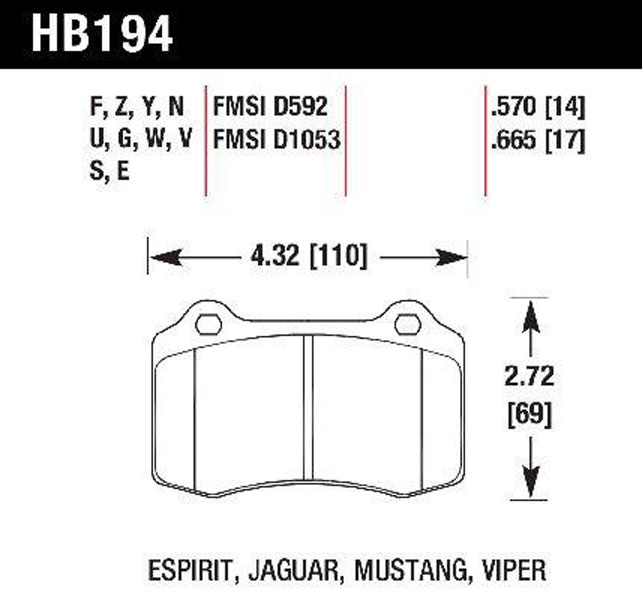

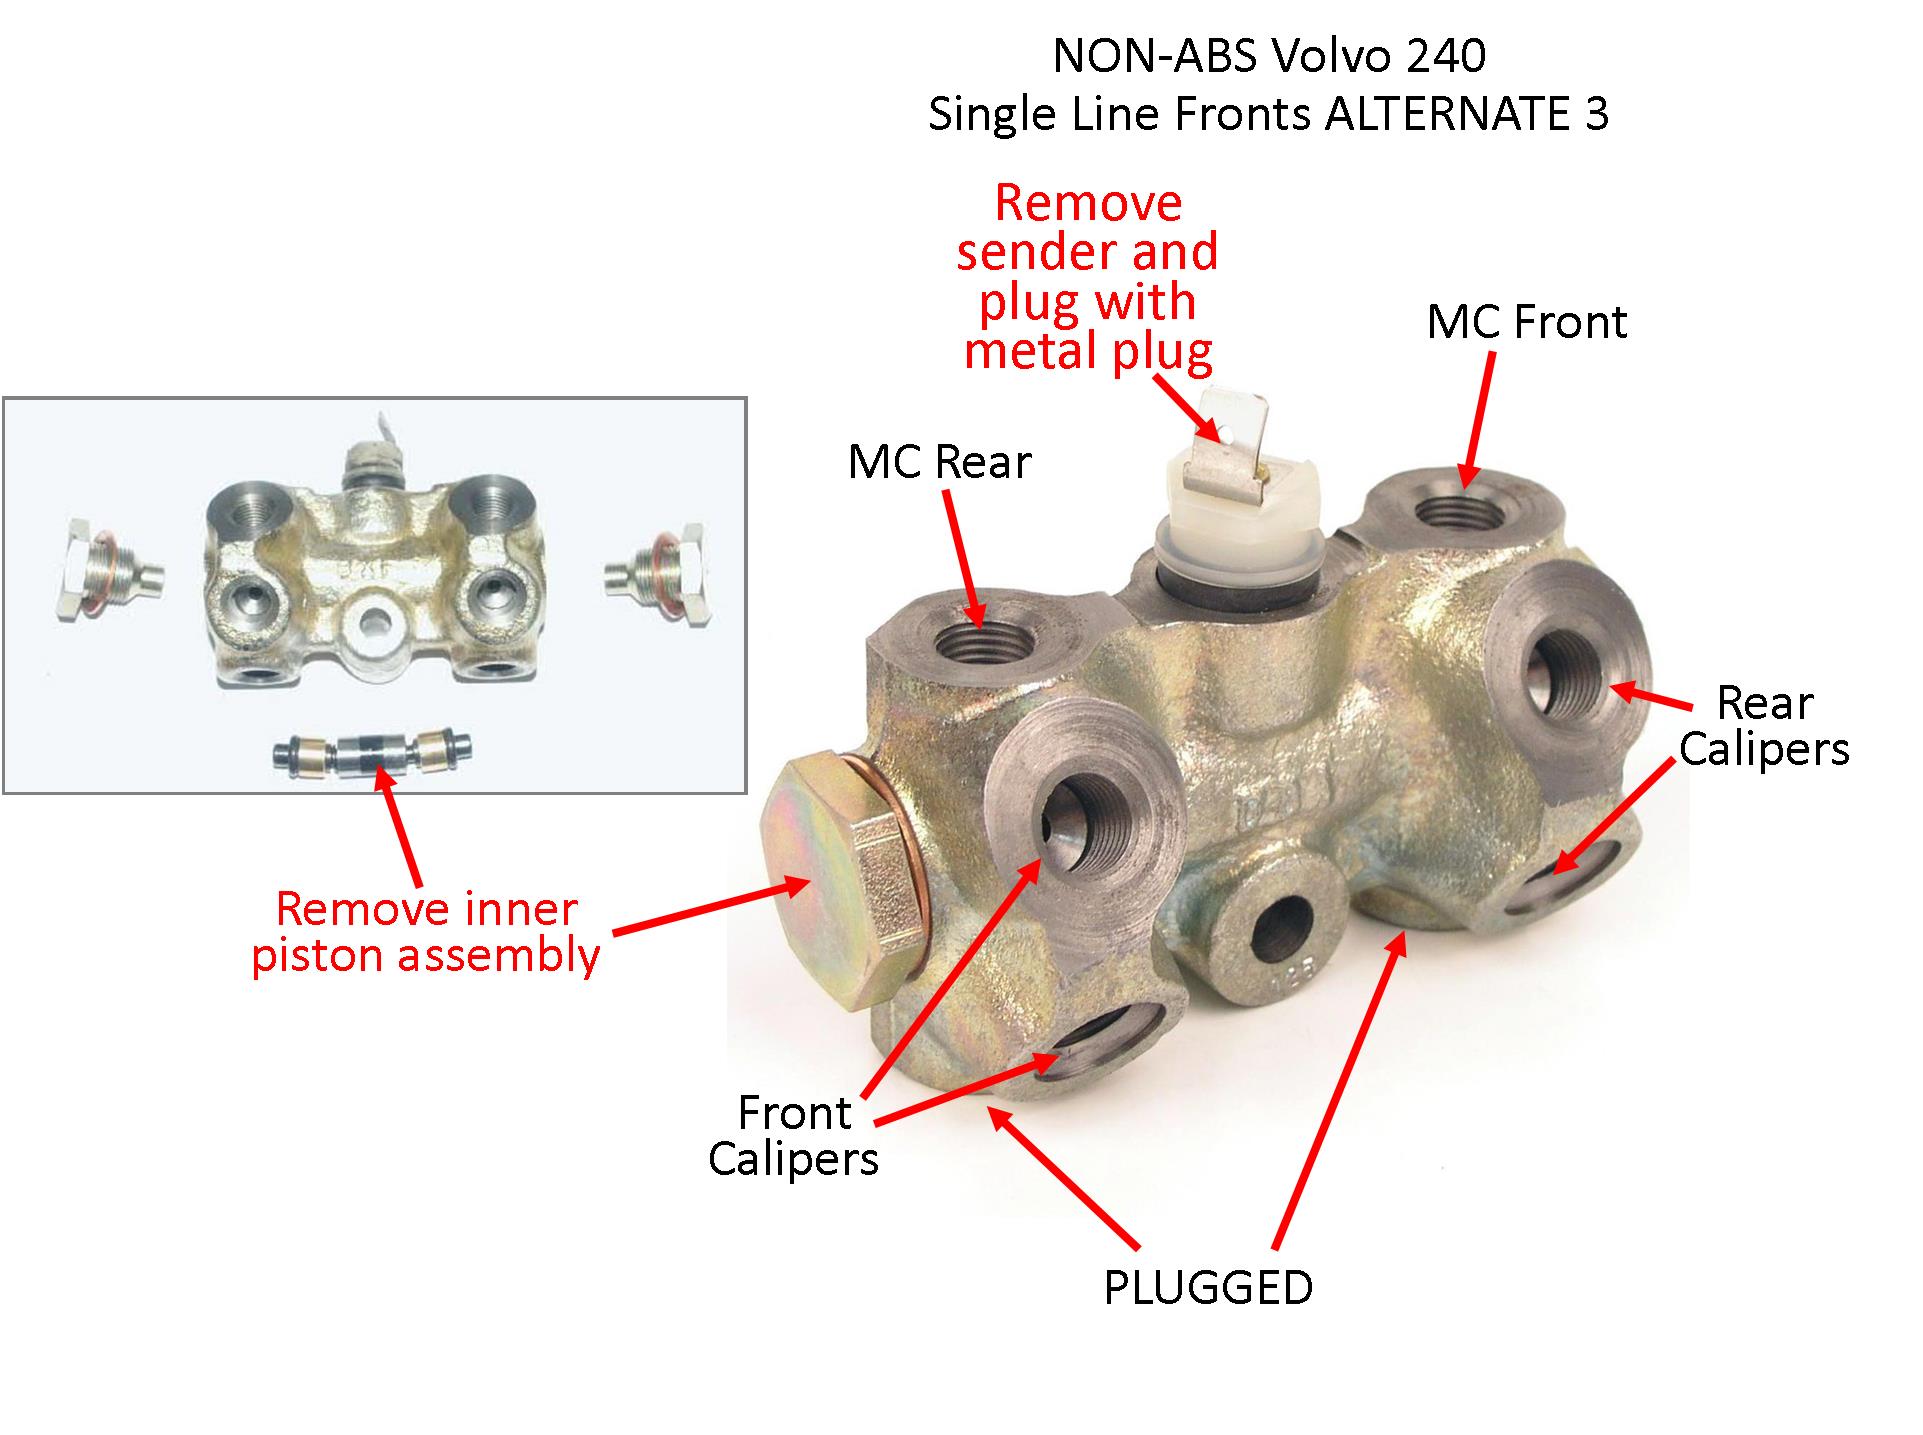


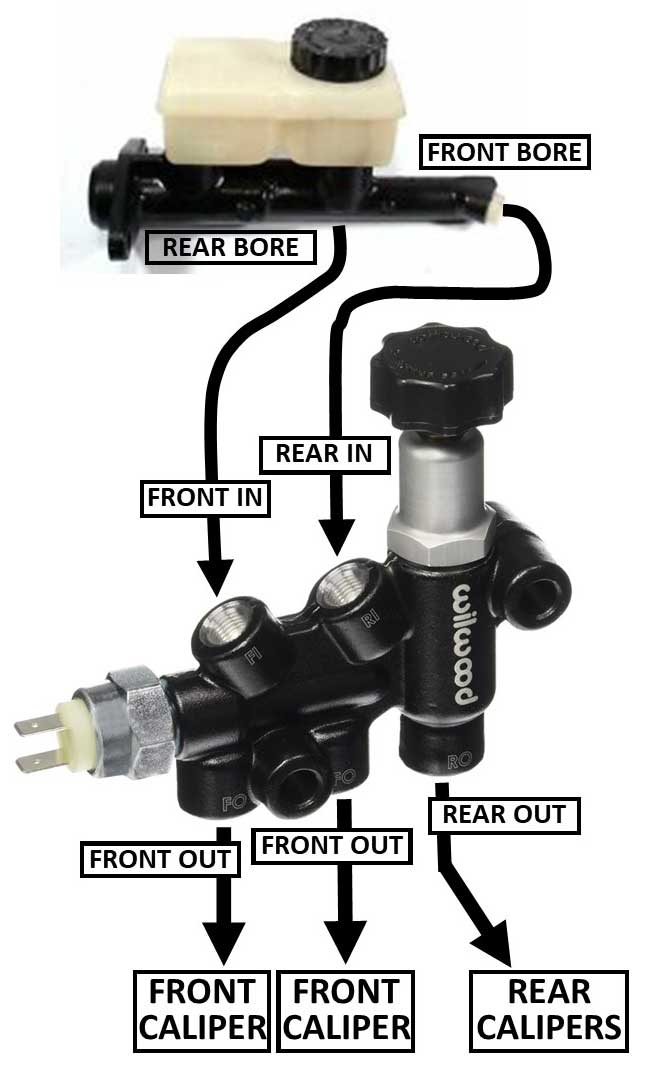

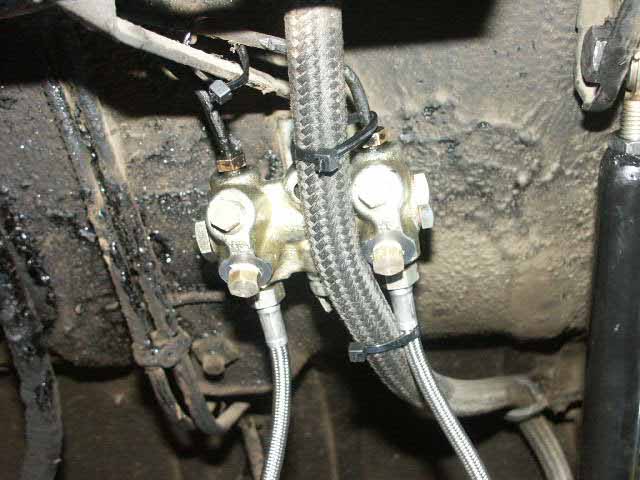

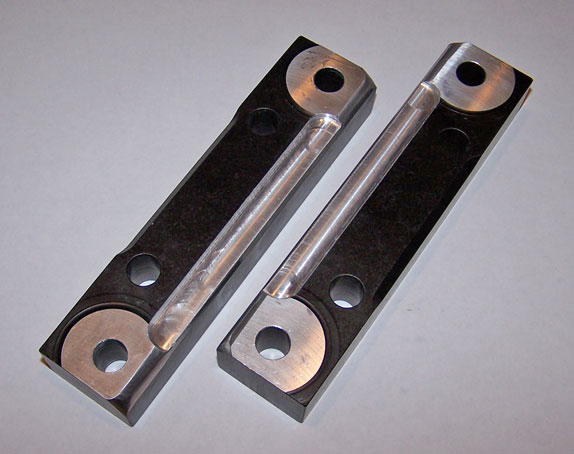
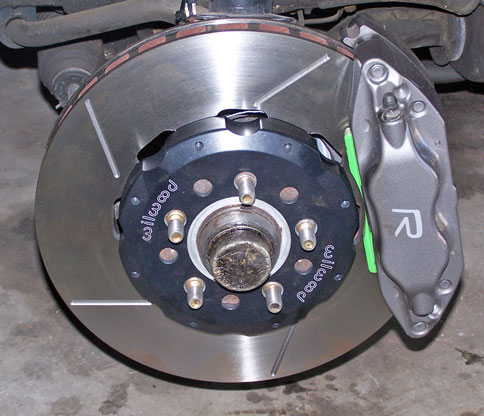
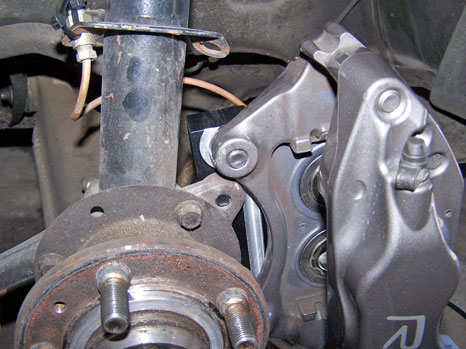

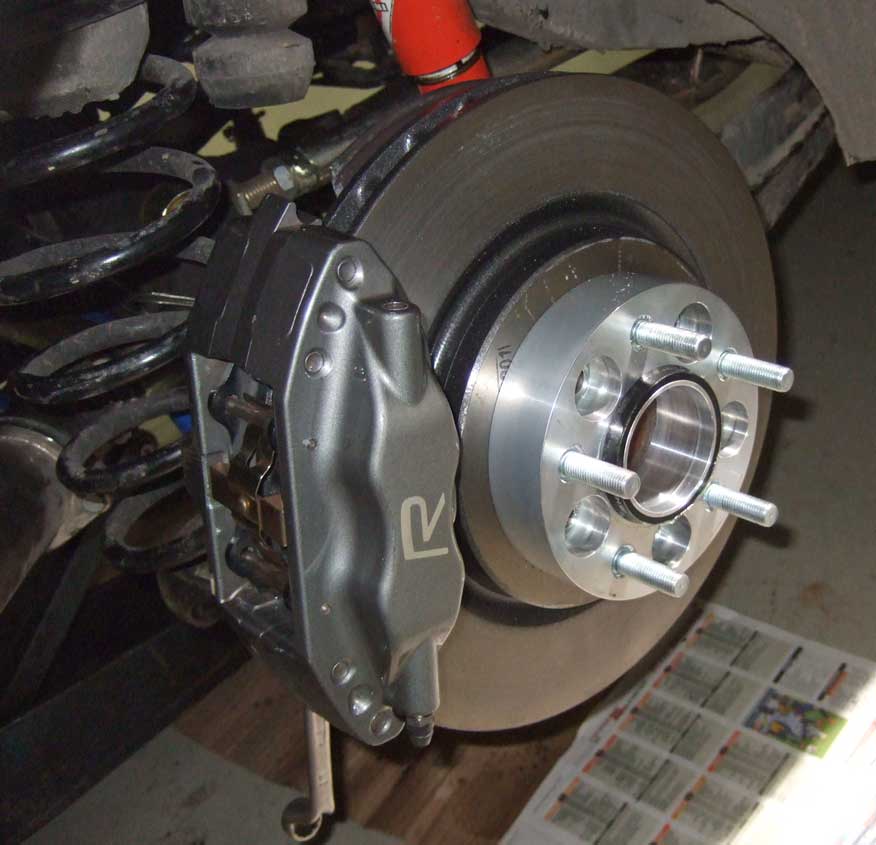
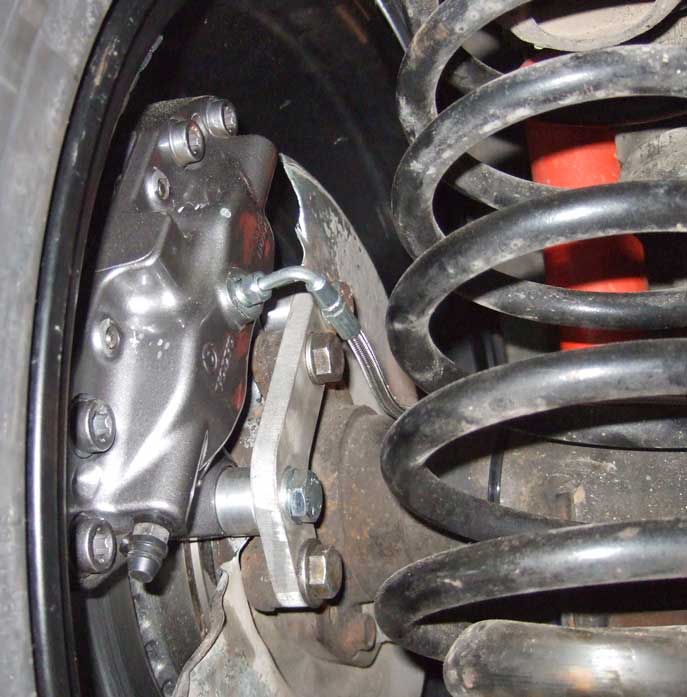
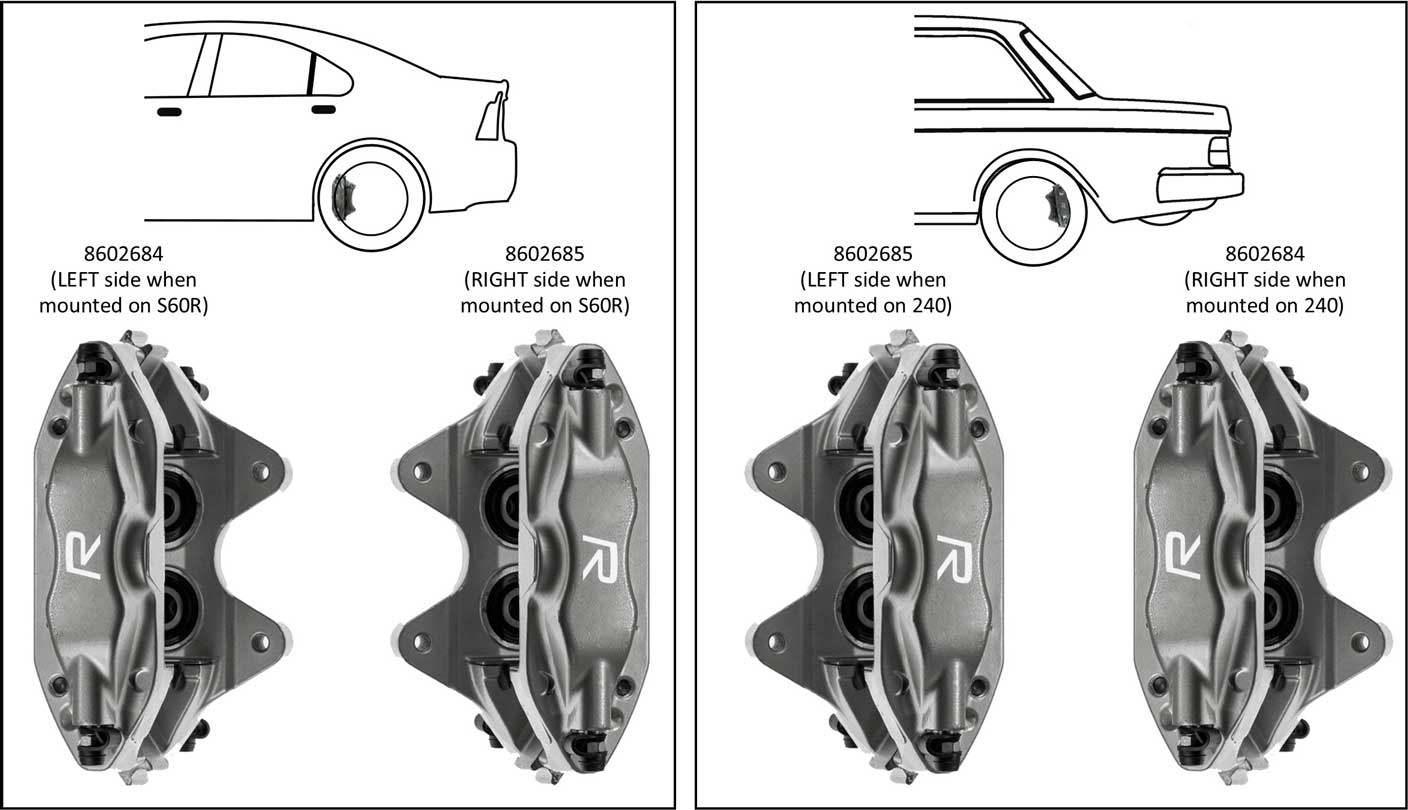

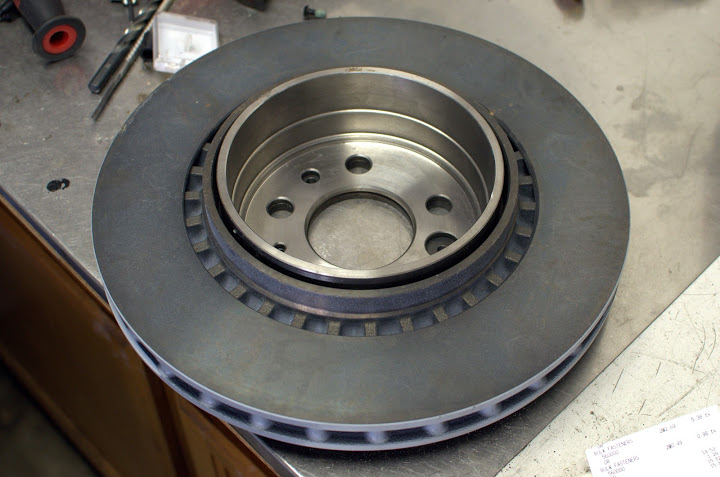
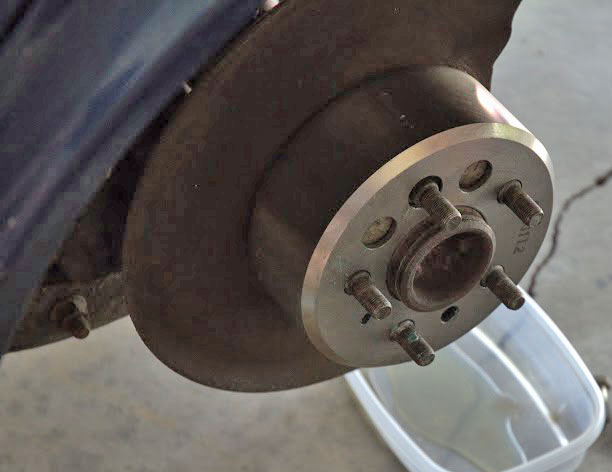
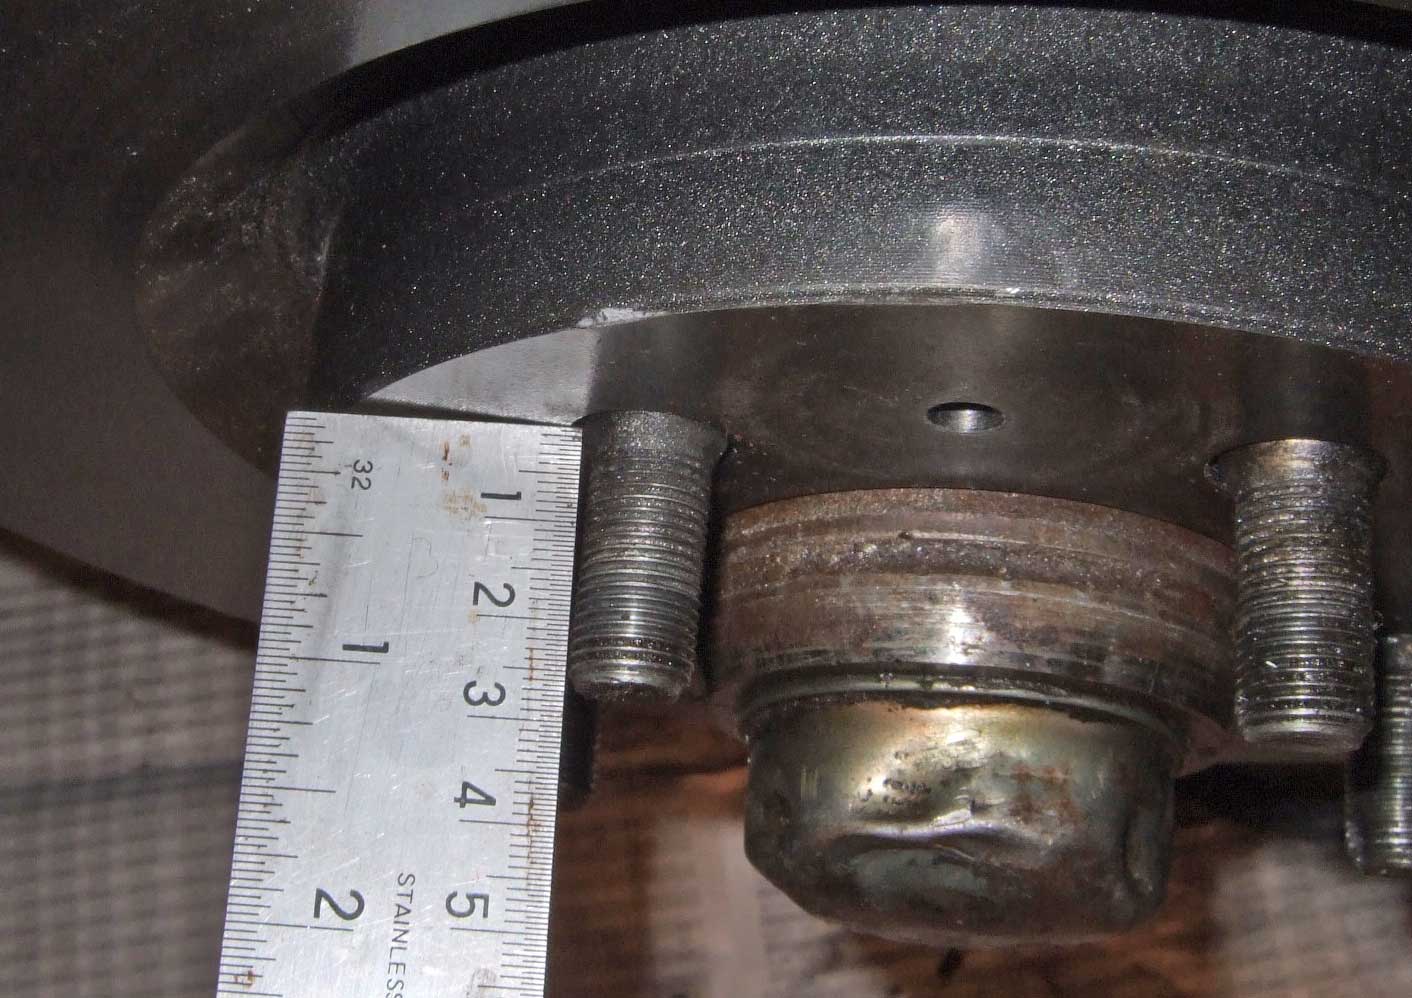
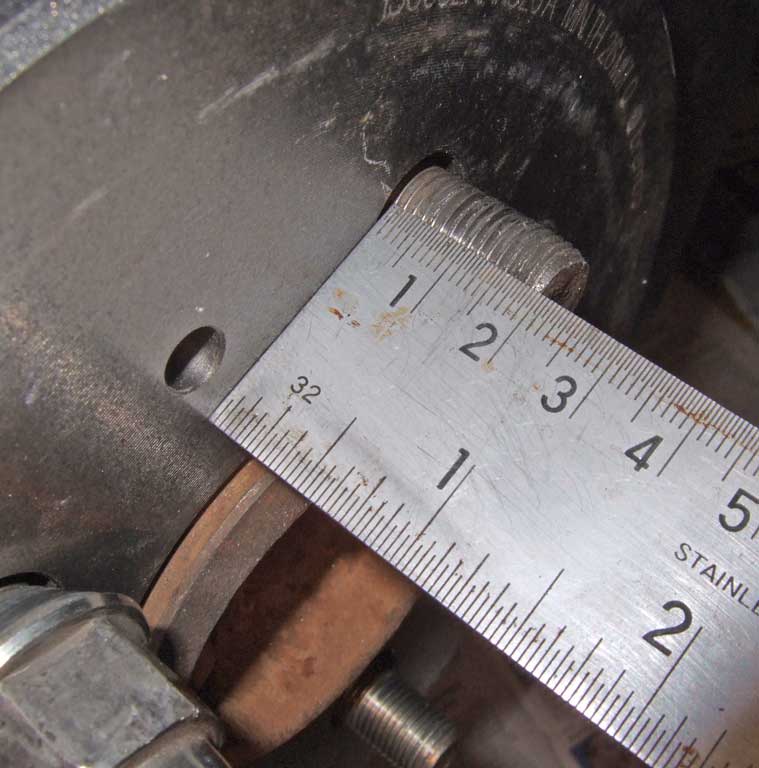
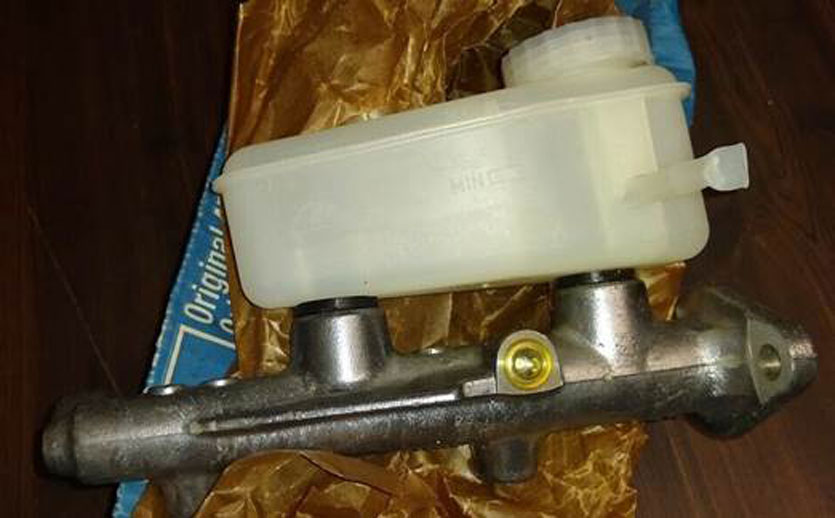
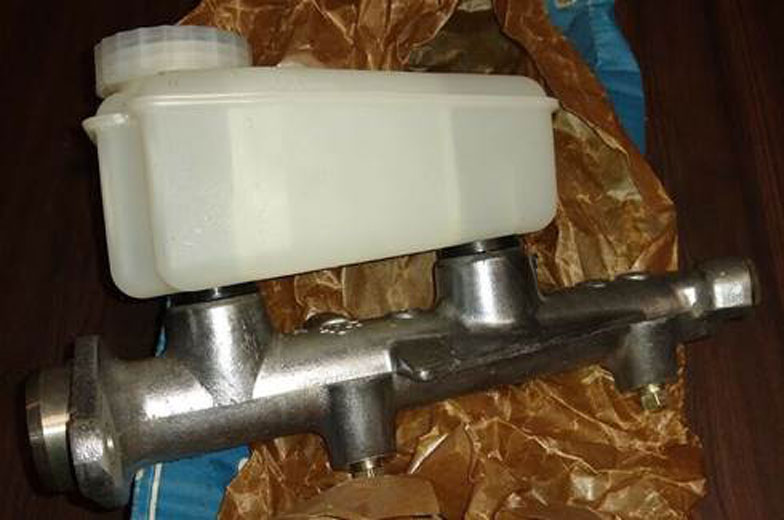
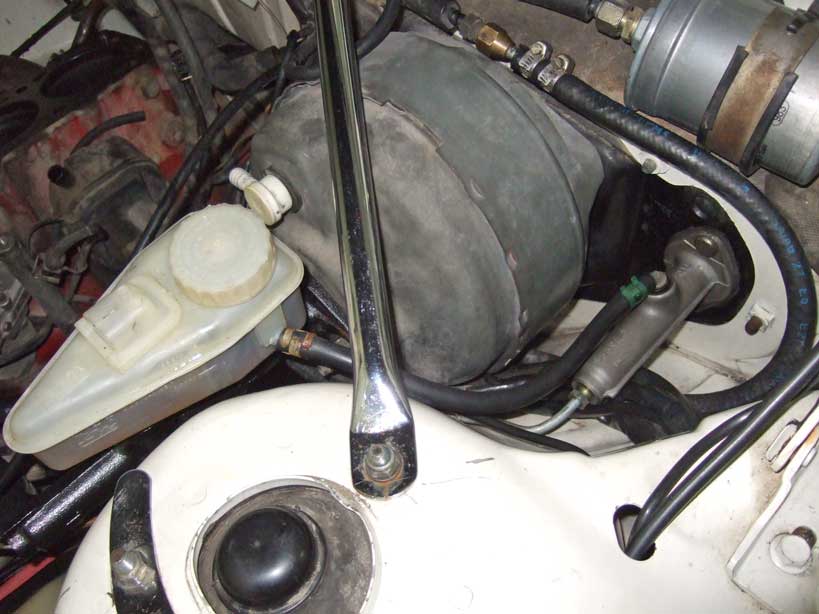


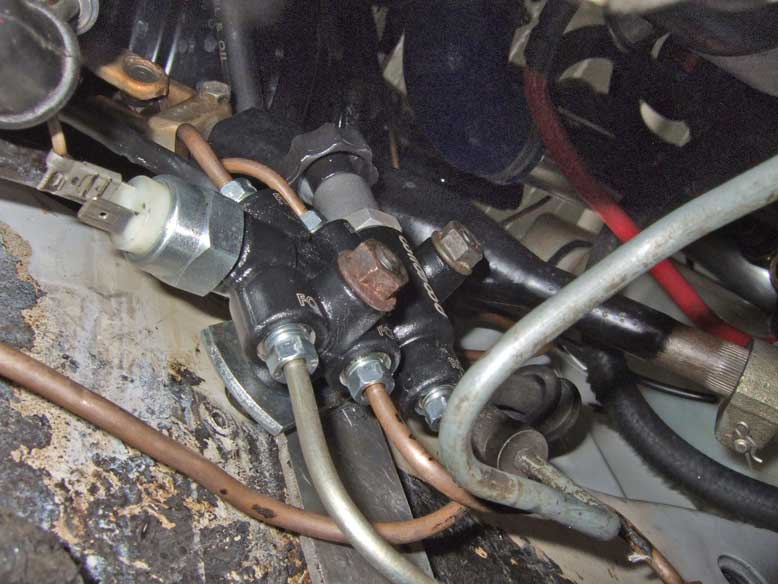
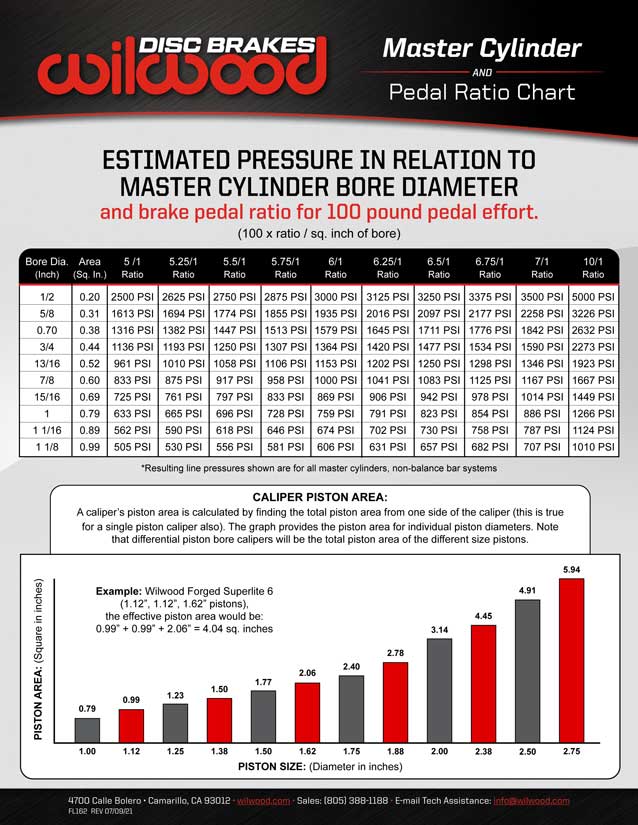
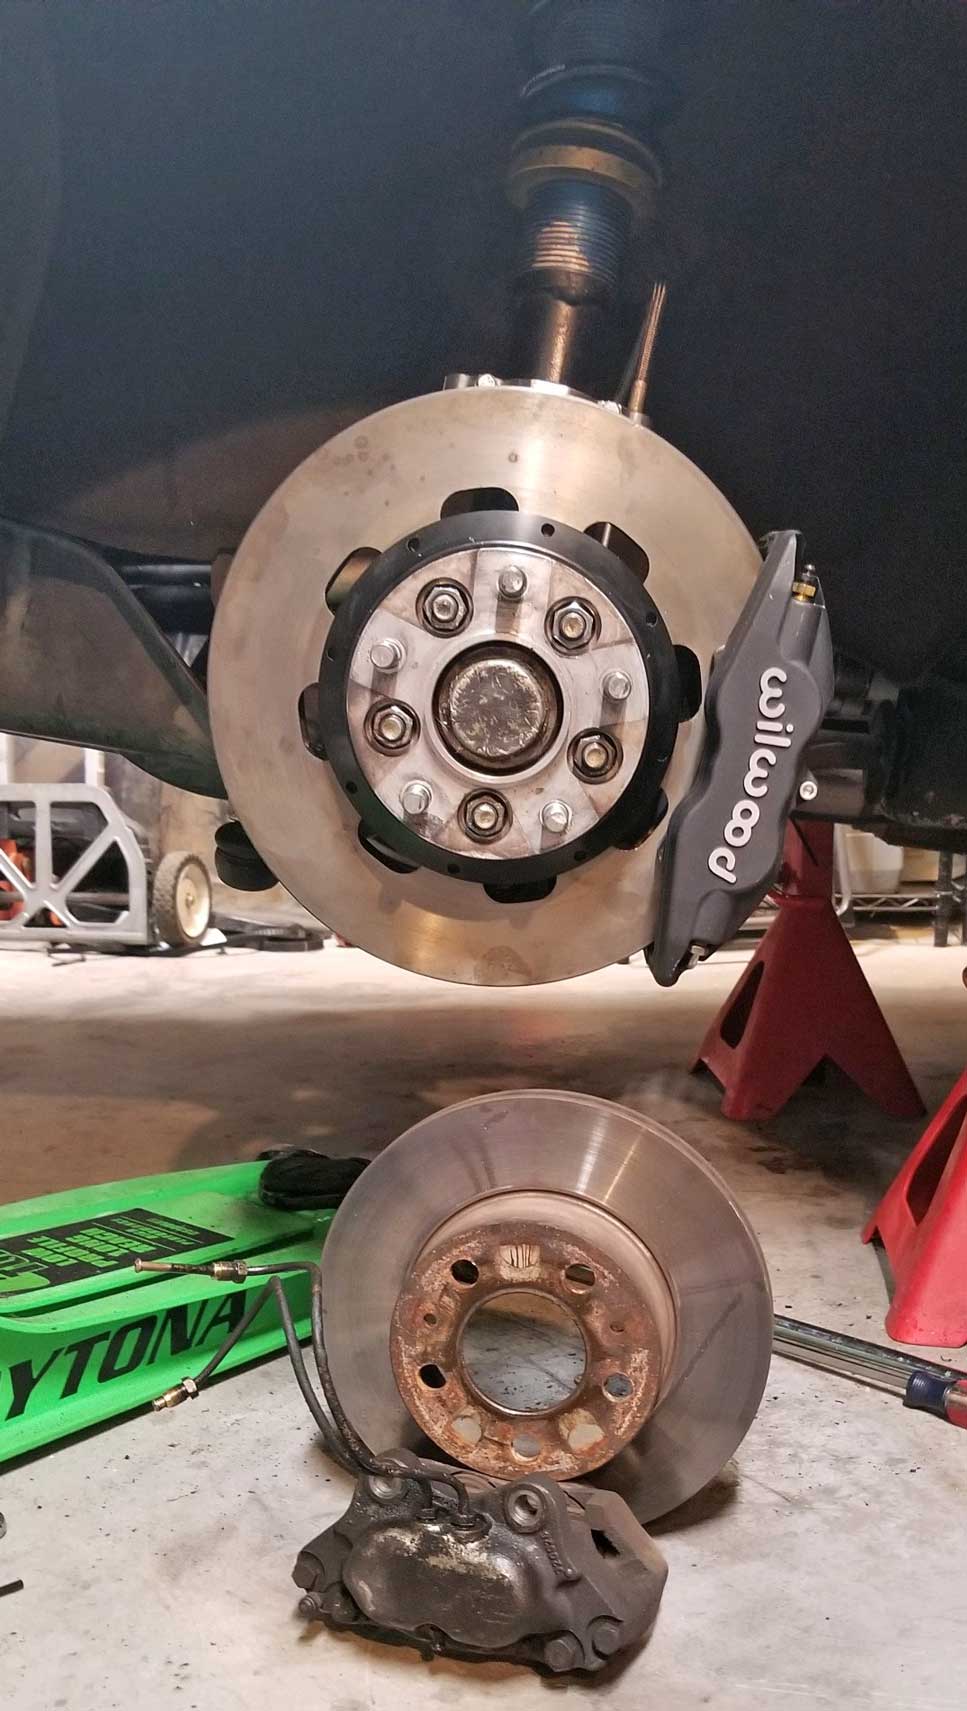
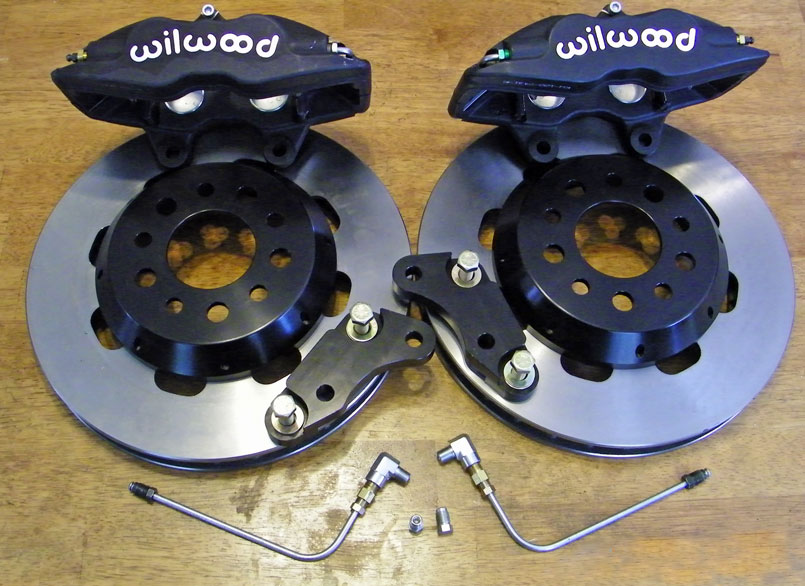
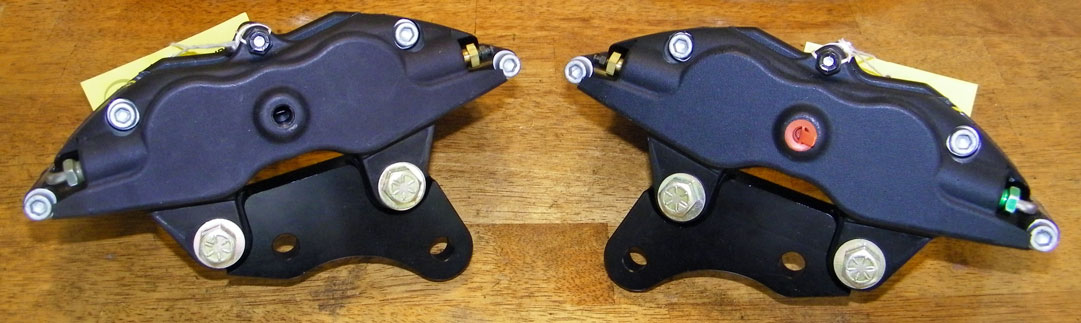
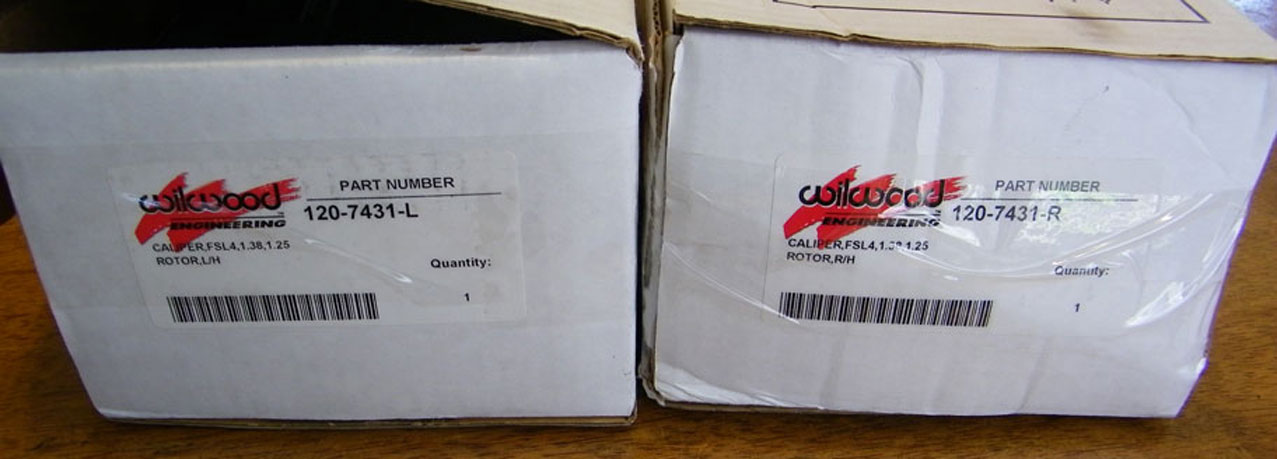
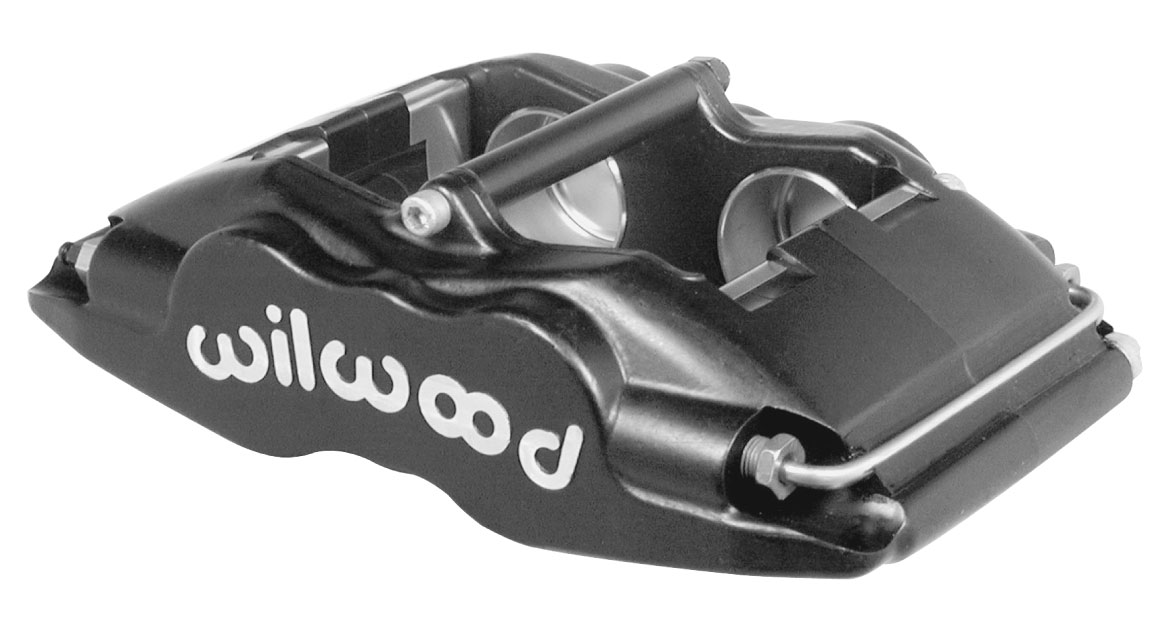
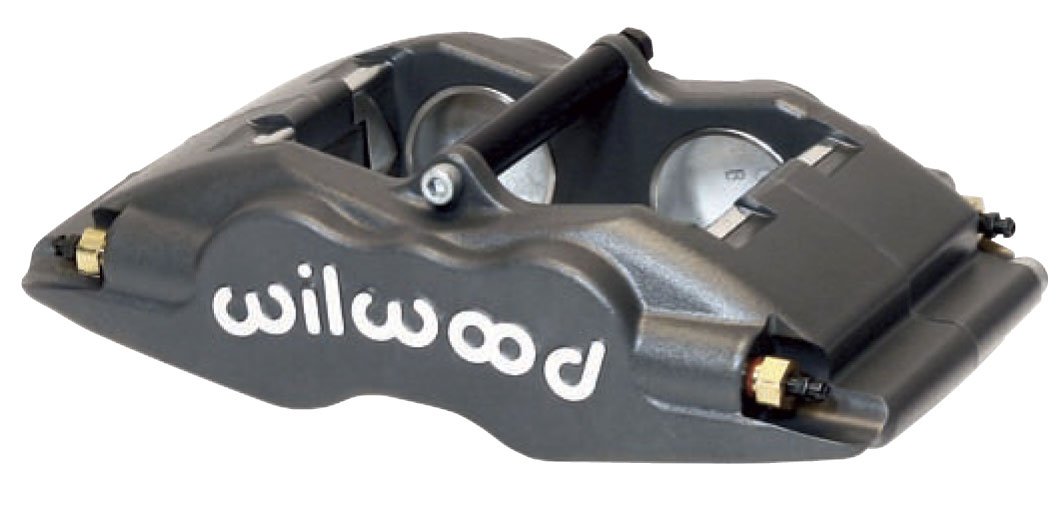
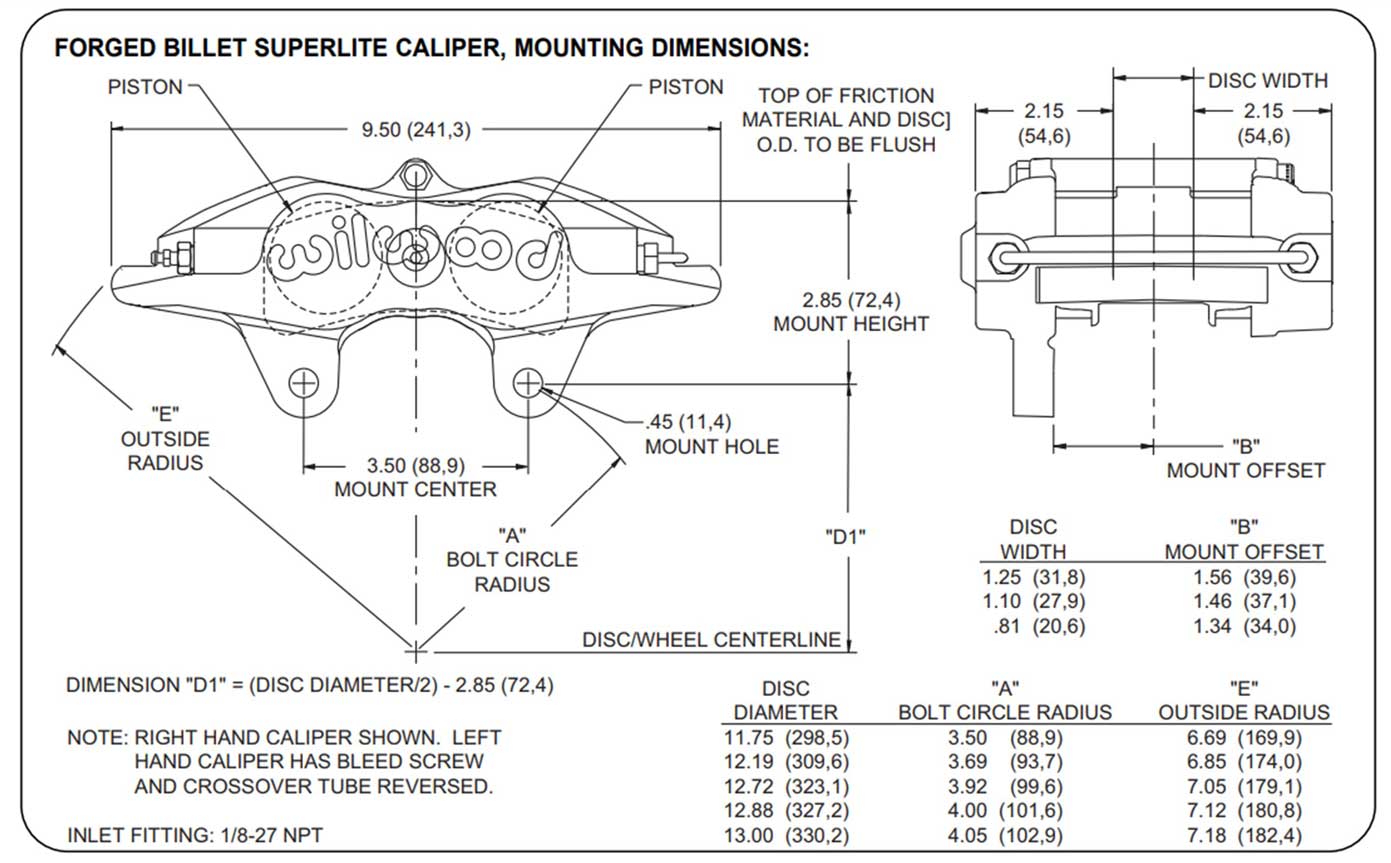


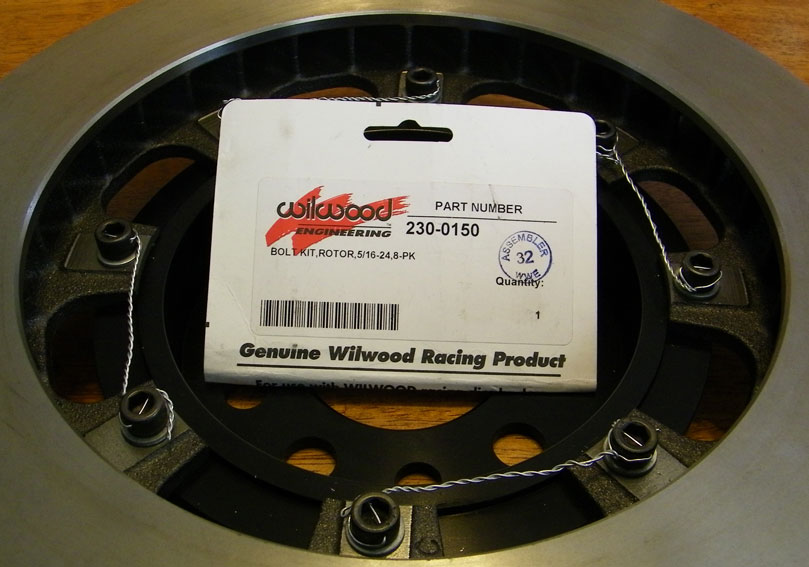

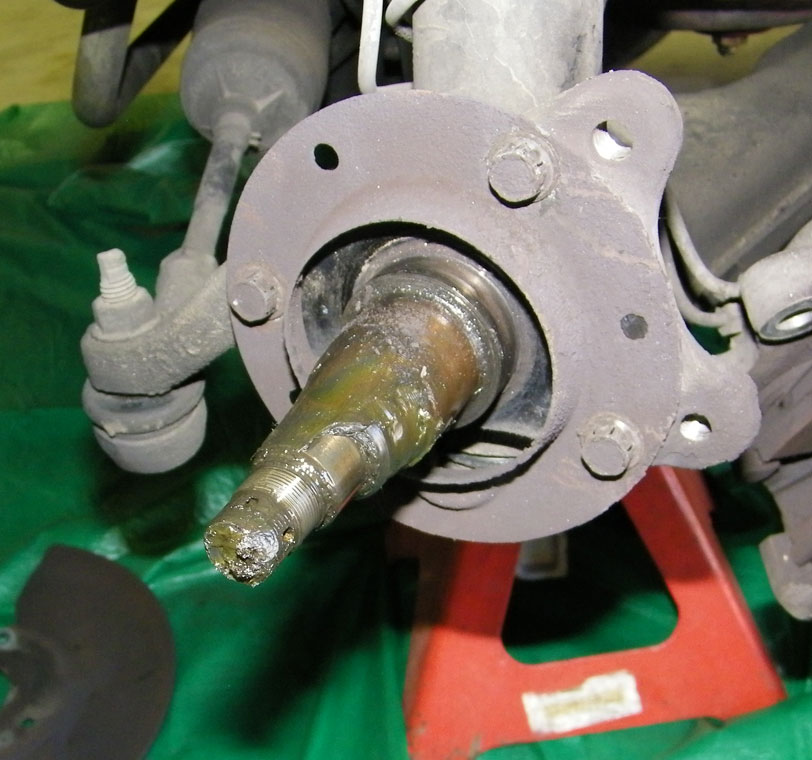
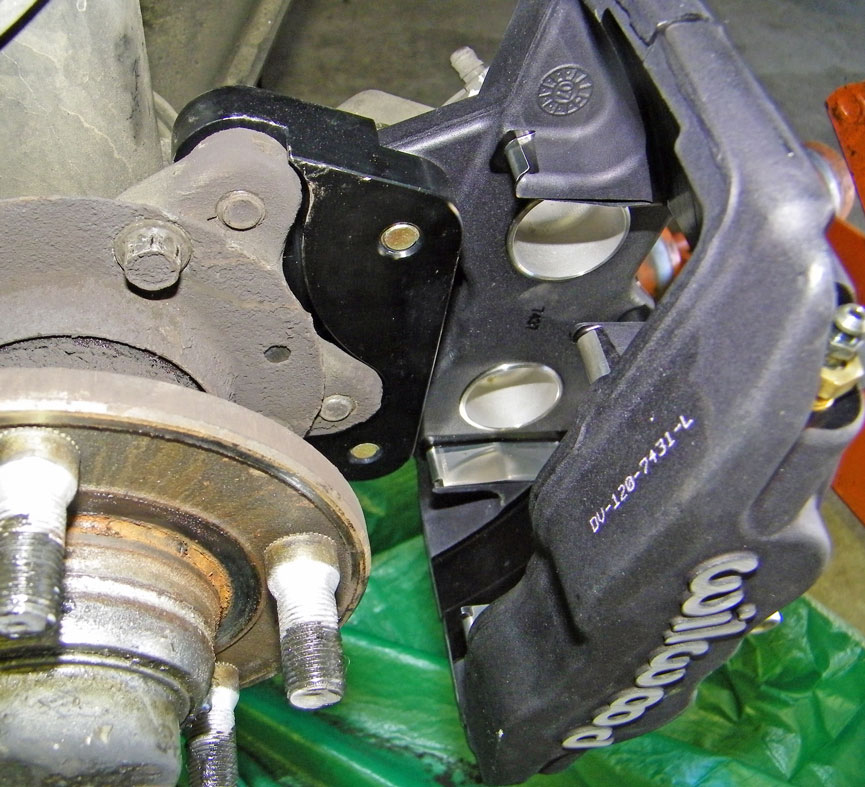
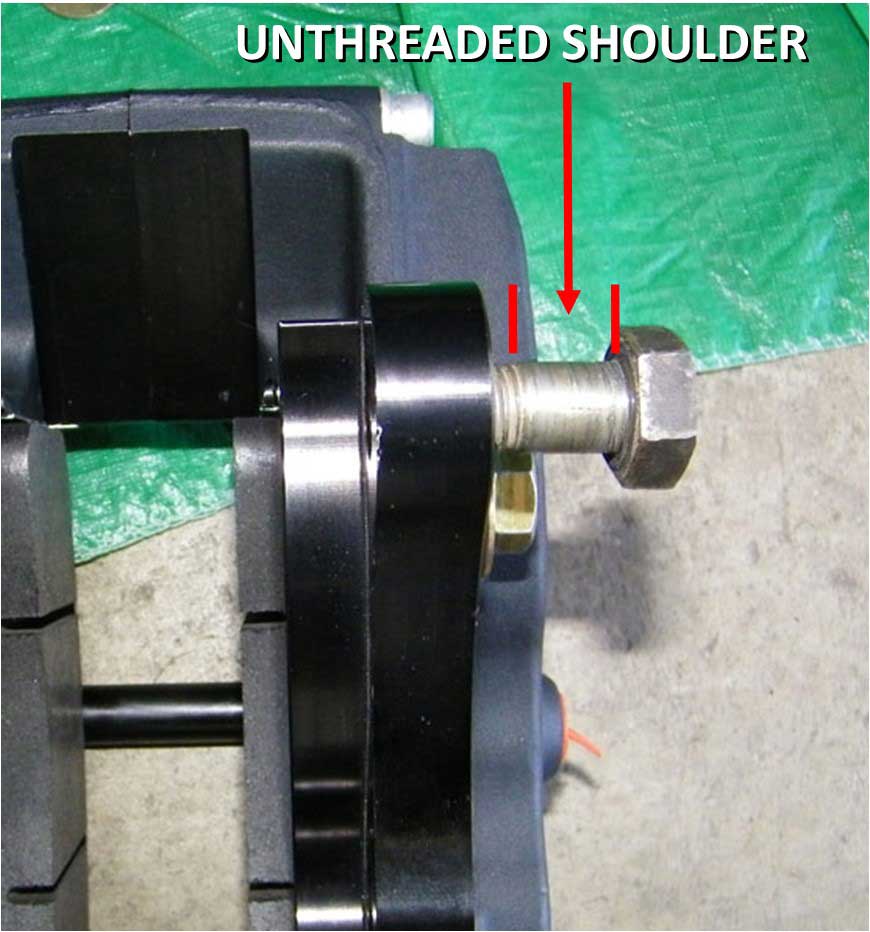

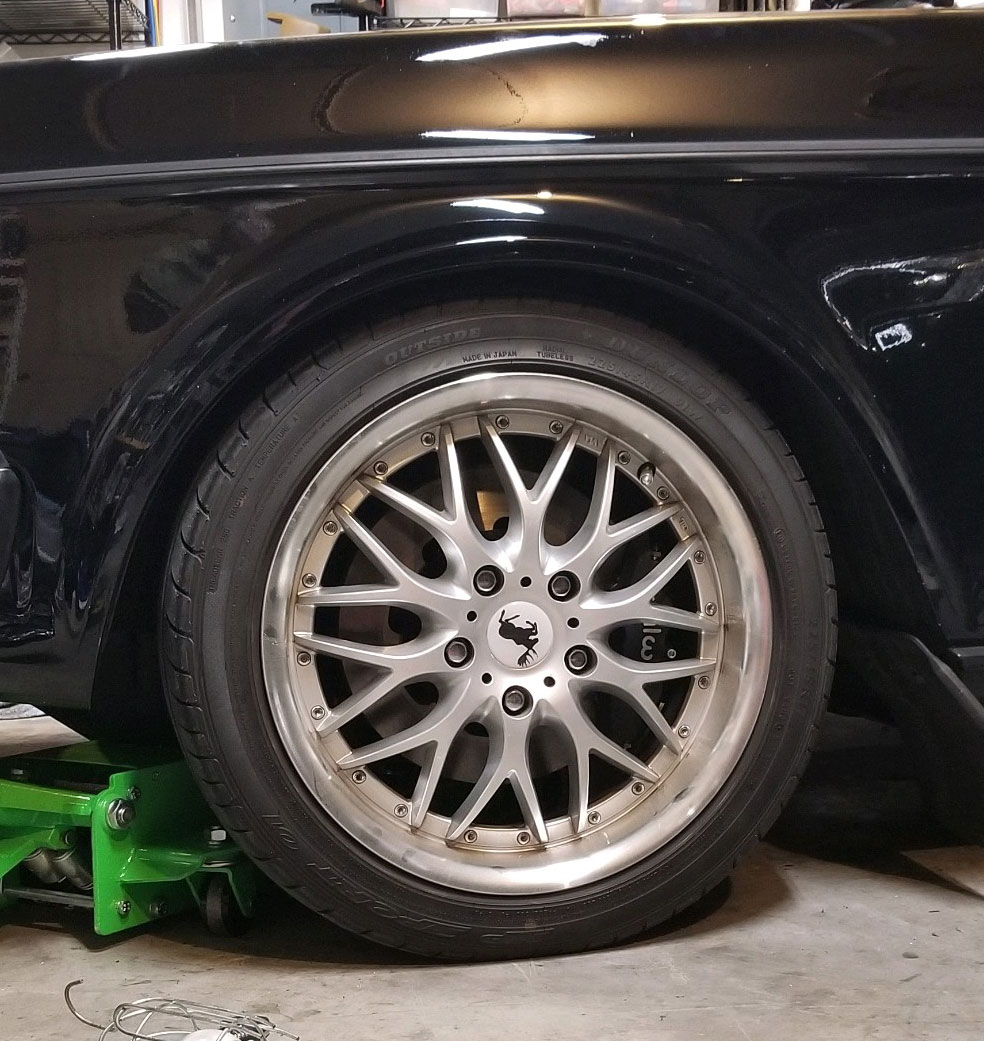


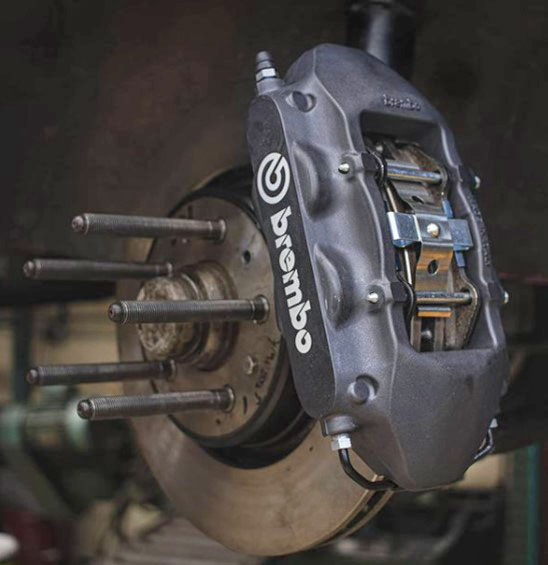
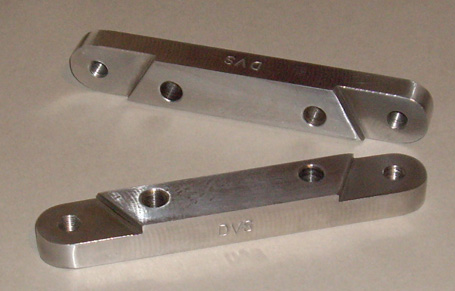
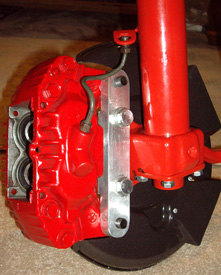
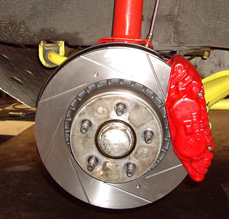


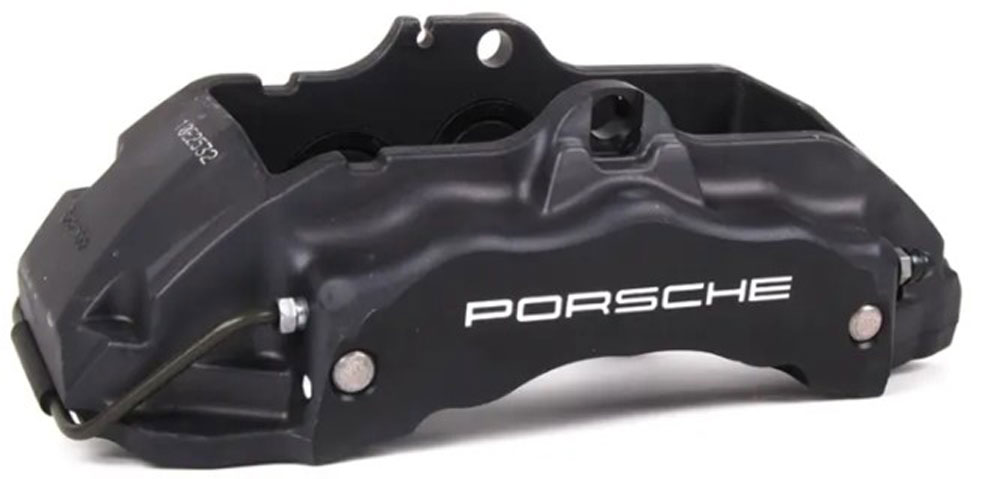
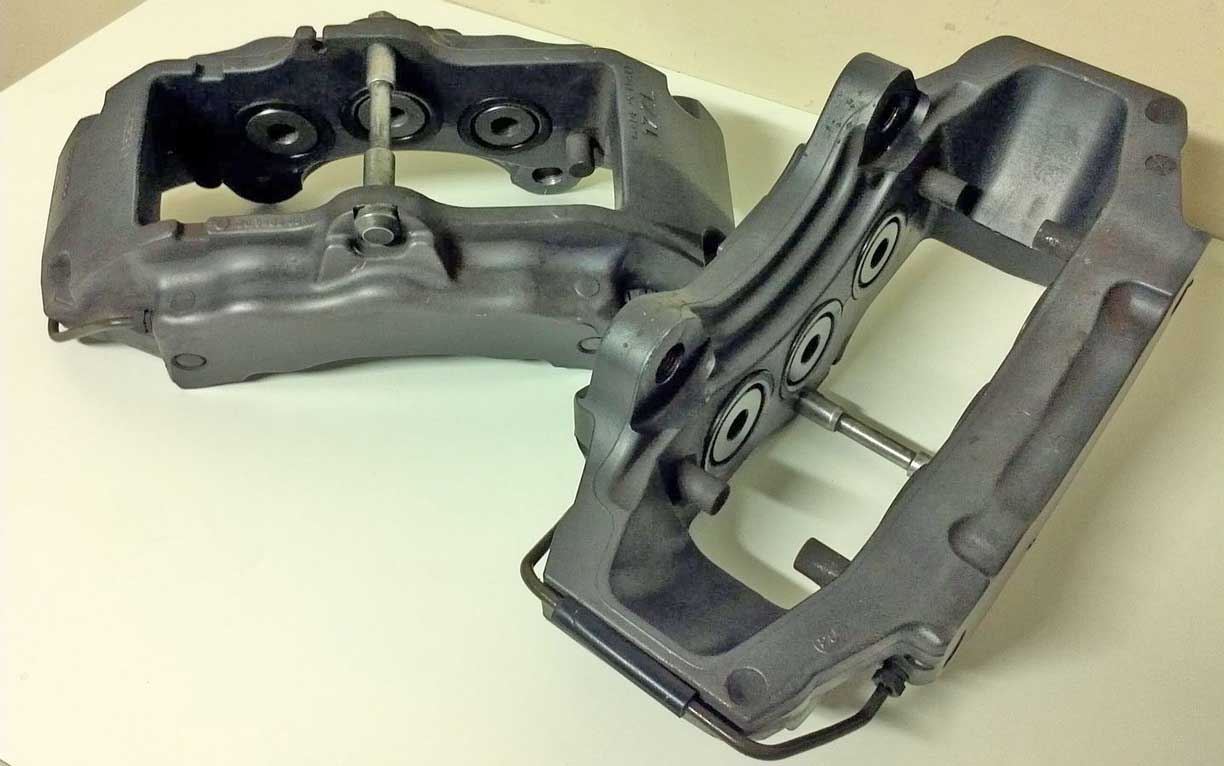
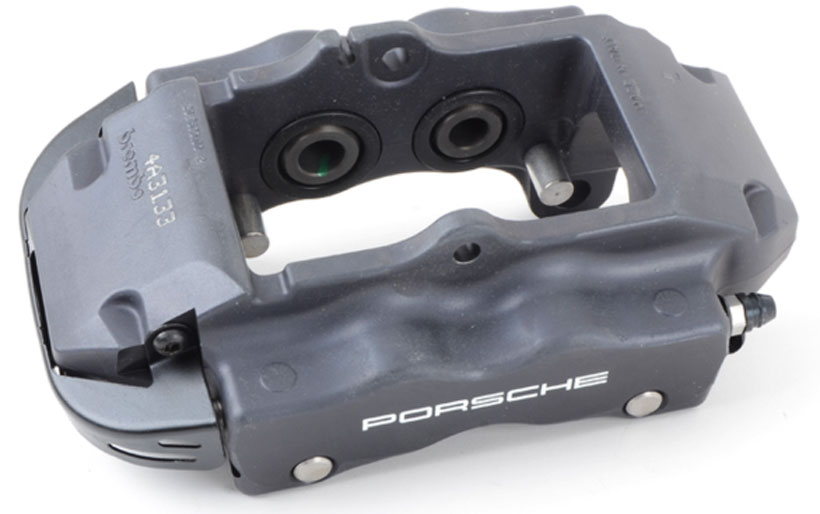
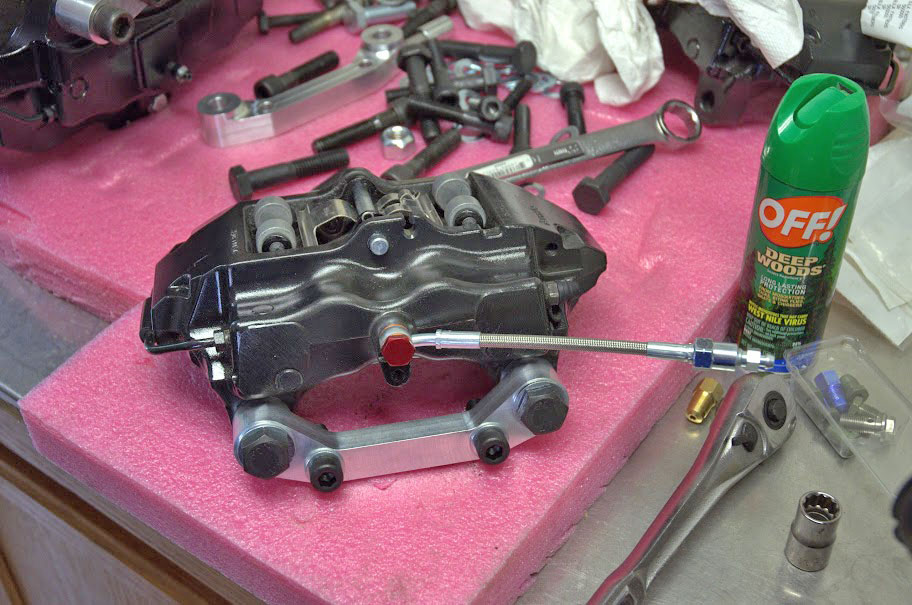


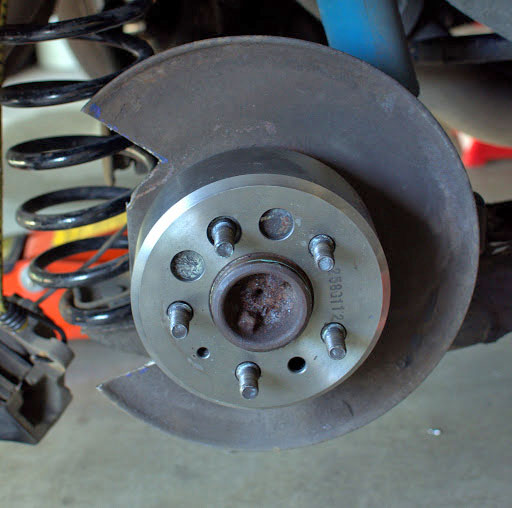
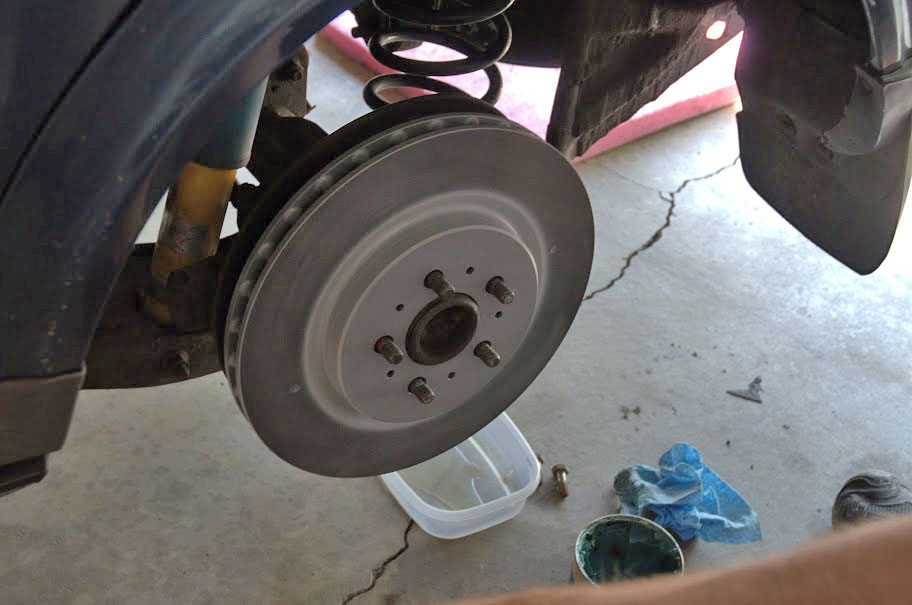
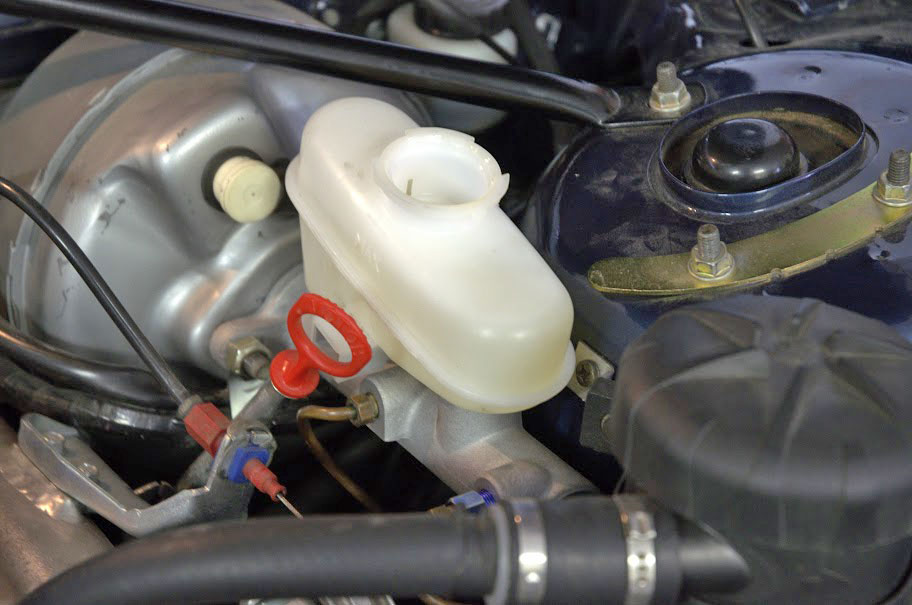
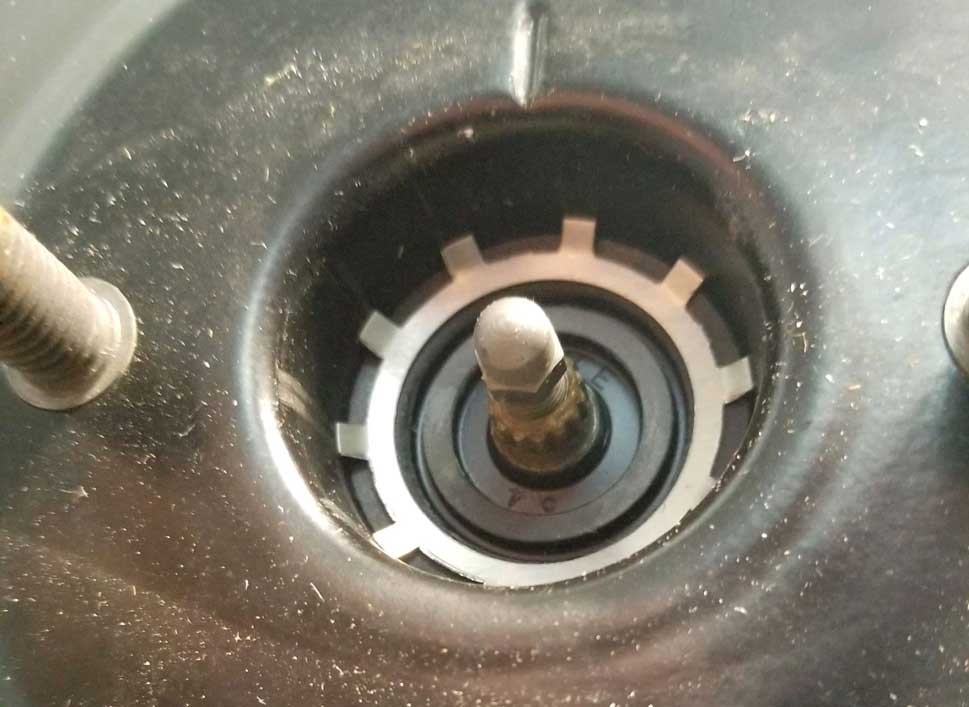
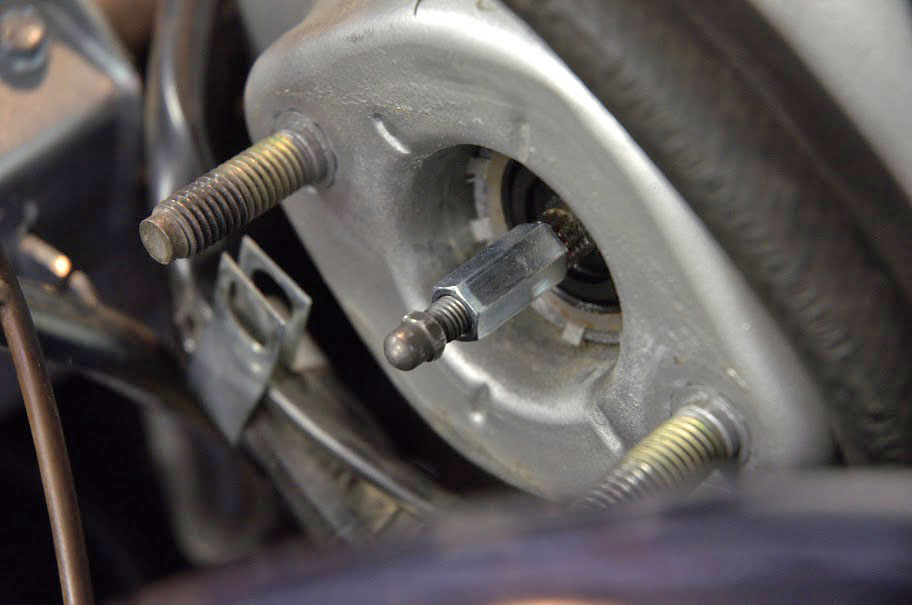
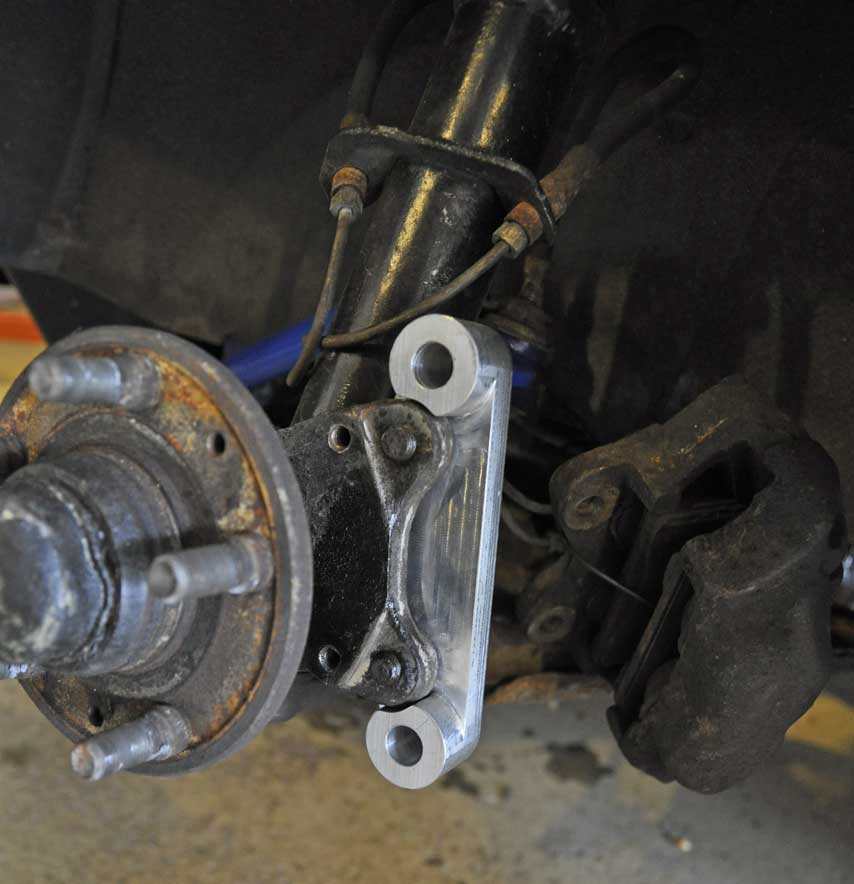
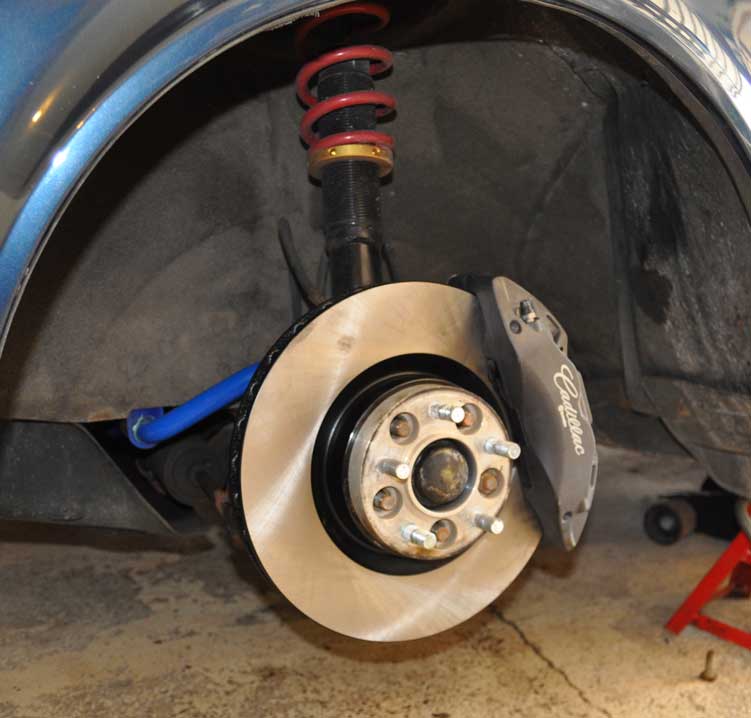
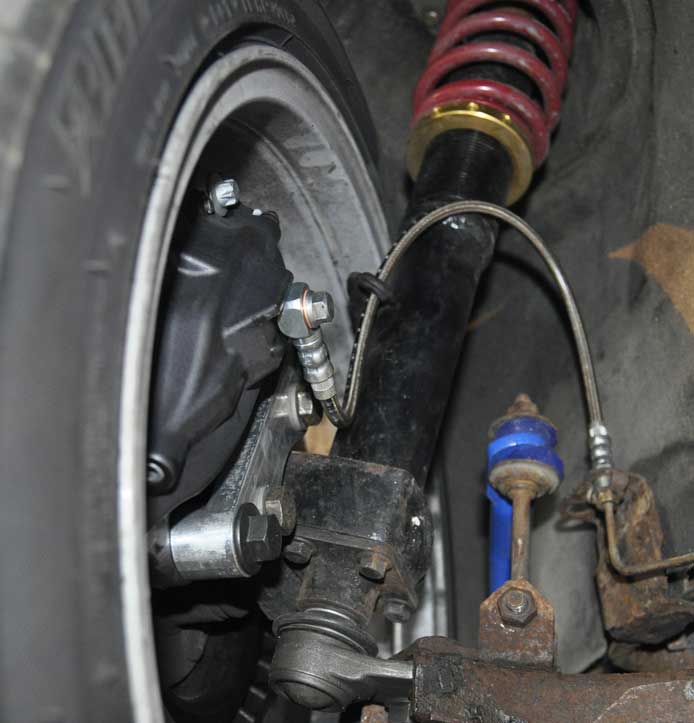
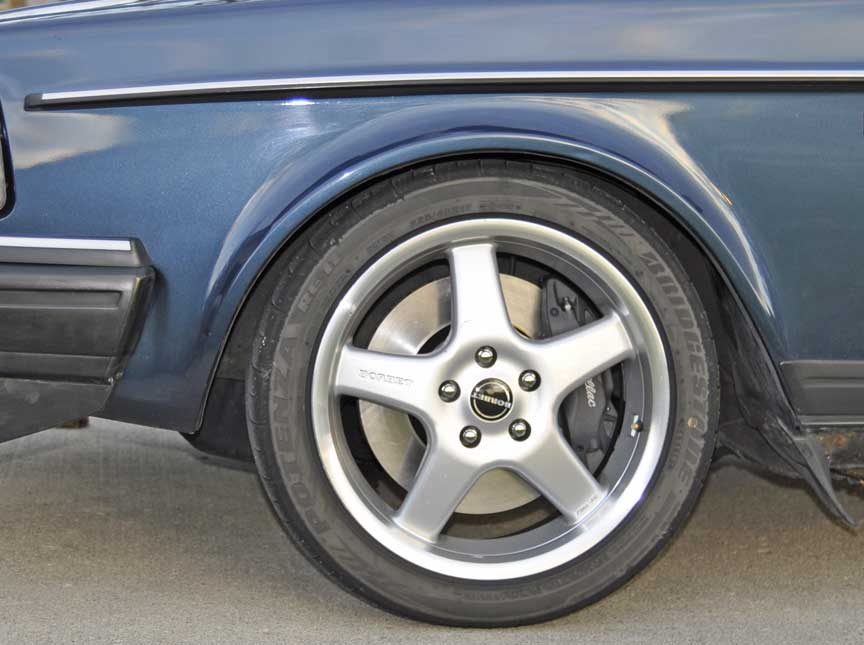

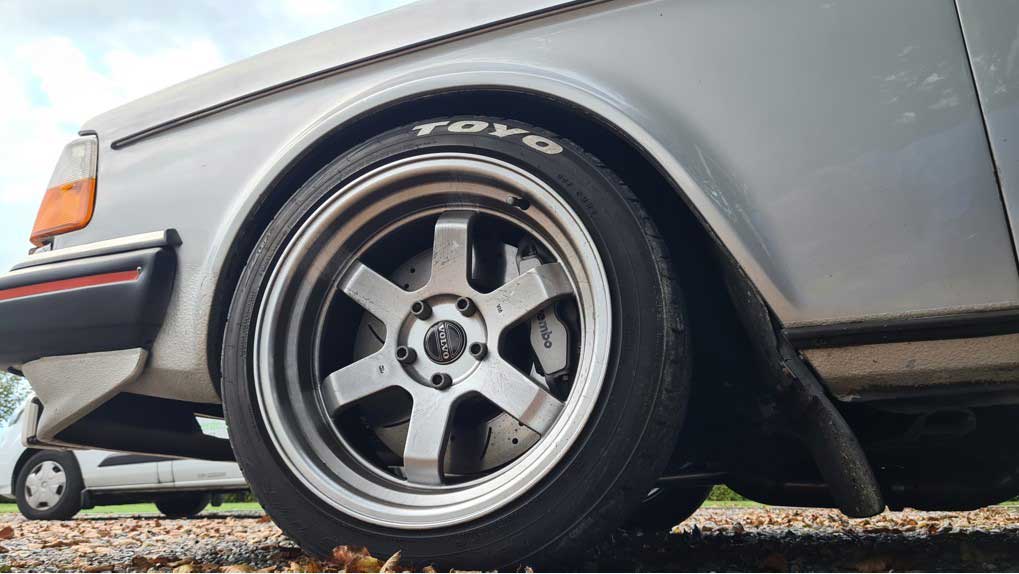
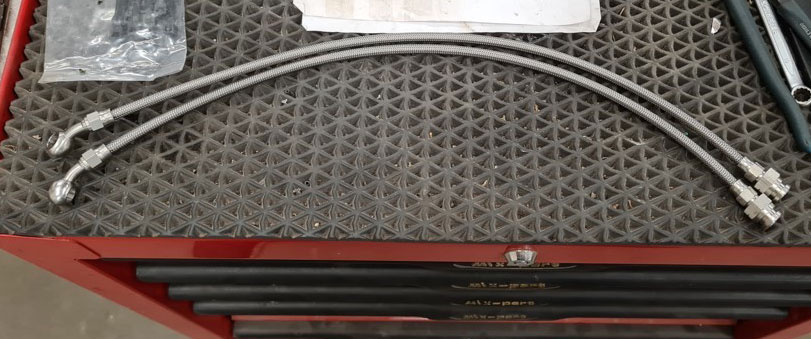


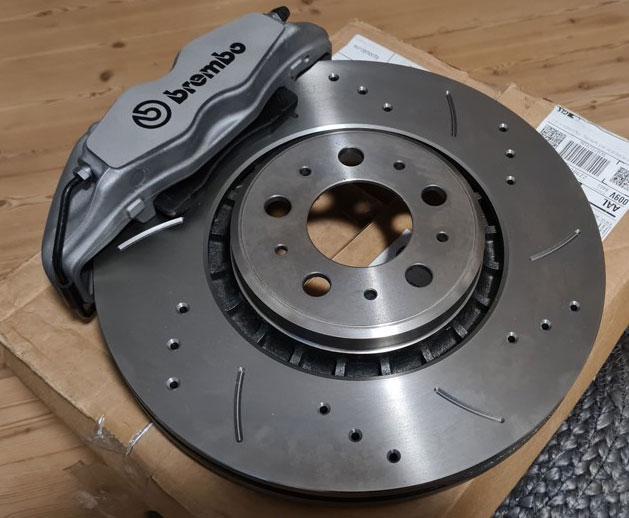
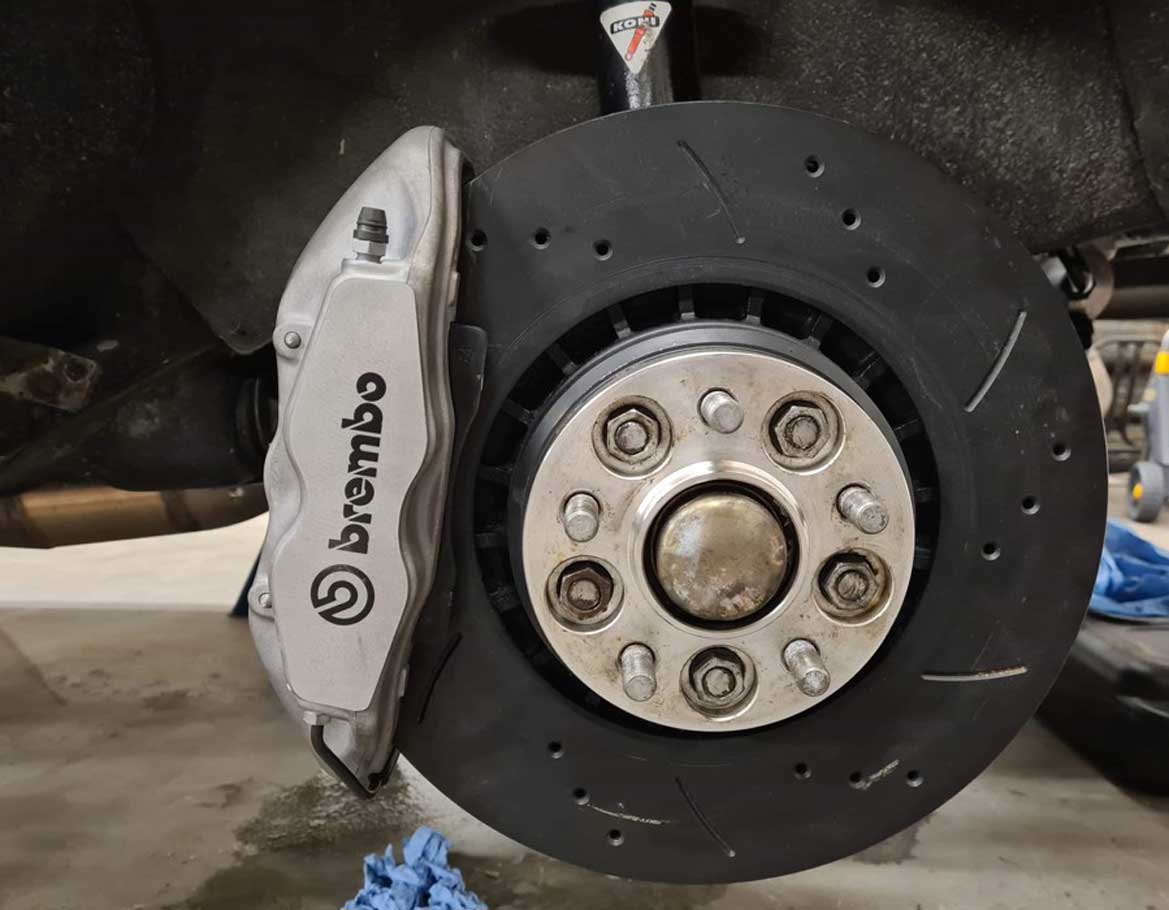
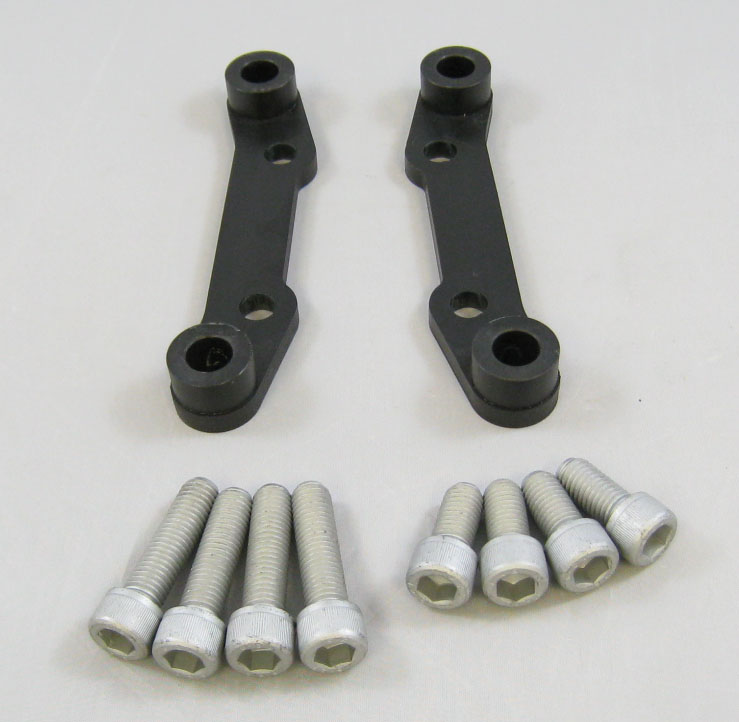
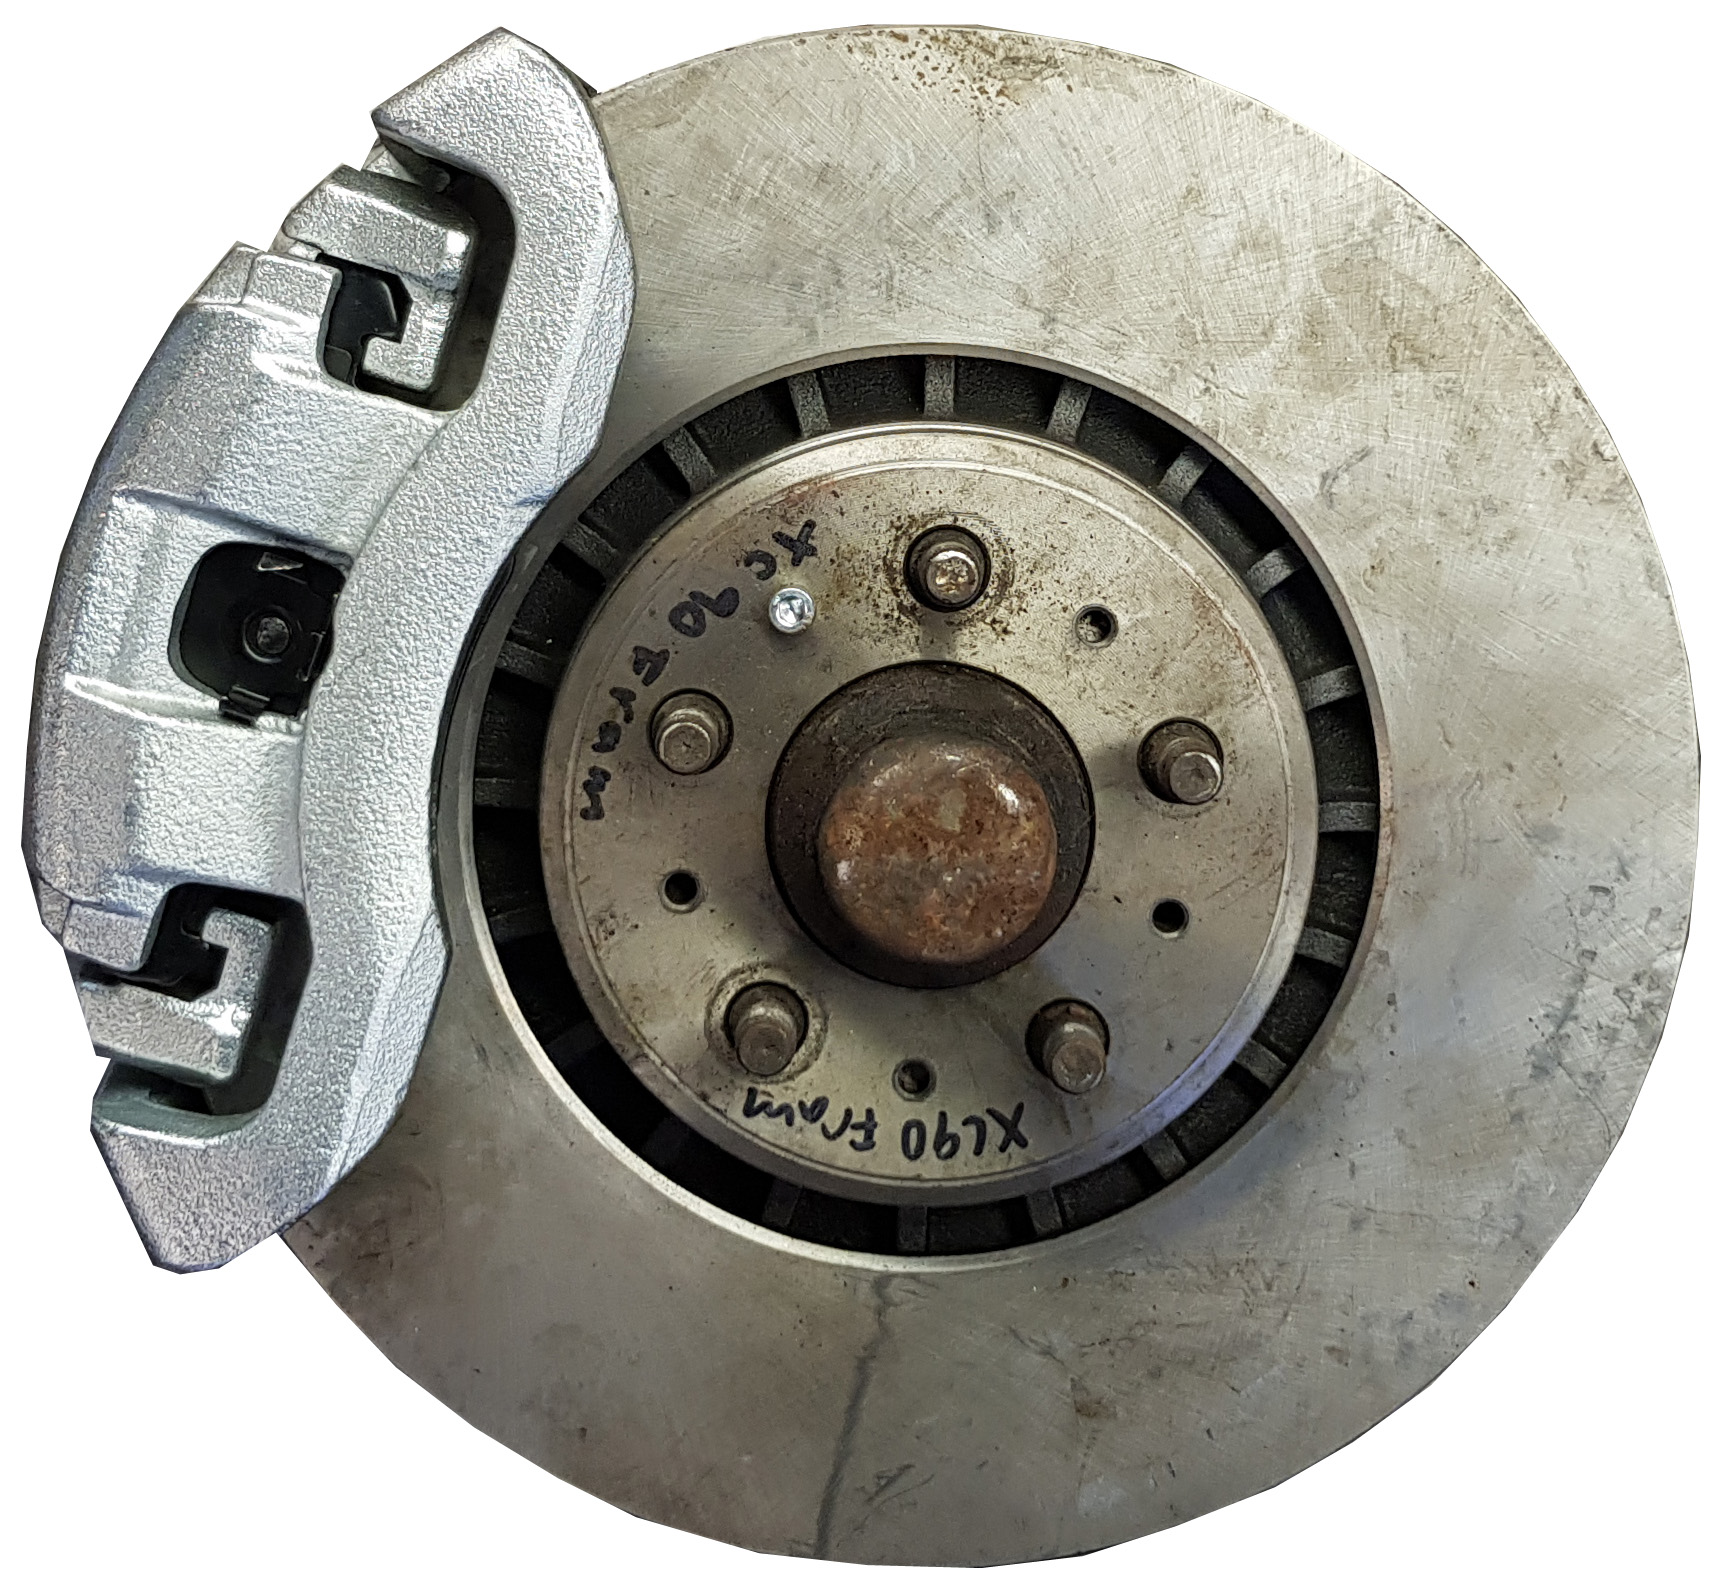
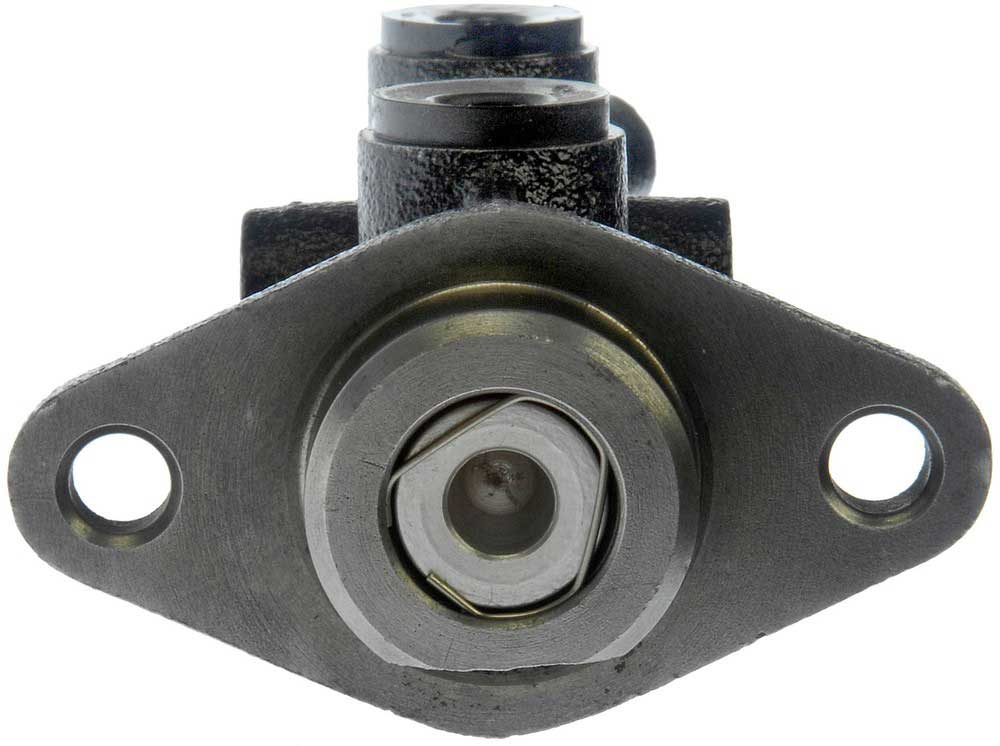
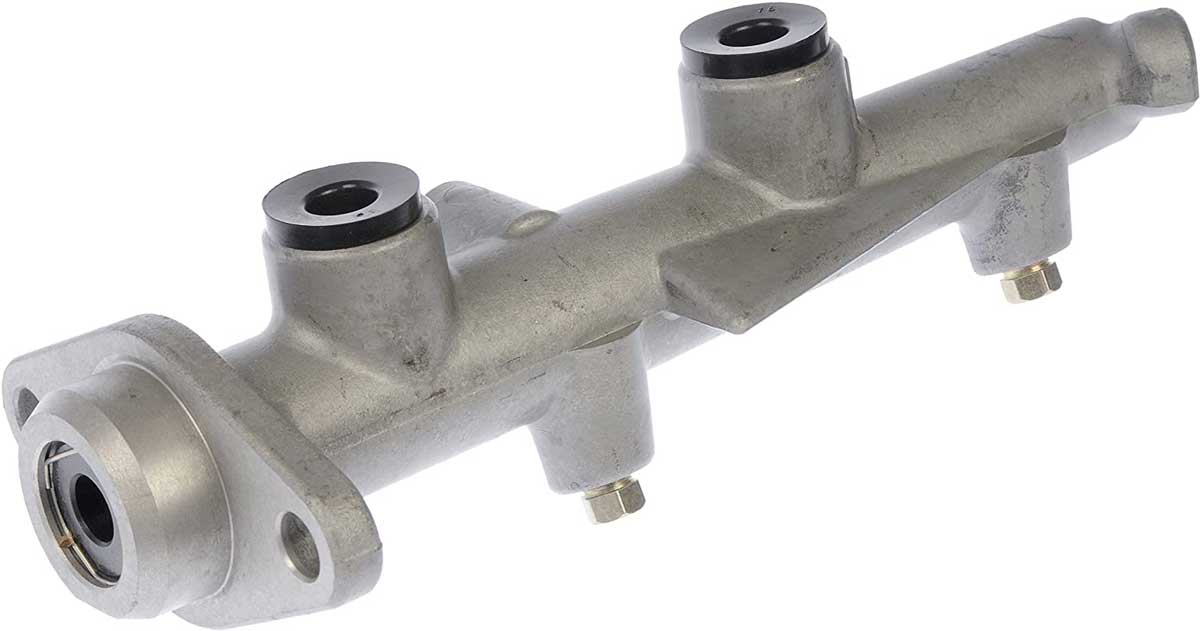
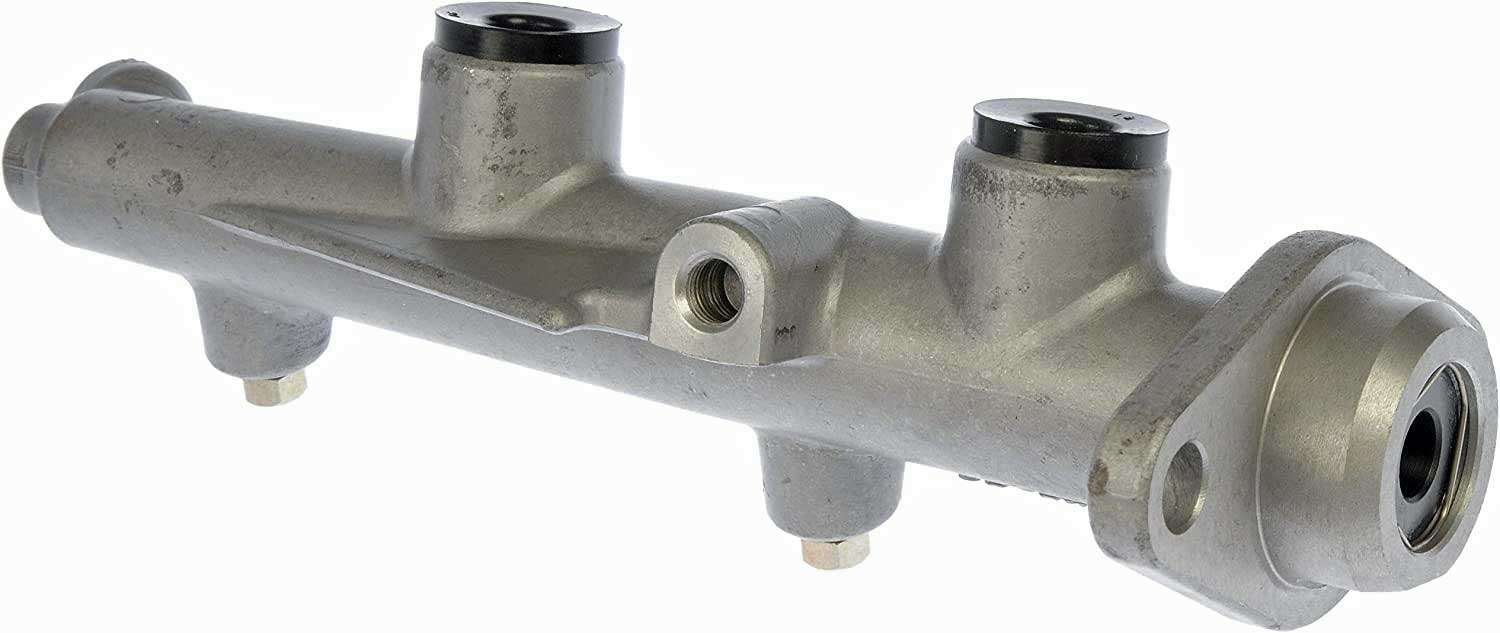


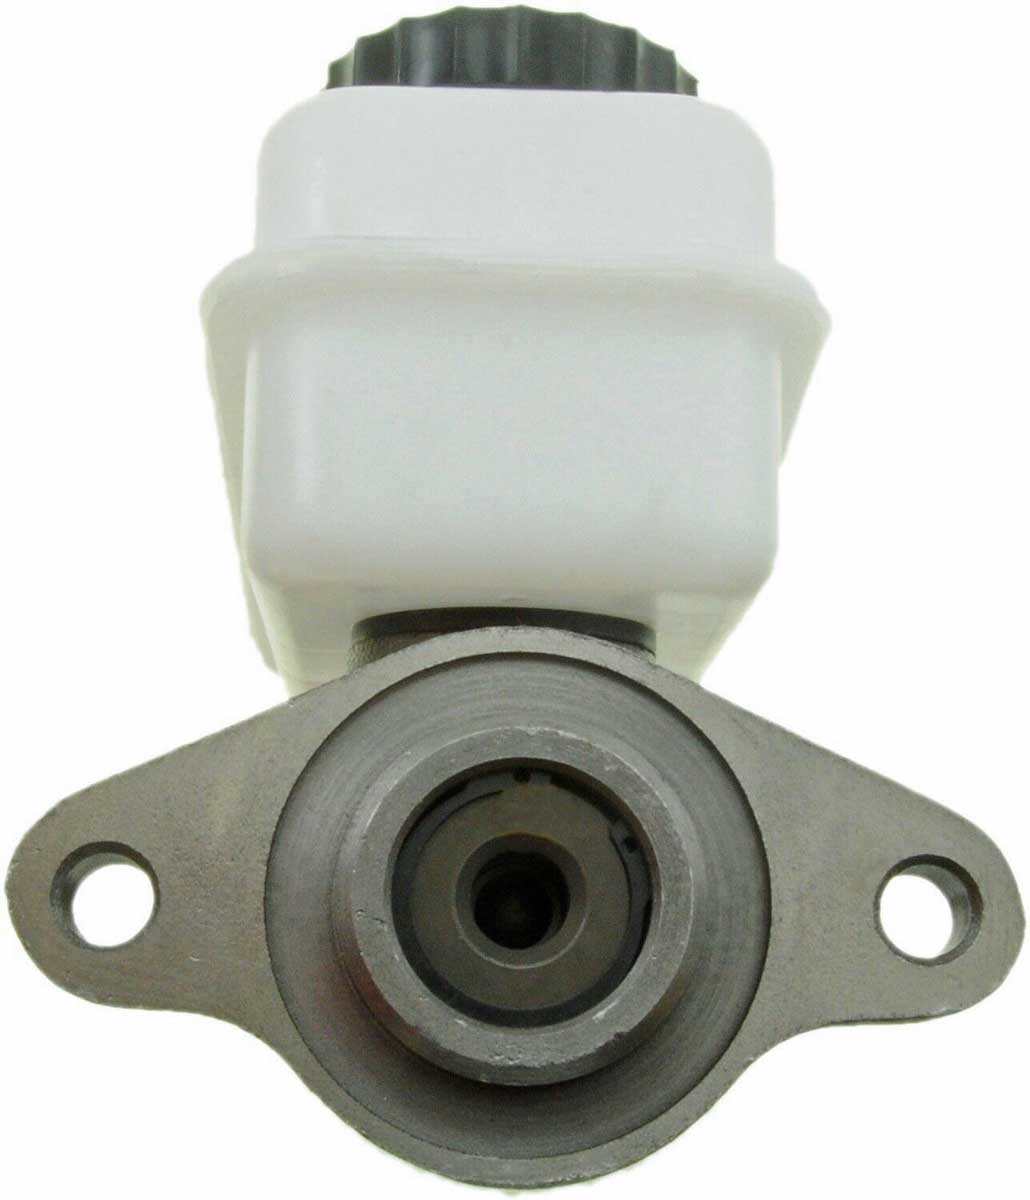


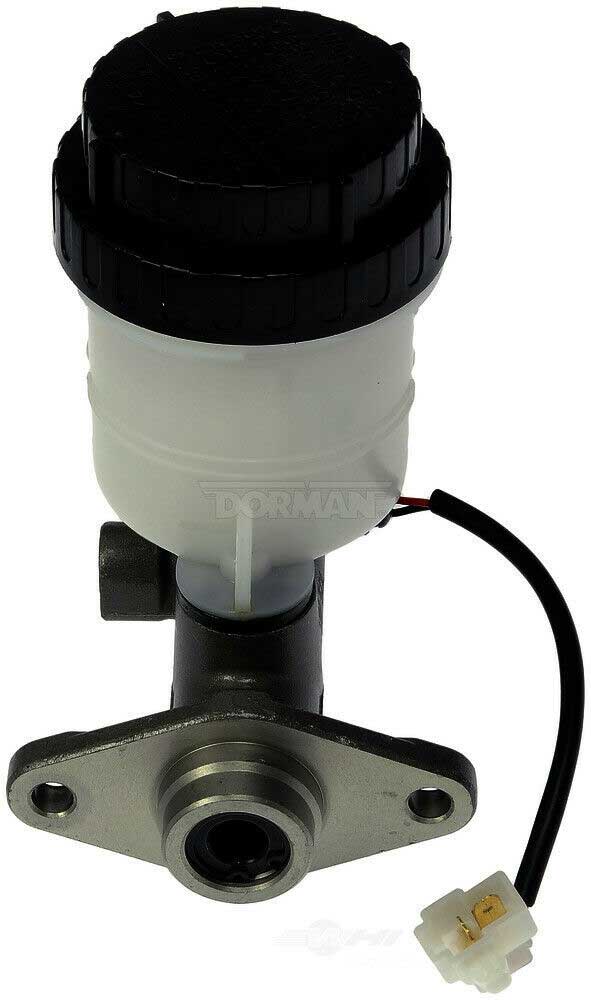
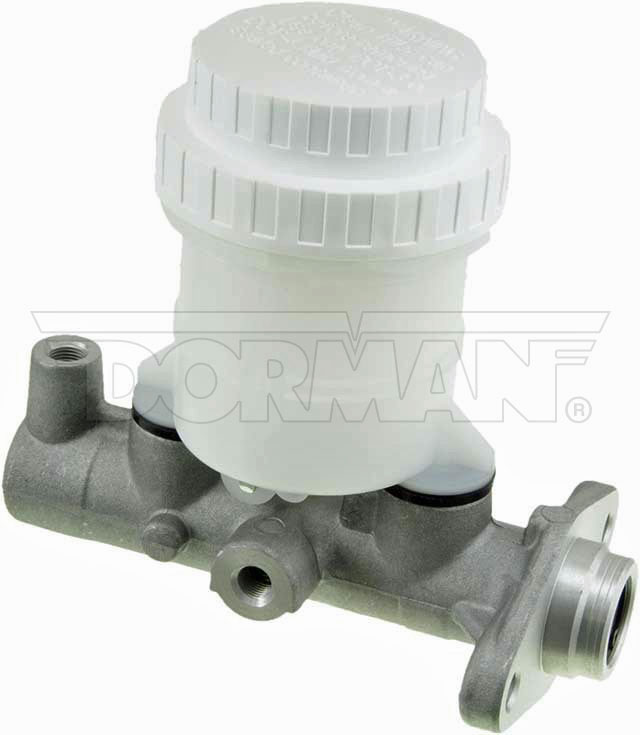


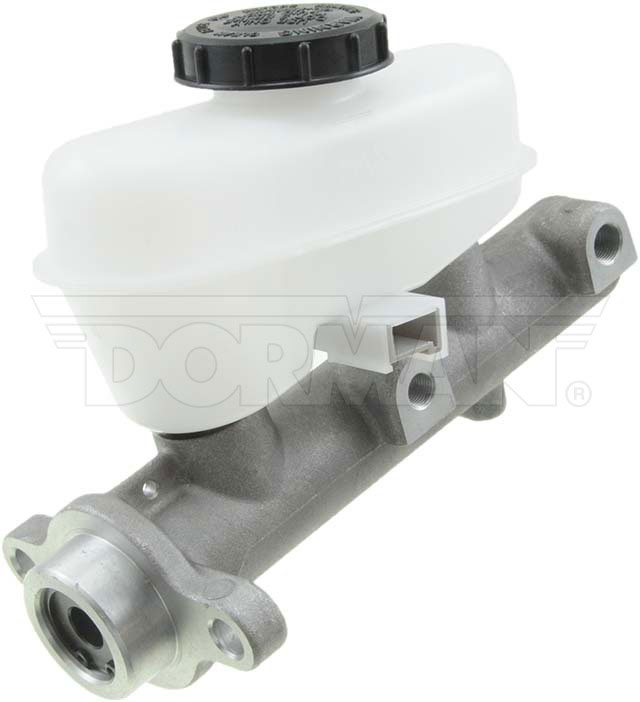


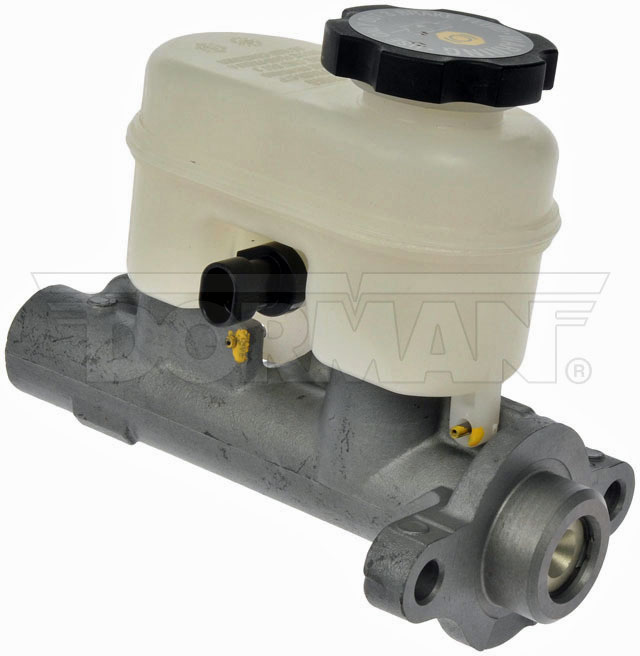

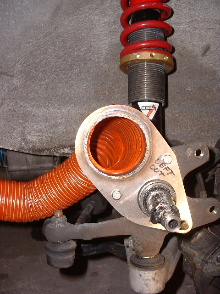
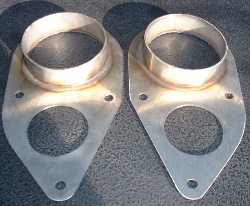
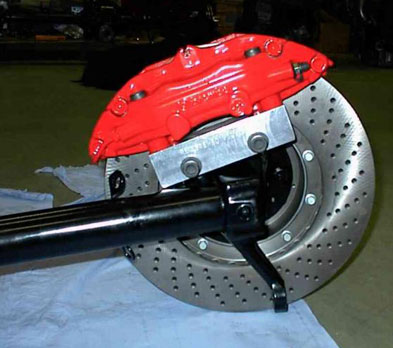
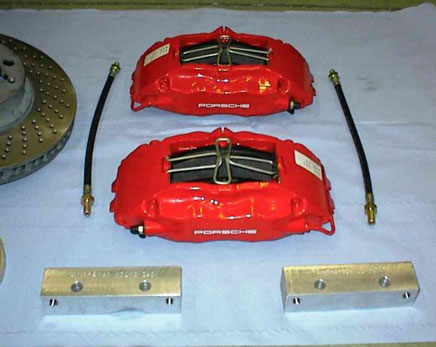


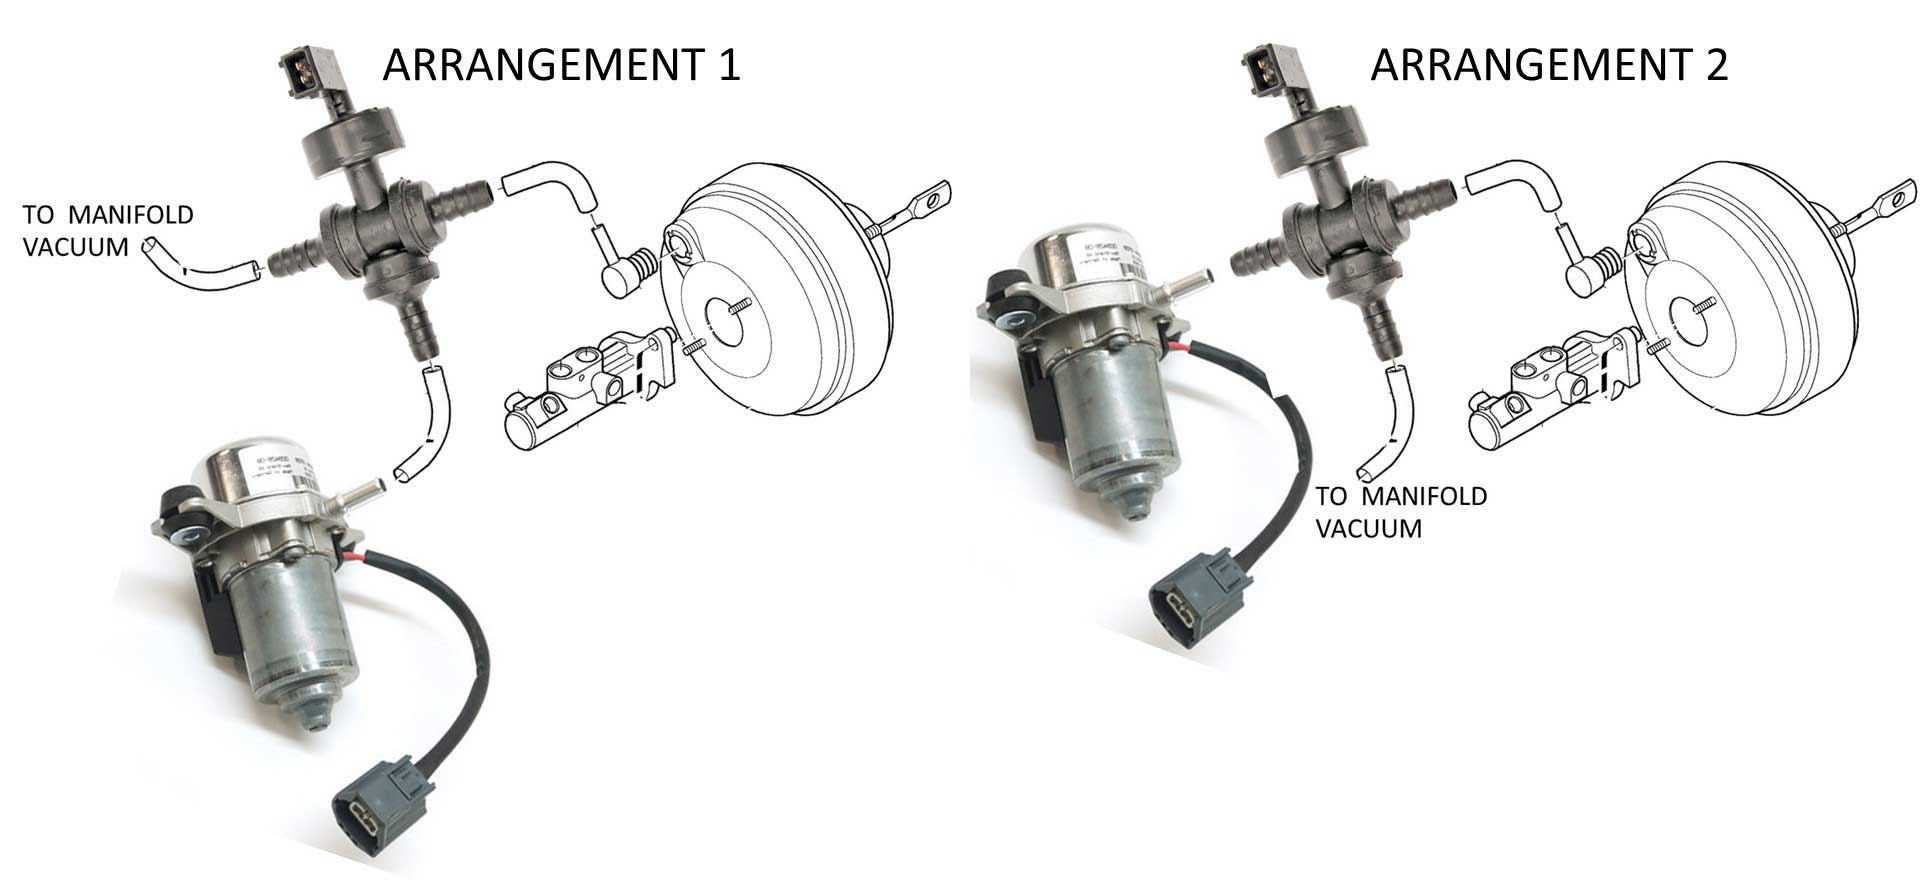


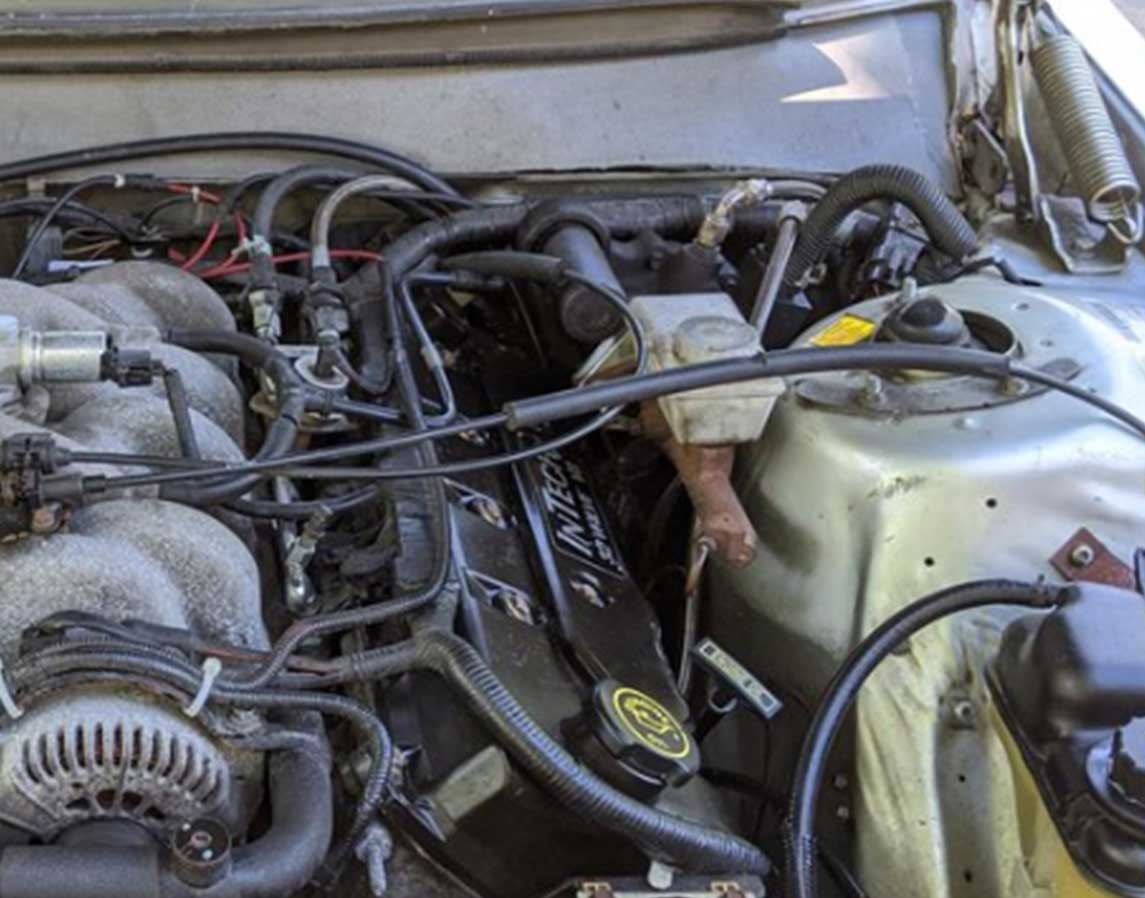
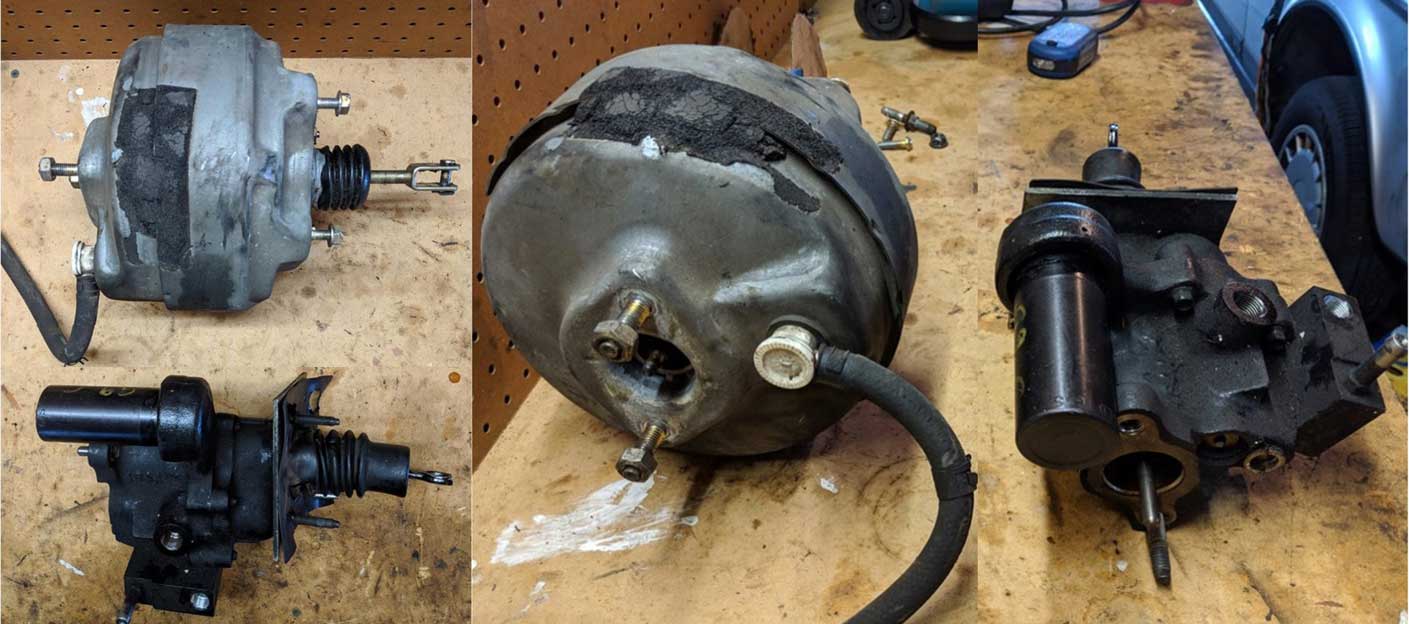

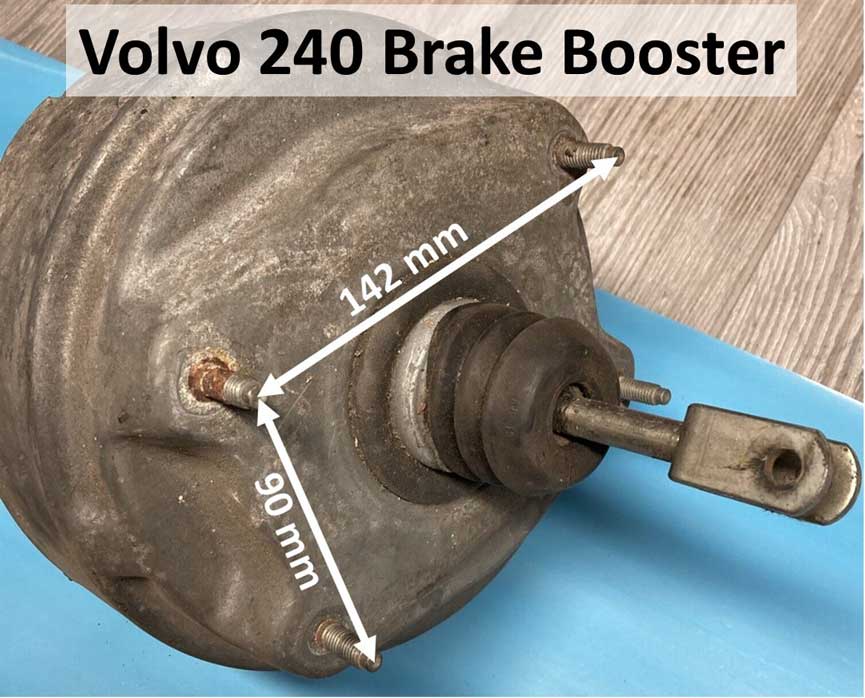
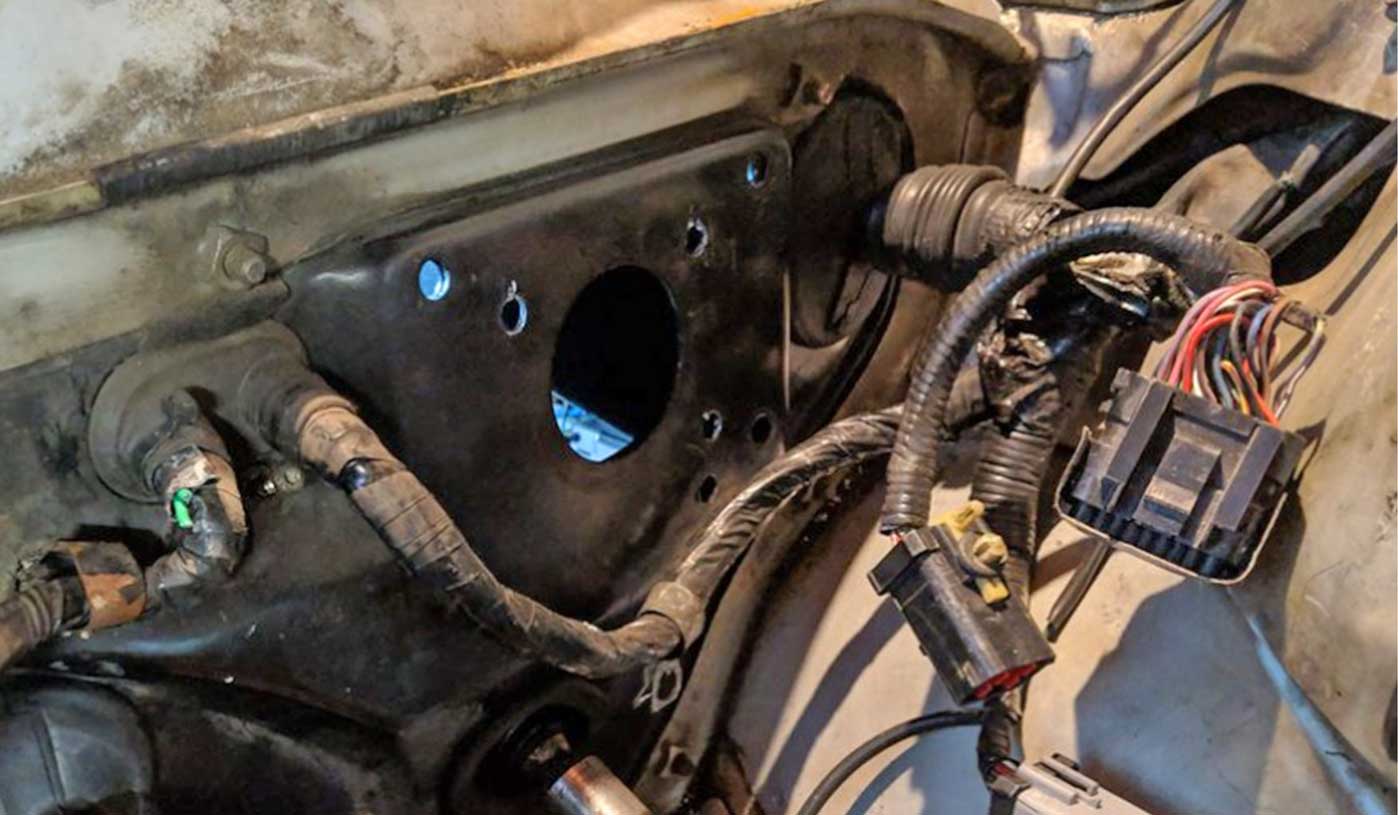
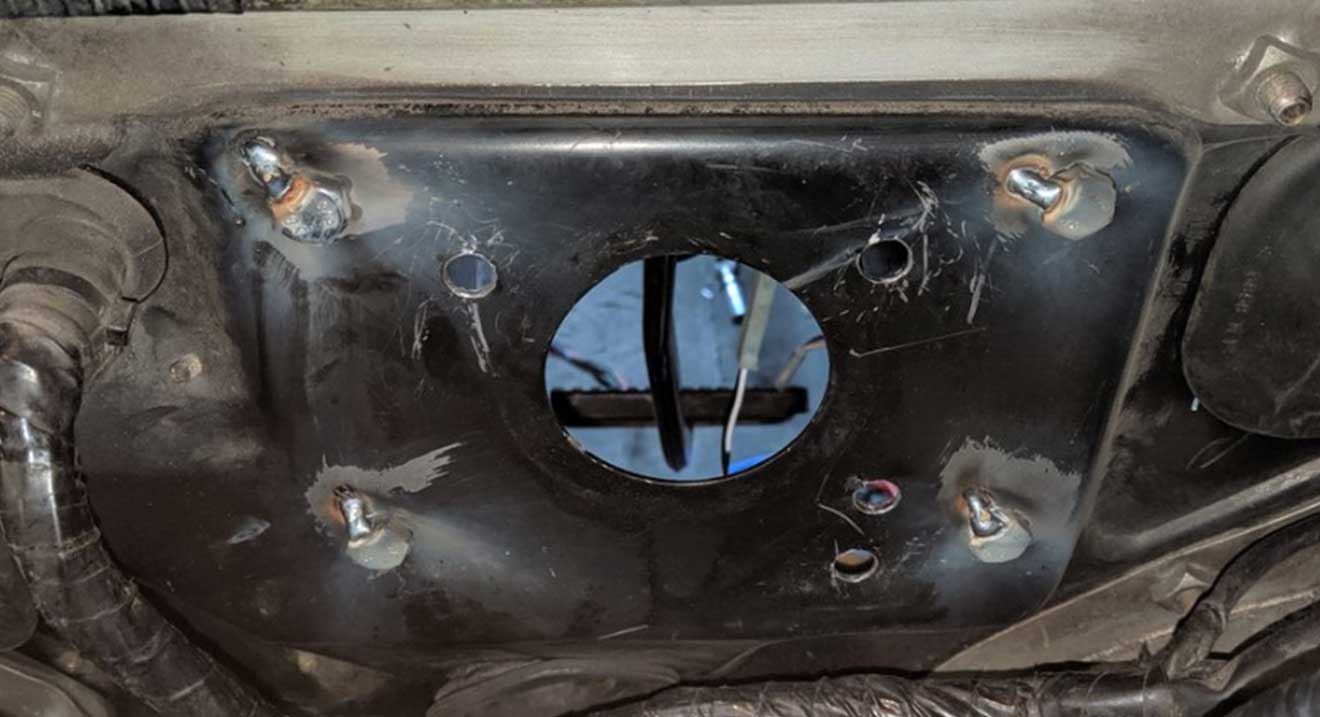
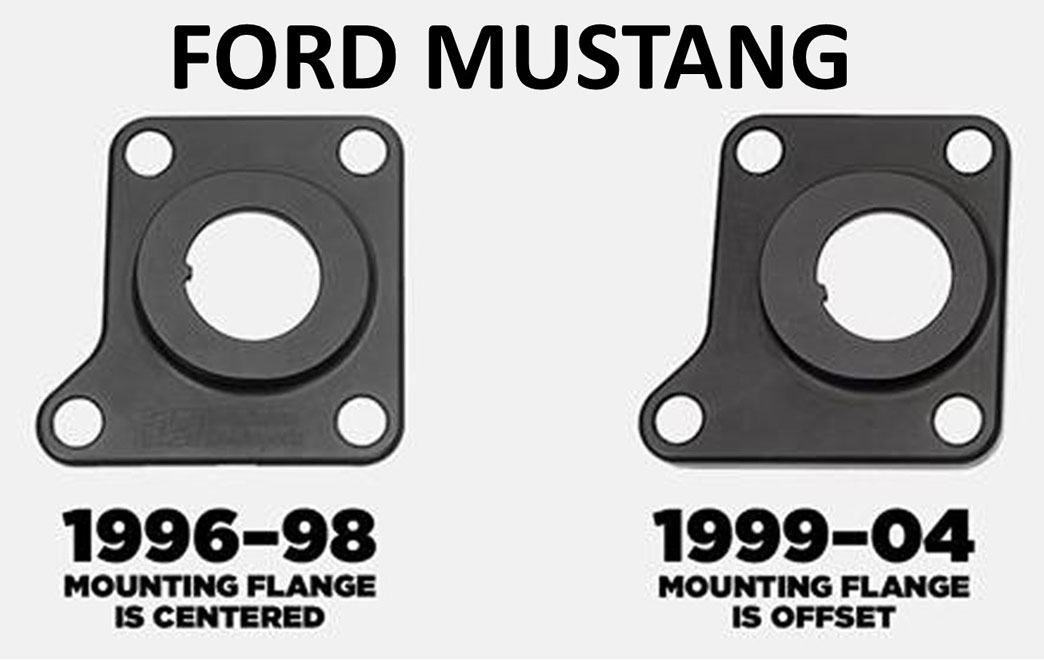
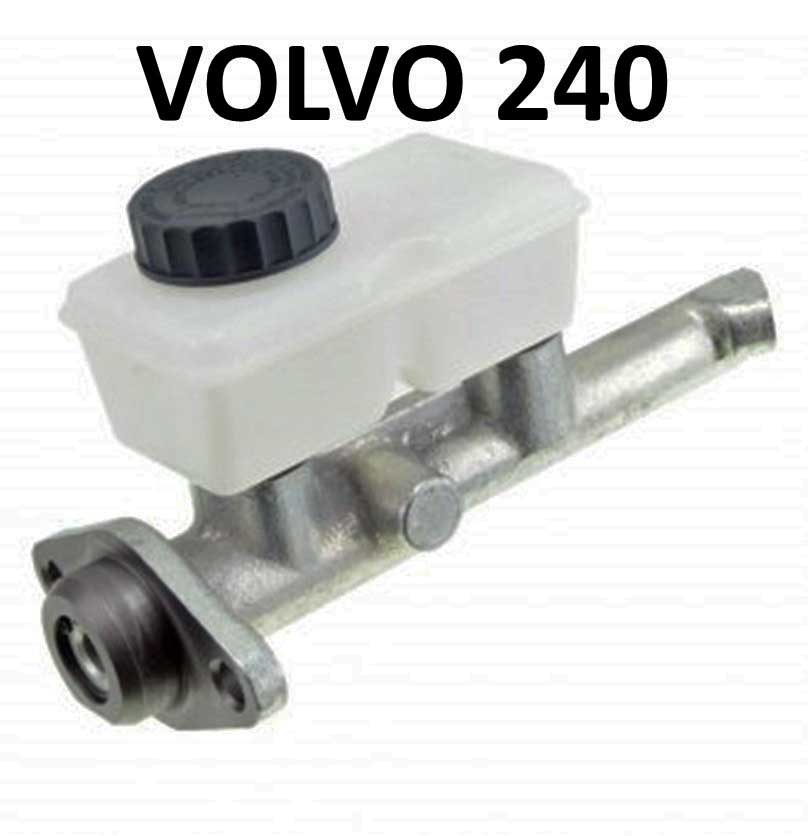
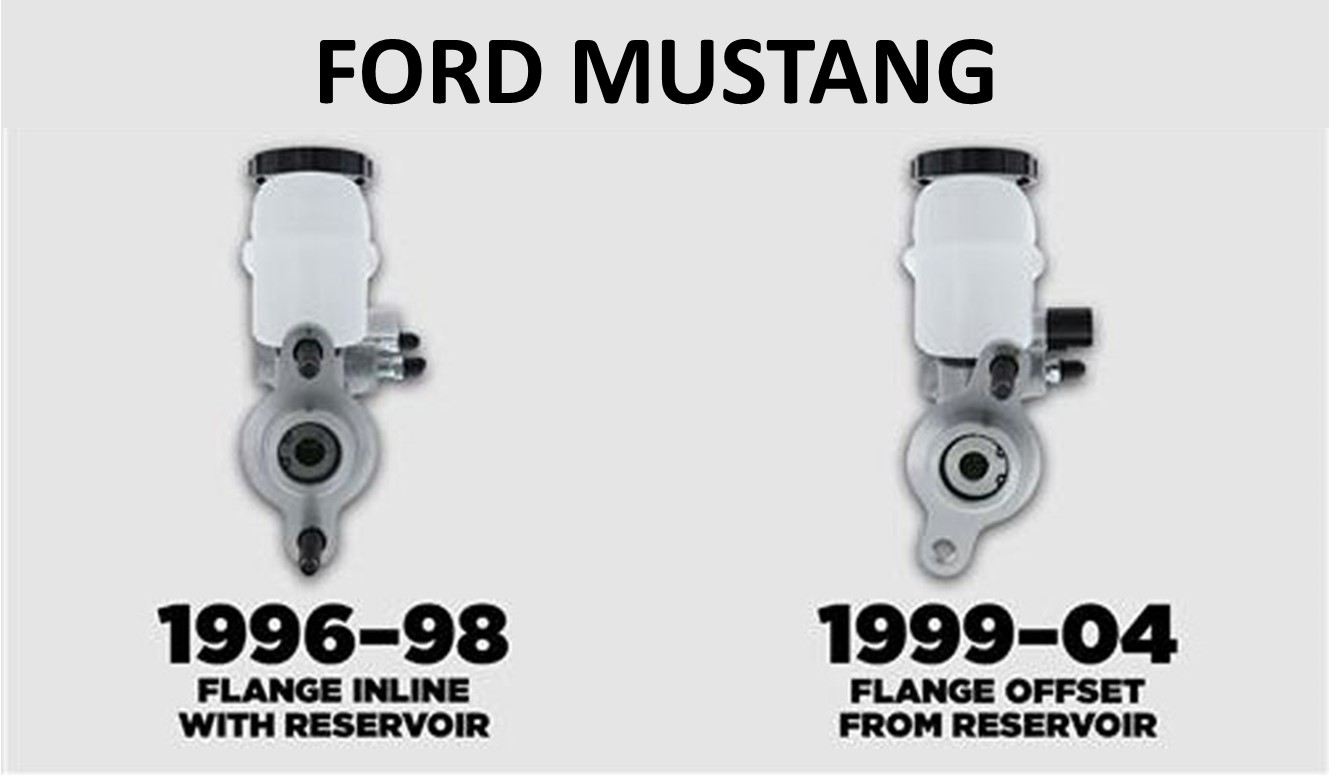
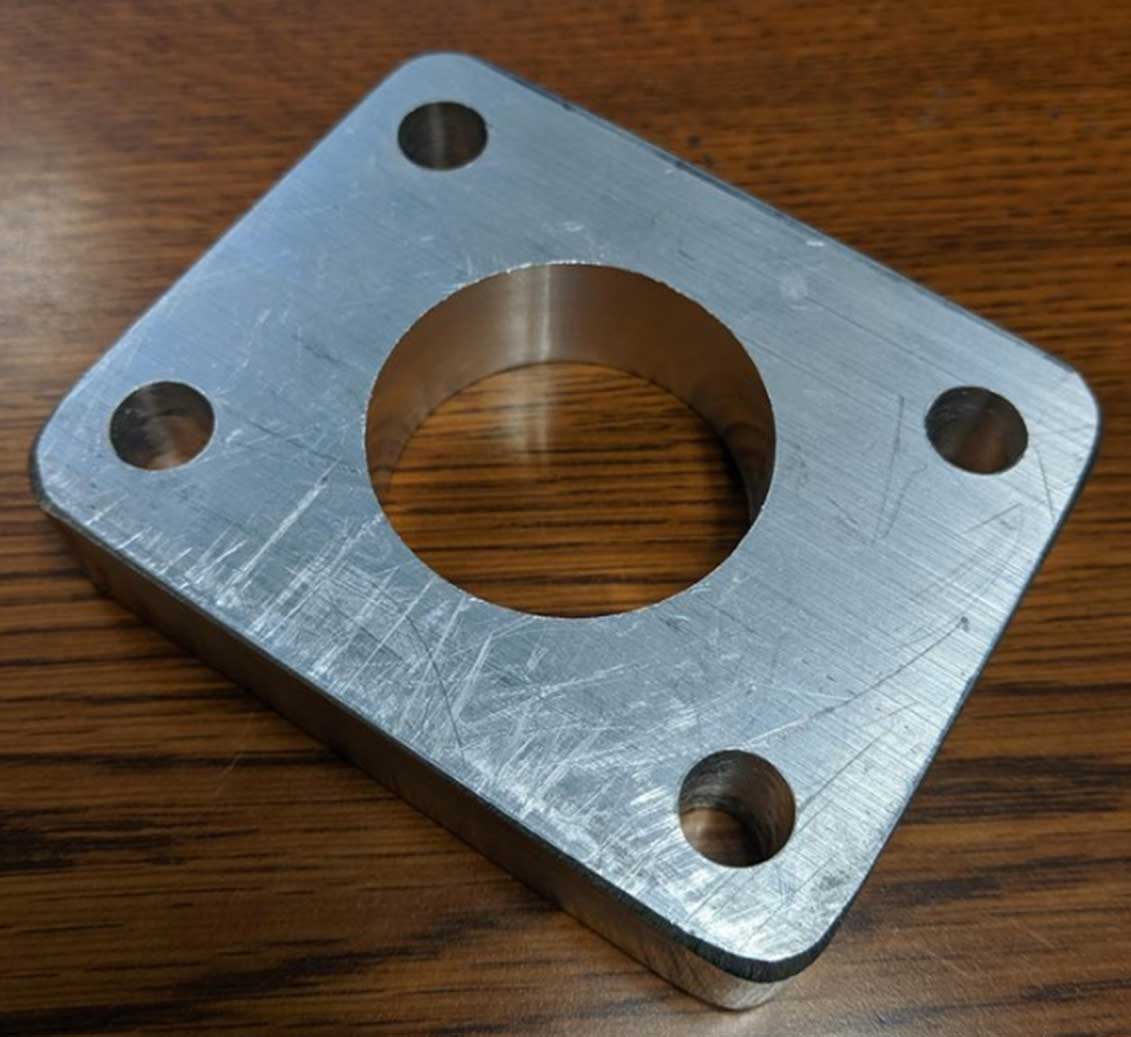

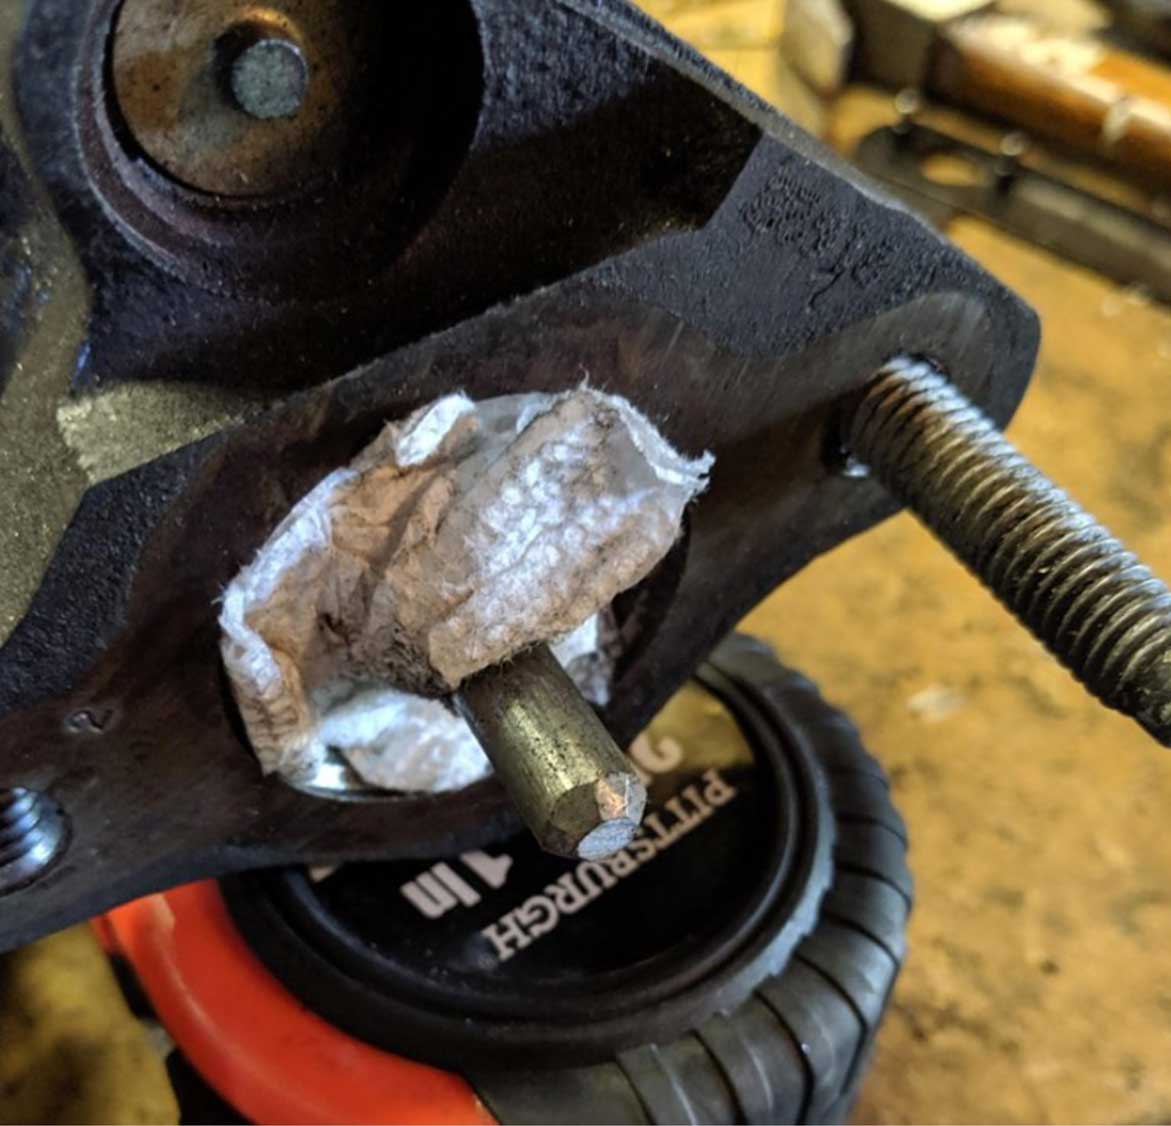
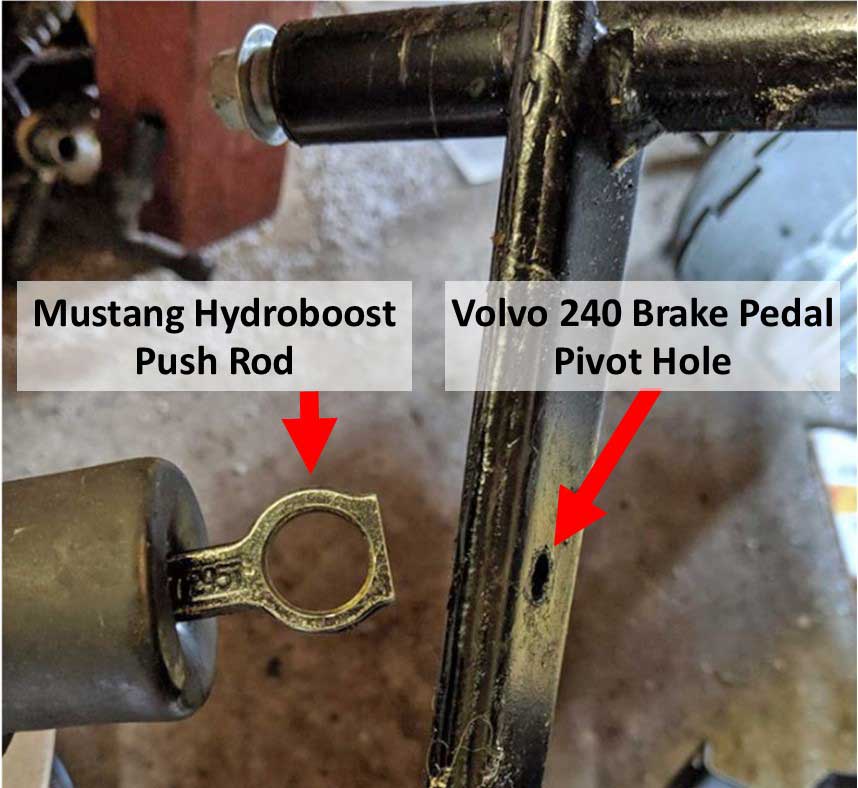
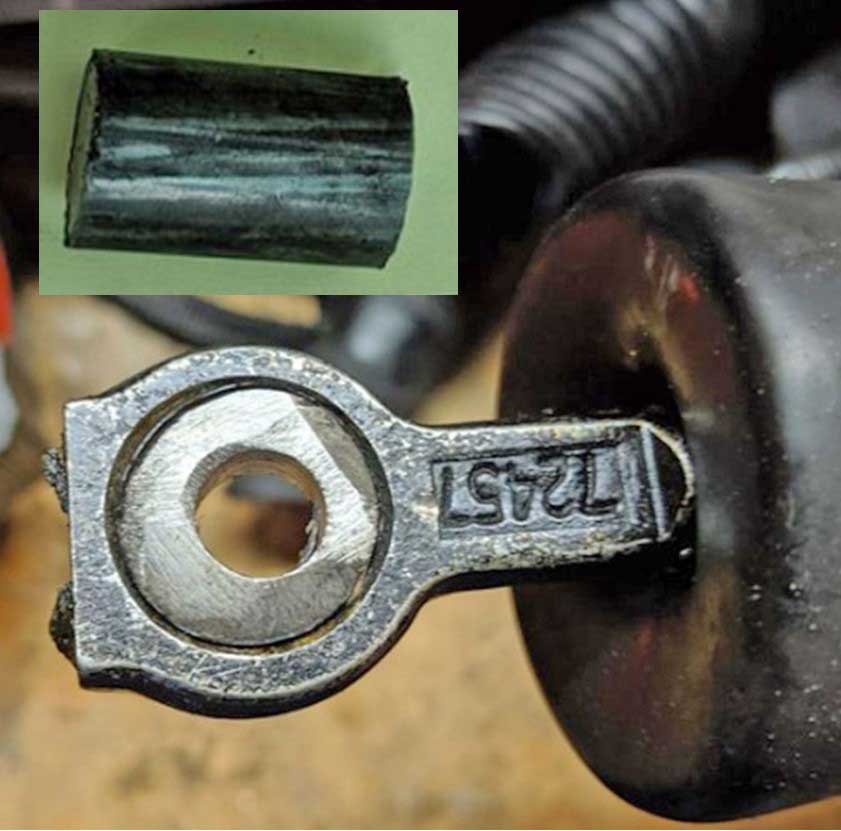

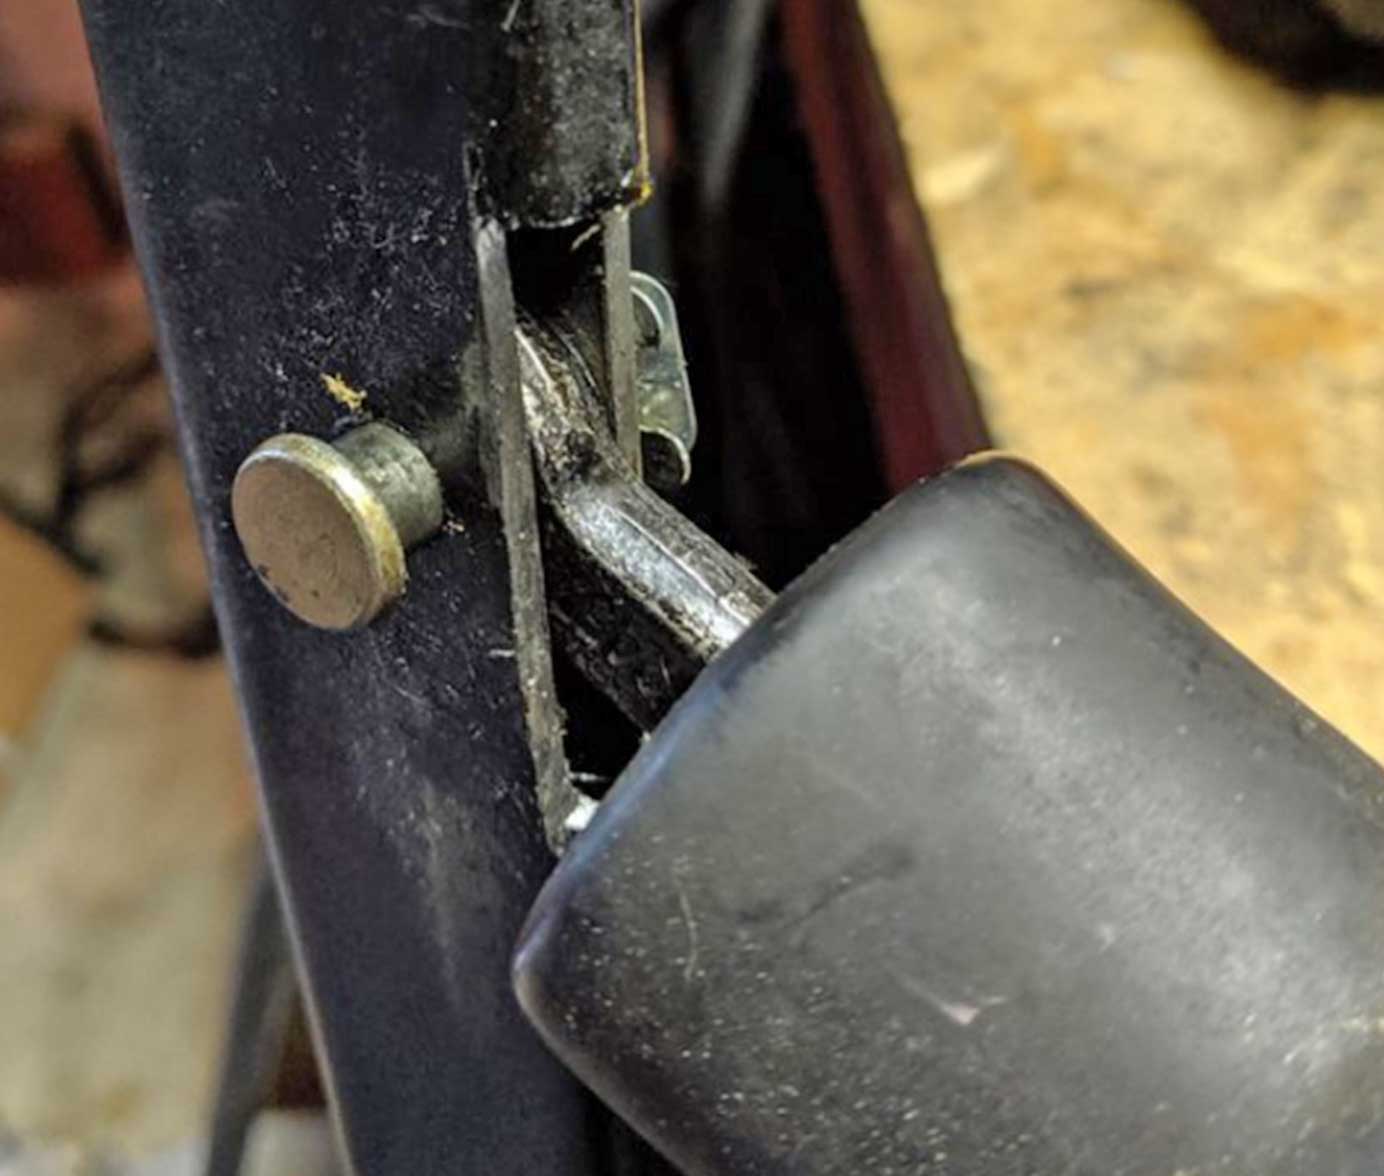
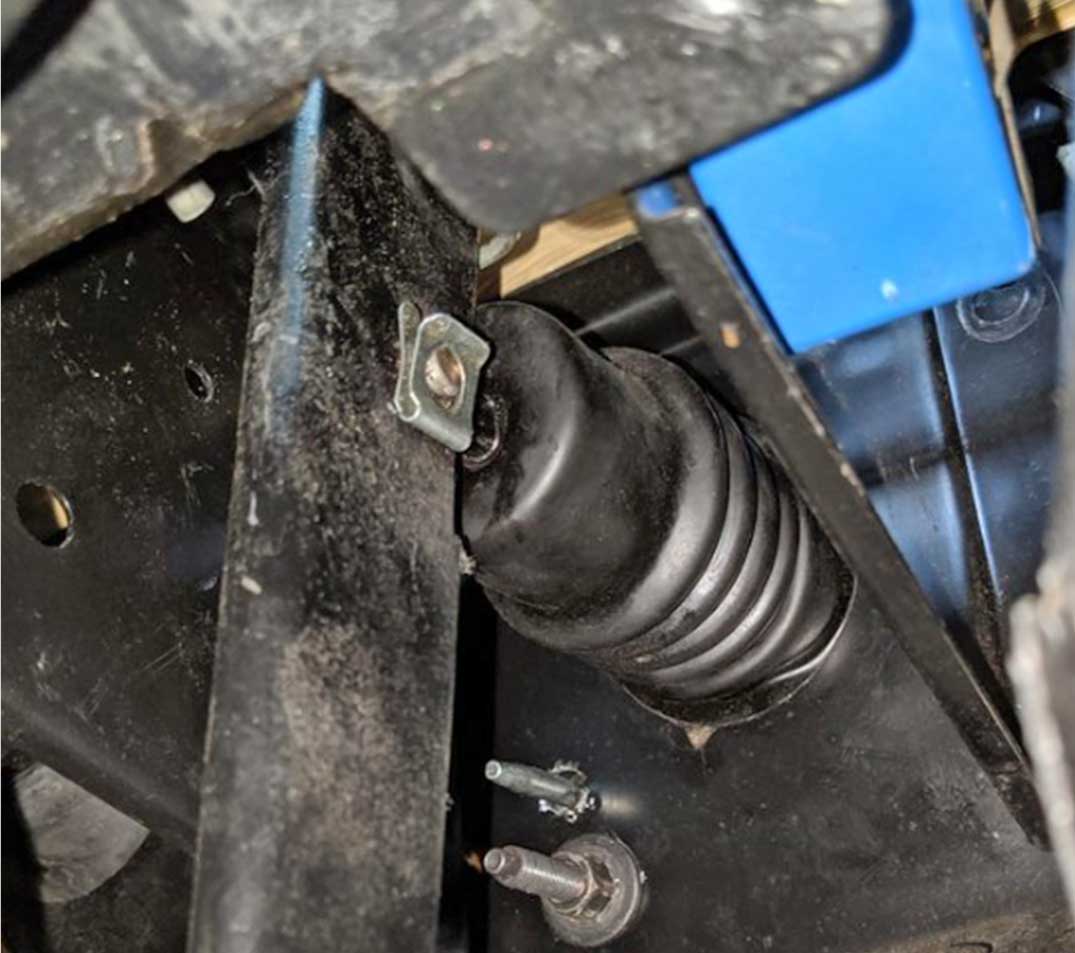
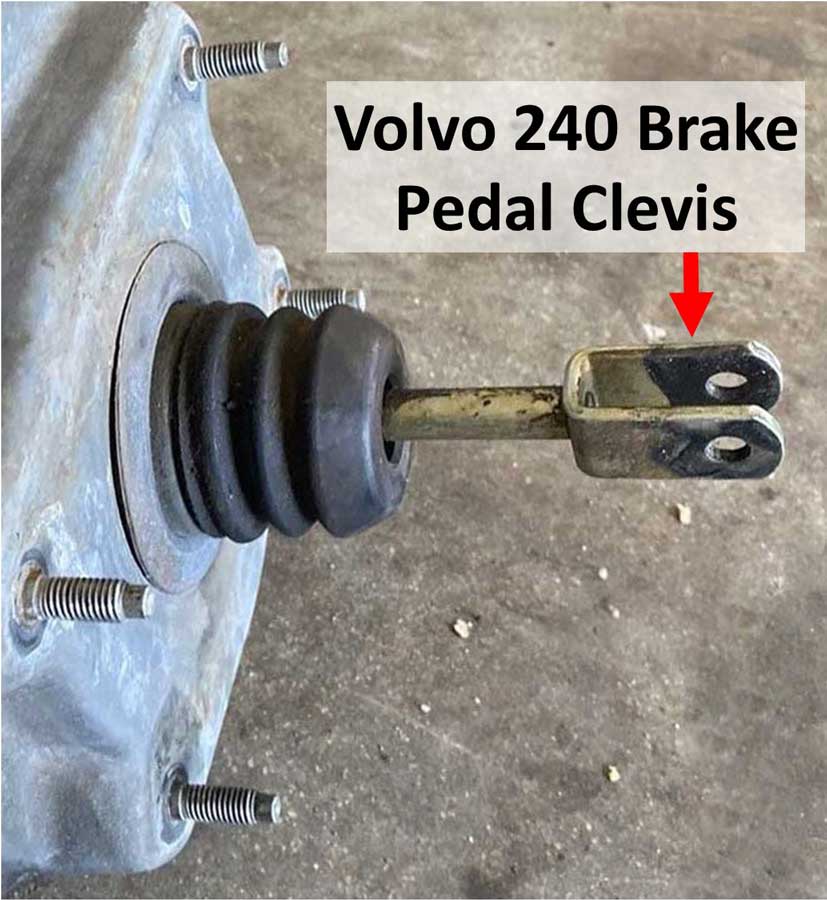

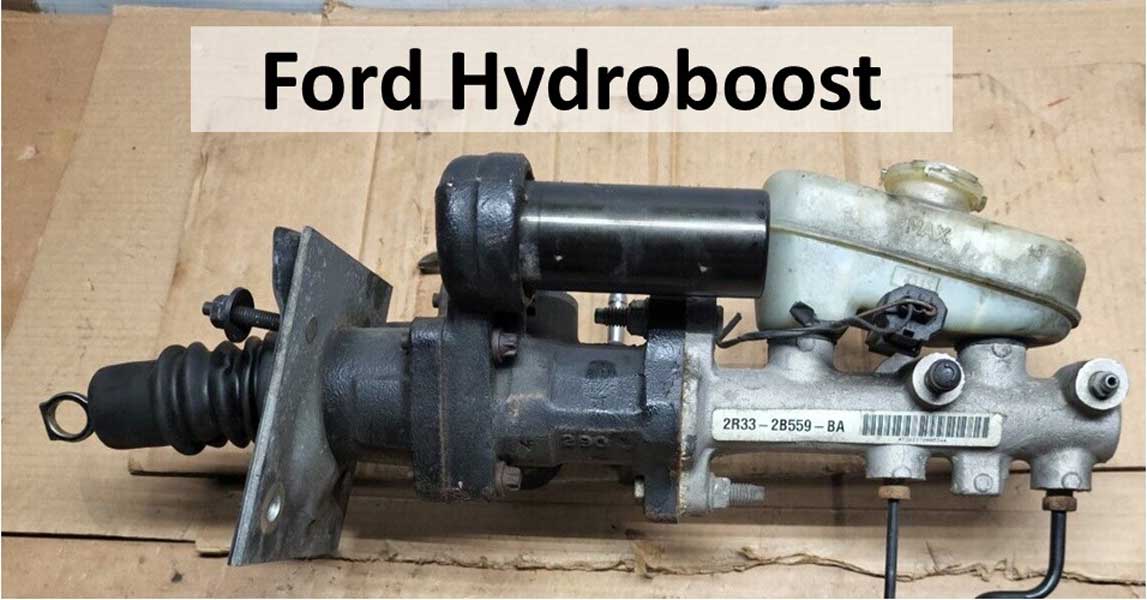

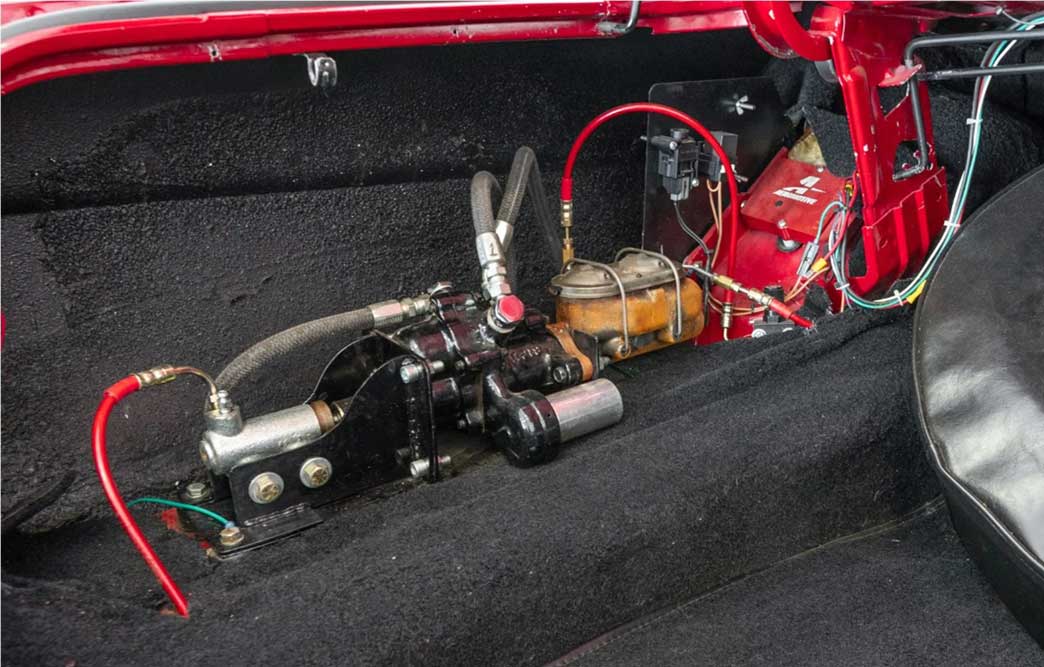
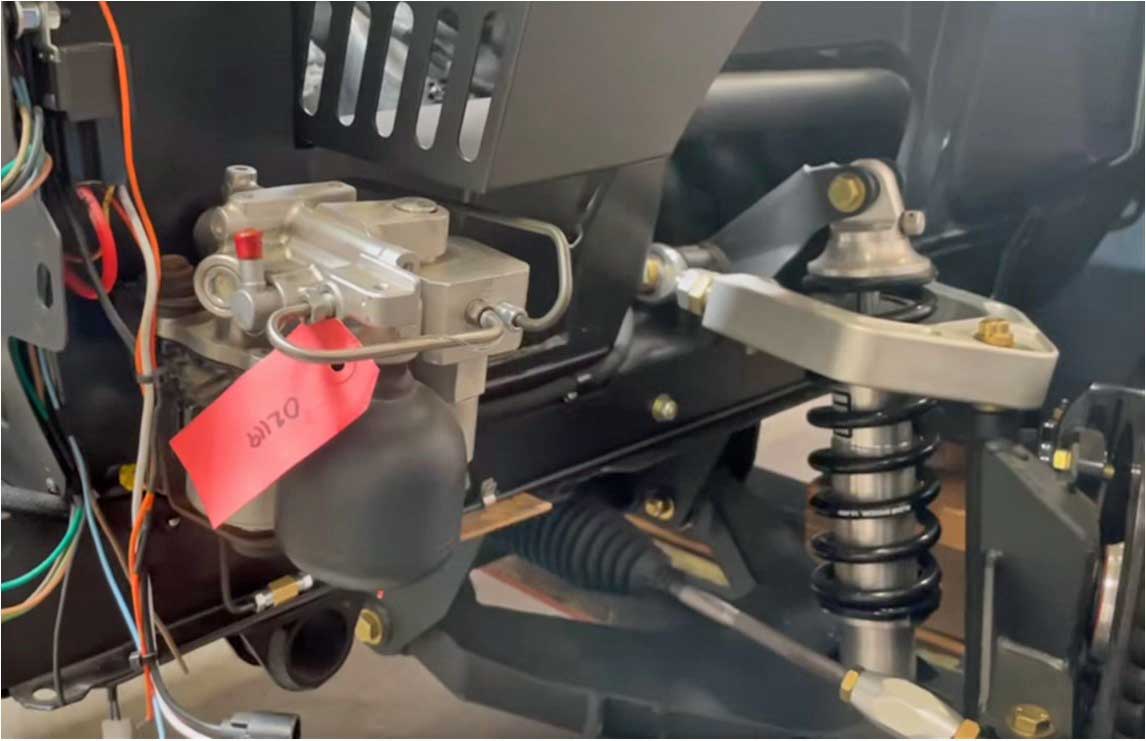
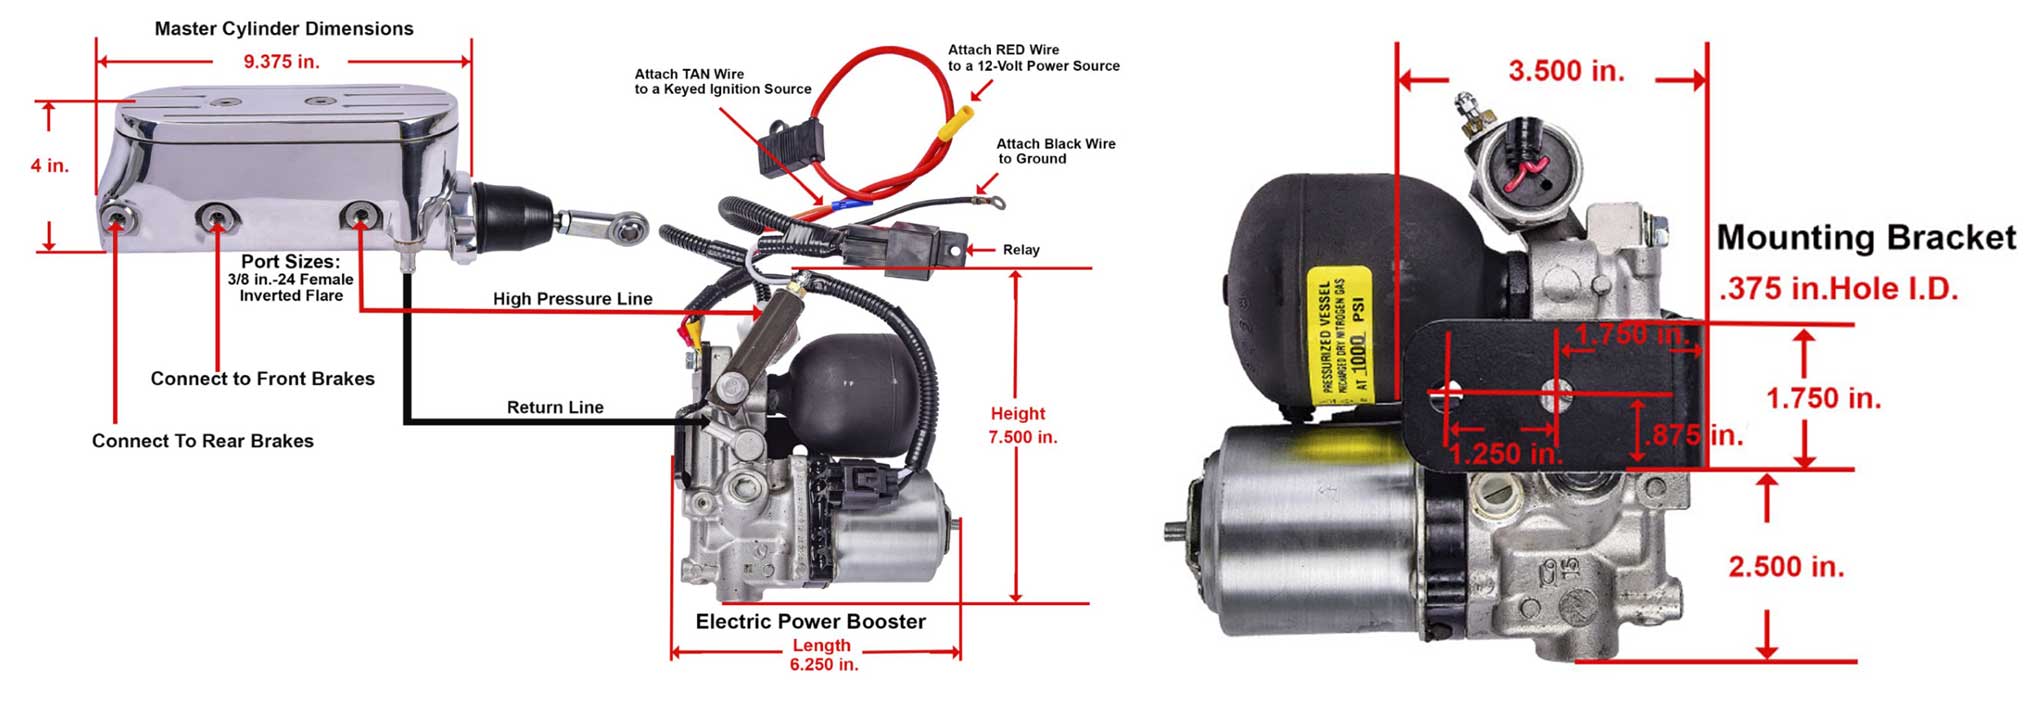
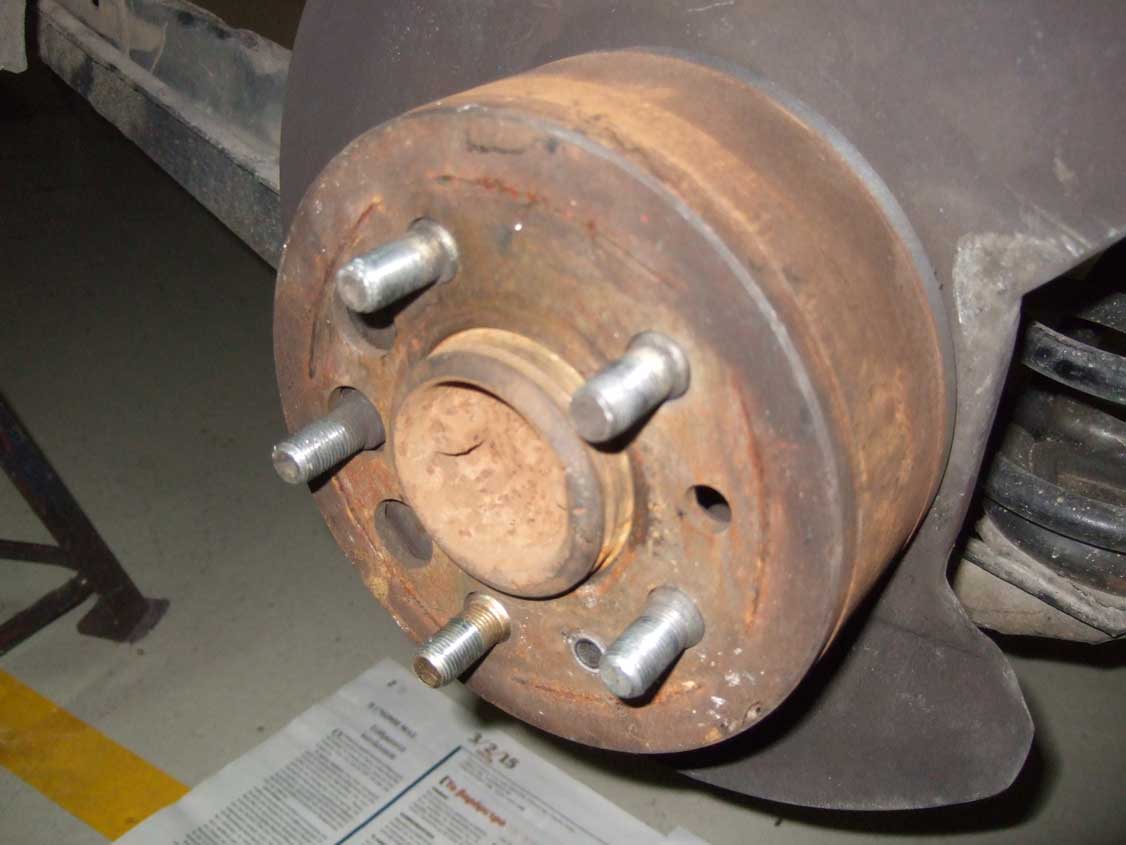