|
2 4 0 T U R B O . C O M D A V E ' S V O L V O P A G E
|
||||||||||||||||||||||||||||||||||||||||||||||||||
|
2 4 0 T U R B O . C O M D A V E ' S V O L V O P A G E
|
||||||||||||||||||||||||||||||||||||||||||||||||||
As
a Volvo 240 fan who's owned and modified a lot of 240s going back over 30
years, I've collected a fair amount of suspension experience.
|
|
|||||||||||
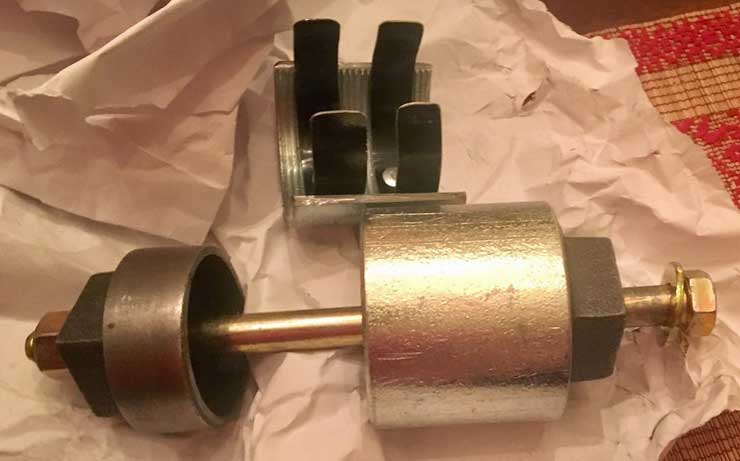
  EARLY versus LATE FRONT AXLE-HUB VERSIONS  The 240 front hub and stub-axle had a size change for the 1981 model year. From 1975 until the change for 1981 models, there existed TWO different front axle sizes. One was for passenger cars and a larger version was for special applications. The smaller version axle had M16 (16 mm) thread (just like the 140 models). In 1981 all front axles became the larger version (mostly for 1982 cars), which had M18 (18 mm) thread. The change occurred after the following chassis numbers: (242) chassis 191000; (244) chassis 595000; (245) chassis 320000. Source: https://ozvolvo.org/d/13880-13880 If ordering front wheel bearings, seals or hubs for an early 240, make certain to order the correct size.  The above comparison image is from BNE Dynamics. https://www.bneshop.com/collections/240/products/240-coilovers-with-koni-sport-dampers-1 SUSPENSION BUSHINGS. Back when i was fairly new into 240s, when I found the old rubber suspension bushings were suffering, I followed the popular trend of replacing every bushing possible with polyurethane. And of course because I was going all in, some rear bushings got replaced with custom made SOLID ROD ENDS, such as sway bar end links, torque rods and the Panhard bar. 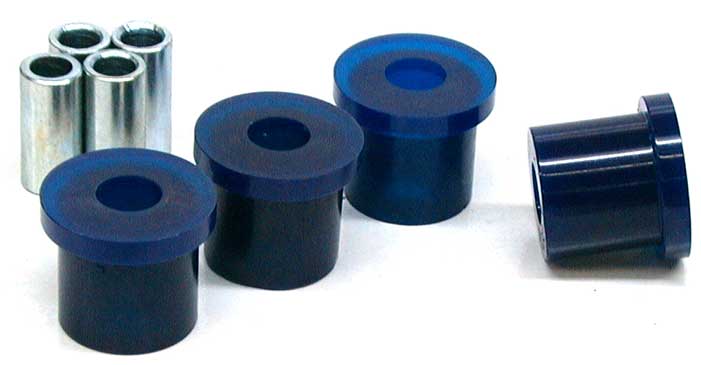 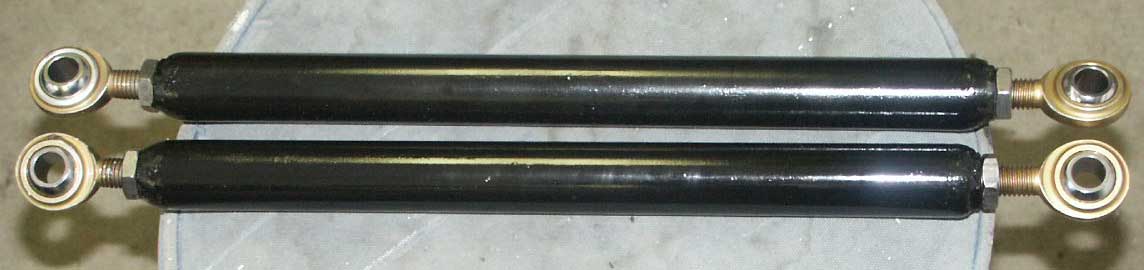  My limited experience at the time didn't consider just how much NOISIER a 240 could become when you begin eliminating so much rubber damping. I really didn't mind the all of the extra noise and rattles that much at the times, but then it got old. Now, many years later, I've changed my mind on some of those preferences. I still think polyurethane bushings are just fine for MOST places when you want to improve responsiveness, and my current 240 still has a number of them, but not everywhere like before. For example, I removed the clanky solid end Panhard bar and installed an iPd one with poly bushings, which is quieter. And I'll be staying with rubber bushings for now on the front lower control arms. I'm planning on installing of some Hybrid Adjustable Torque Rods from Kaplhenke Racing, which have rubber bushings on the chassis end. When that installation is complete, I'll include some photos in this page. Here's a short video installing POLY BUSHINGS in a 240 front control arm. https://www.youtube.com/watch?v=eIyWCHhZoGo
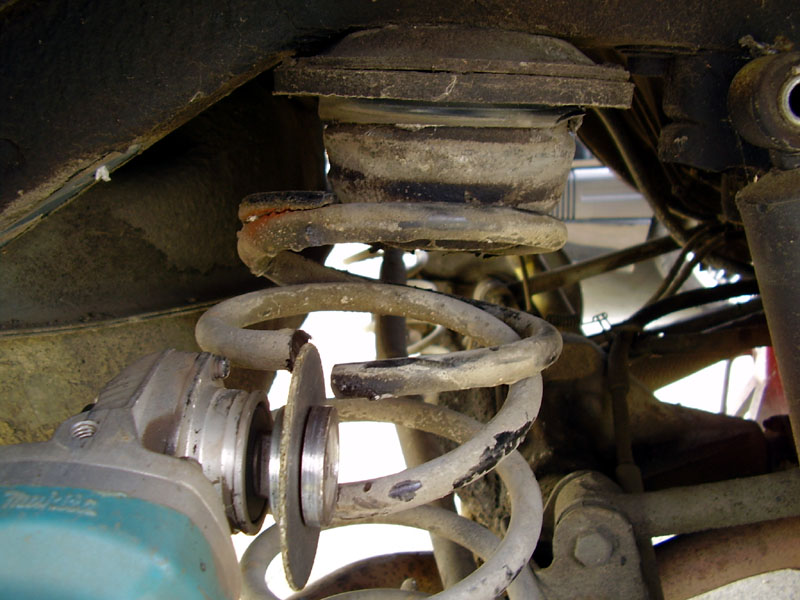
The Volvo 240 was equipped with rubber damped upper strut mounts. These mounts help to keep unwanted vibrations and noises from entering the cabin. The rubber in these mounts will eventually crack or fail as it ages. The old used mount in the first photo below had over 200,000 miles of use, but cracks and distortions began appearing in the rubber. These mounts can have serious failures if neglected long enough. In extreme cases the strut top can break through the damaged rubber and collide with the bottom of the hood. 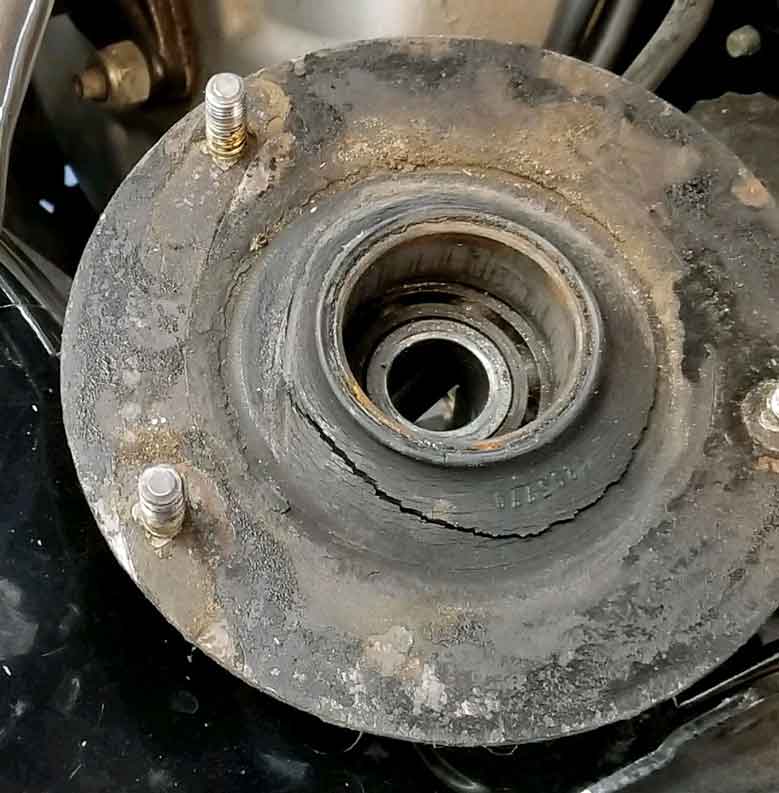 
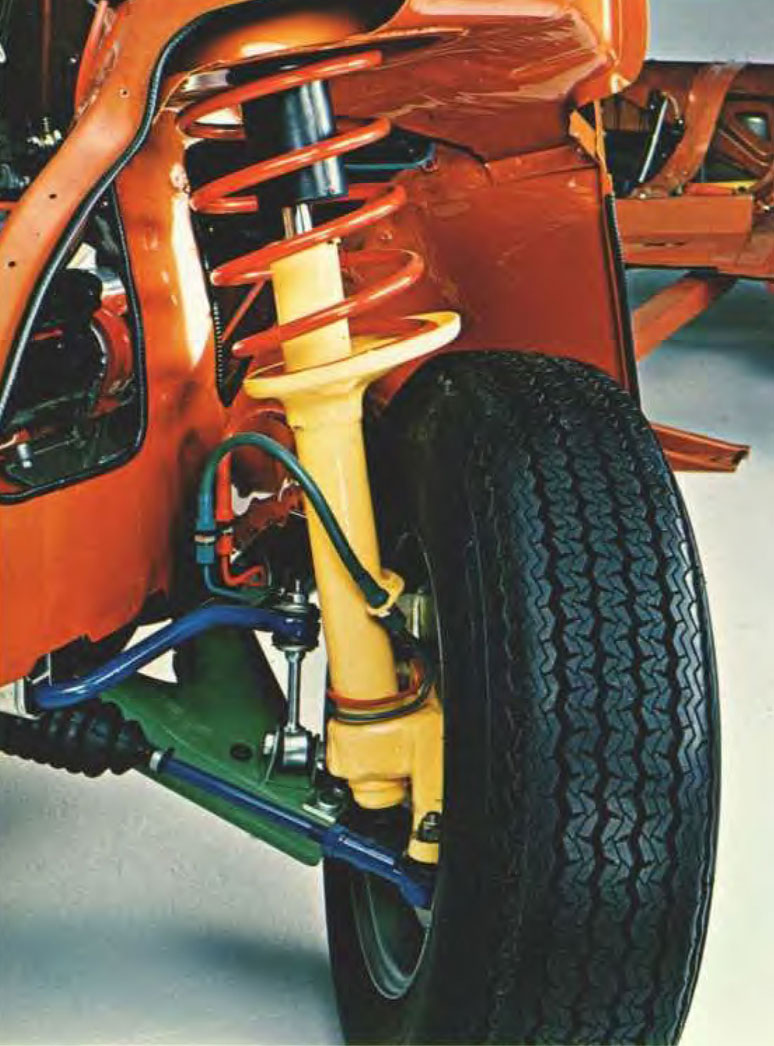
Upper Strut Mount. PERFORMANCE PARTS OPTION. If your goal is to improve suspension performance, you might consider a performance strut mount instead of another rubber one. 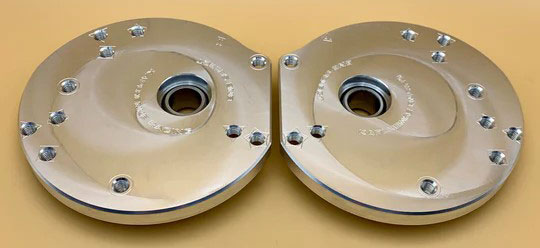 The mounts I installed in my 240 are these 240 Offset Spherical Mounts from BNE Dynamics. Included was the upper spring perch, which has the BNE designed Luxe Steer roller bearing. INSTALLATION IN MY 1984 242 TURBO. I installed these BNE Dynamics strut mounts below along with coil-overs and Koni Sport dampers. These top mounts are versatile, so they can also be installed with stock springs or factory style sport springs if that's what you prefer. 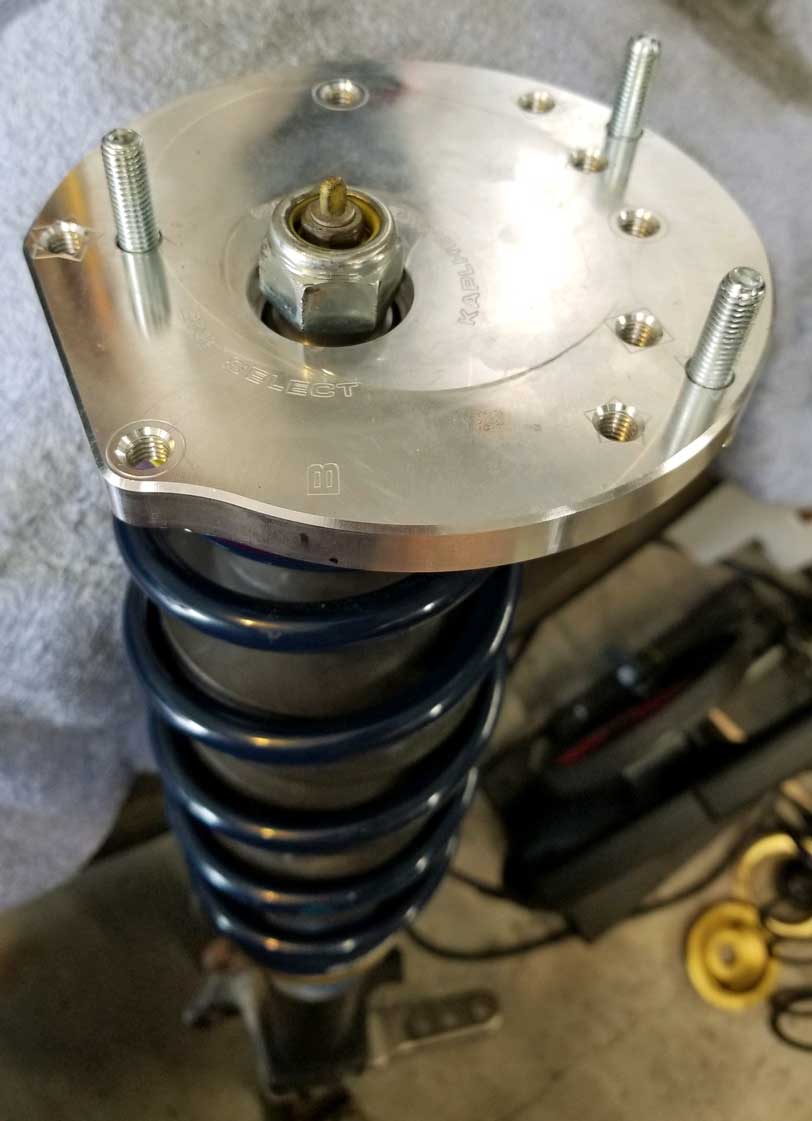 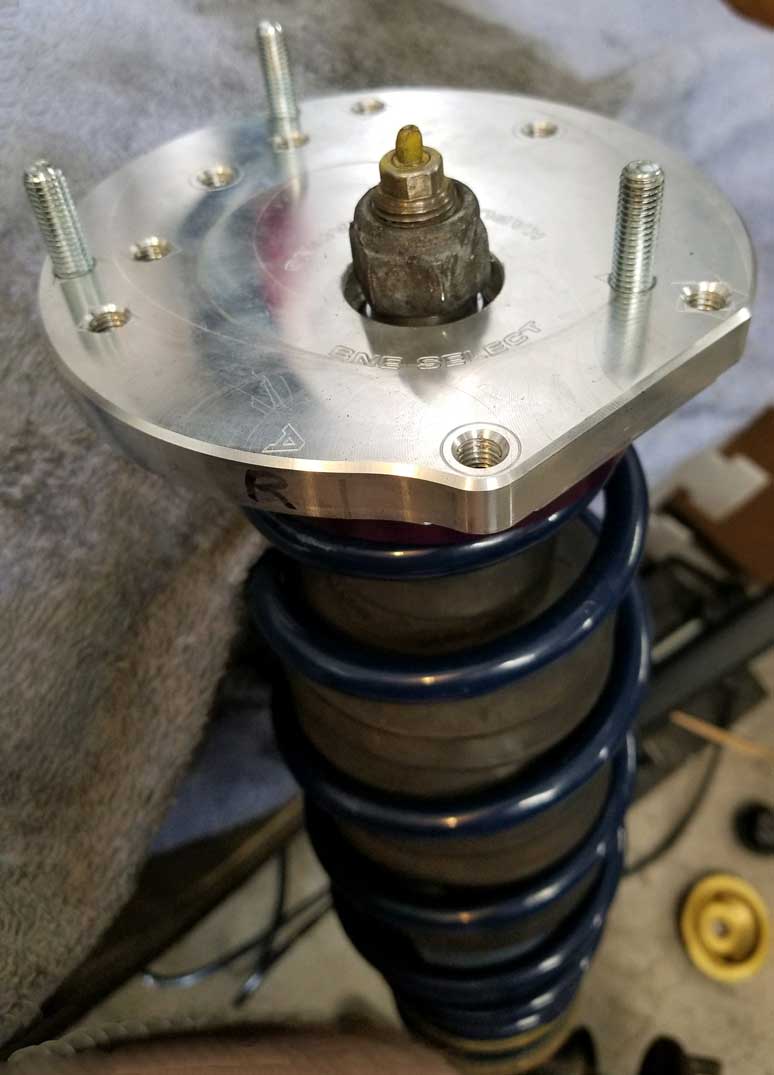 These strut mounts have a variety of adjustments and a number of variations are possible, ranging from nearly STOCK to very AGGRESSIVE. This is done by selecting which mounting holes to use for the three top mounting studs (more detail below). As seen in the photos above, the RIGHT SIDE mount is marked "A" (it's engraved on the top) and the LEFT SIDE mount is marked "B." This RIGHT-LEFT configuration is the most common use, but these mounts can also be swapped LEFT TO RIGHT for even more configurations and settings if preferred. A more detailed list of configurations and options can be found in the BNE Dynamics site. More information about coil-overs for 240 can be found below HERE. More information about Koni Sport dampers for 240 can be found below HERE. LUXE STEER BEARING.  There are several benefits to using the special Luxe Steer roller bearing at the spring top (ABOVE PHOTO). This bearing was supplied by BNE Dynamics and is installed between the spring and top strut mount. This Luxe Steer bearing removes most of the load that would be normally felt by the spherical bearing in the original mount. This new bearing reduces side loading forces on your struts, increasing the dampening performance and service life of the strut cartridges, while reducing steering effort. SETTING UP MY MOUNT CONFIGURATION. with *TRIANGLES* For the configuration I chose for my 240, I inserted the three top mounting studs into holes marked with TRIANGLES. This made it easy to set up without getting the holes confused. This TRIANGLE position is described as, "The preferred position for street cars using 2.5 inch coil-overs." That describes my car. This position offers maximum positive CASTER (approximately +3.0 degrees over stock) and a good range of negative camber. 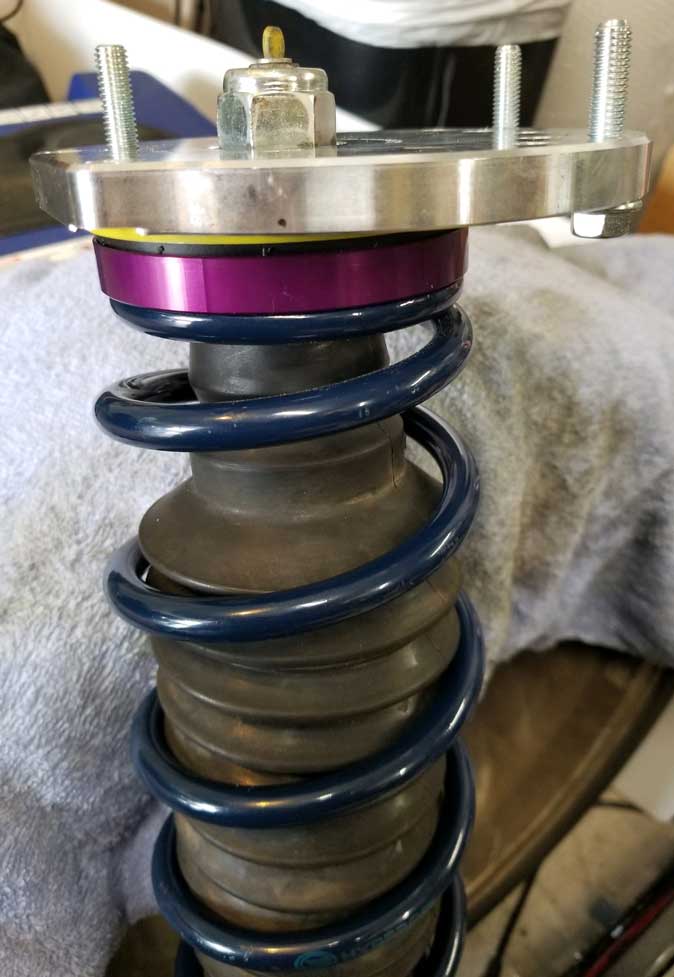 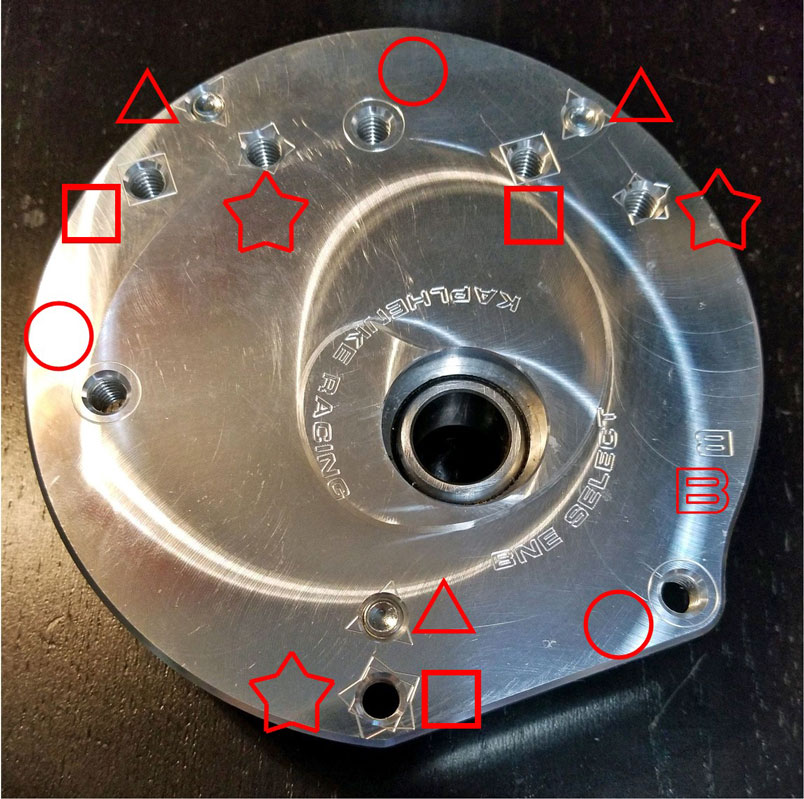 IS MORE CASTER BETTER? More information about the benefits of positive caster can be found in the Alignment section HERE. There was no need to cut any sheet metal on my car, but additional negative camber can be added if desired by trimming some sheet metal on the strut tower (I didn't do any trimming for my installation).  This image above was taken as I was finishing up my installation.
The ultimate goal with all this effort is a car that drives and handles better than before. If this is you're goal too and you're seeking similar improvements as I am, here's a good video from a really good DIYer. He explains what he did to achieve these goals better than I can. https://www.youtube.com/watch?v=fDa6lF1LBX4
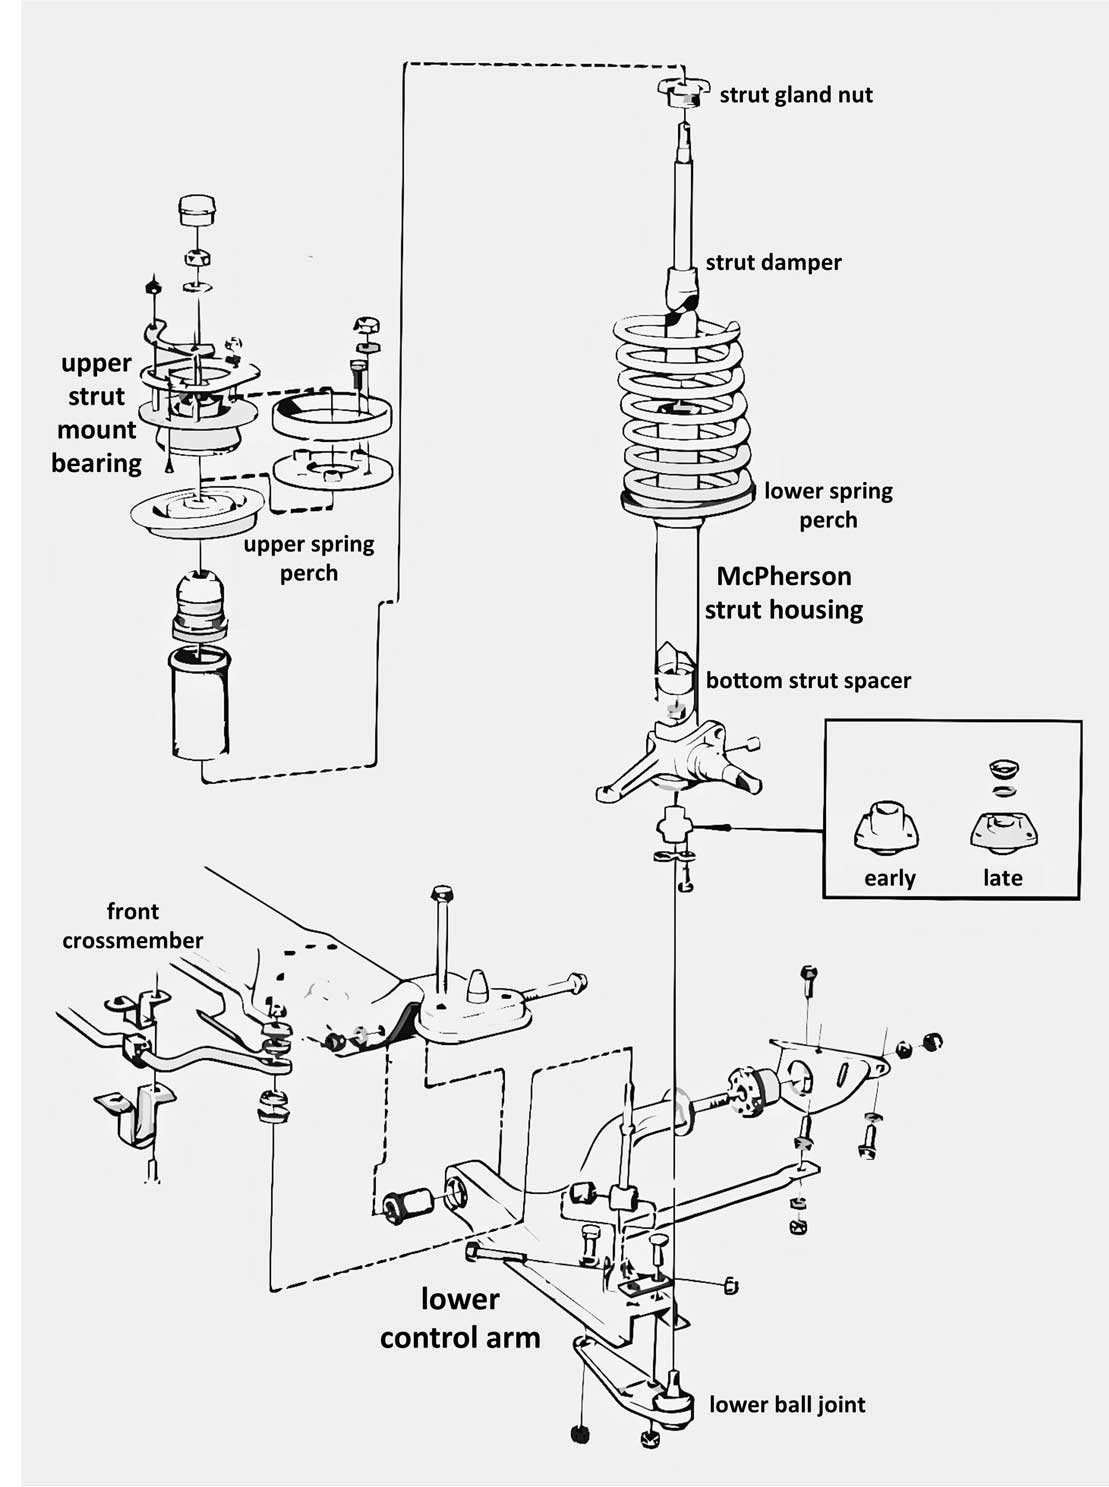
The first two photos below show the bottom of an early 240 strut housing (1984 240). NO BOTTOM SPACER is present in these photos. This style of strut housing was used until 1989. If you look closely at the first image below you can see an internal retaining ring, which is set in a groove inside the tube. The strut cartridge is inserted from the top and it rests on top of that retaining ring. If a spacer was needed and inserted first, then the spacer would be resting on that ring. 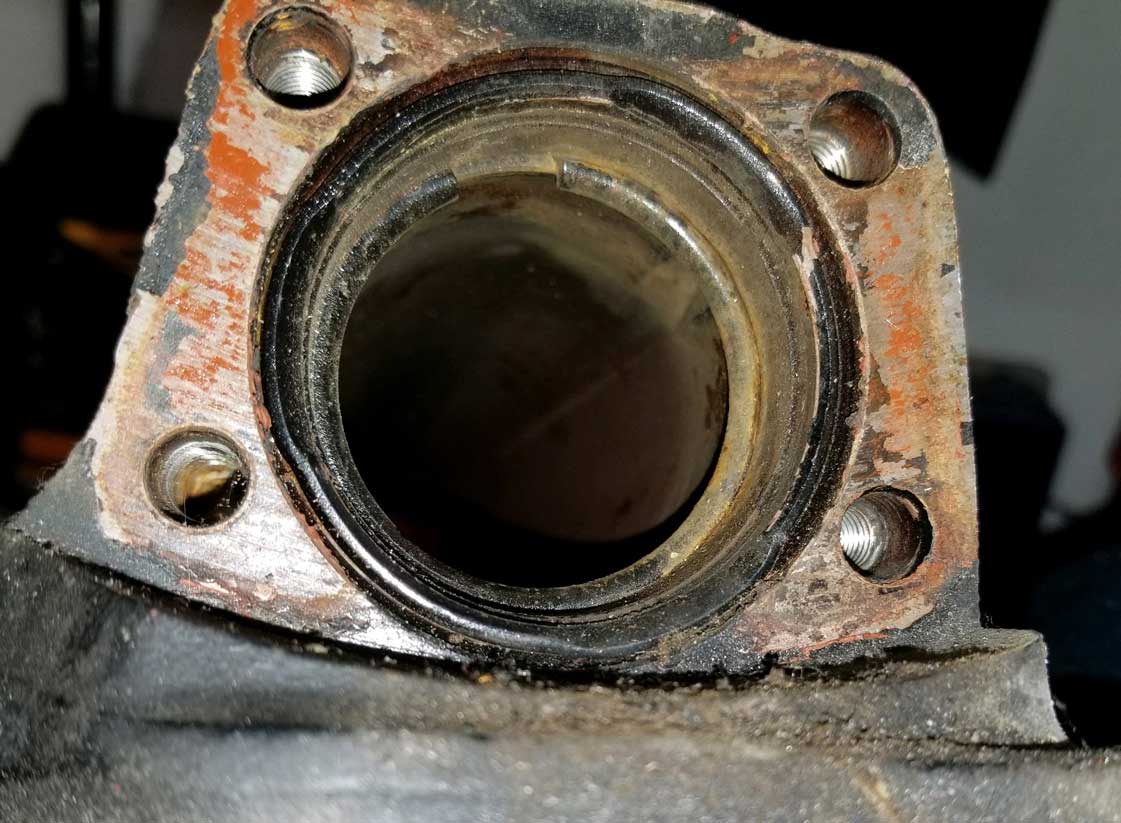 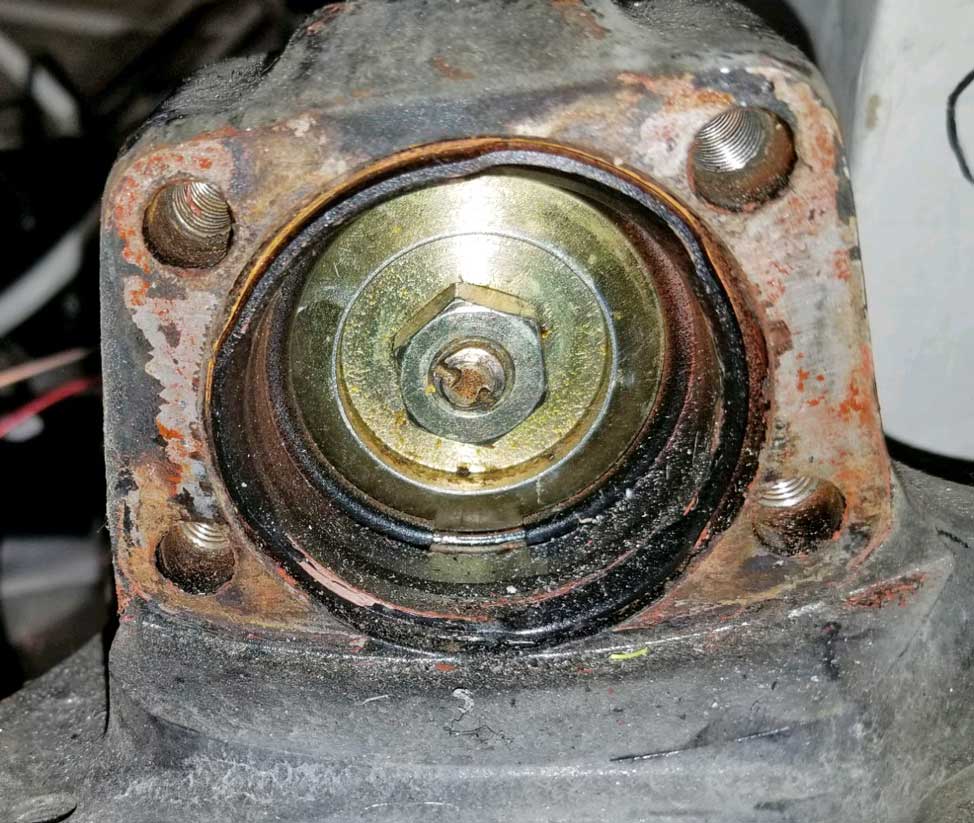 NOTE: This is a DeCarbon gas damper shown above if you're curious. In these BELOW photos there's a Bilstein HD (B6) strut cartridge being fitted into a pre-1989 strut housing. NO BOTTOM SPACER is used in a 240 with the Bilstein HD (B6) cartridge and it fits correctly without a spacer. The top gland nut (second photo below) can be seen to be fully threaded down into the strut housing. It's preferred to have a gland nut full seated like this. 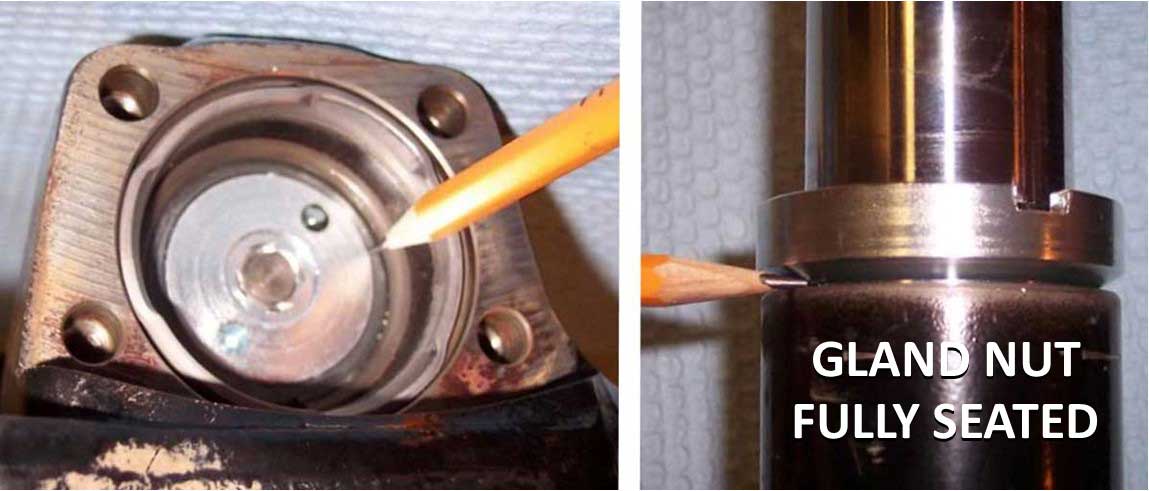 The Bilstein HD (B6) strut cartridge may be too tall to fit correctly into a post-1989 strut housing (more info below on later struts), because the later strut housing uses a permanent spacer at the bottom. That spacer can prevent the top gland nut from becoming threaded in fully. Here's a close-up of the original removable Strut Spacer. This spacer is Volvo PN 1229423 (this part is no longer available new). This photo BELOW shows this SPACER resting on the retaining ring in the bottom of the strut tube. 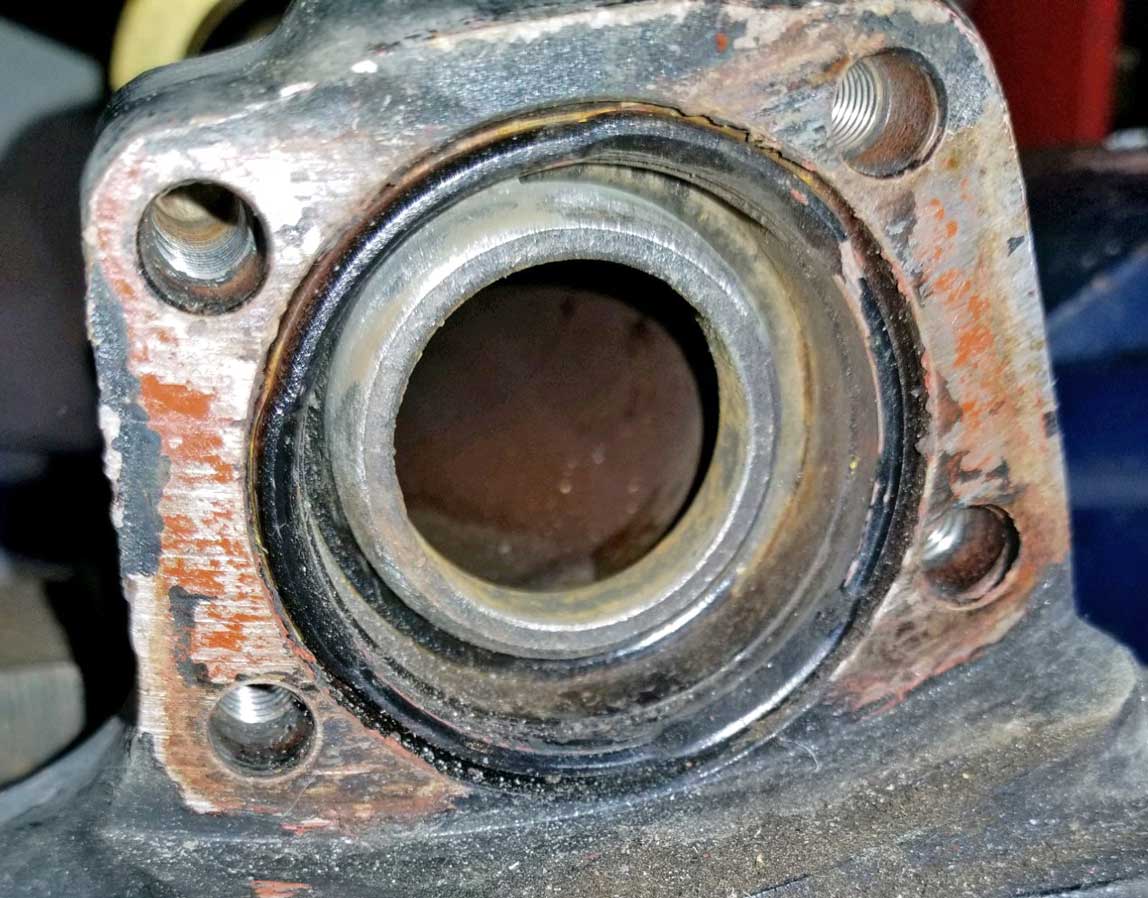 Some strut CARTRIDGES require a spacer and some do not because of their length. If you install a SHORTER cartridge and forget the spacer, the cartridge won't be tight in there and you'll know it pretty fast from the rattling and knocking from your suspension. When a spacer is added the strut cartridge then rests on the spacer. The actual LIFT that this spacer provides is small. It's about the same as the thickness of the wide top lip on the spacer image above, which is about 3.8 mm thick.
What if an original spacer is simple not available? Suggestion: SUBSTITUTE SPACERS. Since factory Volvo spacers are no longer available new, I was trying to think of an option that could be a substitute. Spring steel shims with an outside diameter of 45 mm can be a good option. Being spring steel would allow them to flex and slowly compress at the bottom of the strut as the gland nut is tightened down. The combined thickness of multiple 1 mm shims should probably be somewhere between 4 and 7 mm. The exact amount will not be known until someone actually tries this and reports their findings. These 45 mm OD spring steel shims from McMasterCarr BELOW are available in thicknesses of 1 mm and 2 mm. A pack of 10 for under $10.00. 1 mm thick shims: https://www.mcmaster.com/98055A346/ or 2 mm thick shims: https://www.mcmaster.com/98055A576/ IF YOU TRY SHIMS LIKE THIS, please let me know and send some photos: CONTACT Late 240 Strut Housing 1989-93. With a PERMANENT BOTTOM SPACER (Integral Spacer) This permanent spacer makes installing some dampers a bit troublesome on a later 240. 
Sometime during the 1989 model year Volvo made a change to the 240 front strut housing for late 1989 240 and all 1990-93 240 models in preparation for new ABS models. This newer style strut housing then came on 240s with ABS. Volvo permanently added the spacer in the bottom. It is not removable. An ABS style strut can also be identified by the ABS sensor mounted on the backside opposite the caliper.  This photo below shows installation of a Bilstein HD (B6) strut cartridge into a later 240 housing. Because the Bilstein HD (B6) cartridge is taller, the top gland nut will not fully thread into the housing. This has not stopped a large number of people who have completed their installations with a gland nut as shown below. It's not preferable, but I have been told that if you can get at least 50% of the threads to engage, that *should* be enough. 
Here's a discussion thread on this subject with more photos: turbobricks.com/best-struts-for-comfort-longevity.358034 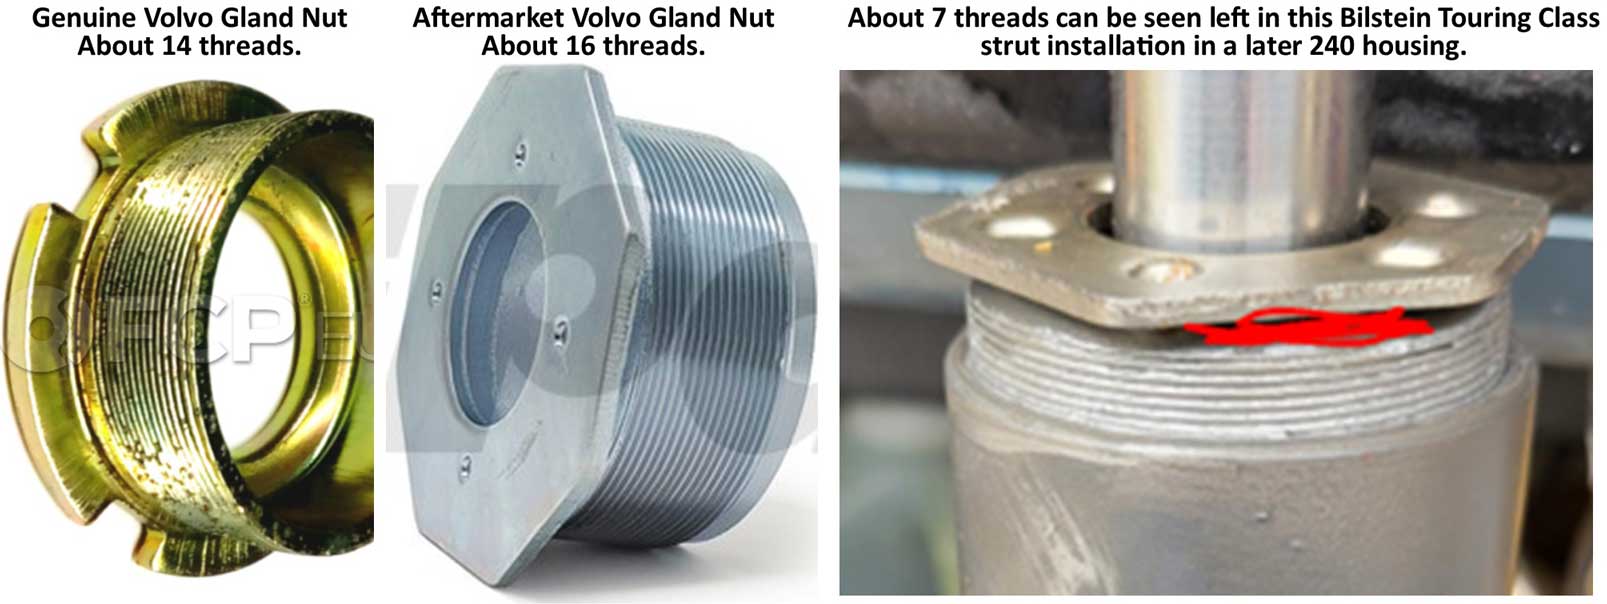 The first gland nut above left is a genuine Volvo part from FCP. It appears to have about 14 threads. The seconds nut above is an aftermarket part offered by iPd. It seems to have about 16 threads. The installation photo above right is a taller cartridge in a later 240 housing. The photo described it as a Bilstein Touring Class (B4) cartridge. After the nut was tightened, there appeared to be about 7 threads left. If 50% of the threads is considered to be enough, then this installation might be OK. This will be up to YOUR judgement. There is a risk, as I have received emails from some who could NOT get a gland nut to seat enough for a safe installation. These images below show a 1990 240 strut housing with a Bilstein HD (B6) cartridge. The gland nut only managed to engage a couple threads and this attempt was considered a failure by the owner.  So far it's known that the Koni Sport strut cartridge will fit the later 240 housing with integral spacer and the gland nut should fully seat. Other cartridge brands are not fully known. More info is being listed with each strut brand in the DAMPER SECTION. If you have a 1989 or later 240 and you decide that you really NEED a strut housing without the integral spacer, some later 240 owners have solved this problem by fitting earlier strut housings or by using custom coil-overs made using earlier strut housings. Be aware that an early strut housing may not accommodate Anti-Lock Brakes (ABS) components.
The lower control arm and tie rod position becomes important when considering modifications to your 240 front suspension. If you plan to leave your 240 at factory height, your control arms and tie rods should be just fine as they are, but since so many people choose to lower the ride height, the position (or geometry) of these parts becomes more critical. If you get anything out of this, just remember that they should be LEVEL. Even if you only plan to use sport springs (i.e.: iPd), which will lower the car only a small amount, you should still pay attention to this. There are a lot of lowered 240s running around with poor front suspension geometry. 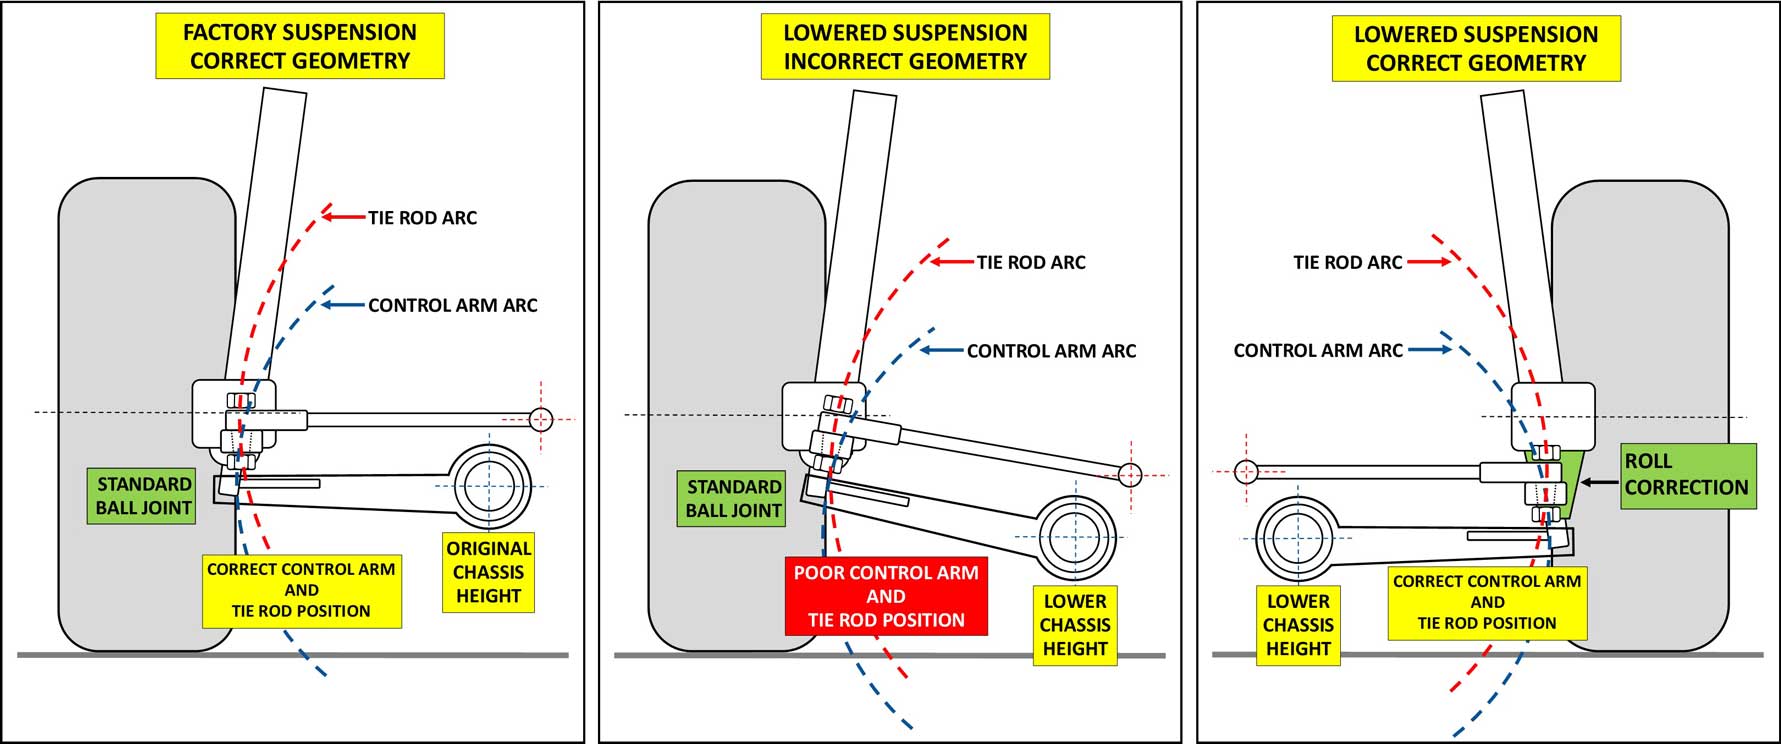 The control arm and tie rod should be HORIZONTAL at ride height. The ABOVE RIGHT image shows a lowered suspension with a Roll Correction Spacer. More on that below. Here are some real world examples ABOVE of good versus bad control arm and tie rod position. Both of these cars are lowered with tires on the ground and with the suspension at rest. 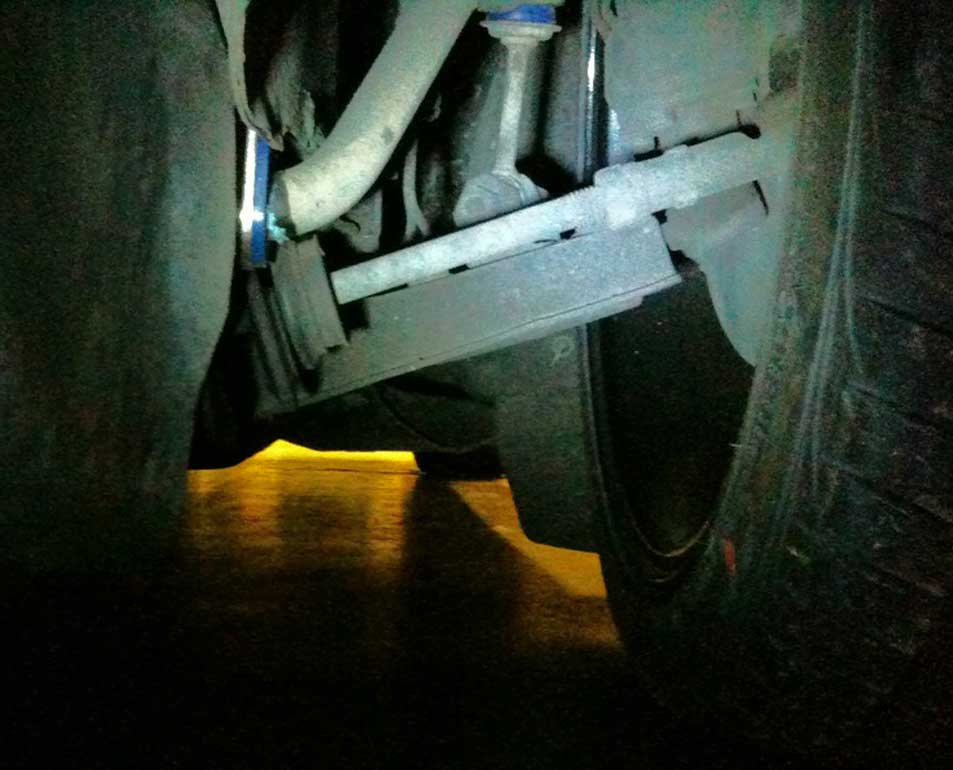 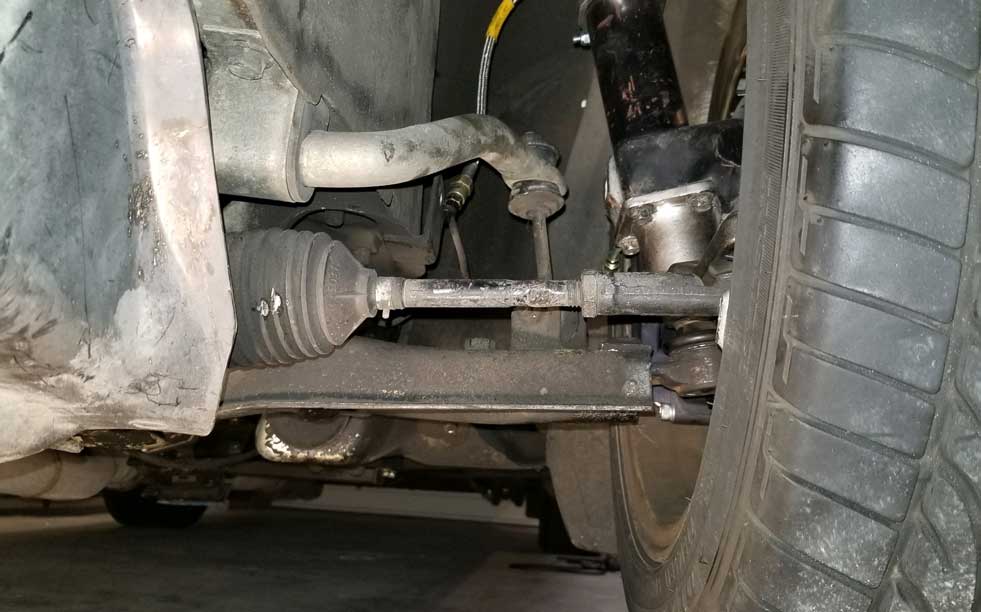 This first photo above shows pretty bad geometry, because the lower suspension arm and the steering rod are no longer horizontal. In the second photo a set of BNE Dynamics Quick Steer Roll Correction Spacers (QRSC) have been installed to correct the geometry for this lowered 240. 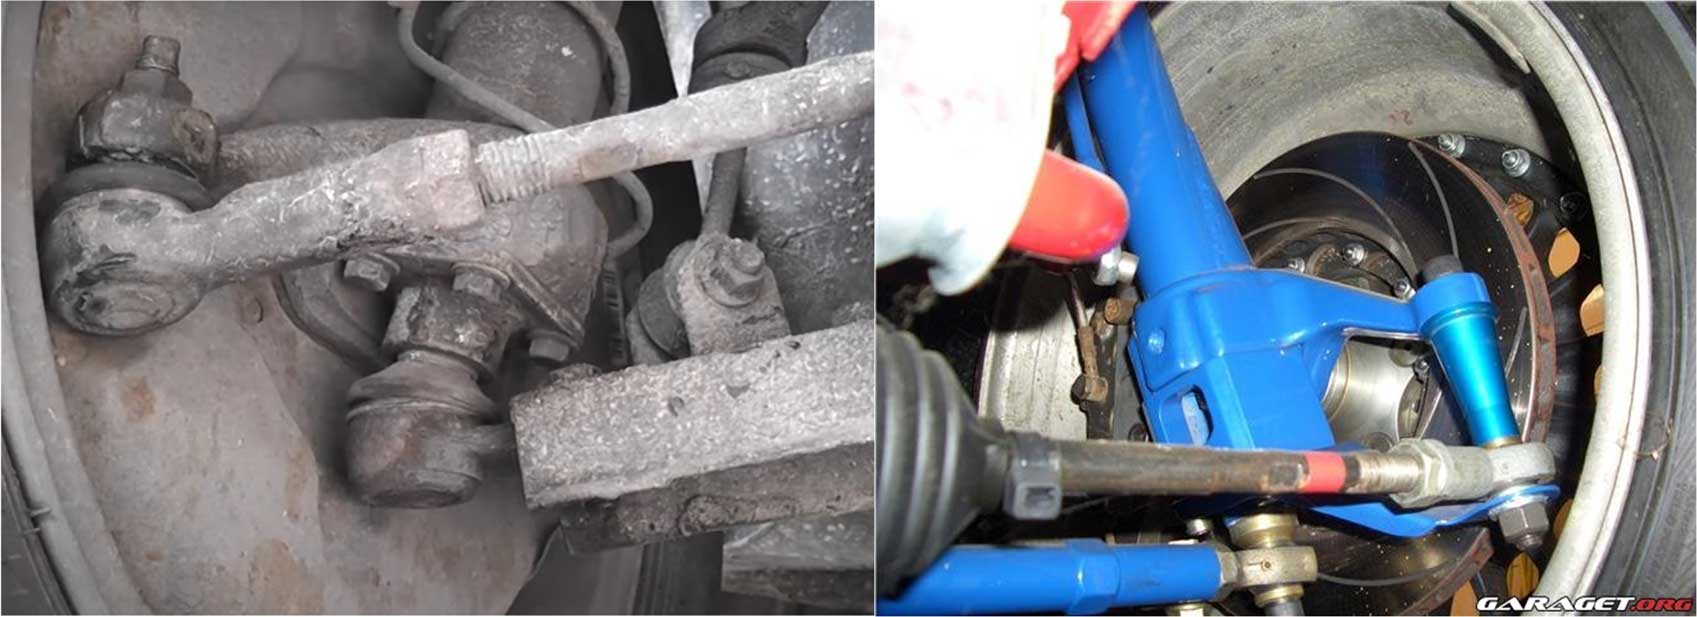 When the racing suspension was developed for the Volvo 240 Turbo in the European Touring Car Championship, it was done using special custom spacers to correct the geometry for a lowered suspension. This worked fine. The more modern approach to this is the new specially engineered spacers from BNE Dynamics below. Quick Steer Roll Correction Spacers (QRSC) from BNE Dynamics   I installed a set of these QSRC Spacers into my 242. The set I installed is the first photo above. The latest versions have been revised by BNE since I bought mine and the newer style is in the second photo above. Using a Quick Steering option is not required. That's why there are three different holes on the steering arm. The end hole is the same as stock steering. The other two holes offer quicker steering if desired. The main benefit from these is the correction to your suspension geometry if your car is lowered. BNE also offers an optional version (shown below) which can be adjusted for STEERING ACKERMANN ANGLE. You can learn more about Ackermann near the bottom of the Alignment Section in this page HERE.  This QSRC device is meant to be installed on the bottom of your strut housing in place of your original ball joint mount. Originally your ball joint bolts to the ball joint housing, which bolts to the bottom of the strut. If a video will help you understand how this ball joint is removed, here's one: https://www.youtube.com/watch?v=k-wUVcp_31A So then your existing ball joint will bolt up to this new steering arm exactly as it would bolt up to your factory housing. Your steering tie rod just attaches to the new steering arm instead of the old one.  TO CUT OFF or NOT CUT OFF the Old Steering Arm The old steering arm may get in your way when attaching or detaching the outer tie rod to your new QSRC arms. I prefer to use an impact driver to remove that nut and that needs room to work. That method will not be possible if the old arm is there in the way. Removing the old steering arm from your strut housing is optional and it requires a certain commitment. If you decide to remove it, a sawzall with a new, sharp, fine-tooth blade will take it off in a few minutes. 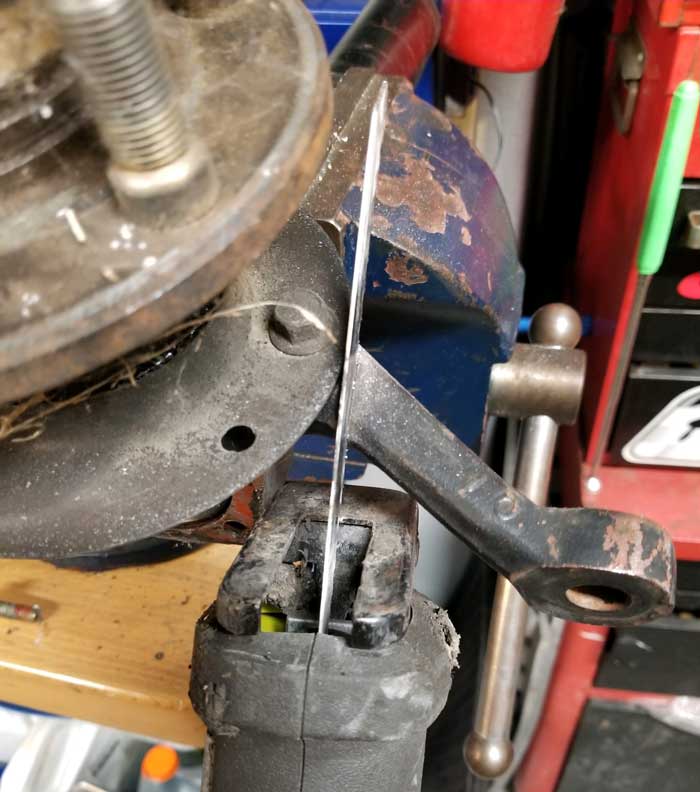 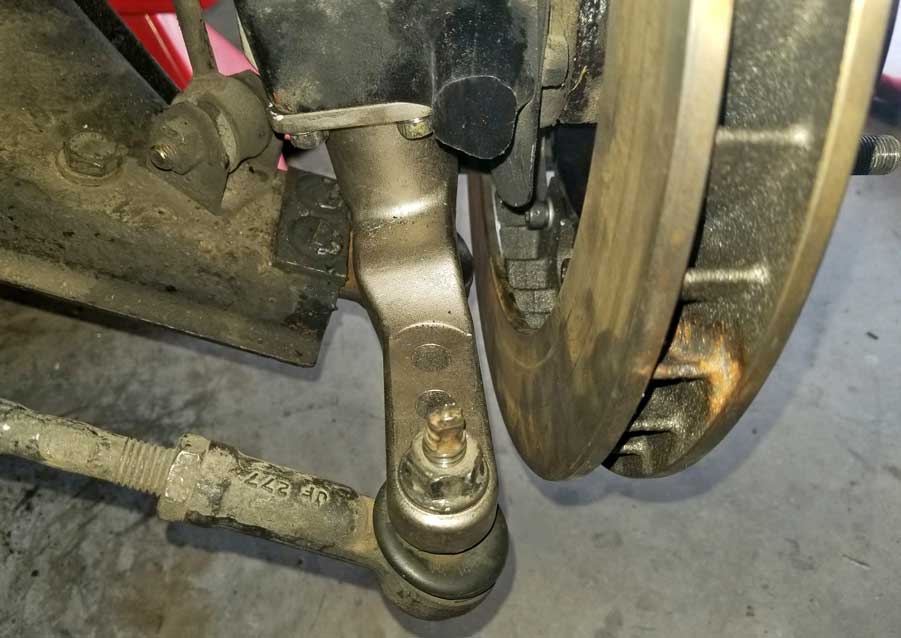 A QUICK NOTE ON THE BRAKE BACKING PLATES 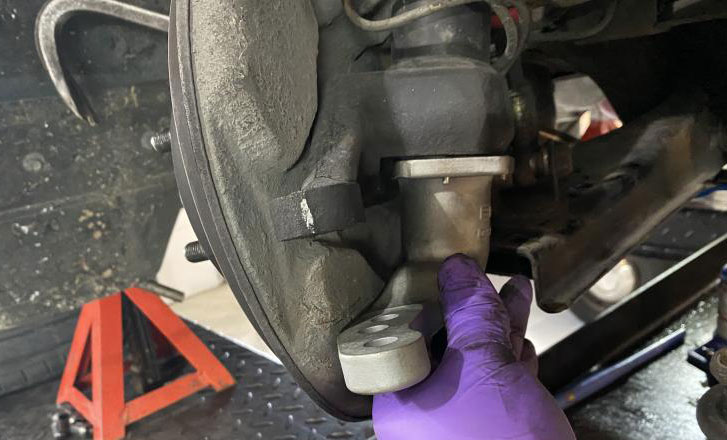  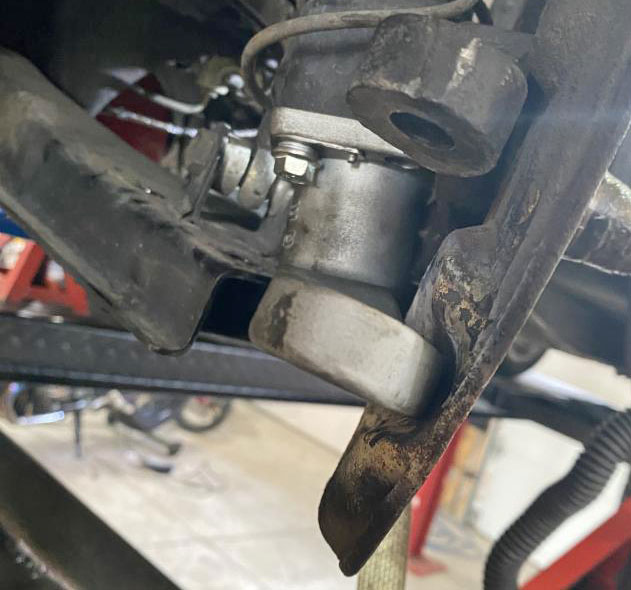 These above photos show the installation of these spacers in a 240 owned by smoothdurban in Turbobricks. His build thread is linked below. For this installation the brake backing plates were kept in place (unlike in my installation). He found that the QSRC spacer arms from BNE contacted the backing plates, so you can see above that he "clearanced" the backing plates with some heat and a hammer. turbobricks.com/smoothys-242-turbo-build.292243/page-7#post-6077897 ALIGNMENT TIME. The instructions in the BNE site: cdn.shopify.com/s/240QSRC.pdf will tell you that you should get your toe alignment setting adjusted after installing the QSRC arms. You should prepare yourself. The changes brought by these arms will change the toe setting a lot. So YES, definitely get the toe setting adjusted. This photo below is the front tires on my 242 immediately after installing these. They went from 1/8th inch TOE IN (stock setting) to 4.8 inches TOE OUT, just like THAT! The QSRC arm geometry changes may not take all the blame, since it's possible the new camber adjustment setting in my top mounts might have also helped to increase the below toe out measurement. So this might be a good time for you to learn how to adjust the toe setting yourself. If that interests you, CLICK HERE for the main ALIGNMENT section. 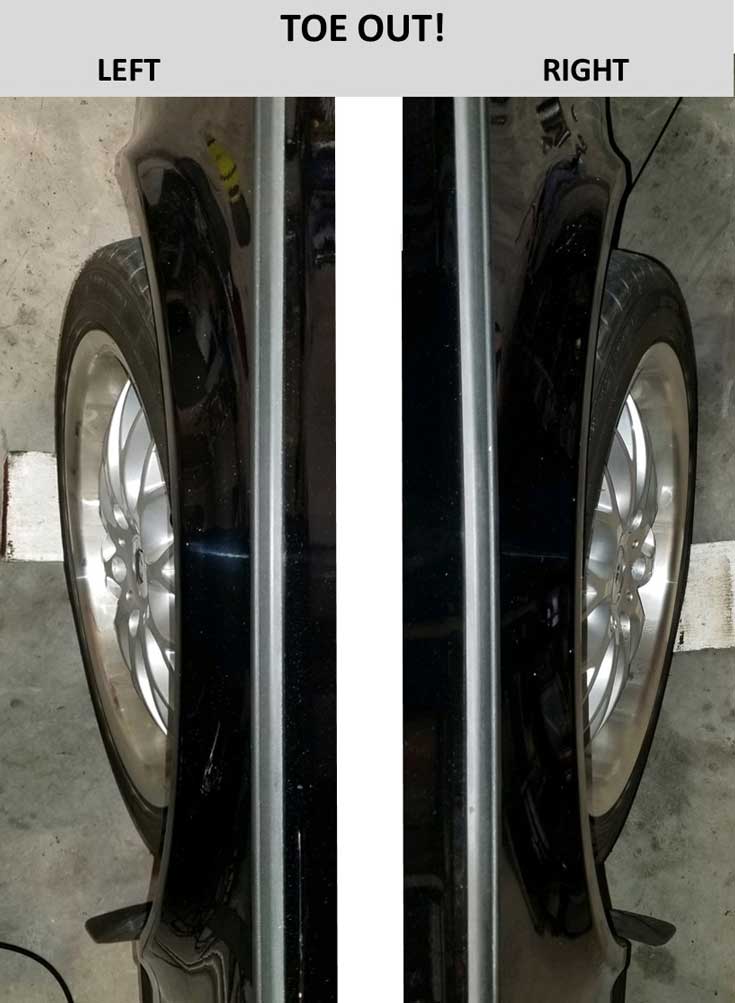 This info below may help if you will be adjusting the toe setting yourself. Adjustments needs to be made with the suspension compressed normally. Car on the ground. But since getting under my car is tight, I set the tires down on some 6 inch wooden blocks. After installing these arms in my car and finding my TOE setting at 4.8 inches OUT, I wanted to see how much range existed when adjusting the tie rods. So I began by adjusting the tie rods all the way IN and measured again. This resulted in a setting of 1.5 inches TOE IN. Then I adjusted FOUR full turns OUT on each tie rod, which brought the setting to 1/8 inch TOE OUT. Now I was getting very close. Then I made some smaller adjustments. 1/4 turn IN on each side brought the setting to between 1/16 and 1/8 inch TOE IN (measured at the tread). That's a pretty good setting for a power steering car.  (PHOTO ABOVE): Here's how the final setting looked. Once done with your alignment setting, check your steering wheel position. It may need to be re-centered. 240 ALIGNMENT SPECS 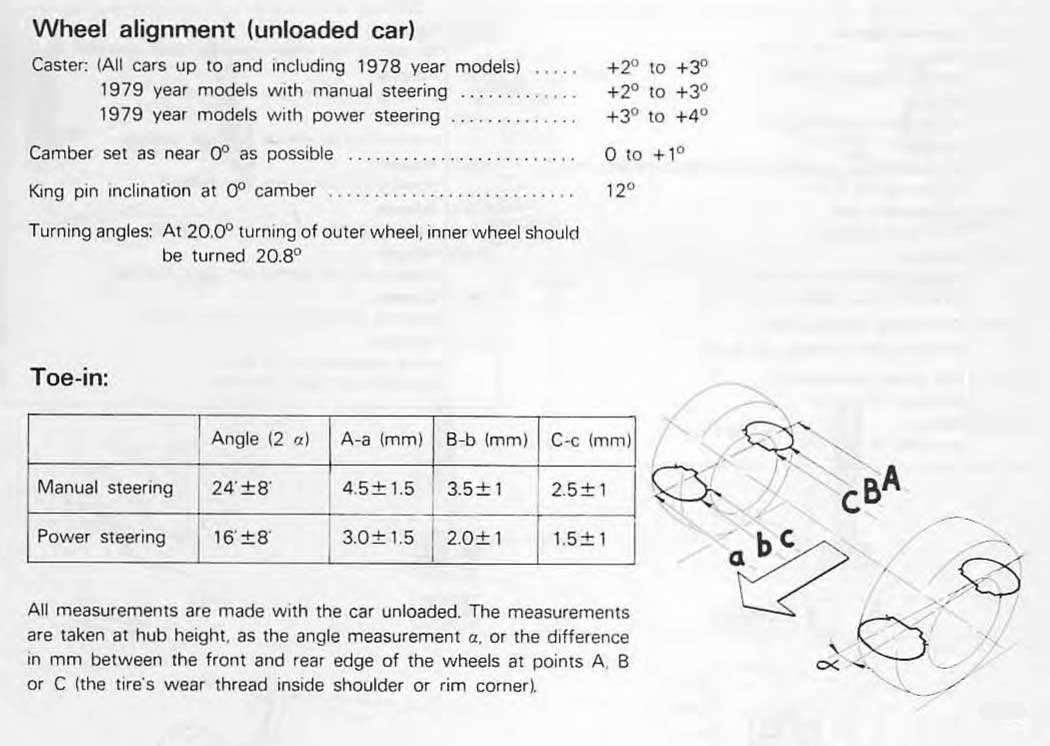 The toe-in setting ABOVE for a power steering 240 like mine will be under "A-a" and is shown in millimeters. 3.0 mm ±1.5 mm (0.118 inch ±0.06 inch), which comes to about 1/8 inch ±1/16 inch of toe in.
240 BALL JOINTS. Volvo used two different 240 front ball joint designs. MANUAL STEERING. This ball joint below is PN 275117. It fits both the right and left sides. It was made for manual steering cars. 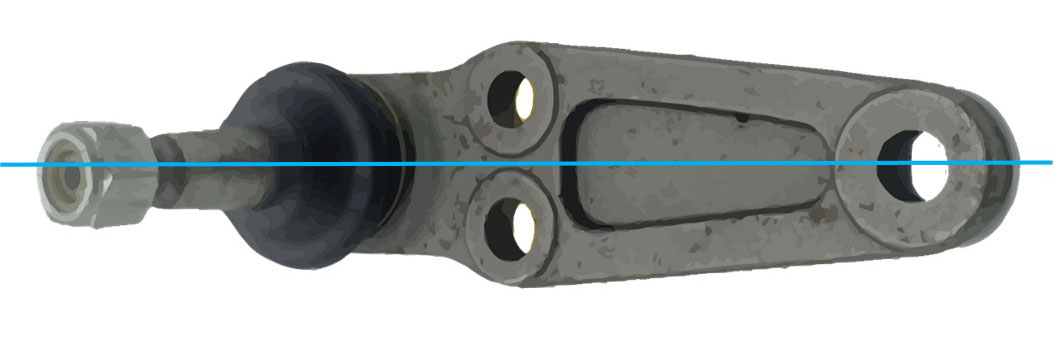 POWER STEERING. Power steering ball joints (BELOW) are OFFSET FORWARD to provide an additional ONE DEGREE of positive caster. An increase of caster improves automatic centering in steering, however it will also increase steering effort, which is typically not noticed in a car with power steering. LEFT SIDE: PN 274118. RIGHT SIDE: PN 274119.  If you're interested in a good article on alignment basics, including detailed info on how Camber, Caster and Toe will affect handling, try this one: https://grassrootsmotorsports.com/articles/what-camber-caster-and-toe-handling-basics/ This article was originally published in the May/June 1997 issue of Grassroots Motorsports. 
I built my own Trammel Bar more than 30 years ago after learning about it in the book How to Make Your Car Handle, by Fred Puhn (images below). 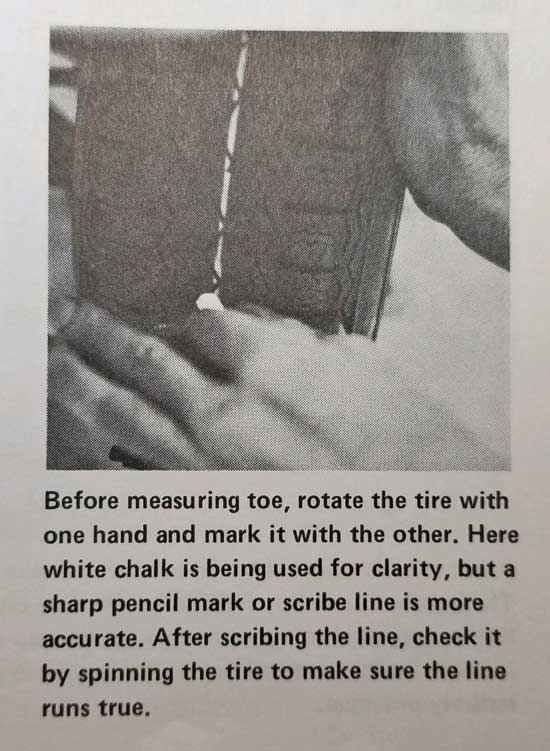 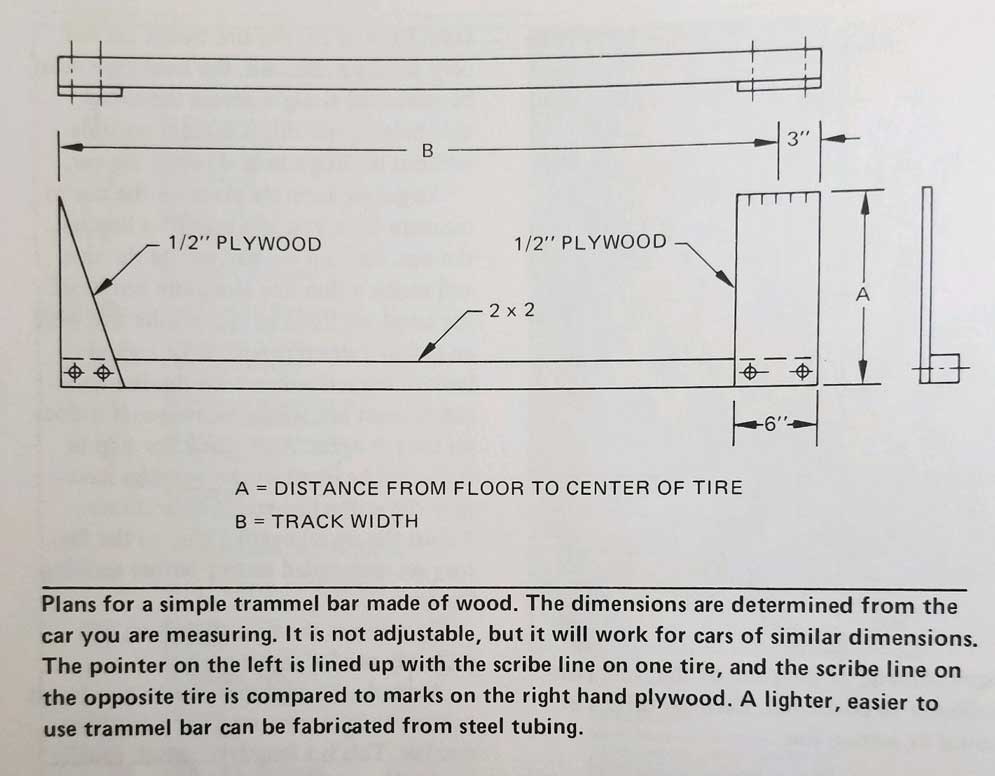 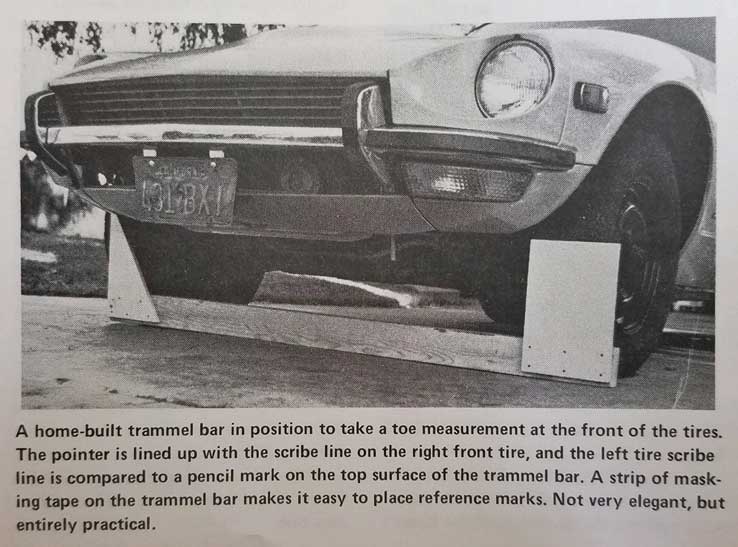 I haven't had a reason to take a 240 to an alignment shop for toe adjustments since making my own trammel bar. A Trammel Bar can be very accurate and it's easy to build using scrap parts. It's very easy and quick to use without needing a helper. The bar I built below uses an old u-channel extruded aluminum curtain rod part. It's very stiff, so it doesn't flex much. Total length is 60 inches. Plus I used a couple pieces of sheet metal and a metal ruler, all riveted together as shown below. It doesn't have to be made of metal. It can be wood also. 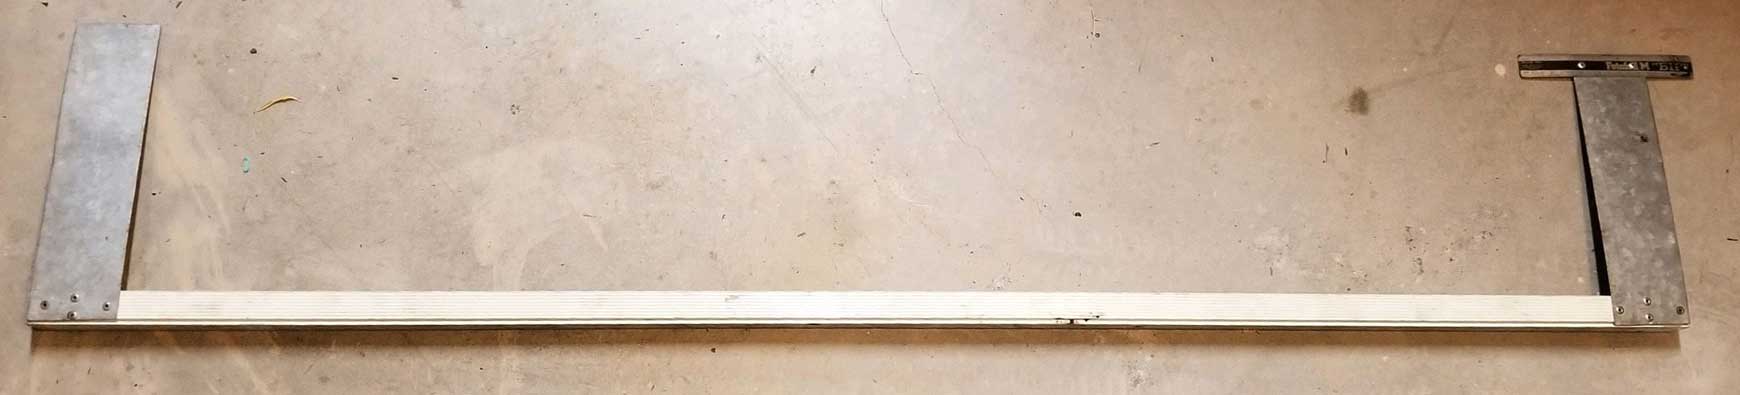 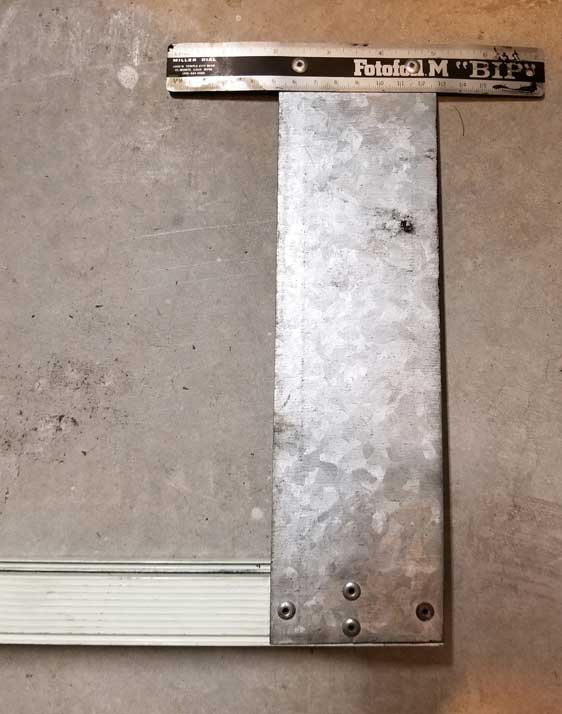 CHECKING TOE ALIGNMENT If I intend to adjust the toe setting, I find it easier to get under the car if the front tires are on some blocks. This can be pieces of wood, like shown here. The important part is that the suspension is settled and compressed just like it's on the ground. 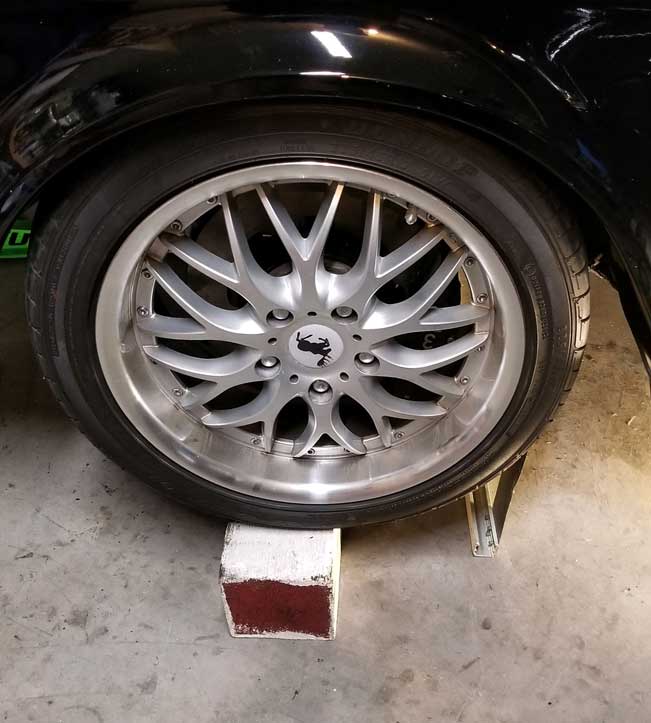 When I want to check toe alignment, I begin by finding a consistent line in the tire tread (or you can scribe or draw a line with a marker while spinning the tire). You'll need to do this for both front tires and use those lines when measuring at the front and back of the tires.  With the tires on the ground or on blocks, place the trammel tool against the tires IN FRONT of them. Line up a part of the tool with the line or tread you selected. Then note the measurement or the distance. You don't need to know the total distance. One measurement is taken with the trammel bar FORWARD of the tires and one measurement taken BEHIND the tires. If you're goal is 1/8th inch toe-in, then the front measurement will need to be 1/8th inch less than the rear measurement.  
The toe setting below for a power steering 240 will be under "A-a" and is shown in millimeters. 3.0 ±1.5 mm (0.118 ±0.06 inch). This is about 1/8 inch ±1/16 inch. 240 ALIGNMENT
Here are some similar Trammel Bars in use.   
Even if you still plan to visit an alignment shop, a tool like this will get you set up just right after replacing a steering rack or other front end parts and then you can verify your work at the alignment shop. Here a good page to read about DIY Alignment with more Trammel Bar pics: https://lugnutz65chevystepside.weebly.com/alignment-tools---easier-than-you-think.html And here's a similar method of someone using a very expensive professionally built Trammel Bar: https://www.youtube.com/watch?v=V3RsOYY5gK0 This looks like the bar he is using: https://www.amazon.com/Longacre-52-79620-79620-Toe-In-Gauge/dp/B001NNFZ2Q There are other methods, such as a string alignment. Long video here: https://grassrootsmotorsports.com/video/video-diy-string-alignment/ Using Toe / Camber Plates. These are available and they seem to be fairly affordable, depending on options. DIY Alignment with Toe / Camber Plates. https://www.youtube.com/watch?v=0PXA4immC18 |
|||||||||||
You might not know or care about Ackermann steering, since it's not something that can be adjusted or tuned in a stock 240. But it's possible with this added item below.  EXPLANATION: Taken loosely from wikipedia,
Ackermann is the relationship of angles between your front tires when making a
turn. EXPLANATION: Taken loosely from wikipedia,
Ackermann is the relationship of angles between your front tires when making a
turn. It can get more complex, but if you were to adjust your Ackermann angles, you would be adjusting the angle relationships of your tires, because the inside and outside tires in a turn need to follow circles of DIFFERENT sizes to smoothly roll across the pavement without one of the tires slipping or skipping. Rear tire Ackermann can become involved for cars with REAR STEER. It can get very complex. So if your 240 front suspension is stock, then your Ackermann angles are not adjustable. It is, however, potentially adjustable using this BNE Dynamics device below. This is the BNE Dynamics 240 Quick Steer Roll Correction Steering Spacer (QRSC). It does a few things. It attaches to the bottom of your 240 strut and replaces your ball joint housing, while at the same time adjusting your roll center to accommodate a lower-than-stock ride height. It provides the steering link to your tie rods and offers three different tie rod mounting locations, to allow an adjustment of steering speed or leverage ratio (your choice of STOCK, 20% faster or 35% faster). And it offers an adjustment for Ackermann steering changes as well. More info at: BNE_240-quick-steer-roll-correction If you want to see the write-up I did when I installed these in my 240, CLICK HERE.
|
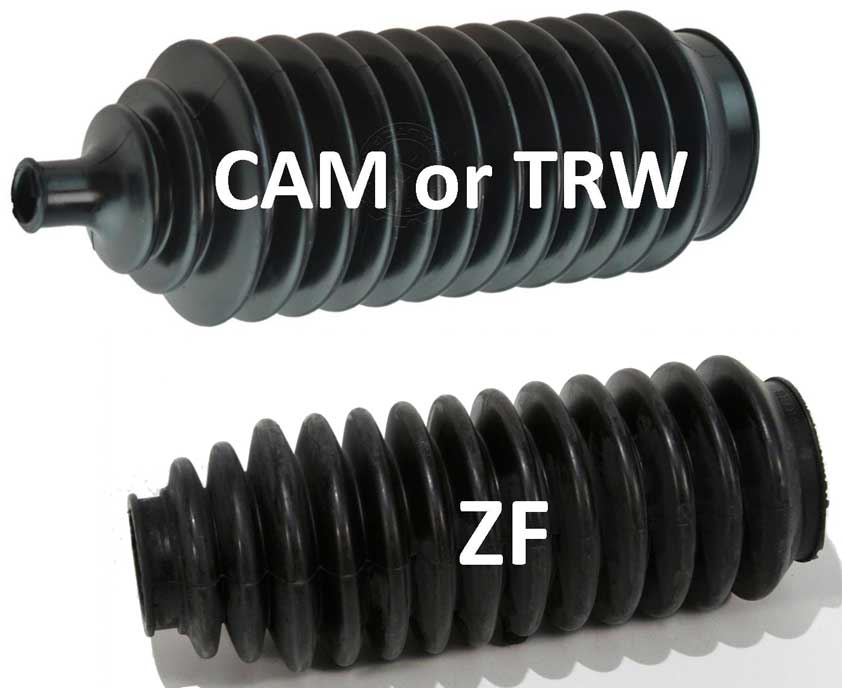 Volvo TP31579/1 (1990 publication) shows CAM Gear units were used exclusively in 1975. Then from 1976 to 1990 both CAM and ZF power steering units were being used in 240s. CAM units had four different types, and ZF had two different types. In most cases, a CAM rack can be identified by the rubber boot outer end. The CAM type narrows down to a smaller opening where it's then clamped to the tie rod. With a ZF rack, the rubber boot outer end normally clamps to a larger rubber bushing on the tie rod. TRW bought CAM Gear Ltd. in the mid-1980s, so you will find TRW/CAM racks in most mid-1980s and later 240s. Keep in mind this information relies on parts still being original. It's possible that different parts may have been installed over the years. If you're pretty certain the steering parts on your car are original, you can look at the VERSION LABEL in your car. This label is most often found in the trunk of a sedan (or under the rear platform in a wagon). In some 1970s cars it may be found on a door or even under the hood in 1980. Look at the line marked "STEERING GEAR" at the bottom. The numbers 2, 4, or 5 designates a CAM Gear or TRW rack. Number 3 designates a ZF rack. 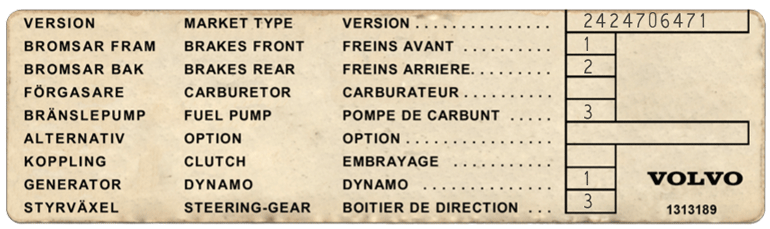 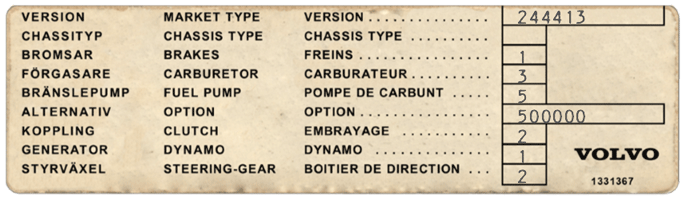 Steering Rack Part Numbers. Source TP30425 240 Specifications 1983-85. PN 1272460 Cam power steering rack. PN 1329694 ZF power steering rack. These photos below are ZF racks. The "ZF" mark can be seen on the casting after cleaning. Also note the unique shape of the bolt-on cover just to the right of the "ZF" logo.  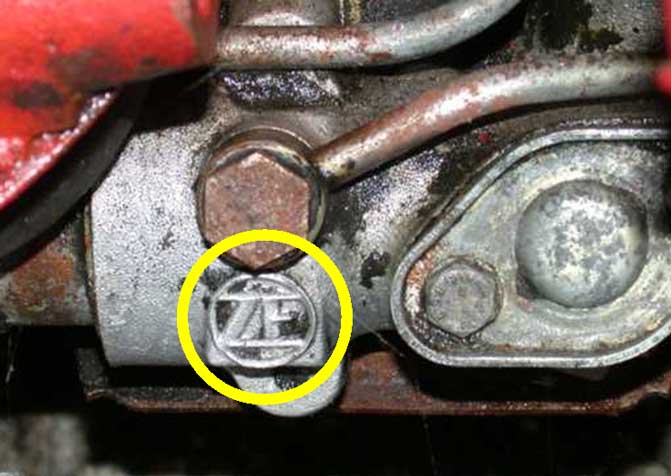 Here's view of a CAM or TRW rack below.  BOOTS for CAM and TRW RACKS. BELOW PHOTO: The image below shows boots with two different lengths. These are designated for the LEFT and RIGHT sides of a CAM Gear rack specifically marked 1272460, 1273236, or 1329998. These CAM racks are believed to be found in some 240s made between 1979 and 1987. Volvo part numbers for these boots are LEFT: 270881 and RIGHT: 270882. They were originally found on racks using inner tie rod PN 1272947 (with FEMALE threads on the inner end).  BELOW PHOTO: Sometimes steering racks get replaced by non-identical units. Many 240s have had CAM racks changed from one type to another type. If you find that your 240 has a CAM (or TRW) rack and it has boots that are the SAME length like the below photo, then it's likely your rack is marked 1359900 and uses inner tie rods PN 9140505 (these have male threads on the inner end). These SAME LENGTH boots are Volvo PN 270597. 
INNER TIE ROD CHANGES. ON LEFT: CAM Rack, Inner Tie Rod with MALE threads on inner end PN 9140505. 1988-89 240. MIDDLE: CAM Rack, Inner Tie Rod with FEMALE threads on inner end PN 1272947. 1979-87 240. RIGHT: ZF Rack, Inner Tie Rod with MALE threads on inner end PN 3530167. 1975-89 240. 
When an Inner Tie Rod has seen it's last breath. https://www.youtube.com/watch?v=s3VV-dkZUzk |
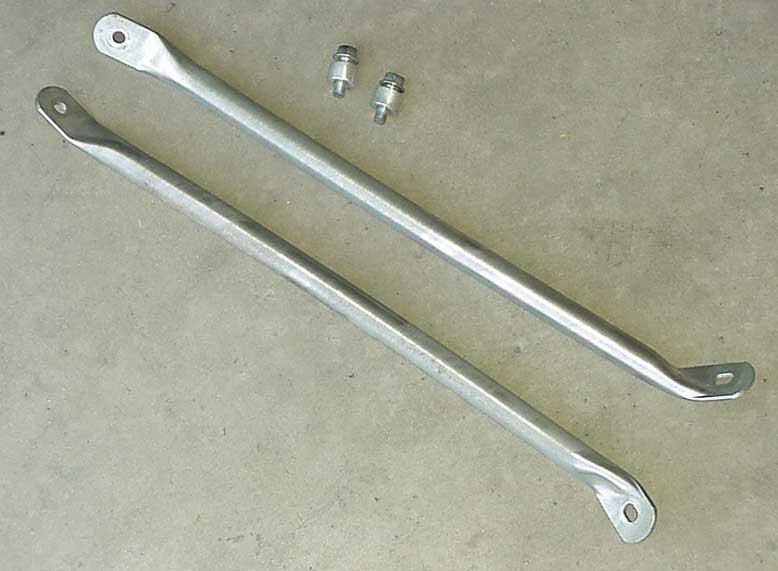 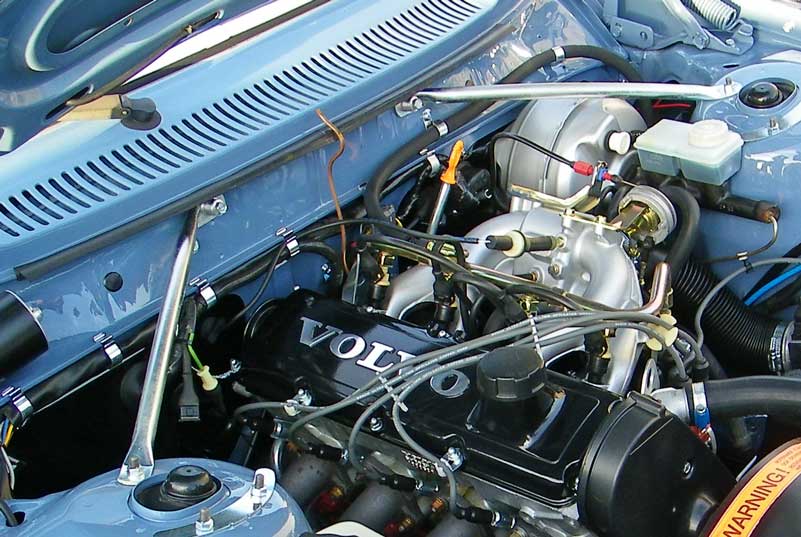 There are things you can do to improve the 240 chassis stiffness. Volvo thought of this. Back in 1978 the 242 GT came equipped with these UPPER DIAGONAL SUSPENSION STRUT BRACES (AKA: STRUT BRACES). Not all 240's will have the threaded holes in the firewall, It appears some 1978 cars did not, so this may be a thing where LATE-1978 cars got the holes. And all 1979-93 240s will have those holes. A set of ORIGINAL GT Strut Braces will be hard to find, but there are a few places that offer reproductions ones. There is a noticeable difference. The ORIGINAL braces (BELOW) will have a slight curve, which I believe is there to allow a bit more clearance over a brake booster. All the reproduction ones I've seen so far are straight. 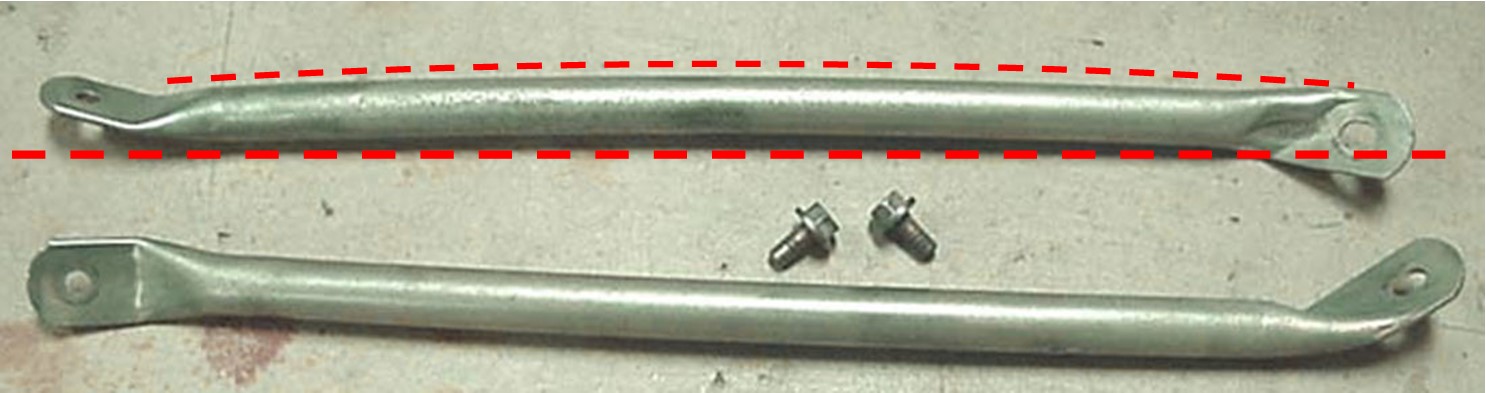 The Volvo 240s that were developed for Group A European Touring Car Racing (ETCC) got STRUT TOWER CROSS BRACES to further help stiffen the chassis. There are a few different versions like these that have been made available for street Volvos over the years. 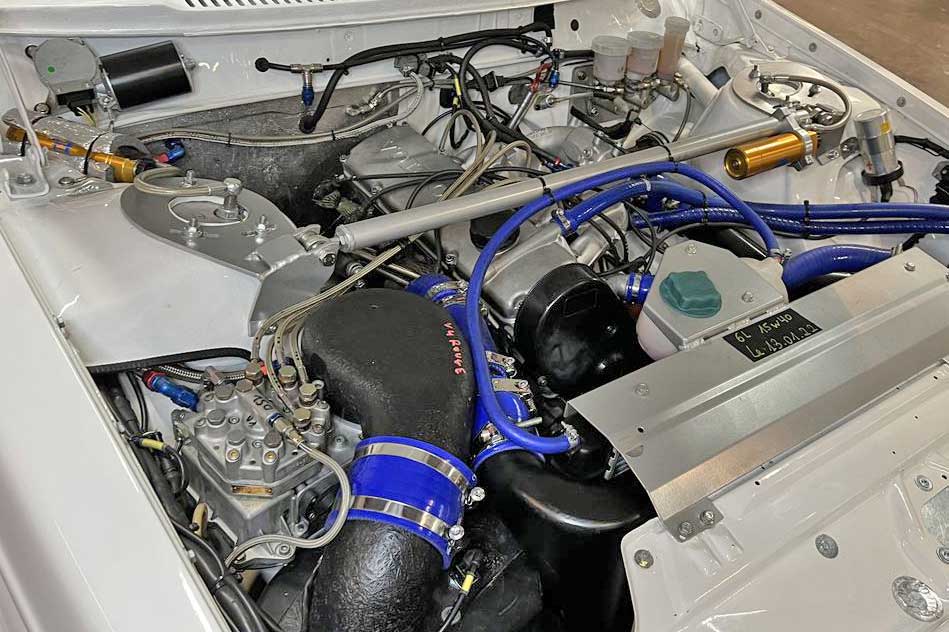  LOWER CHASSIS BRACES.  The 242 GT also came with lower suspension braces for one year (1978), which looked similar to the upper braces. The lower braces bolted to the bottom of the cross-member at the front and to the bottom of the control arm bushing housing at the rear. Other than stiffening the front end, this appears to be an attempt to better stabilize or strengthen that rear bushing housing. Variations of reproduction upper and lower braces are available from a few Volvo performance parts places. https://yoshifab.com/store/240-lower-chassis-braces.html https://www.bneshop.com/products/240-strut-brace?variant=9741110277 https://www.wagonmeister.com/240-firewall-brace-set https://www.wagonmeister.com/s https://www.ipdusa.com/products/5051/GT-Strut-Braces-for-Volvo-IPD-103611 http://www.retroturbo.com/?product=volvo-240-242-series-flathood-adjustable-strutbar Here's a video showing installation of iPd lower braces on a 240. https://www.youtube.com/watch?v=9UJDnPW1Usk |
  REAR SUSPENSION BUSHINGS
|
 Should you change the ride height of your 240? How? This question comes along often enough. You have to decide if you like your car at the original ride height (because you like it that way or you drive on unpaved or flooded streets?) or if it looks better and handles better if it's a little lower (and a little stiffer). Sometimes the road conditions in your area will help you decide, since lowering a car usually creates a more harsh ride and less under-car clearance. If you want to first determine or compare your existing ride height to factory original height, the 1981 New Car Features Greenbook lists the height of the 240 GLT, GL and GLE (at curb weight) from the ground to the center high point of the roof at 1427mm (56.2"). You should pay attention to your SUSPENSION TRAVEL. When changing or lowering your suspension, you need to consider if your car will have proper suspension travel. Lowering a car can have the result of reducing that travel. So pay attention to the bump stops and if your shocks could be bottoming out before hitting bump stops. If you want to know how much suspension travel your car has, there's a quick and simple way to find out by placing a zip-tie on your shock tube and simply going for a drive. Here's a quick video showing how that's done. https://youtube.com/shorts/GTOm9mquYsM Keep in mind that if you lower your 240 (even a little) there can be issues with your front suspension geometry. But you're in luck. 240 front geometry can be now be corrected in a lowered car. CLICK HERE for the Lower Control Arm Section. When you decide you want to lower it, here are some options to consider below.
Most available sport springs will lower your 240 about 1.25 to 1.75 inches and will stiffen the ride by a small amount (maybe about 30%). iPd Sport Lowering Springs are by far the most popular sport springs in the U.S. for a 240. Other spring companies offering 240 sport springs: Lesjöfors Springs from VP Auto Parts (USA), King Springs (Australia), Classicswede.co.uk (UK). These springs will be the same diameter as stock springs (about 6.5 inches wide for fronts, 5 inch for rears). Their UNINSTALLED length will be noticeably shorter than stock when you set them side by side (the front sport springs will be 4 to 5 inches shorter). This usually results in an easier job installing them. As mentioned, your ride will be a little stiffer with a sport coil, which can offer more responsive handling. It will be very important to use good struts and shocks, which will be able to control (properly dampen) a stiffer spring, or you'll suffer unsatisfying bouncing. Bilstein HD or Koni adjustable (yellow) shocks are considered a very good match to iPd sport springs. I'll include more information on these dampers and others in the strut/shock section below.
It's important to note that other numbers have been published on iPd springs since then and some separate testing has also been done over the years, resulting in a range of rates. Other measurements of iPd springs have been given as between 130 and 190 lbs/in. for front and between 120 and 150 lbs/in. for rear, so use this info along with your best guess. Here's a thread started in 2016 that began compiling measurements on many Volvo Spring Rates: turbobricks.com/spring-rate-data.325739/ This thread notes that ordinary STOCK 240 springs (not GT or HD overload coils) will generally measure about: FRONT: 80-95 lbs/in.; REAR: 90-115 lbs/in. Here's some math nerd stuff: Due to the position behind the axle, a rear spring rate on a 240 may be calculated using a motion ratio of about 1.5, which means a rear spring rate of 200 lbs will be equal to an adjusted rate of about 300 lbs. Real world "seat of the pants" feel may be quite different. Also sway bar thicknesses can alter the feel of springs to a point. If you're interested in a good article on Calculating Spring Rates, click on the image below. This article was originally published in the May/June 1997 issue of Grassroots Motorsports. 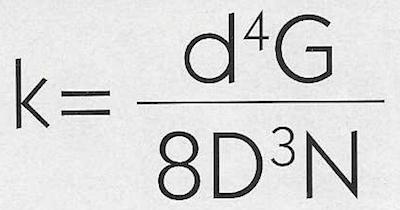
 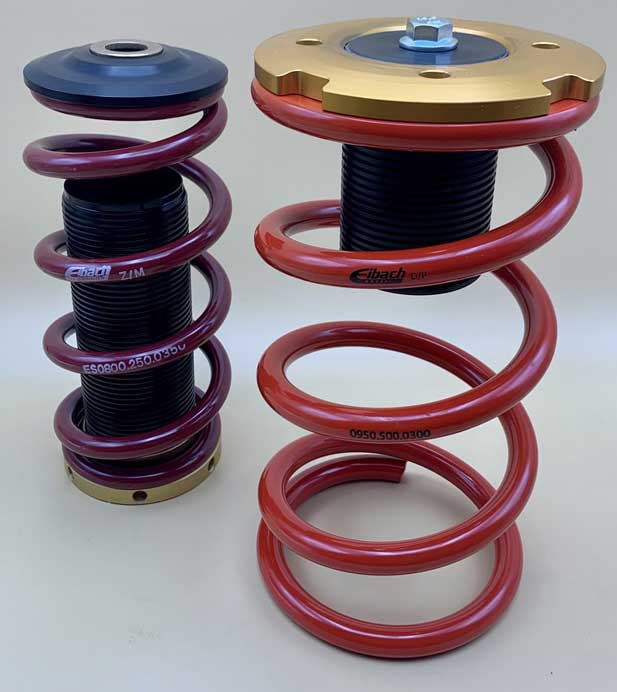 BNE Dynamics coilover pieces are shown above. Coil-overs are a GREAT choice if you have more money to spend on your suspension and if you want to be able to better tune your suspension. These offer a wide range of adjustment, allowing the use of a variety of standard, off-the-shelf coils in many different stiffness settings. And the upright threaded sleeve allows for considerable adjustment of ride height. Most kits will use standard 2.5 inch ID front coils and 5 inch ID rears, all of which are available in various lengths from a number of manufacturers. Choosing spring rates can be difficult for a beginner, so reading up on what others have done and what sort of uses they have planned for the car will help (street, track, etc.). If you plan to use springs stiffer than sport springs, keep in mind that you may lose your comfy ride. You can also ask a coil-over supplier for help if that supplier has experience with 240 springs. Coil spring sets are inexpensive enough that you can experiment and try something different if you change your mind. Springs come in various lengths and your spring length must also be chosen. This choice will be affected a little by your spring rate choice and of course by the choices you make about your ride height. The most common FRONT length for a 240 seems to be 10 inches for spring rates between 200 and 400 lbs. Stiffer spring rates and a lower ride height may allow for an 8 or 9 inch front spring, although a shorter spring will more greatly limit suspension travel. A 12 inch length will also be possible for many rates under about 250 lbs. There will be lots of ride height adjustment possible on that 6 inch tall upright threaded sleeve. Similar concerns will apply when choosing a REAR spring length. 11 or 13 inch lengths seem to be the popular choices for a 240. Again, there will be a few inches of height adjustment available with the threaded sleeve. When I purchased the below coil-over kit for my 245 Turbo many, many years ago (about 2004), I knew little about it, so I asked the builder for a spring recommendation. Based on mostly street use (it was a daily driver) and an occasional track-day, the recommendation given to me was as shown below, which seemed to work very well for me. FRONT SPRING: 2.5 x 10 inch, 200 lb. rate. REAR SPRING: 5 x 11 inch, 175 lb. rate. These spring rates were noticeably stiffer than the iPd sport springs they replaced. 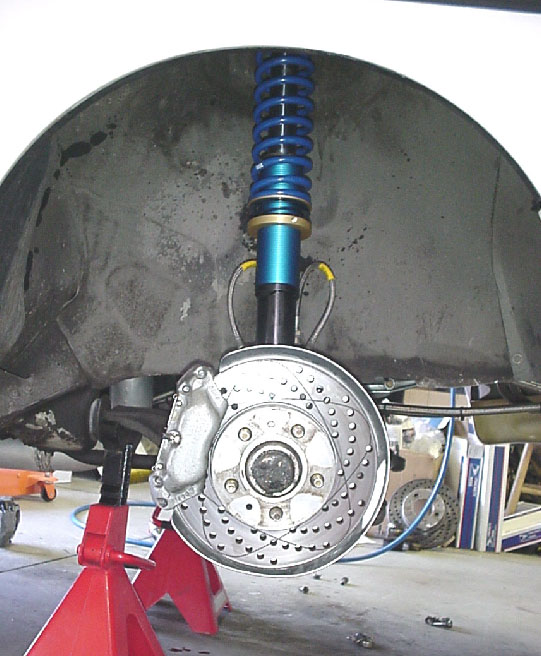 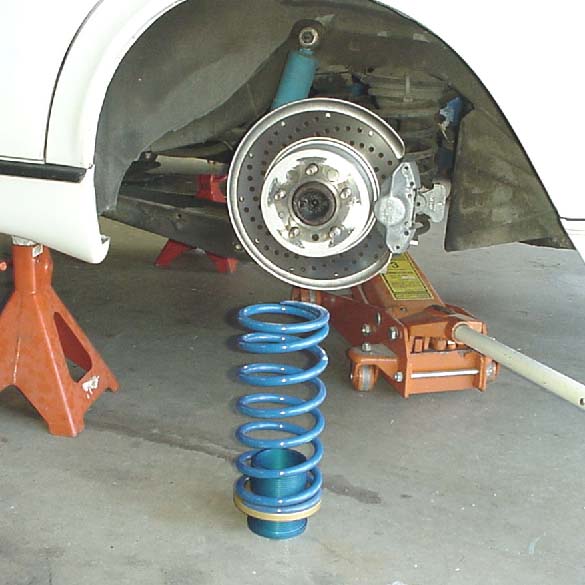 Using better "Barrel" Shaped or "Beehive" Shaped Coil Springs Some spring suppliers offer barrel shaped springs (sometimes called beehive shaped). This is something you may want to consider for your front coil-overs for a bit of extra clearance between the spring and the strut. I now recommend barrel shaped 2.5 inch front springs after I found that my standard springs had a habit of flexing enough to contact and damage the threaded sleeve in the below photo. Using a barrel shaped spring will improve this clearance. 
 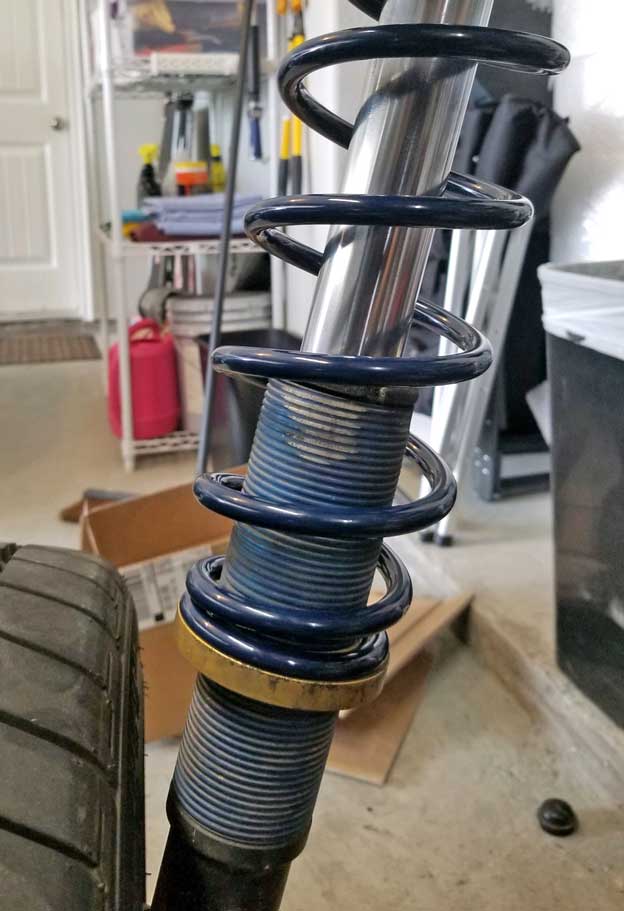 So, will a barrel shaped coil stick out and interfere with the wheel or tire? NOT LIKELY. You can decide after looking at this photo above. It's not an issue. Eibach offers Eibach XT (Extreme Travel) Barrel coilover springs beginning at a 10 inch free length or longer. Hyperco (Hypercoil) also offers Hyperco UHT (Ultra High Travel) barrel shaped coilover springs in their catalogs beginning at a 12 inch free length or longer. BNE Dynamics (Kaplhenke Racing) reports that they use only barrel shaped springs with their coilover kits.
Or if you're handy, you can build your own set of coil-overs. Here are some resources for the DIY builder: 240 Coilovers: The Kyote Way DIY 240 Series Coilover Instructions turbobricks.com/how-i-did-rear-coilovers-on-a-240.334283/ Or search the Turbobricks forum for more.
  There are people out there who will scream at you to never cut your springs! I think it's because there have been more failures from inexperience than great success. Yes, it can be a less precise solution, but it certainly can help for those on a lower budget, as long as you know what to expect. The key to getting it right is experience (or following someone with experience). Getting it right is definitely possible. The above 1983 245 is sitting on cut stock springs with 17x8 and 17x/9 wheels and tires: 245/40-17's all around. Coils are cut roughly about 3 coils (turbobricks.com/classicswede-lowering-springs.337116/page-2).
And for more info on cutting springs, you can read the following threads. You may want to pay particular attention to posts from Tuff240, author of the above spring cutting tutorial. He has more experience cutting 240 springs than anyone else I know. So this is the best information I know on this subject: turbobricks.com/cutting-volvo-240-factory-springs.310040 turbobricks.com/classicswede-lowering-springs.337116 turbobricks.com/basic-suspension-spring-cutting.165499 Calculating Spring Rates for CUT COILS. 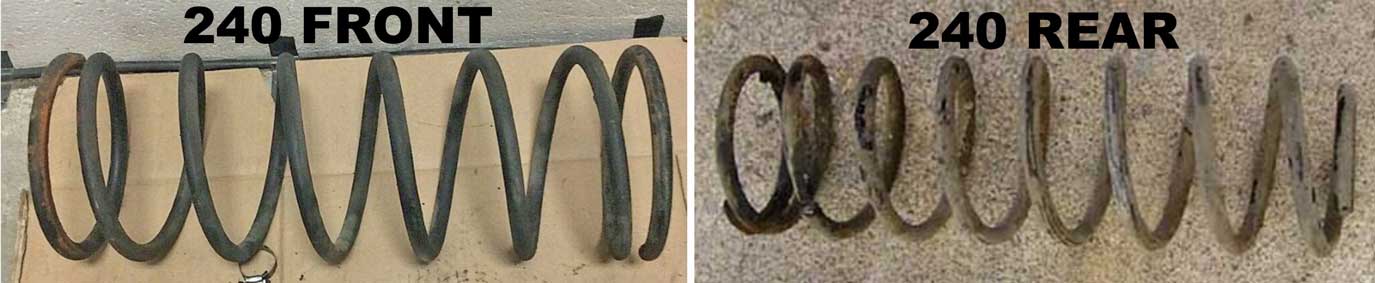
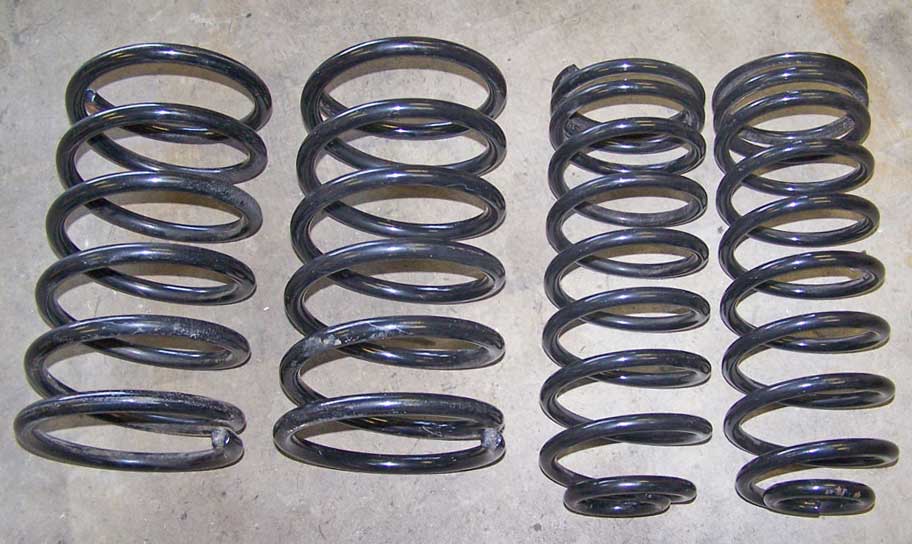
For those interested in calculating the new spring rates for cut coils, it's a simple math equation, assuming you know the original spring rate before cutting. Spring Shape A stock 240 FRONT spring is considered to have a standard shape, which means the spring is uniform or straight. A stock 240 REAR spring appears mostly straight, but since the bottom coil is smaller than the top coil, this spring can be considered to have a CONICAL shape at the bottom. Spring Rate Looking at the above images, a factory 240 FRONT spring appears to have 7.5 active coils. Cutting off 2 coils (5.5 coils remain) will increase the spring rate by 36%. The math is: 7.5 ÷ 5.5 = 1.36. So if the original spring rate was 100 lbs, then the new rate is 136 lbs. A factory 240 REAR spring appears to have 8 active coils. Cutting off 2 coils (6 coils remain) will increase the spring rate by 33%. The math is: 8 ÷ 6 = 1.33. So if the original spring rate was 100 lbs, then the new rate is 133 lbs. This thread started in 2016 has compiled SPRING-RATE MEASUREMENTS on many Volvo Springs: turbobricks.com/spring-rate-data.325739 This thread states that ordinary STOCK 240 springs (not GT or HD overload coils) will generally measure about: FRONT: 80-95 lbs/in.; REAR: 90-115 lbs/in. The source for the SPRING RATE MATH above is this article on Calculating Spring Rates, which was originally published in the May/June 1997 issue of Grassroots Motorsports. |
Original DeCarbon or Boge Shocks. Here is a factory high-pressure gas strut cartridge that reportedly originally came in some 240 GT, GLT and Turbo model. This was made by DeCarbon in France (photos below). These front struts were normally fitted in 240s without using a bottom strut spacer. These might not fit in a 1989 or later strut housing with a permanent spacer. The 240 Turbo also reportedly sometimes came with Boge high-pressure gas dampers, although the specific years is not known to me.  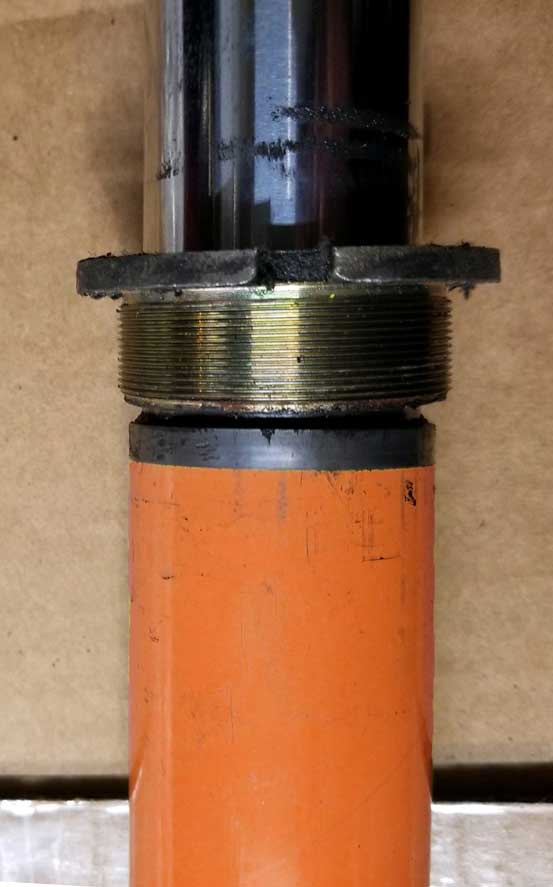
BILSTEIN HD (B6). The Bilstein HD (B6) is the most popular aftermarket strut/shock combination when using sport springs on a 240. They will generally give pretty good damping with stock springs or with sport springs, however it was my experience that the REAR Bilstein HD shocks combined with iPd sport springs were a bit too soft for the heavier REAR of a 245. I had no complaints when using these with iPd sport springs on several different 242s or 244s. If you plan to use springs that are stiffer than iPd sport springs, these may not be sufficient. The Bilstein HD front struts will fit in a 240 early (pre-1989) strut without using a bottom strut spacer. Since these are taller, if you're fitting these into a 1989 or later 240 strut housing, the strut gland nut will not fully thread down (see more in comments below in the Bilstein Touring Class section). BELOW BILSTEIN (B6). Volvo 240 front strut cartridge Bilstein HD: 34-181539 Volvo 240 rear shock Bilstein HD: 24-002967 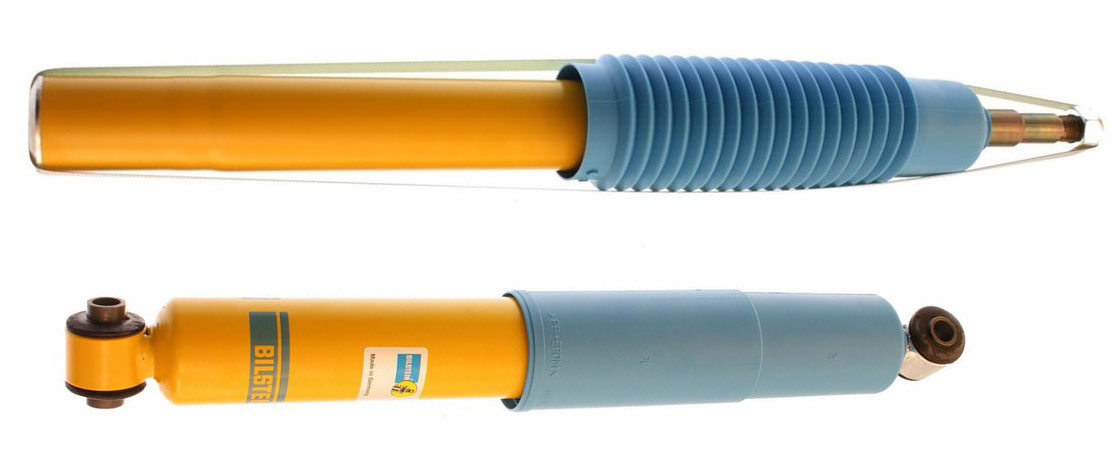 The Bilstein HD is a high pressure gas damper. The high pressure gas chamber helps to prevent foaming of the damper oil, giving the advantage of more consistent damping during heavy use. The gas chamber is pressurized at 25 bar (about 350 psi) and this tends to force the shock toward the open position. This opening force is about 40 lbs, which may raise the ride height slightly compared to a non-gas shock. The Bilstein HD strut has an internal bump stop inside the tube at the bottom. It can be easily accessed by removing the nut on the bottom and threading the rod out through the top.This way you can trim down the bump stop if needed for a very low ride height. There are a number of videos. Here's one: https://www.youtube.com/watch?v=RU-p0qTNVIY 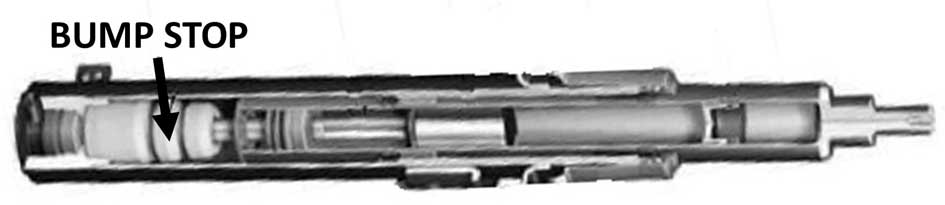 NOTE: Bilstein offers rebuilding and custom damping settings for their Bilstein HD's. https://www.bilstein.com/us/en/technology-and-knowledge/service/ If you plan to use springs in your 240 that are stiffer than typical sport springs, I would recommend either moving up to a higher level damper or having custom dampers created. I have included more about custom damping settings further below in the Compression and Rebound section. BILSTEIN TOURING CLASS (B4). I have never personally used Bilstein Touring Class (TC) shocks, but most opinions I've read conclude they will offer satisfactory damping with stock springs. They might not offer good damping when combined with a spring STIFFER than stock, such as sport springs or lowering springs. Your comments or opinions are welcome. And I have read that REAR Bilstein TCs are known to have rattle issues in 240s due to improperly sized bolt eyelets. This might be improved by over-torquing the bolts (insert caution here). Feel free to email if you can offer more. 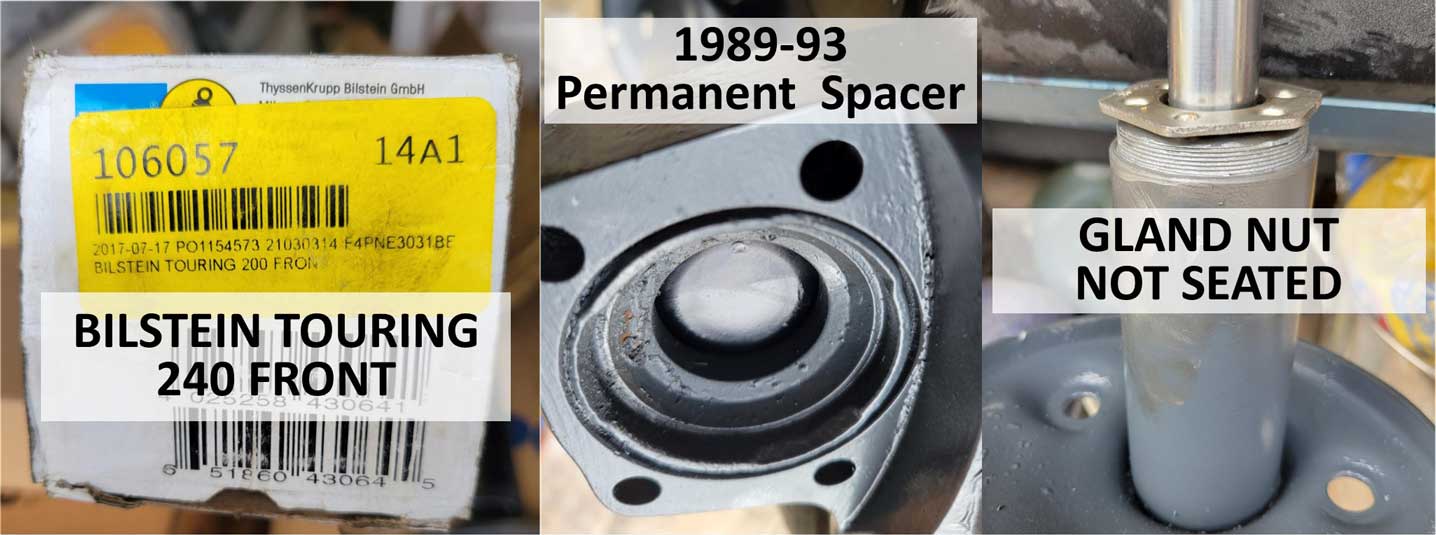 The Bilstein Touring front struts, PN 106057 (shown above) may be fitted in a 240 early strut housing (pre-1989) without using a bottom strut spacer. If you're installing these in a 1989 or later 240 strut housing, which uses a permanent spacer that cannot be removed the strut gland nut will NOT FULLY THREAD into the housing because these struts are taller. This has not stopped a large number of people who have completed their installations with a gland nut like shown above. I have been told that if you can get at least 50% of the threads to engage, it might be OK (but not if it was me). The first gland nut above is a genuine Volvo part from FCP. It appears to have about 14 threads. The seconds nut is an aftermarket part offered by iPd. It seems to have about 16 threads. The installation photo above is a Bilstein Touring Class cartridge in a later 240 housing. After the nut was tightened, there appeared to be about 7 threads left. If 50% of the threads is considered to be enough, then this installation should be OK. KONI SPORT. Koni Sport (yellow single-adjustable) struts or shocks are considered to be a higher level compared to the above Bilstein HD because of the adjustable rebound. These front struts must be fitted in a 240 with a bottom strut spacer. These strut inserts are shorter than a Bilstein insert, so these will fit just fine in any year 240 when using a strut spacer, and in a 1989 or later strut housing, which has a permanent strut spacer. 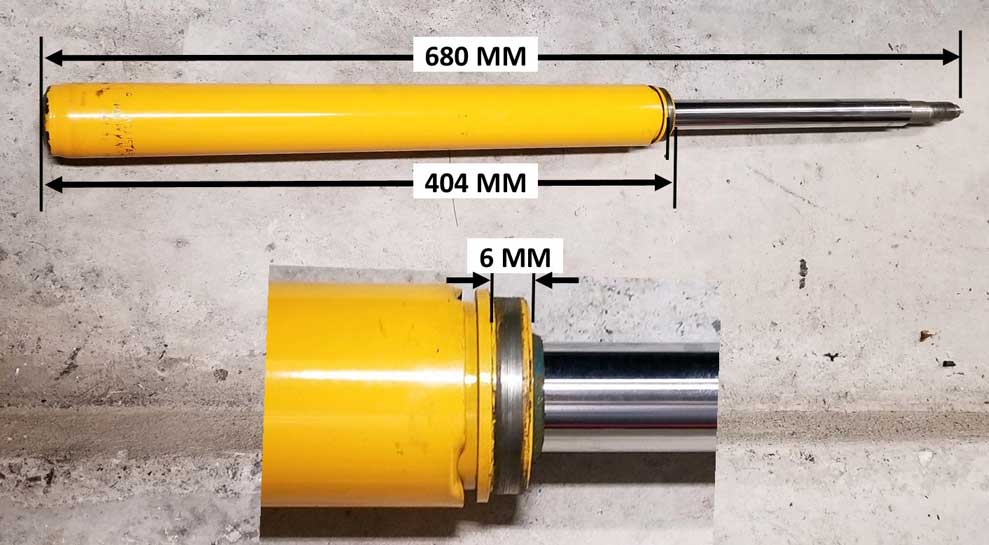 The single-adjustable Koni Sport (240 front strut: PN 8641-1245; 240 rear shock: PN 26-1129) is adjustable for rebound stiffness (click here for more info). The compression stiffness is not adjustable on a Koni Sport. 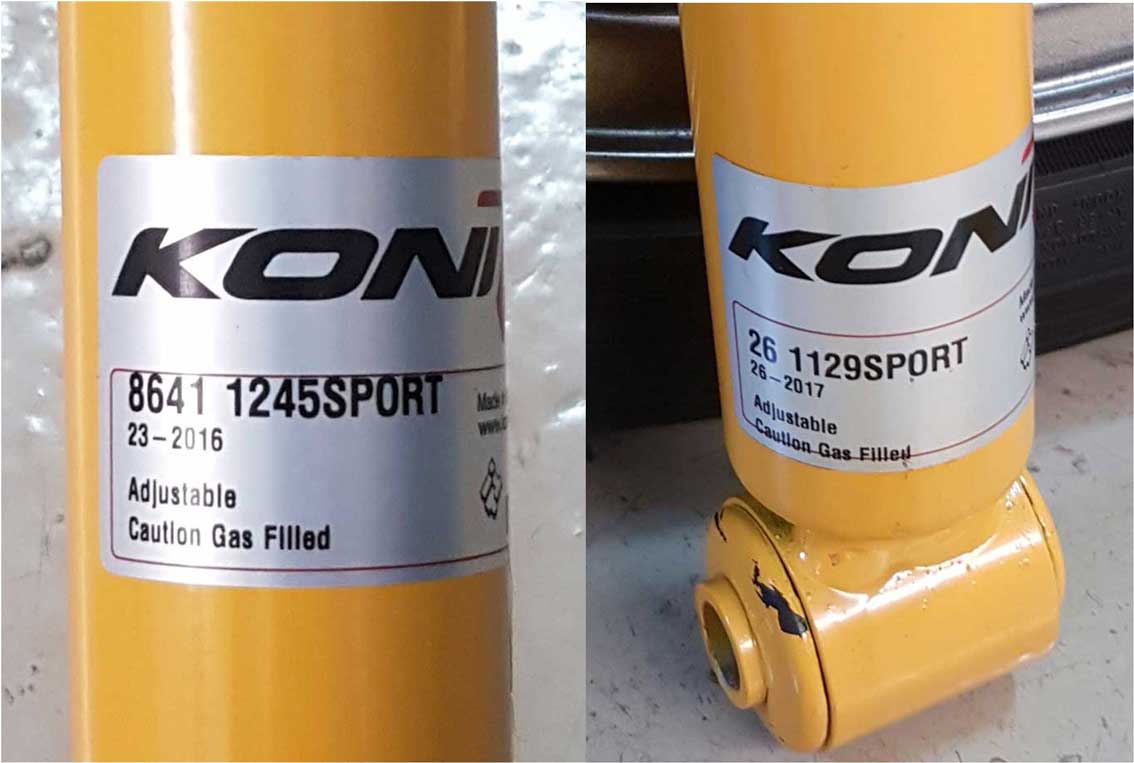 The adjustment on a Koni Sport damper will be made either internally (before installation) or with an external adjustment knob (depending on model). The Koni front strut shown above for a Volvo 240 is externally adjustable using a knob placed at the top of the strut. Turning the adjustment will be smooth, without detents. If you're setting it to full soft or full hard, I have seen a recommendation to leave the adjustment a few degrees away from the full limit to best protect the internal valve. Koni Sport front strut adjuster knob is shown below. 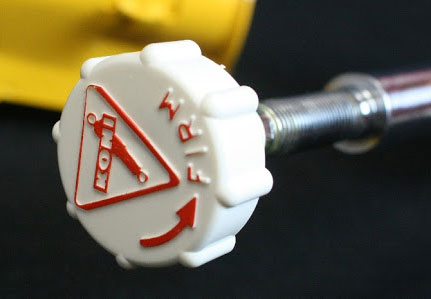
The Koni Sport front strut uses an external bump stop which is placed at the TOP. It will fit inside a coil-over spring, although it's a snug fit. The bump stop can be shortened or trimmed down if needed if you have a very low ride height. The rubber boot or dust cover is optional and it's often left off when installing a Koni with narrow (2.5 inch) coil-over springs because there's not much room. In the below first two photo of my 240 springs, which are 2.5 inch barrel shaped springs, there is a enough room for a rubber boot if you want to use it as I did. 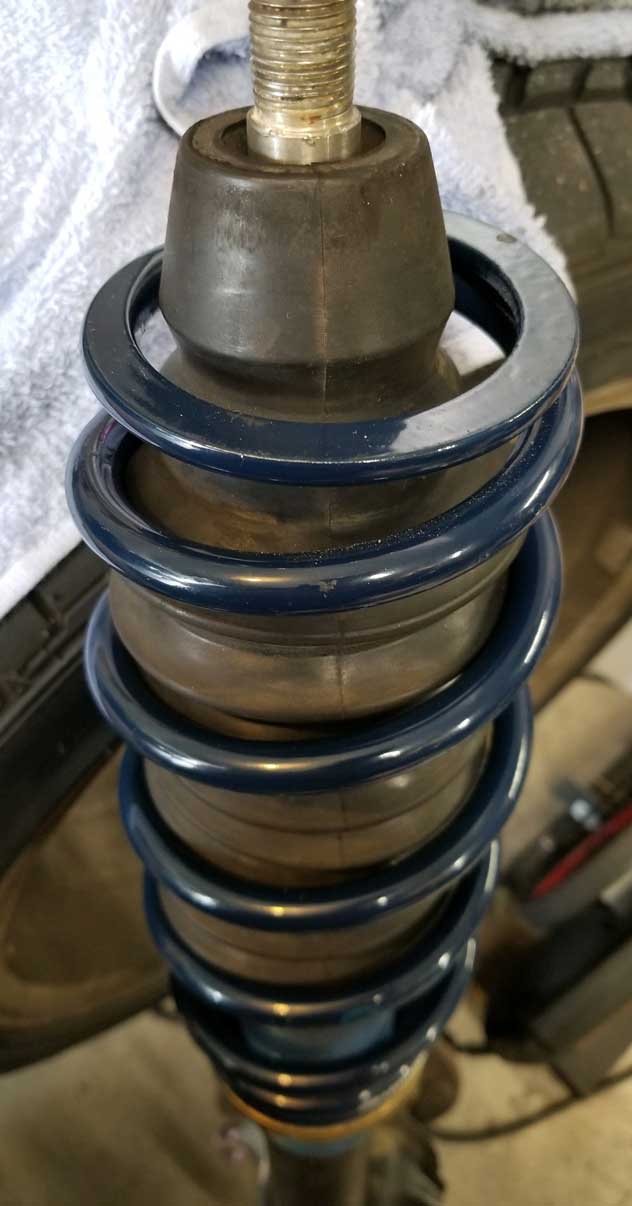 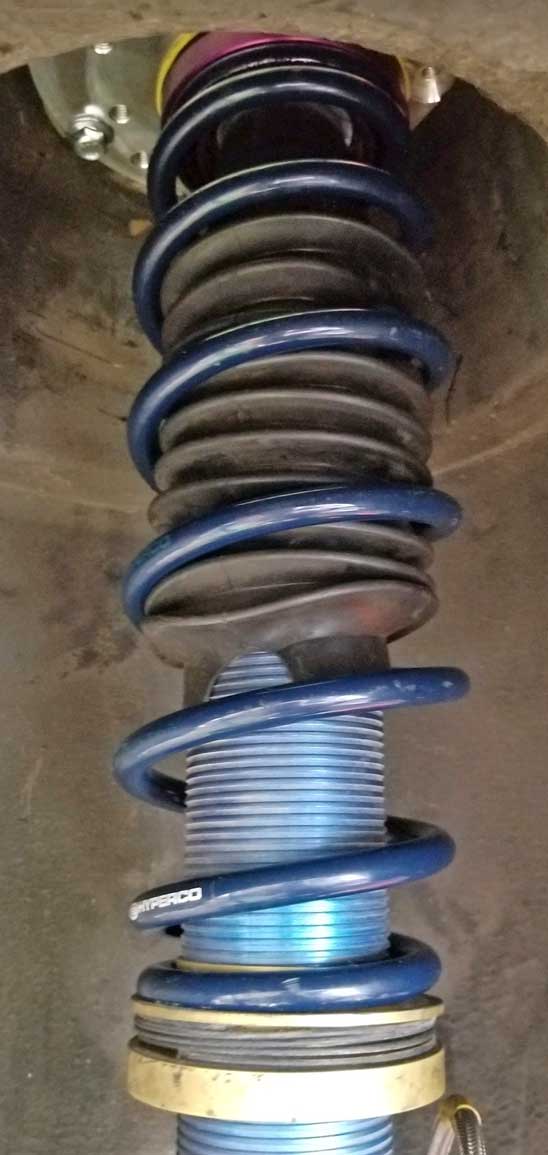 
KYB SHOCKS. I had only one experience with a set of KYB Gas-A-Just struts/shocks on a 244 with iPd sport springs many years ago. These were considerably cheaper than Bilsteins and the reason I bought them was because of recommendations from other 240 owners. Some people might have had better luck, but I CANNOT offer a recommendation for these. These were very noticeably worn out by 11k miles. Then I switched to Bilstein HDs. GAZ 
Gazmatic International in the UK offers GAZ adjustable struts and shocks. GAZ GAI FRONT adjustable front strut inserts for Volvo 240 offer an adjustment range for rebound only, similar to the Koni sport front strut. GAZ PN GAI-200F for 240 FRONT: Range is 125 to 140 lbs rebound force GAZ GT REAR adjustable shocks are available in single adjustable (rebound only) or double adjustable. A double adjustable shock will adjust both compression and rebound stiffness from a control knob on the outside of the shock body. 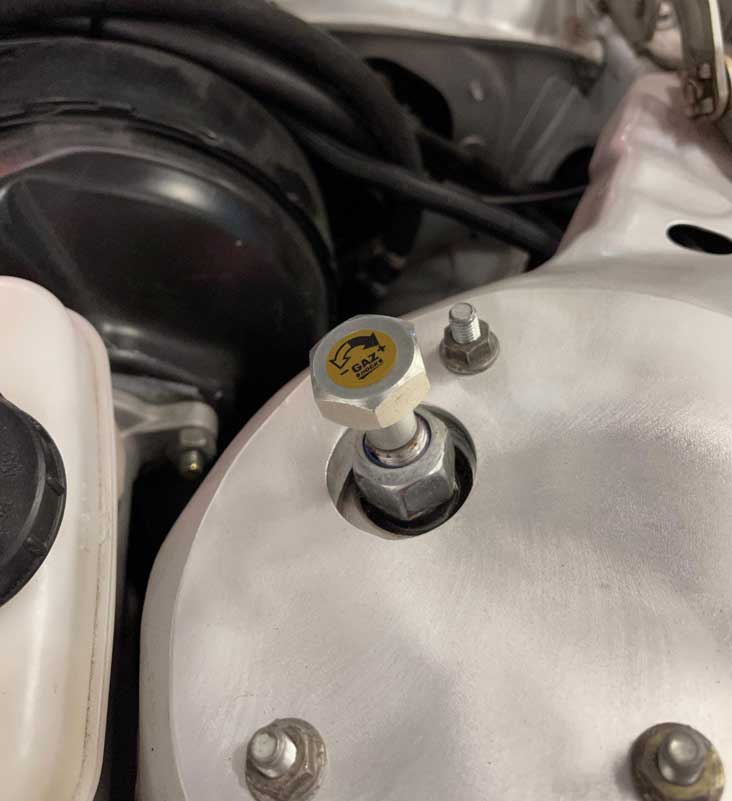
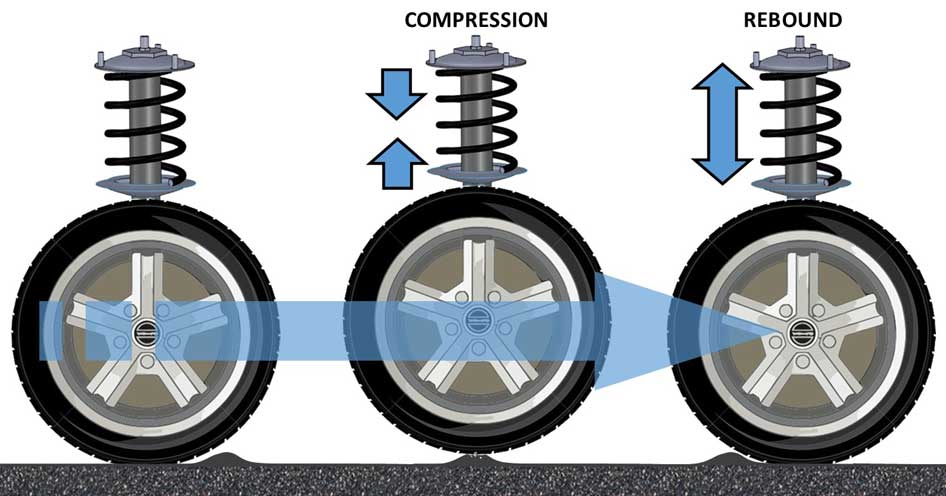
Compression and Rebound Stiffness 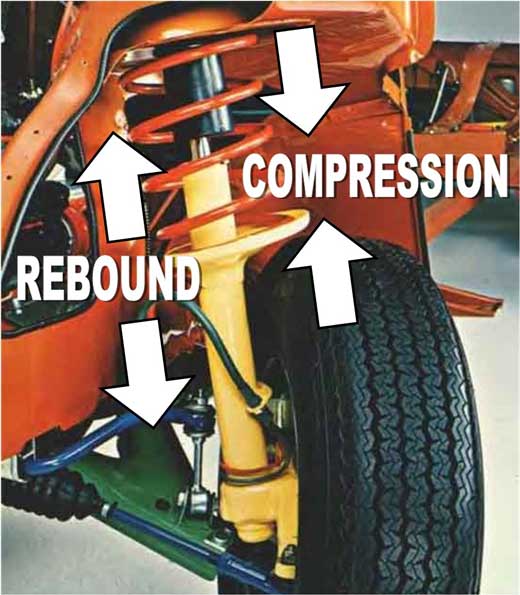
In simple terms, COMPRESSION DAMPING (or sometimes called "BOUNCE") will control the mass of the suspension as it compresses downward or as it closes the damper. Koni yellow sport shocks offer rebound adjustment only. They will tell you it makes compression stiffness non-adjustable because the mass of the suspension doesn't really change. REBOUND DAMPING controls the mass of the chassis as it extends upward or opens the damper. If you stiffen the rebound stroke, it can increase the response of the chassis to steering inputs, however as rebound becomes stiffer, less traction will be realized. So moderation is needed. Rebound tuning can help refine the breakaway characteristics or the balance of the car:
DOUBLE ADJUSTABLE? There are also higher-level DOUBLE-ADJUSTABLE dampers (sometimes abbreviated "DA") which will allow you to adjust both rebound AND compression stiffness independently. Koni and Gaz both offer more expensive double adjustable options. While tuning rebound damping is not hard, tuning compression damping is generally done at a more advanced level. If you know what you're doing, you can come close to matching the compression setting to your spring rate to improve the mechanical grip of the tire, but it's easy to go too stiff and degrade traction. This kind of tuning is normally done in track settings and not really something for a novice. Most street drivers will never need double adjustable dampers. If you would like more reading on the subject of dampers, here's a good article originally published in a 1997 issue of Grassroots Motorsports. https://grassrootsmotorsports.com/articles/understanding-shock-absorbers-dampers-and-struts-h/ Over the years I've compiled some useful damper stiffness info below. If you can help improve or add to this information, please email.
|
|||||||||||||||||||||||||||||||||||||||||||||||||||||||||||||||||||||||||||||||||||||||||||||||||||||||||||||||||||||||||||||||||||||||||||||||||||||||||||||||||||
| Here's a good video on shock damping stiffness that will explain a lot for you. https://www.youtube.com/watch?v=rA0vz_bLrwg 19:30 - Damping rebound. 19:48 - Low speed damping. 20:28 - Mid speed damping. 21:40 - High speed damping. 26:39 - Single adjustable shocks settings. 26:56 - More front rebound. 27:56 - Too much front rebound. 29:37 - Too little front rebound. 31:31 - More rear rebound. 34:37 - Too much rear rebound. 36:30 - Too little rear rebound. Here's a video showing what can happen when you have a lot of money to spend on custom dampers and coil-overs. https://www.youtube.com/watch?v=XXBd8xWTM6s |
|||||||||||||||||||||||||||||||||||||||||||||||||||||||||||||||||||||||||||||||||||||||||||||||||||||||||||||||||||||||||||||||||||||||||||||||||||||||||||||||||||
This image below from a 1990 iPd catalog caught the attention of many Volvo enthusiasts who wanted improved handling.  I have always considered a good set of iPd anti-sway bars to be a great first step in improving a 240 suspension. Every 240 I have owned had a set. You can call it better handling, better grip, better road manners, etc. If you want your car to perform better on the road, part of that is how well your car inspires confidence in the twisties. Whether the car has too much body roll is part of that. Just don't go too far. Keep this in mind; Reducing body roll for the sake of just reducing body roll will not always make your car corner faster, however in most cases it will. One reason for doing this is that a flatter cornering car will most likely have more tire grip. For a 240, the front tire grip will usually be greatly improved by flatter cornering. This is because with the McPherson Strut front suspension design, the front tires lean over when the car does. Reducing that lean helps the tires to keep a better contact patch. Due to the live axle rear end, the grip of the rear tires on a 240 is not affected as much by body roll, but it can still be improved by reducing roll. This is obviously not a 240 below, but the suspension design is similar. This photo below will help explain how front camber can be affected by body roll with a McPherson strut front suspension. This below car is in a high-speed turn and the body roll is roughly around 3 degrees. While the front left (outside) tire is doing its best, the suspension geometry allows the tire to pitch over a few degrees. The front right (inside) tire has a greater pitch of maybe about 6 degrees. Luckily that right (inside) tire isn't needed nearly as much for grip, but still, losing any portion of any contact patch in a turn like this will reduce grip. In this car it may also increase understeer. The rear tires, of course, will have no change in camber angle due to the live axle design, so the rears will more likely retain grip pretty well. 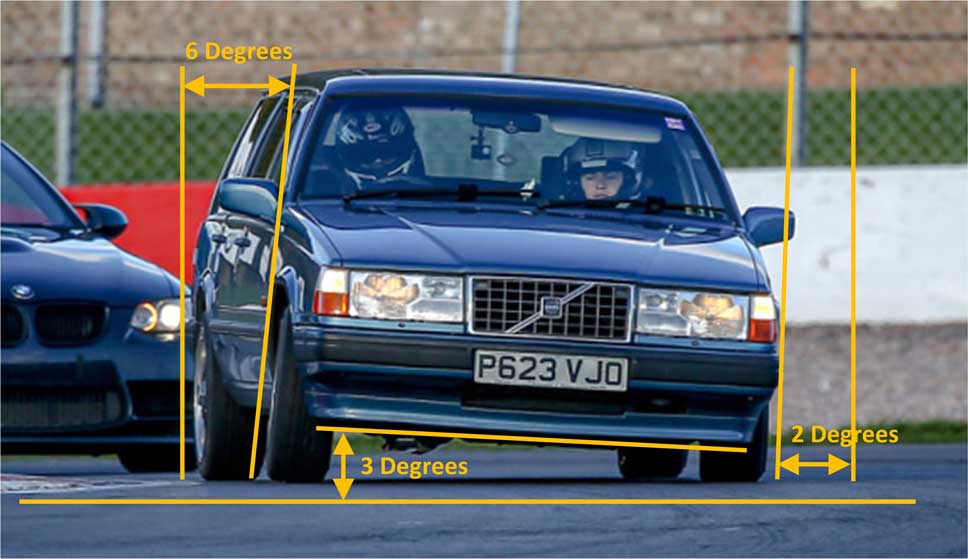 So if reducing your body roll is a good thing in most cases, will a car with NO BODY ROLL corner even faster? No. Your car has a suspension for more than one reason. Not just for a comfortable ride. Since roads are not perfectly smooth in corners, your suspension needs to flex to even out the changes as your tires struggle for SIDE-GRIP when rolling over bumps or other surface imperfections. A car with MORE suspension movement and more body roll will almost always also give the driver more warning when the car is reaching its limit. This can help explain why removing that movement will usually make the car less forgiving as you approach or exceed the traction limit in a turn. Even a far less-forgiving racing 240 (below) had some body roll (not very much though). The ultimate goal is to find the right compromise to fairly serve your desired performance, comfort and road surfaces you'll be cornering on. 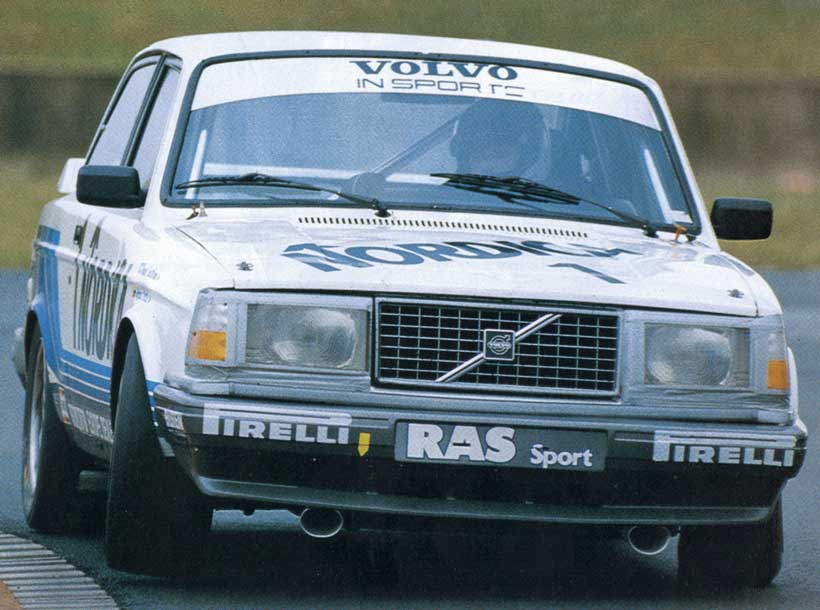 The rubber in your tires will help to even things out too, but their role in evening out surface imperfections is smaller. The springs and shocks help the most with this, but there will always be bumps which will momentarily lessen tire grip in a corner, and an ultra-flat cornering car won't absorb those bumps well and that can give an unwelcome surprise if you're near the limit in a corner. Stiffer anti-sways bars will reduce roll, but will also affect your comfy ride quality. A stiffer anti-sway bar will make your car corner flatter, but it adds some compromises. It will also transmit harsh bumps into the chassis and into your comfy cabin a bit harder than a smaller sway bar would, especially in a fast corner when the bar becomes pushed or the suspension is loaded. In most cases, a slightly harsher ride is a small price to pay for the improvement a stiffer anti-sway bar will usually offer. If you would like to learn much more on the subject of reducing body roll,and how anti-roll bars are designed, here are good articles, which were originally published by Grassroots Motorsports. https://grassrootsmotorsports.com/articles/lean-less-what-body-roll-and-how-reduce-it/ https://grassrootsmotorsports.com/articles/what-anti-roll-bar-and-how-does-it-work-handling-b/
|
|
|
||||
| davebarton.com |
prancingmoose.com |
240turbo.com |
Special Emblems |
|
| Prancing
Moose Stickers |
Volvo
Stickers |
Body/Chassis/Engine
Labels |
240 MODS and FIXES Page | |
| Other Car Brand
Stickers |
Steering
Wheel Labels |
Center Cap Labels/Overlays |
Cool Volvo
Products |
|
| Grill Labels/Overlays |
Volvo Wire
Harnesses |
Conversion Harnesses |
Harness
Parts/Connectors |
|
| Volvo Relays |
Coil Repair
Harnesses |
240 Window
Scrapers |
740/940
Window Scrapers |
|
| Adjustable Voltage
Regulators |
Horn Buttons |
240 Odometer
Repair |
740 Odometer
Repair |
|
| Volvo Gauge
Faces |
740
Turbo/Boost Faces |
240 Black Door Vinyl |
850 Odometer
Repair |
|
| ALTERNATOR Page |
240 Power Mirrors - Switches |
240 Oil Cooler Page |
240 Fuse Panel Page |
|
| Group A
Racing 242 Turbo Page |
240 Hydraulic Clutch | Fuel Pump RELAY Page |
240 Headlight RELAY Page |
|
| Used Parts & Extra Stuff for sale |
CRIMPING Page |
240 Ignition Page |
240 Headlight Page |
|
| 240 Gauge Electrical Diagrams | 240 REAR END Page | Yoshifab Catch Can Install | 240 TAILLIGHT Page | |
| Side Marker
Lights Page |
Gentex Mirror Upgrade | Yoshifab Drain Tube Install | Modified 240 Favorites | |
| SoCal Salvage Yards | Unleaded Racing Fuel | B26FT Stroker | Dave's 245 Spec Page | |
| 240 SUSPENSION Page | 240 Lowering Page |
240 Windshield Page |
240 WIPER Page | |
| 240 BRAKES Page |
240 Dash Top Gauge Pod | Cadillac 4-Note Horn Install | 240 DYNAMAT Installation | |
| 4 Speed Fan
Controller |
Electric Cooling Fan
Page |
BRUSHLESS Cooling Fan Page |
Tropical Fan
Clutches |
|
| 240 AC Page | "KOMFORT BLINKER" Upgrade | T5 Trans Conversion Page | 240 Engine Mount Page | |
| 240 VIN Page | Stepper Idle Valve Page |
Vacuum Diagrams | 240 HOOD Page | |
| 240 Exhaust Page | 242 Power Vent Window Project |
EFI Volvo Pin Function Diagrams |
Favorite Links | |
| R-Sport
Apparel |
Prancing
Moose Apparel |
Volvo Meet Photo Albums | Texas Volvo Meets and Events | |
| Ordering Instructions | Policies | PAYMENTS Page |
Mojave Road Trail Map Page |
|
| Returns | Shipping | Shopping Cart Troubleshooting | Contact Us |
|

|


 alternators are known for
poor voltage.")


