|
2 4 0 T U R B O . C O M D A V E ' S V O L V O P A G E
|
||||||||||||||||||||||||||||||||||||||||||||||||||
|
2 4 0 T U R B O . C O M D A V E ' S V O L V O P A G E
|
||||||||||||||||||||||||||||||||||||||||||||||||||
| If
you have any comments or if you can help to improve
this information, please email. CONTACT |
|
Here's a good crimping guide for beginners: https://www.xj4ever.com/crimping my style.pdf And here a good page showing a lot of CRIMPING advice and CRIMP TOOLS for Marine and other uses: https://marinehowto.com/marine-wire-termination/ |
||
|
||
 What is an OPEN BARREL terminal? What is an OPEN BARREL terminal? <<< It's a NON-INSULATED terminal with open "wings" as shown to the left. Those wings are crimped over the wire. |
||
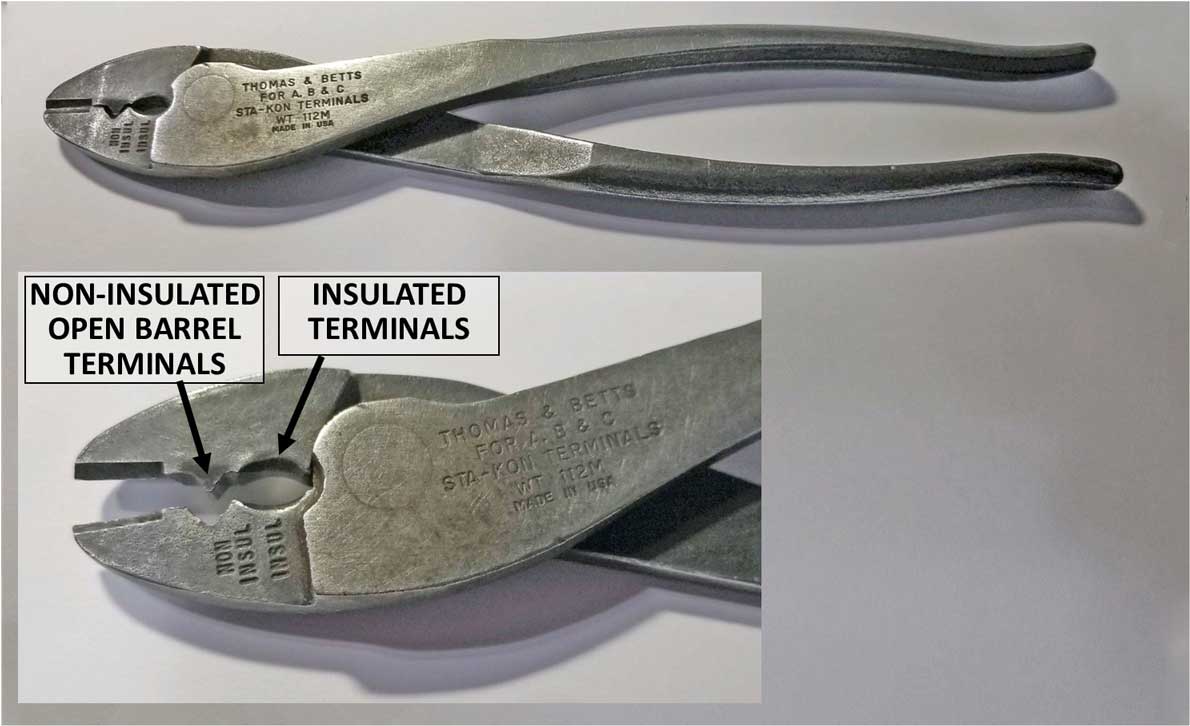 <<<
PROPER CRIMP
tools are important. Try
not
to use a cheap stamped metal crimping tool. Buy yourself something at
least as good as this one to begin with. For those of you who are curious
about what crimper I use, this is it for 90% of my
crimps for non-insulated or open barrel terminals and virtually all
insulated terminals. This is the THOMAS &
BETTS model WT 112M. It runs about $40. I've had this
one for 25 year plus. <<<
PROPER CRIMP
tools are important. Try
not
to use a cheap stamped metal crimping tool. Buy yourself something at
least as good as this one to begin with. For those of you who are curious
about what crimper I use, this is it for 90% of my
crimps for non-insulated or open barrel terminals and virtually all
insulated terminals. This is the THOMAS &
BETTS model WT 112M. It runs about $40. I've had this
one for 25 year plus. |
||
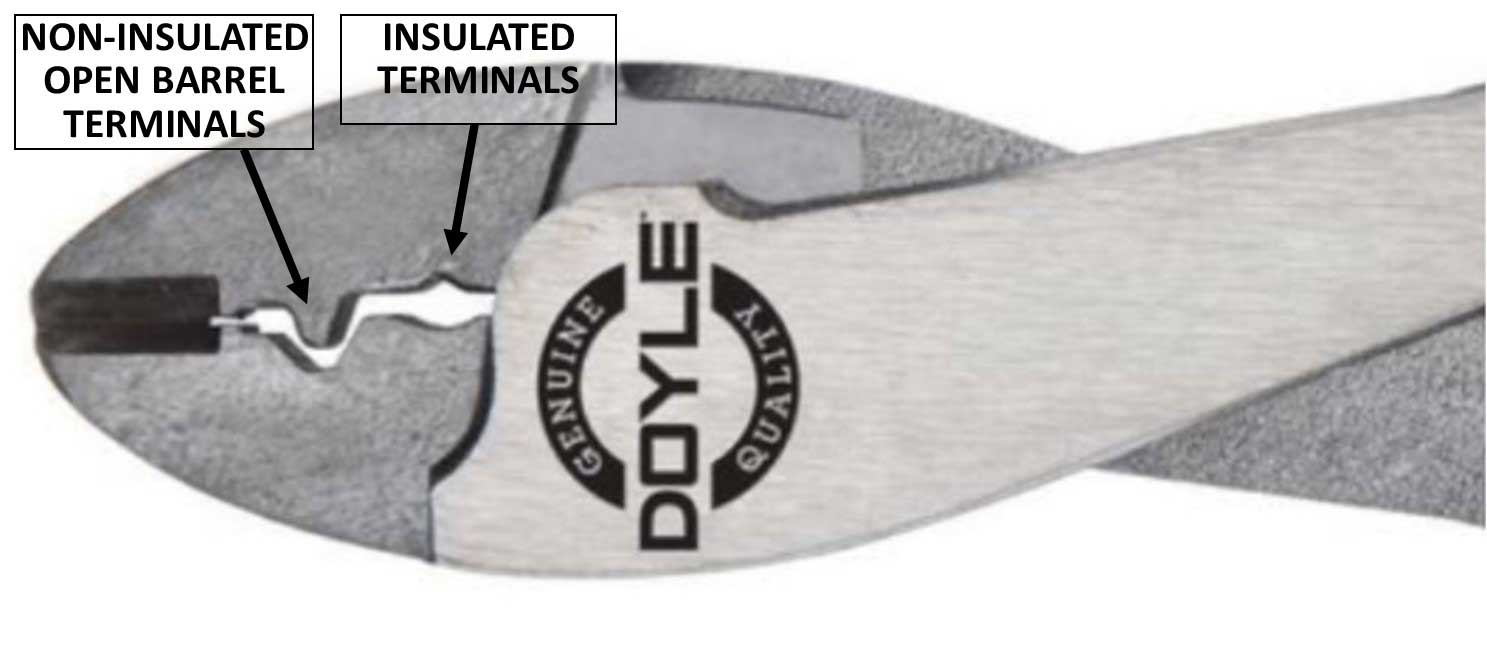 <<< Here's a fairly close copy of that crimper, which is available at Harbor Freight. <<< Here's a fairly close copy of that crimper, which is available at Harbor Freight. https://www.harborfreight.com/9-12-in-wire-crimping-tool-63989.html |
||
|
||
Good general video on crimping open barrel terminals. https://www.youtube.com/watch?v=bHEjqfUs4ws |
||
RATCHETING CRIMPERS
|
||
Here's an expensive
MSD ratcheting crimper which I have used
for many years when I need a fancy crimper. It has dies which can
be swapped for different style crimps, such as for auto ignition
cables. It
was pretty expensive (close to $100), but years ago when I bought this one there
were not many cheap tool options like there are now. So shop around.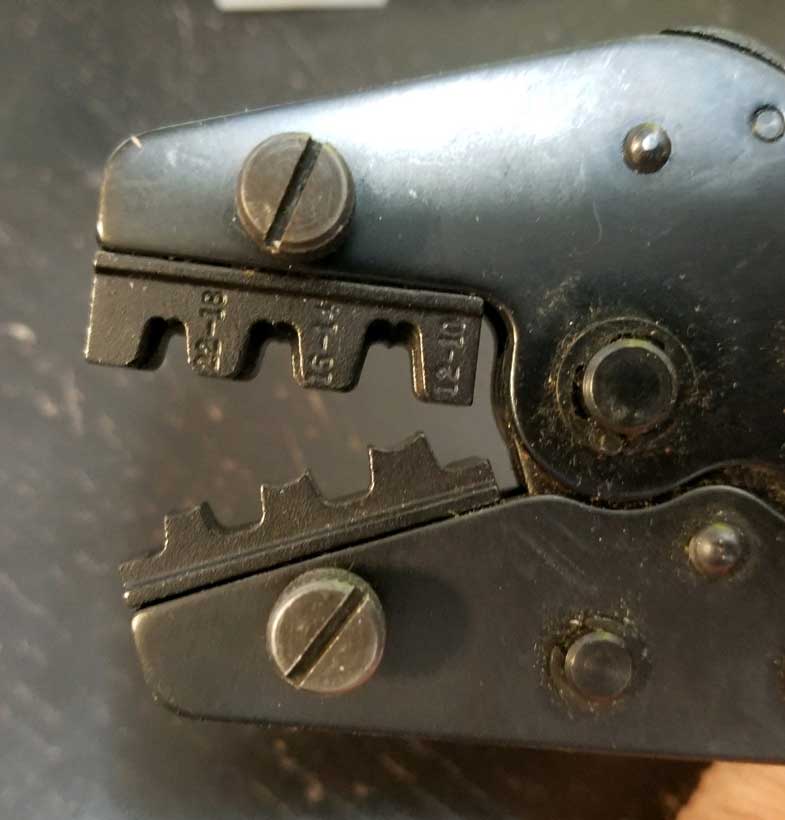 THIS MSD CRIMPER ABOVE: with ignition dies: https://www.summitracing.com/parts/msd-35051/overview/ or with optional open barrel dies: https://www.summitracing.com/parts/msd-3506/overview/ |
||
|
OR . . . Here's a highly rated copy of the above expensive crimper for a fraction of the price. https://www.amazon.com/gp/product/B00OMMZ502/ref=ask_ql_qh_dp_hza 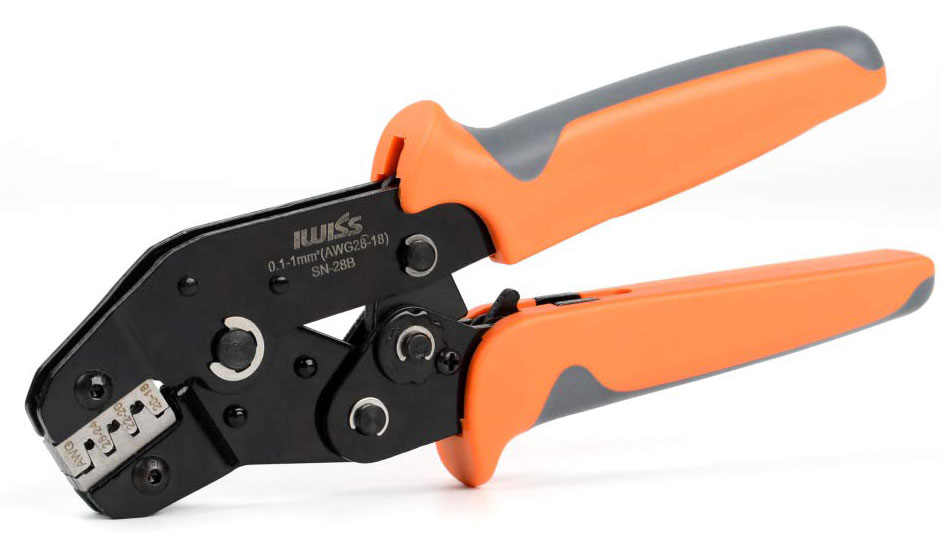 |
||
|
|
||
| When shopping around for crimping tools, try to find one that will do open barrel F type terminals.
You can spend a lot of money on one of these tools or kits, but it you hunt carefully, you can find cheaper ones that will work pretty well. This one pictured BELOW is under $30 for the crimper and it comes with extra crimping dies and a wire stripper. Sometimes you get what you pay for when buying CHEAP tools, so shop carefully and read reviews if they exist. 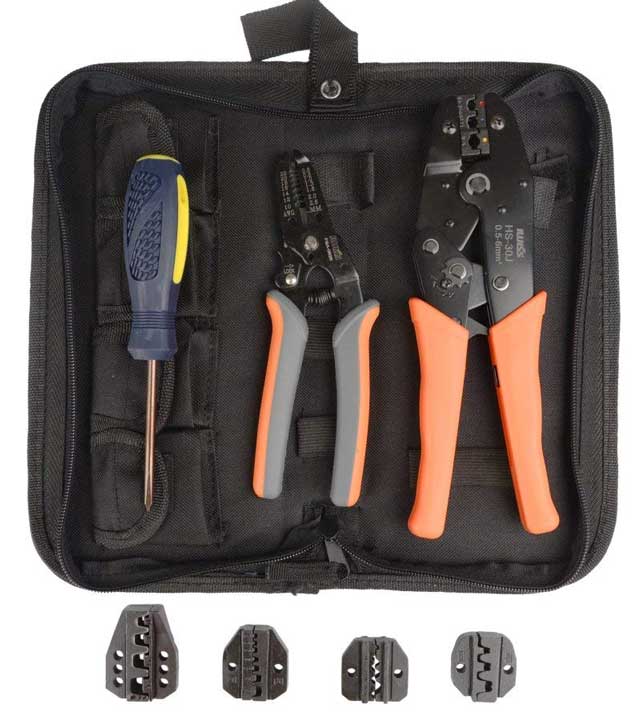 Looking at this photo ABOVE, the style of crimping die normally used for open barrel terminals that are found in my harness pages is the one on the bottom right in this photo. It's most similar to the ABOVE larger photo of my expensive MSD crimper. The other dies might come in handy, so they would be a bonus. I don't own this particular crimper. This one is cheap and might be worth the cost, or it might explode! You can never really tell until it's in your hands, but I would buy one if I didn't already have mine. HERE: https://www.amazon.com/IWISS-Crimping-different-terminals-interchangeable/dp/B0195VXA10/ |
||
| Here's a short, but decent video showing
close-up crimping action for an open barrel
terminal. https://www.youtube.com/watch?time_continue=2&v=8jcfD1UW8SE |
||
|
|
||
|
||
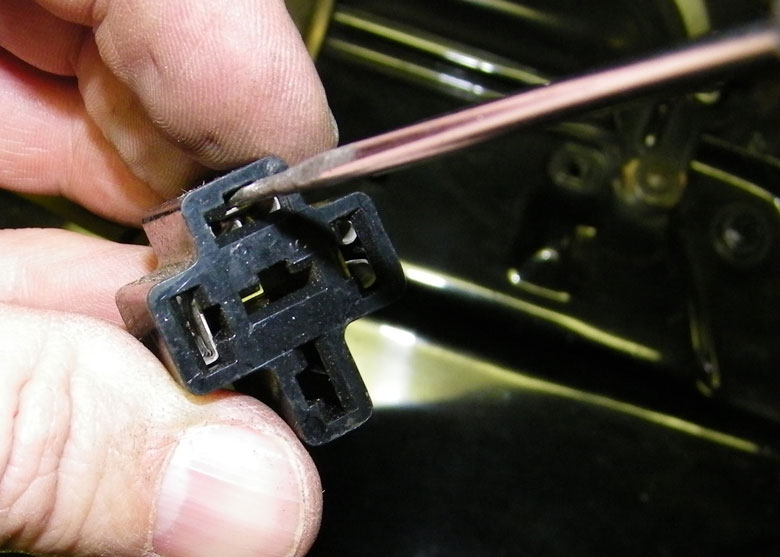
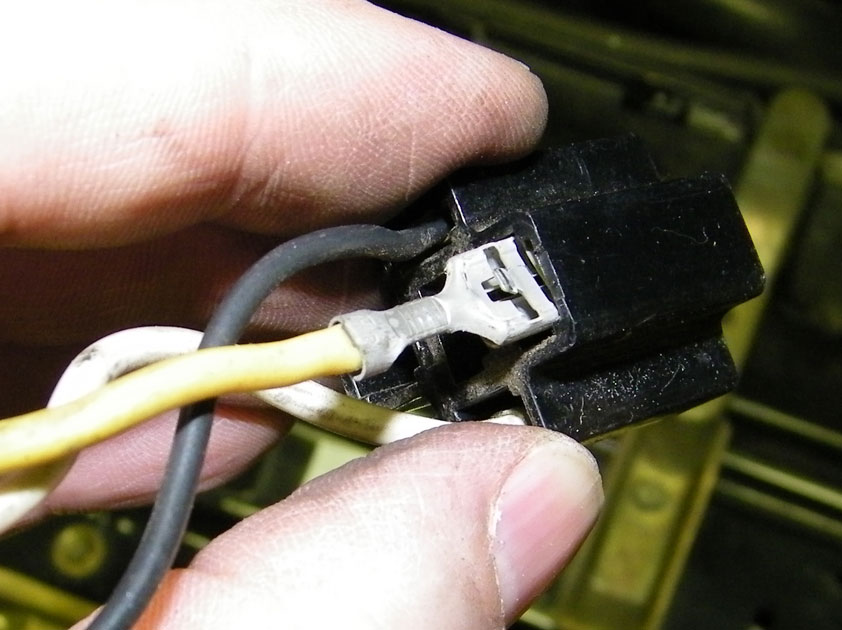
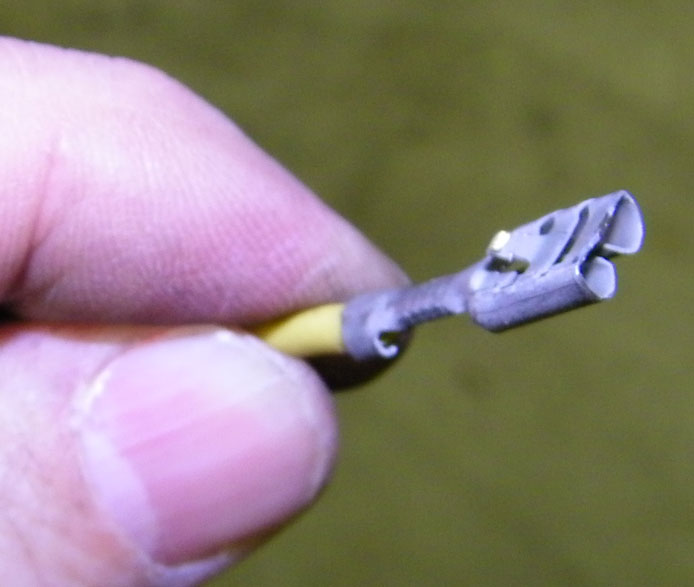
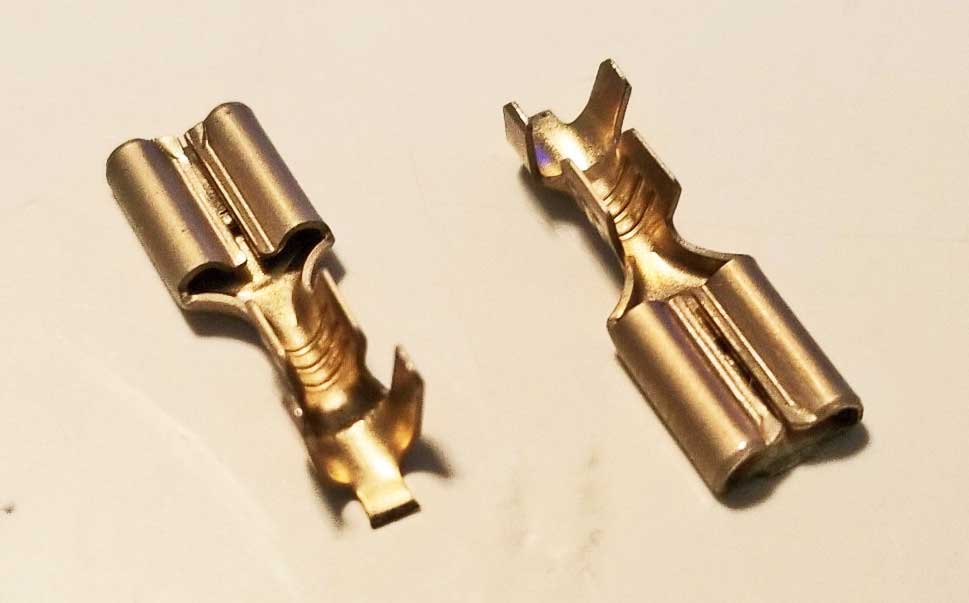
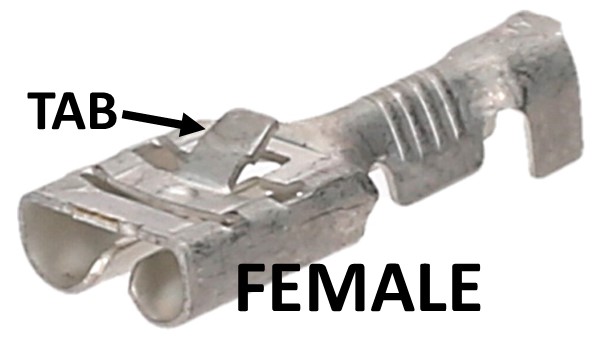 <<< Here's a FEMALE push-on terminal (AKA: Faston). The most common size is .250 inch (6.3 mm). If this terminal is in a connector housing, it will be held in by that tab. In most cases it's a simple task to insert a thin probe or pick from the front and push that tab flat. Then the terminal can be removed from the back of a connector. <<< Here's a FEMALE push-on terminal (AKA: Faston). The most common size is .250 inch (6.3 mm). If this terminal is in a connector housing, it will be held in by that tab. In most cases it's a simple task to insert a thin probe or pick from the front and push that tab flat. Then the terminal can be removed from the back of a connector. 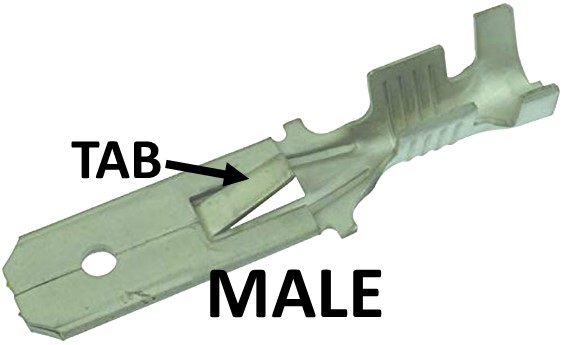 <<< Here's a MALE push-on terminal. <<< Here's a MALE push-on terminal. |
||
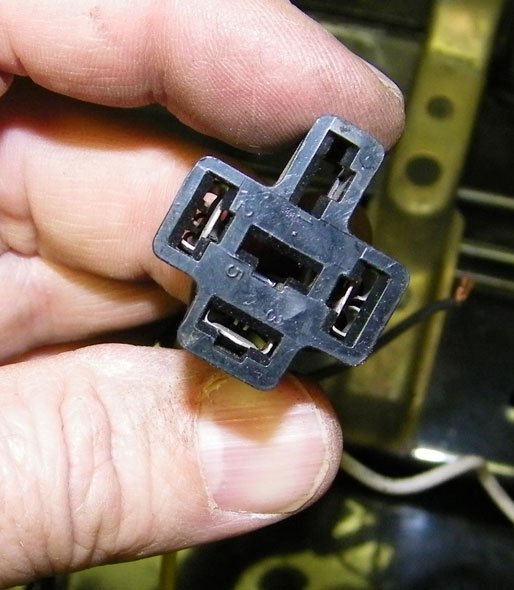
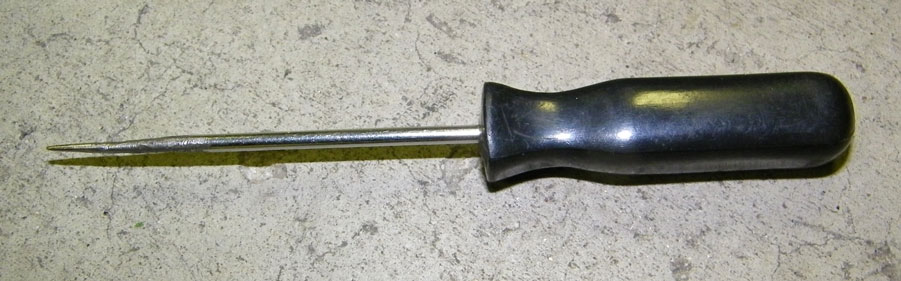
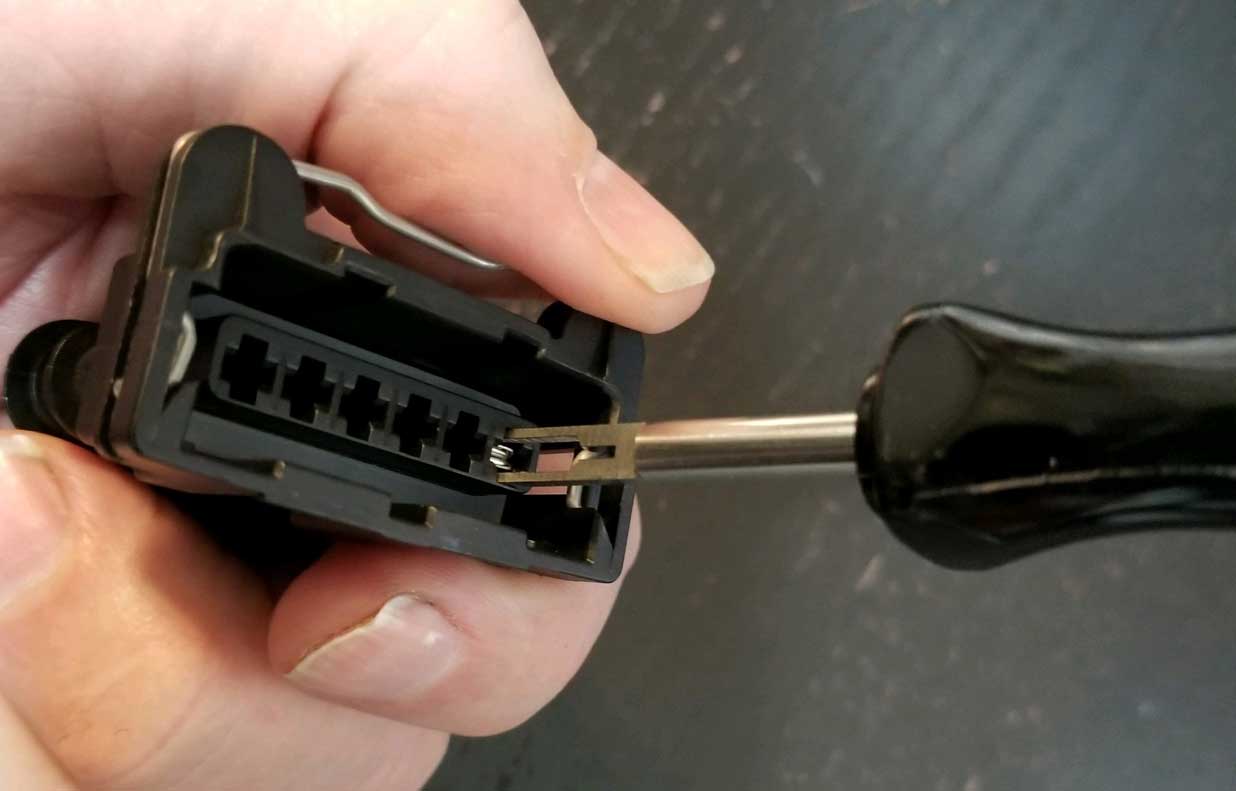
Here we have a typical relay socket plug used in Volvos, which uses the above female push-on terminals. Notice the metal terminals inside the holes of this connector housing? You'll need a tool for this part... a long sharp pick will do. A micro screwdriver can also be used. If your tool is not small enough on the tip, a little grinding will fix it as I did on this pick. Even a stiff piece of piano wire can work for this step. |
||
| Here are a couple videos that show how these terminals are inserted or removed from a connector housing. https://www.youtube.com/watch?v=YdNcIHQRLko |
||
https://youtu.be/_3GoK3xE1gs |
||
|
||
| These style connectors and
terminals are available in Dave's Volvo Page: https://www.prancingmoose.com/blackvinyl.html#EFIplugs |
||
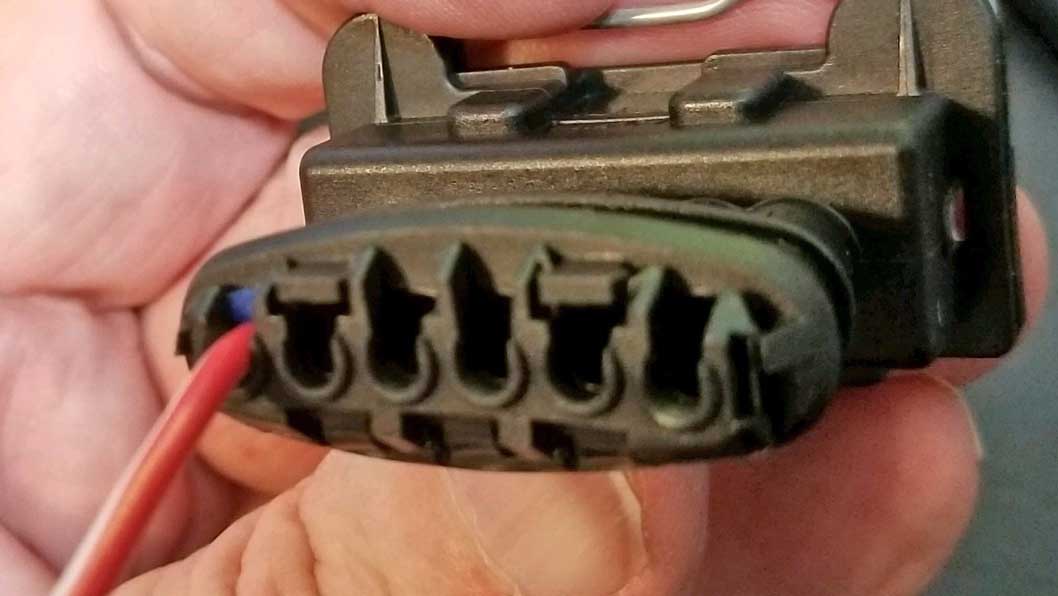
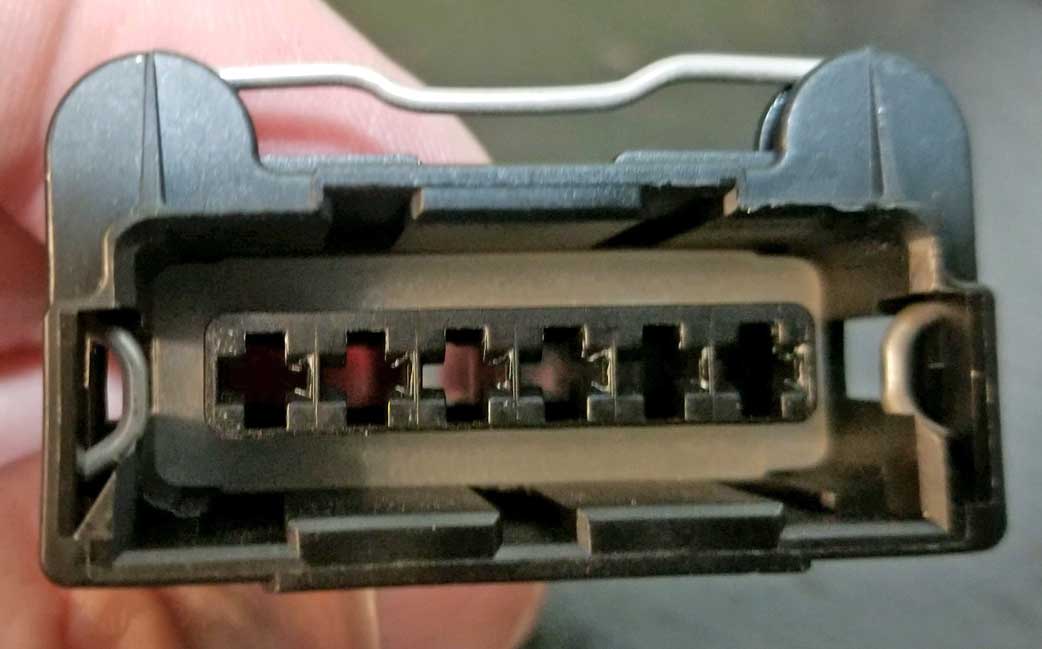 <<<
Here's a typical
sealed EFI connector housing found in many different
Bosch style fuel injection systems. This one
has 6 poles and is most often used for a MAF (mass
air flow) sensor. <<<
Here's a typical
sealed EFI connector housing found in many different
Bosch style fuel injection systems. This one
has 6 poles and is most often used for a MAF (mass
air flow) sensor. This connector housing uses FEMALE crimp terminals, so this housing is known as a FEMALE housing. Inserting or removing a crimp terminal from one of these housings is easy, but if you're never done this before, this page will show you how. |
||
|
|
||
 <<< Connector housings
like these come in a number of different
configurations. The most common one is a
2-pole connector shown here used for a Bosch
style fuel injector. This particular style connector is
also known as an EV-1 connector. They all
use the same style crimp terminals that are
inserted into these housings from the rear after
being crimped onto a wire. <<< Connector housings
like these come in a number of different
configurations. The most common one is a
2-pole connector shown here used for a Bosch
style fuel injector. This particular style connector is
also known as an EV-1 connector. They all
use the same style crimp terminals that are
inserted into these housings from the rear after
being crimped onto a wire. |
||
|
|
||
| <<< Here's a typical
ratcheting terminal crimper that works well for these
EFI terminals (same MSD crimper described
near the top of this page). |
||
| The
below video will offer a quick view of this type of
crimping operation. https://www.youtube.com/watch?v=LXDedfvmI_0 (length: 1:34) |
||
|
|
||
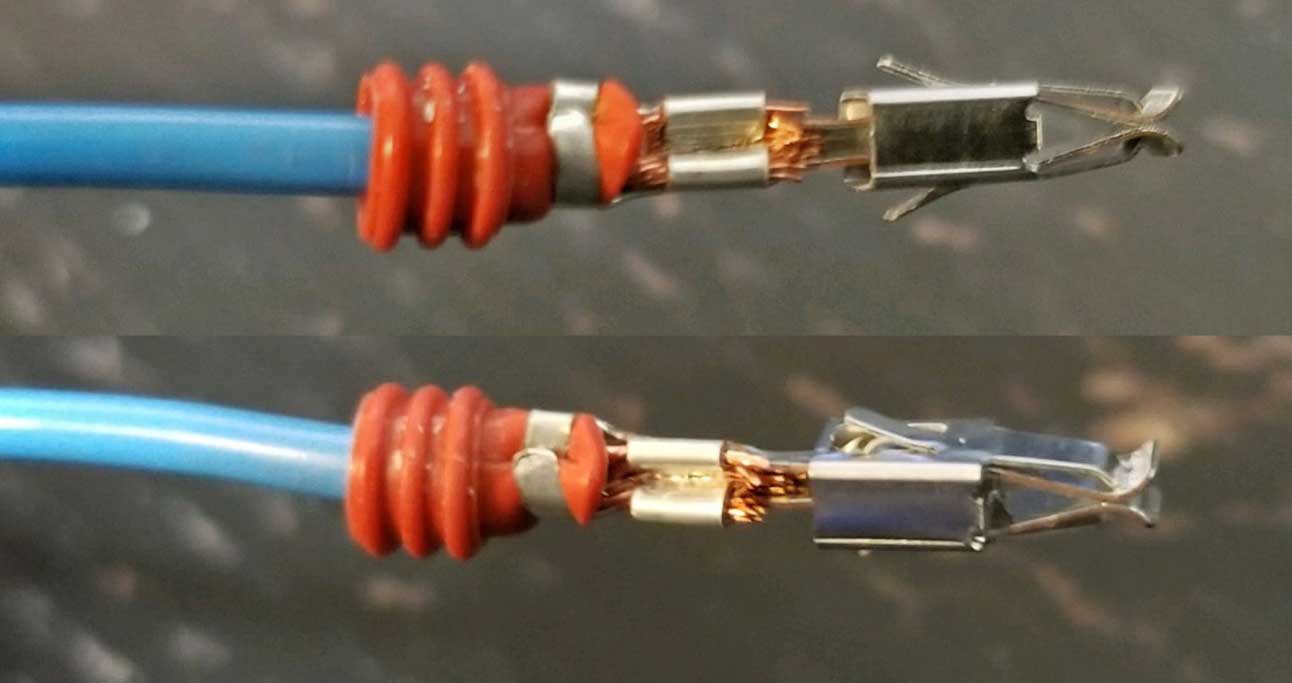
| EFI TERMINALS The Terminals below are TYPE 1 EFI Terminals (Early type). |
||
| These terminals are most often found in Volvo engine harnesses up to approximately 1987, however if you have a harness from Dave's Volvo Page the terminal will usually be the Type 2 (BELOW). | ||
 <<<
If you're learning to
crimp these, it will take some
practice before your crimps come out just right.
The wire needs to be tightly crimped, but not so tight
that the terminal cuts into the wire strands. The crimp on the
insulation does not need to be super tight. Just make it tight
enough to stabilize the insulation portion, but not s tight that it cuts through it.
<<<
If you're learning to
crimp these, it will take some
practice before your crimps come out just right.
The wire needs to be tightly crimped, but not so tight
that the terminal cuts into the wire strands. The crimp on the
insulation does not need to be super tight. Just make it tight
enough to stabilize the insulation portion, but not s tight that it cuts through it. Be sure to remember to pull on the wire to TEST it after crimping. It should not pull free. |
||
|
|
||
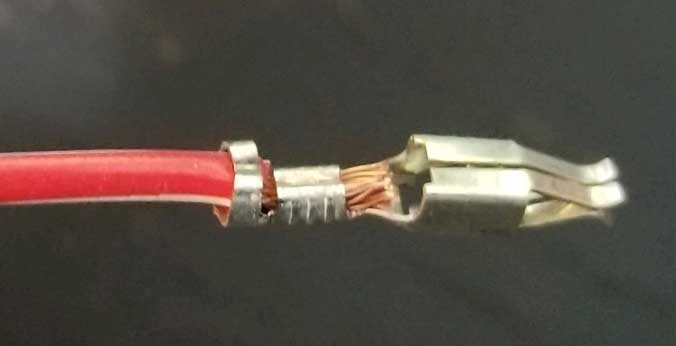
 <<< An EFI TYPE 1 terminal
will have a single HOOK
(or spur) sticking out like that one on the underside. That hook
will be what holds this terminal in place inside the
connector housing. <<< An EFI TYPE 1 terminal
will have a single HOOK
(or spur) sticking out like that one on the underside. That hook
will be what holds this terminal in place inside the
connector housing. |
||
|
|
||
 <<< As the TYPE 1 crimped
terminal is inserted into the rear of the connector
housing, that hook (or spur) will click into place when it
reaches the end and is fully inserted. <<< As the TYPE 1 crimped
terminal is inserted into the rear of the connector
housing, that hook (or spur) will click into place when it
reaches the end and is fully inserted. |
||
|
|
||
When
fully
inserted, you should hear the hook CLICK into place.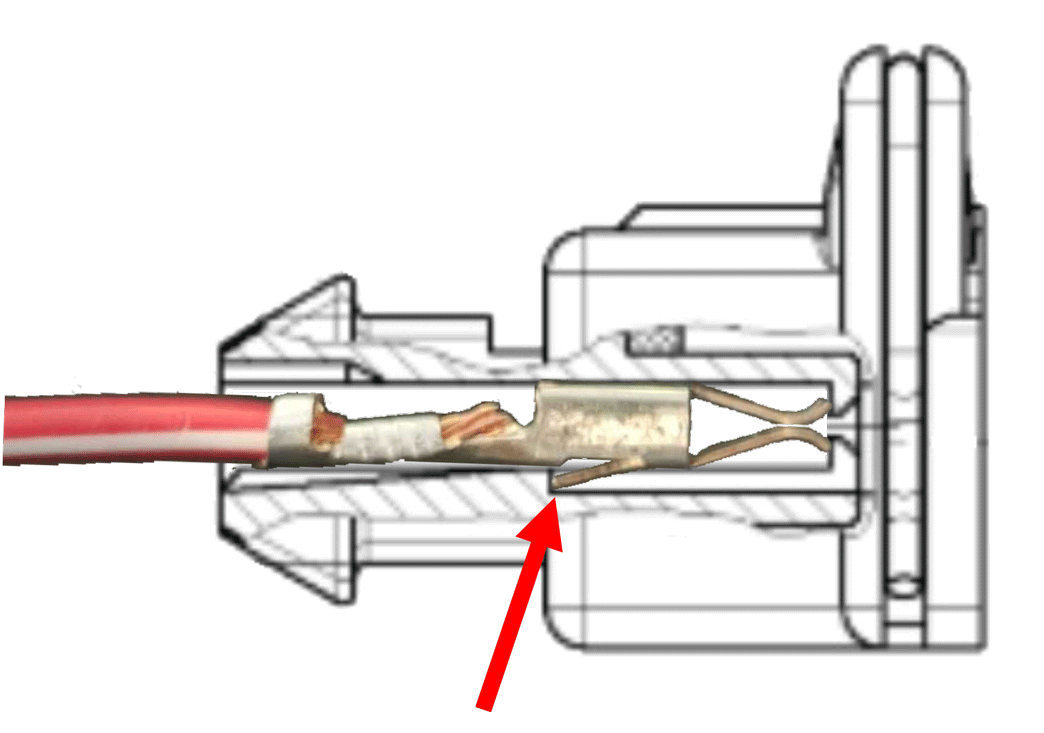
|
||
|
|
||
 <<< Here's the backside of
an EFI connector. That hinged piece on the
bottom is there to help lock in the wire or wire
seals, if used. That hinged piece will not be present
on all EFI connectors like this and there are plenty
of these connectors out there without that part. Those work just
as well. <<< Here's the backside of
an EFI connector. That hinged piece on the
bottom is there to help lock in the wire or wire
seals, if used. That hinged piece will not be present
on all EFI connectors like this and there are plenty
of these connectors out there without that part. Those work just
as well. |
||
|
|
||
 <<<
Here I'm inserting a
crimped TYPE 1 terminal into the rear of the connector
housing. It has a silicone
wire seal installed on the wire before
crimping the terminal. Some prefer crimping the seal
onto the back of the terminal as you'll see below.
<<<
Here I'm inserting a
crimped TYPE 1 terminal into the rear of the connector
housing. It has a silicone
wire seal installed on the wire before
crimping the terminal. Some prefer crimping the seal
onto the back of the terminal as you'll see below.A wire seal like this is optional. If you decide to use a rubber boot on the back of this connector, a wire seal is not needed. |
||
|
|
||
 <<<
Once the terminal is
inserted, then the wire seal can be pushed up the
wire and into the hole.
<<<
Once the terminal is
inserted, then the wire seal can be pushed up the
wire and into the hole. |
||
|
|
||
 <<< If your connector
housing has the hinged piece, it can then be closed to
lock in the wire and seal. If your housing does
not have it, you can certainly still insert a wire
seal and it should stay in place without the need for
a locking device, especially if you decide to crimp
the wire seal onto the terminal as shown below.
<<< If your connector
housing has the hinged piece, it can then be closed to
lock in the wire and seal. If your housing does
not have it, you can certainly still insert a wire
seal and it should stay in place without the need for
a locking device, especially if you decide to crimp
the wire seal onto the terminal as shown below. |
||
| Removing TYPE 1 EFI Terminals. | ||
| These terminals are most often found in Volvo engine harnesses up to approximately 1987, however if you have a harness from Dave's Volvo Page the terminals will usually be the Type 2 (HERE). | ||
 <<< If you need to remove a TYPE 1
terminal from a housing, a simple tool can be used. This can be a sharp pick or even a small micro
screwdriver. The pick is inserted into the
front of the connector housing to reach the hook (shown below).
The goal is to push that hook inward toward the terminal so
it gets released from the housing and the terminal and wire
can then be pulled out the rear of the housing. <<< If you need to remove a TYPE 1
terminal from a housing, a simple tool can be used. This can be a sharp pick or even a small micro
screwdriver. The pick is inserted into the
front of the connector housing to reach the hook (shown below).
The goal is to push that hook inward toward the terminal so
it gets released from the housing and the terminal and wire
can then be pulled out the rear of the housing. |
||
|
|
||
Here's an illustration of a Type 1 terminal and how the above pick will depress the hook (or spur) to allow the terminal to be released. Then the terminal can be backed out and removed from the rear of the housing.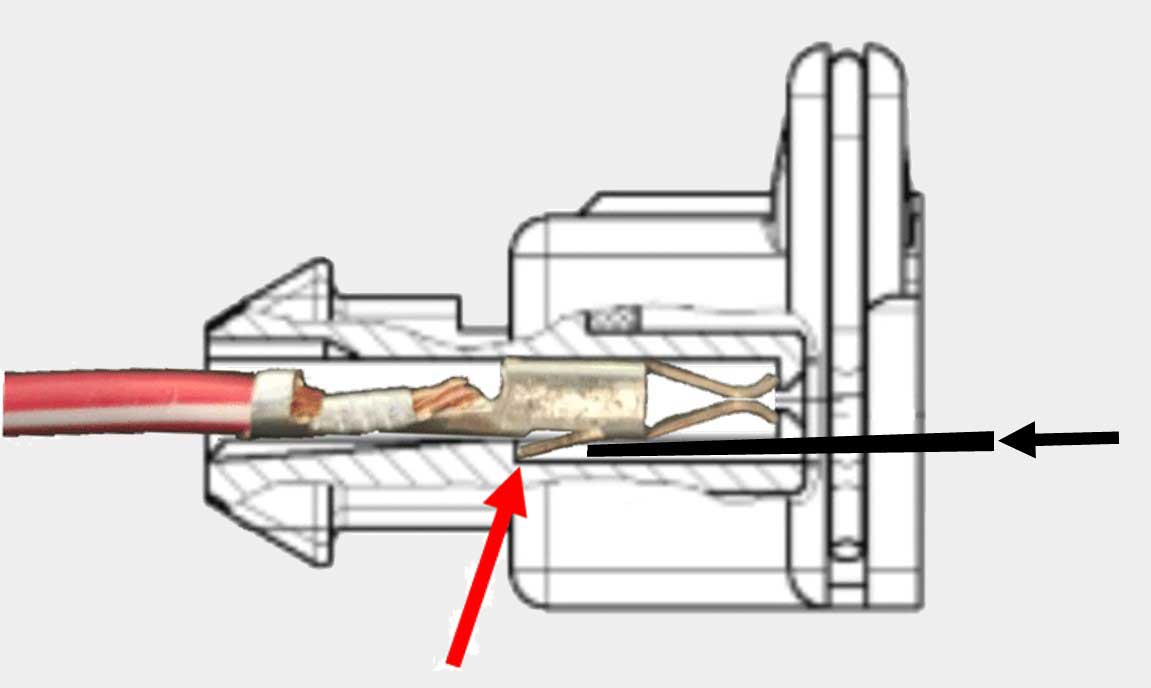 If you want to invest in a special tool, this expensive Rennsteig tool shown in the Type 2 section BELOW also works fairly well to release this terminal. 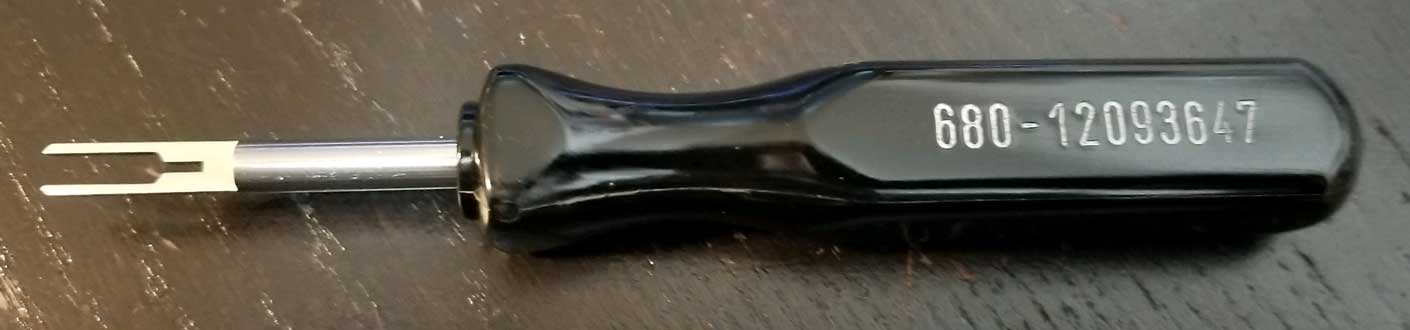 |
||
|
|
||
| <<< Type 1 CAUTION: If you remove a
terminal from a housing and intend to RE-USE it or RE-INSERT it into the connector, first inspect
the hook (or spur) to
make sure it's still sticking out. If you bent the
hook inward and it's still bent inward, it may not
catch when re-inserted. So you should carefully re-bend it back outward
so it'll click into place when re-inserted. |
||
|
|
||
| The Terminals below are TYPE
2 EFI Terminals (Later type). These terminals are most often found in Volvo engine harnesses made after 1987 |
||
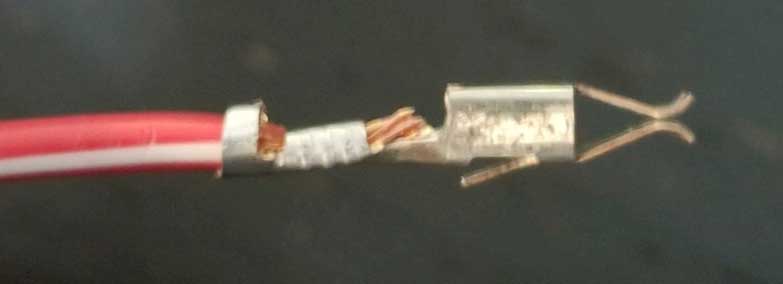
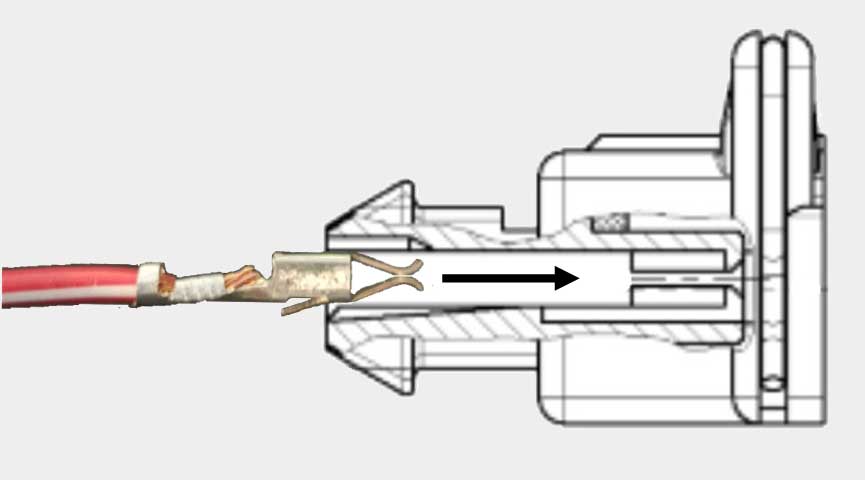
 <<< An EFI TYPE 2
terminal will have TWO
HOOKS (or spurs) sticking
out like these on either side. These hooks will be
what holds this terminal in place inside the connector
housing. <<< An EFI TYPE 2
terminal will have TWO
HOOKS (or spurs) sticking
out like these on either side. These hooks will be
what holds this terminal in place inside the connector
housing. In this photo a silicone wire seal has been added. As mentioned above, this type of seal is optional. It may be used instead of a rubber boot. It you decide to use a rubber boot, then these seals are not needed. This seal has been crimped onto the back of the terminal. This is not required. It can just be slid onto the wire too. It's up to your preference. |
||
|
|
||
As the TYPE 2 crimped
terminal is inserted into the rear of the connector
housing, those two hooks will click into place when it
reaches the end and is fully inserted. 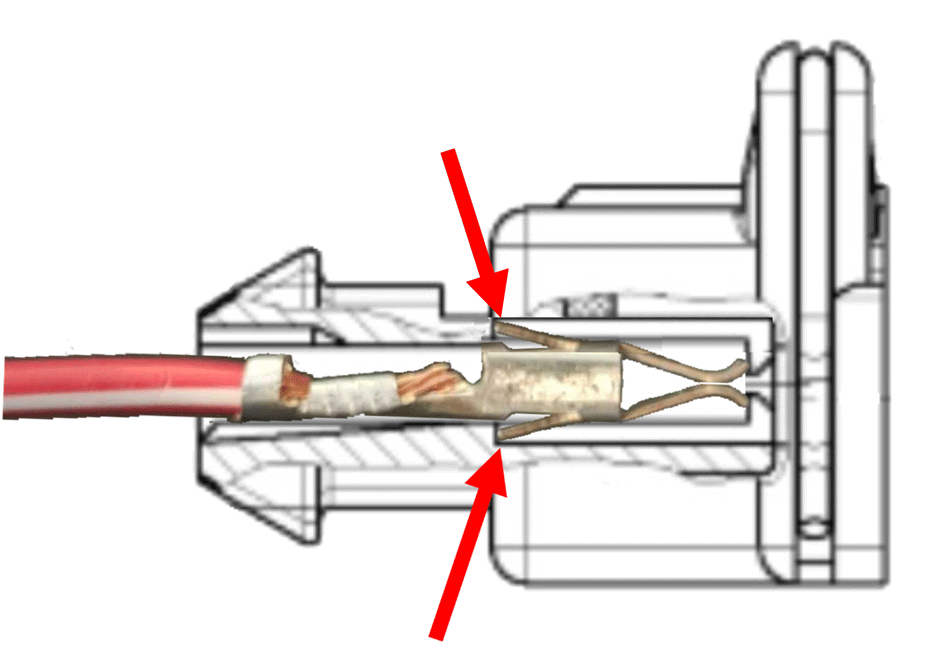 When fully inserted from the rear, you should hear the hooks CLICK into place. |
||
|
|
||
|
RENNSTEIG TOOL:
Since the TYPE 2 terminal
has two hooks, it will be much more difficult to
release it from a connector housing using a simple pick. It's possible
to use TWO PICKS (like used for the Type 1), however a better designed tool can make life easier. This tool made by Rennsteig PN 680-12093647 works fairly well, but it's EXPENSIVE.
https://www.digikey.com/en/products/detail/rennsteig-tools-inc/680-12093647/13573494 OR keep reading below for a great hack I found that work very well and won't cost very much. |
||
|
|
||
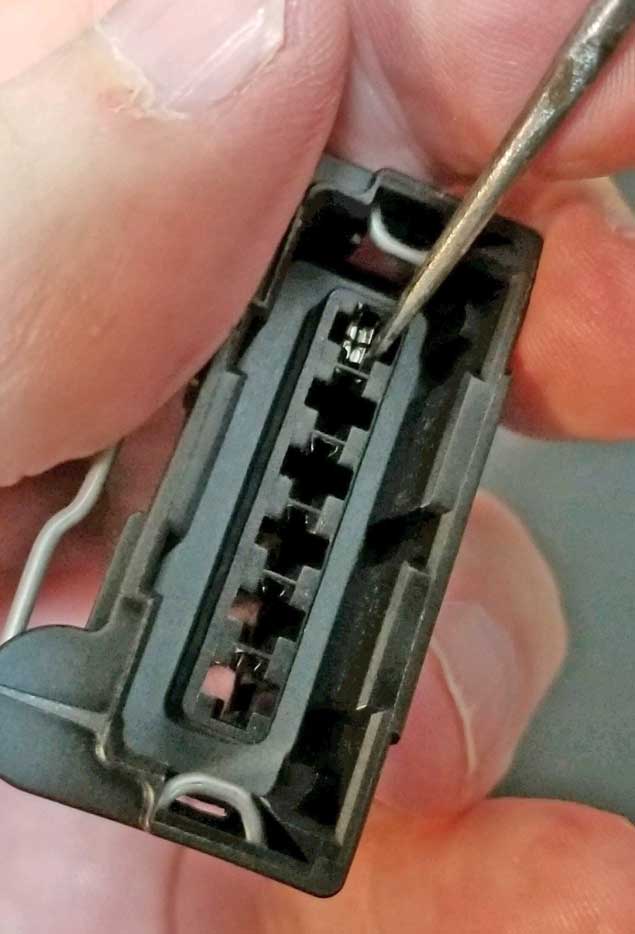
 This special tool is inserted as shown ABOVE. It will depress the TWO HOOKS at the same time. Then the wire and terminal is usually easier to pull out from the rear of the connector housing. |
||
|
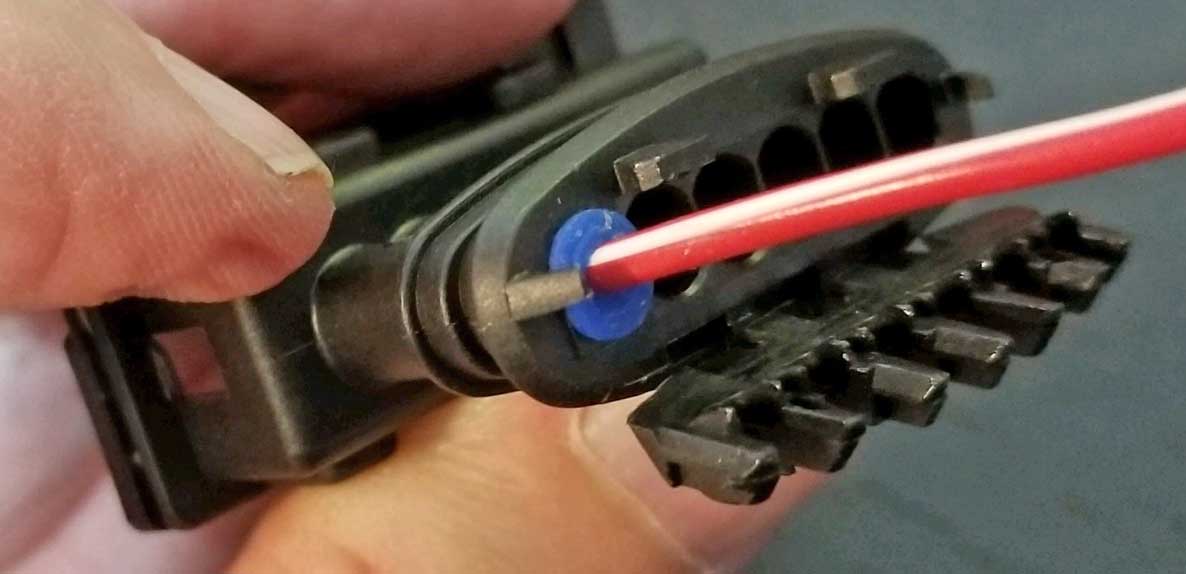
ALTERNATE CHEAP HACK THAT WORKS REALLY WELL for TYPE 2 Terminals:
REMOVING THESE TERMINALS WITH A FLAT BOBBY PIN. Here's a video someone made for a home-made tool to remove this terminal using a FLAT BOBBY PIN.
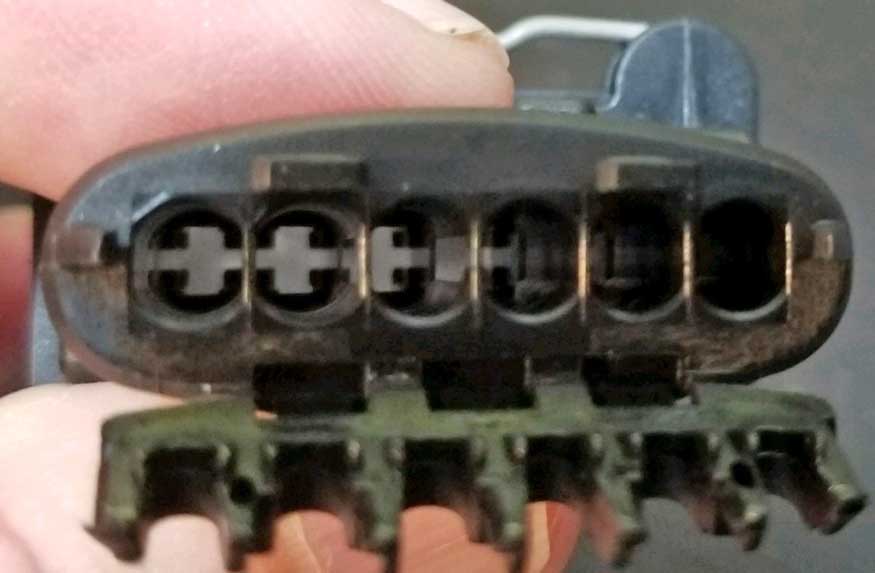
https://www.youtube.com/watch?v=oDWKcAiLJ_Y So I bought some flat bobby pins and made a tool to see how it worked. These pins are from Amazon: amazon.com/dp/B07NV3D6FN  Many bobby pins now are made with ROUND wire. Those are NO GOOD for this. They must be FLAT WIRE like pictured.
These bobby pins are about 2 inches long and about 2 mm wide. The top of the cross shaped hole in the connector (photo below) is also about 2 mm wide. This pin is a tight fit, so I trimmed and straightened the pin and then I shaved down the sides a little with a bench grinder so it fit easier into the hole. Then I also trimmed the ends down a little thinner to a be more of a point, like shown below. That tip helped a lot to make these work much better. Plus the ends should slightly curve inward, as suggested in the above video. This bobby pin is made with a very stiff metal, so removing some metal like I did didn't make it too weak. 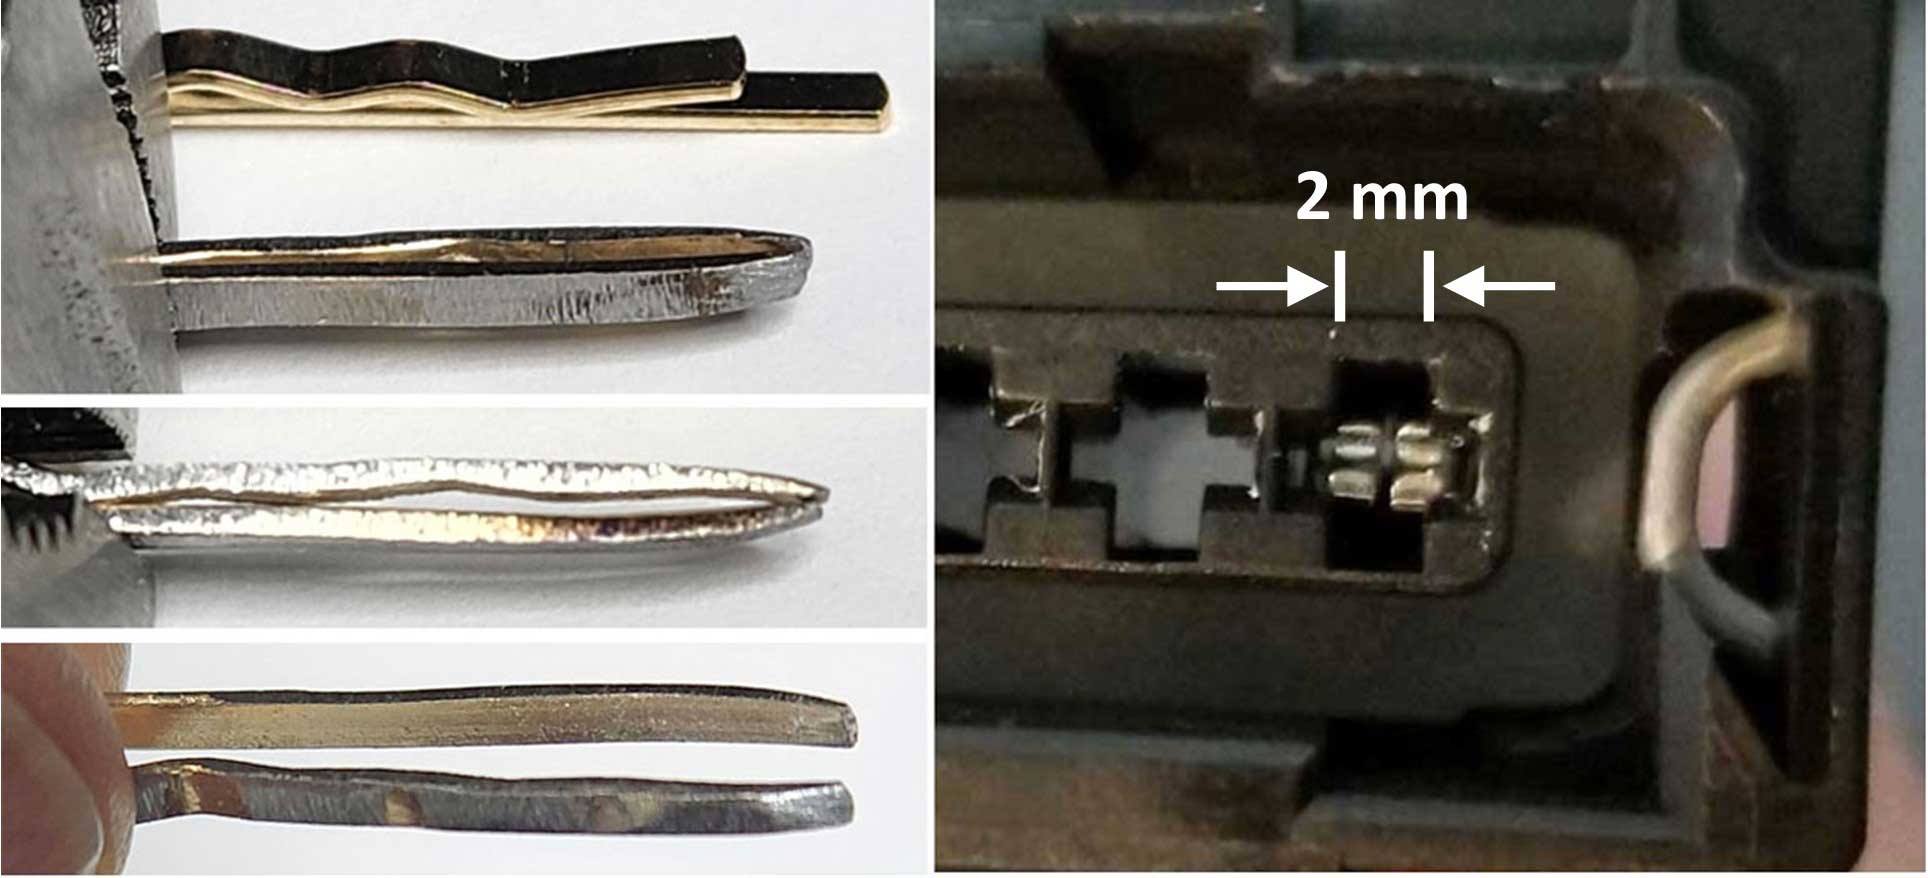 In the end, I think this home-made tool actually works BETTER for a TYPE 2 terminal than the expensive Rennsteig tool. Here's a short video from HandyDan on releasing ECU terminals on a Volvo P80 harness.
https://www.youtube.com/watch?v=QtYe8ph9zic Large 25-Pole or 35-Pole EFI Housings for LH ECU or EZK ICU.
Disassembling and removing terminals from a large ECU connector will be very similar to the above procedures. Many of these connector made before 1987 will have Type 1 terminals. After 1987 you'll probably find Type 2 terminals.  The above connector has three Phillips screws to remove first.
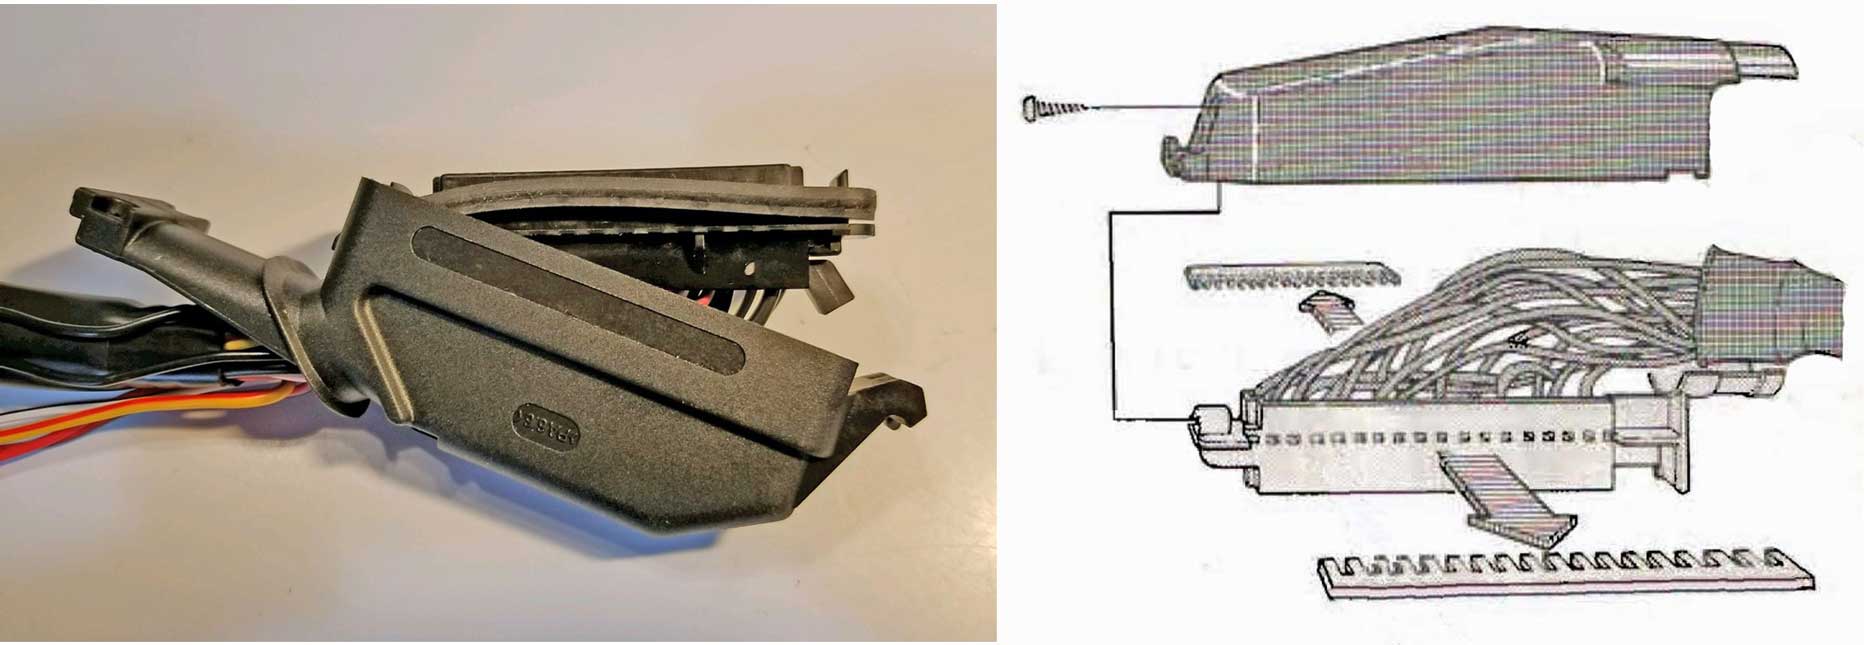 Some original Bosch connectors also have locking combs as shown in the RIGHT image. If present, that comb needs to be slide outward before the terminals can be released. Non-Bosch (aftermarket) connectors usually will not have this locking comb device. If you need to release any terminals, you may use the same procedures shown in the above section to release the Type 1 or Type 2 terminals. | ||
| RUBBER BOOTS |
||
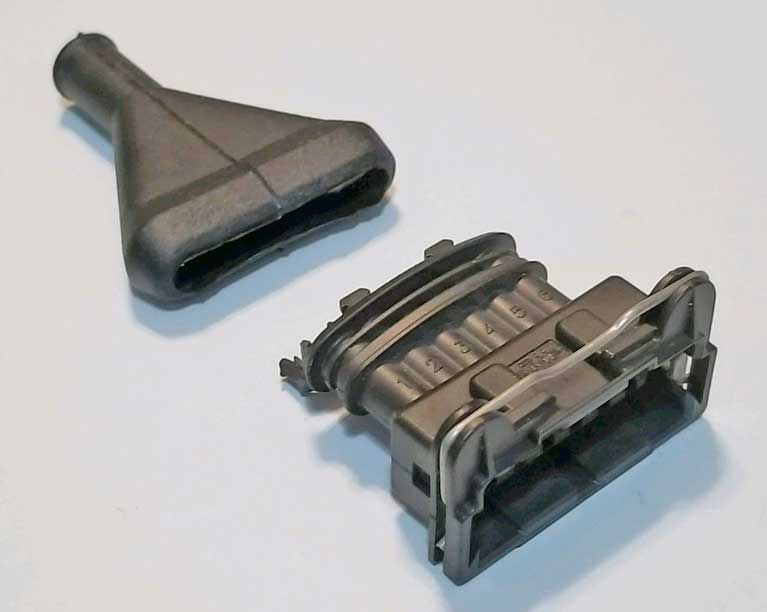 <<< Here we
have a rubber boot that mates to the 6 or 7-pole connector housing.
If you're using a
rubber boot, then using individual wire seals will not be
necessary. <<< Here we
have a rubber boot that mates to the 6 or 7-pole connector housing.
If you're using a
rubber boot, then using individual wire seals will not be
necessary. |
||
| These connectors are available in Dave's Volvo Page: https://www.prancingmoose.com/blackvinyl.html#EFIplugs | ||
Crimping Large Cable Battery Lugs. |
||
| Lots of people have a tool like this one pictured. This one is from 12 Volt Planet,
but there are many other versions available everywhere. I prefer using a VISE with this tool, NOT A HAMMER. This tool is functional and offers pretty good side support for the cable lug. There are better and much more expensive tools, but this one is pretty cheap and better than just smacking the lug with a punch or a screwdriver. The disadvantage to this tool and others that use a vise is it's hard to crimp a lug under your hood. 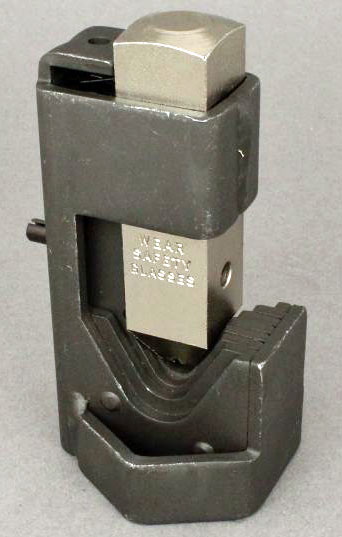 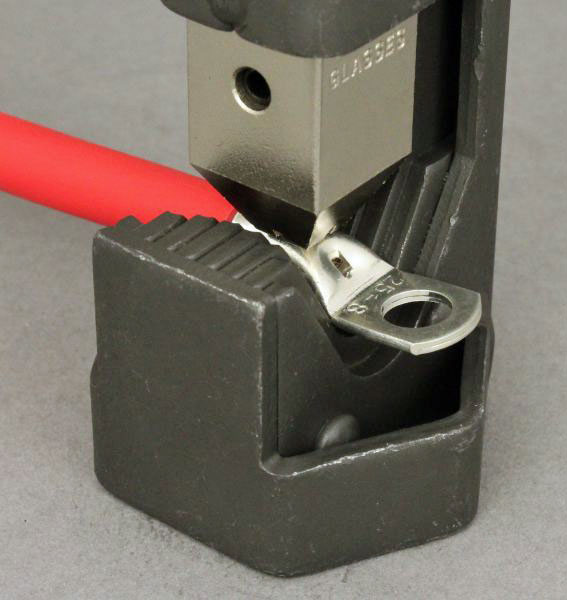
|
||
Lots of people have old tubing flaring tools laying around. Here's a new use for half of your flaring tool in a vise that also offers good side support for a large lug when crimping. This photo is from plan-to-build.com/making-lugs-for-3-0-cable-from-copper-pipe/. 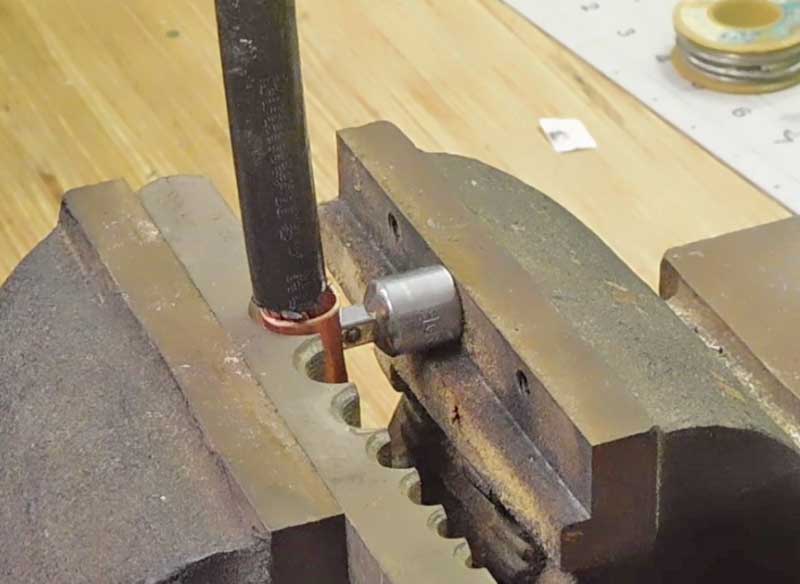 This inexpensive flaring kit from Harbor Freight will go up to 5/8 inch O.D. https://www.harborfreight.com/7-piece-tube-flaring-kit-5969.html 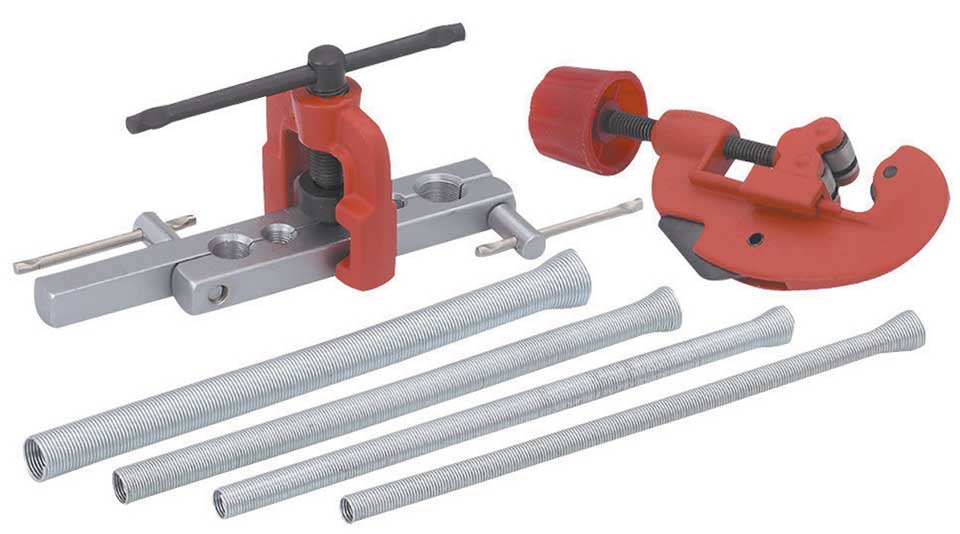
|
||
| Large Crimping Tools | ||
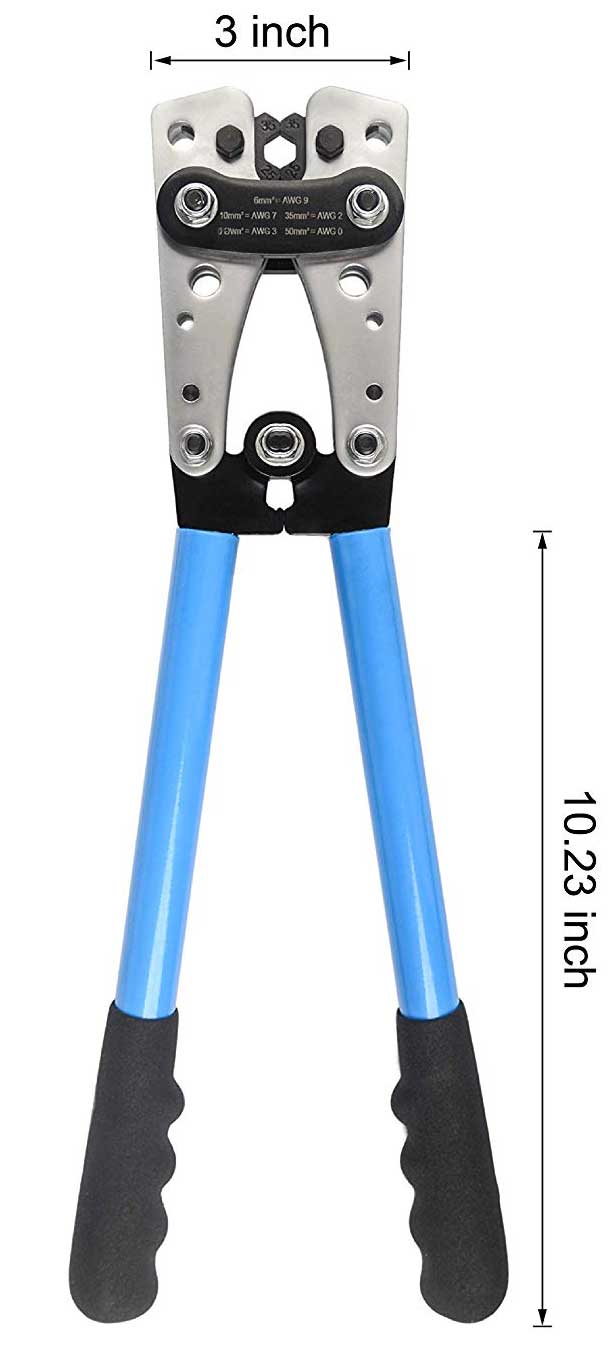 <<< If you will be doing frequent battery lug crimps or if you need to do crimps like this under your hood,
you might want a large crimping tool. These can be expensive, but
if you're been looking on-line, you've probably seen something like
this IWISS Terminal Crimping Tool on Amazon. It advertises the ability to crimp a number of large METRIC sizes, but according to the below video it slightly misses the mark if you want perfect AWG
size crimps. But for the price (under $30) it might be good
enough, especially if you have some tools to modify the crimping dies to
better fit your needs. <<< If you will be doing frequent battery lug crimps or if you need to do crimps like this under your hood,
you might want a large crimping tool. These can be expensive, but
if you're been looking on-line, you've probably seen something like
this IWISS Terminal Crimping Tool on Amazon. It advertises the ability to crimp a number of large METRIC sizes, but according to the below video it slightly misses the mark if you want perfect AWG
size crimps. But for the price (under $30) it might be good
enough, especially if you have some tools to modify the crimping dies to
better fit your needs. |
||
|
|
||
|
||
 Basic crimping with nylon butt splices. https://www.youtube.com/watch?v=UfXi60hu5zM |
||
|
||
 |
||
| https://www.youtube.com/watch?v=ArOHcJ4bBqM |
||
| SOLDERING BUTT JOINTS | ||
I have NOT normally been a fan of soldering when building an automotive engine harness. Above photo from How to Splice Wires: https://learn.sparkfun.com/tutorials/working-with-wire/how-to-splice-wires Solder is fragile and tends to crack when subjected to vibration, rattling, movement, heat, or a combination of these. If an auto harness connection cracks, it will lead to immense frustration and THEN you'll hopefully have learned your lesson. Solder is just find for wires that will NOT be bouncing, rattling or vibrating. It's good for an electronic device in your house, but I don't prefer it in a car. For the very best conductivity in a butt joint, copper wires should be joined together COPPER touching COPPER or joined by a butt connector. COPPER TOUCHING COPPER or COPPER TOUCHING METAL is best. If you like SOLDERING, soldering PLUS crimping can work well in a car harness. 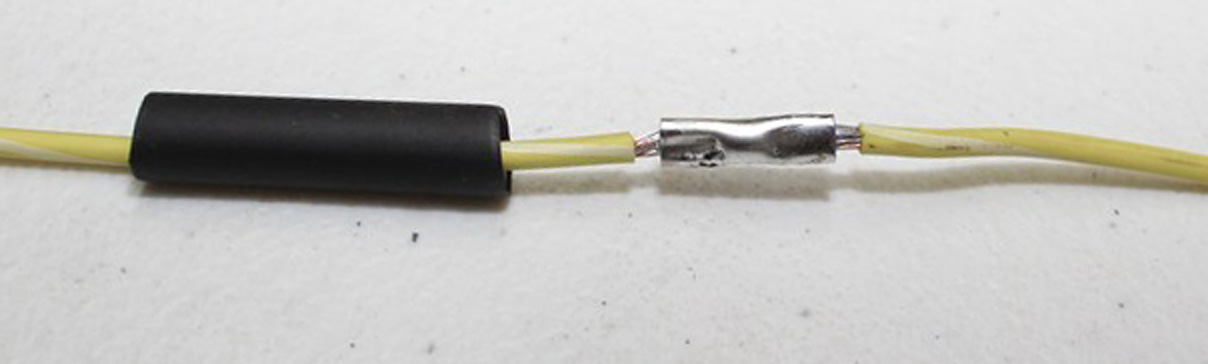 It's obviously a lot more work than just crimping, but it's a lot stronger. Here's a video below demonstrating the use of solder AFTER crimping a battery lug. Below video: https://www.youtube.com/watch?v=XkMdlPsBxkc |
||
|
|
||
| SOLDER BUTT CONNECTORS |
||
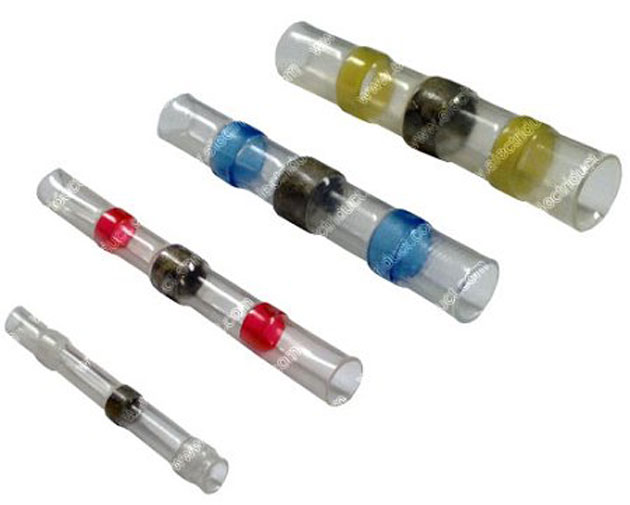 These are popular, but be aware these are not miracle connectors. These do not offer a CRIMP. These have a low-temp melt solder inside that melts at a much lower temperature than normal solder. Normally a heat gun will not get hot enough to melt solder, but low-temp solder will melt as low as 200 to 300 degrees Fahrenheit. I would not use these under my hood in an area that gets very hot, but these would be OK inside the car. The tubing will shrink and seal the connection, which is a good thing. |
||
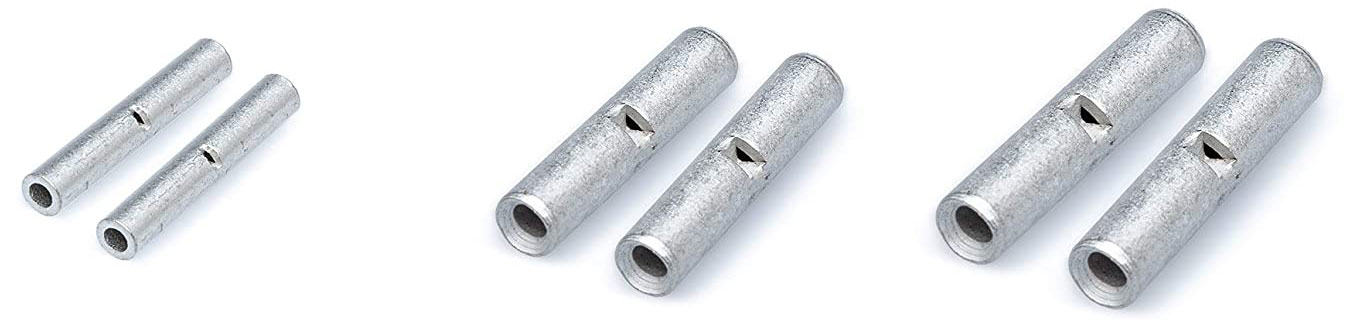
| CRIMP AND SOLDER BUTT CONNECTORS | ||
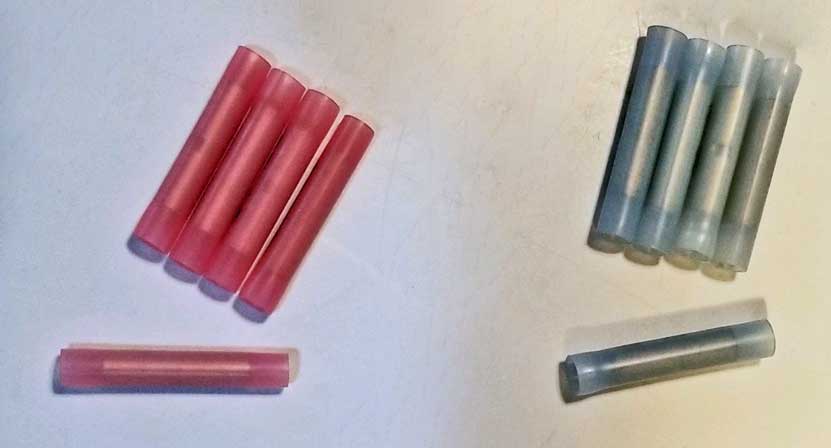
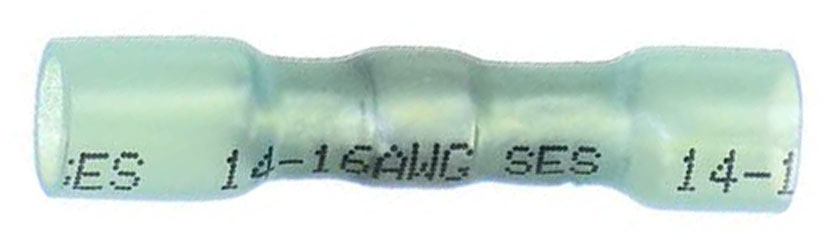 These butt connector have a metal butt crimp inside for a strong, secure connection, plus low-temp solder in the center, which will melt when heated. The plastic tube will also shrink down and seal the connection well (adhesive lined inside, which melts and glues the connection tight. These connectors are expensive, costing as much as almost $1.00 each. They come in sizes for wire in 18-20 AWG, 14-16 AWG, or 10-12 AWG. |
||
| WIRE TWIST BUTT JOINTS No Crimping, No Solder, but would I do this in a car? NO. |
||
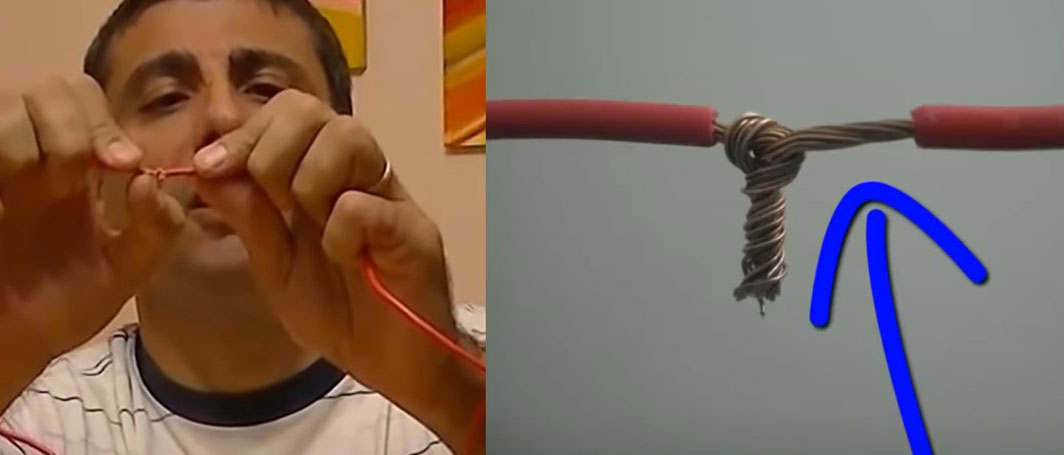 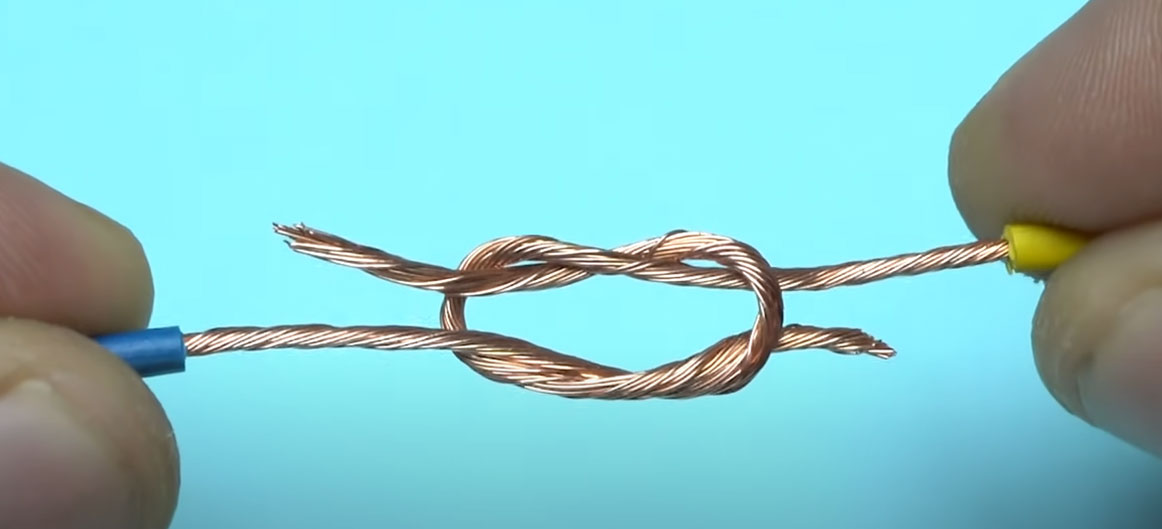 There are a number of videos showing how to twist wire together effectively WITHOUT using solder or butt crimps. Here are a few methods below. Just keep handy a supply of some different sizes of HEAT-SHRINK TUBING to cover them. |
||
| https://www.youtube.com/watch?v=xBw5hrV3aZM |
||
| https://www.youtube.com/watch?v=RdTQ1W07GRE&t=251s |
||
| https://www.youtube.com/watch?v=ZSS6ZNCuiPI |
||
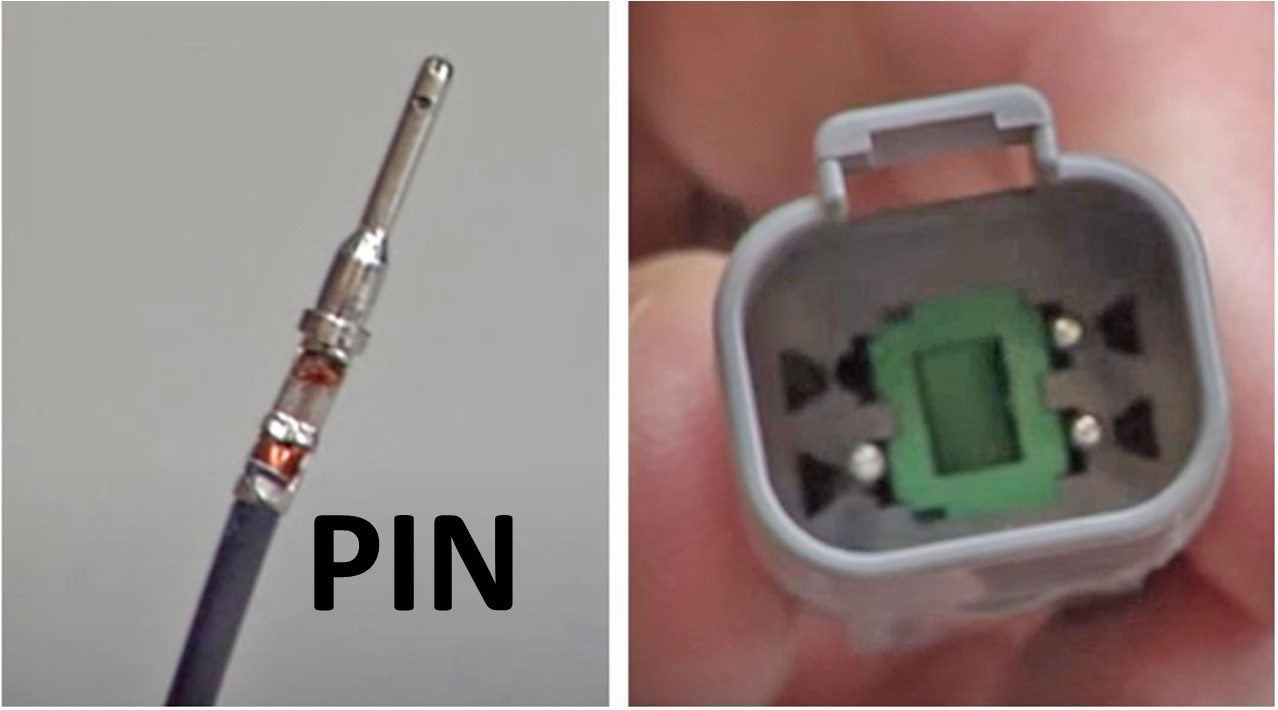
| DEUTSCH DT CONNECTORS Detailed Explanation |
| DEUTSCH DT connectors are 100% interchangeable (every piece) with Amphenol AT Series connectors. | ||||||||||||||||||
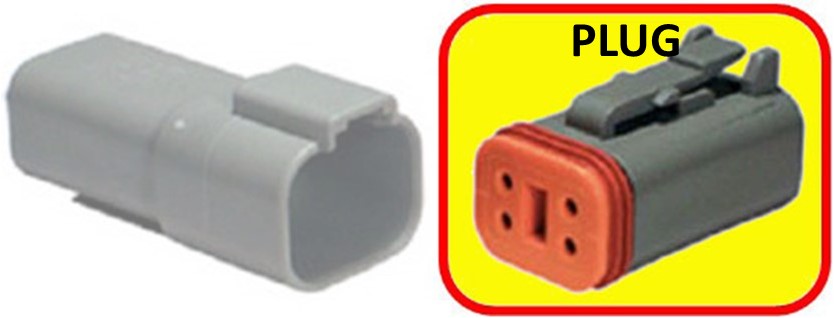
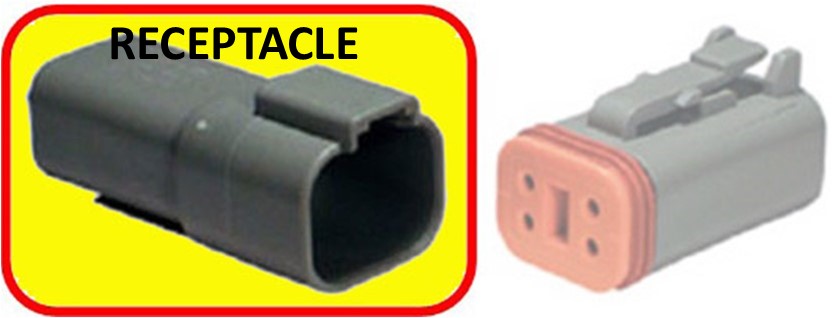
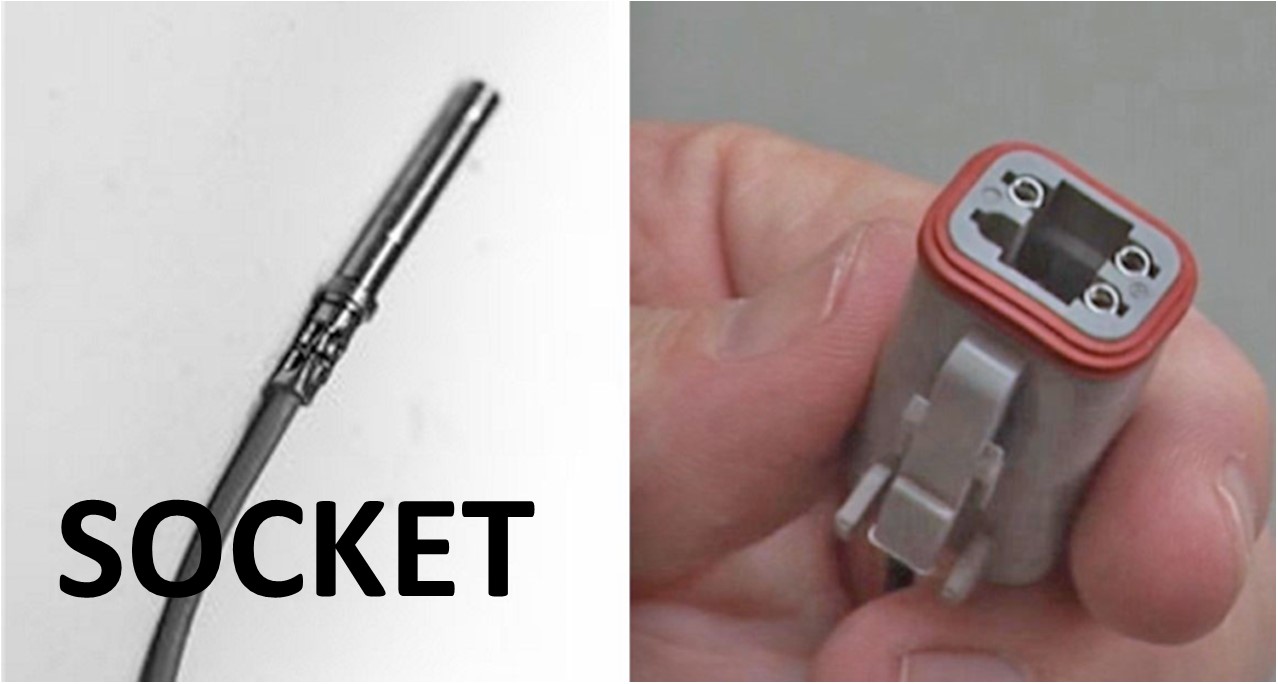
Hard to spell, but Deutsch connectors are very good. They are fully sealed, easy to use connectors suitable for almost any automotive application. Deutsch connectors are sold by TE Connectivity, formerly Tyco Electronics. I like these connectors, so I thought I'd highlight them here. I don't offer these in my pages, because they're available pretty much everywhere. But I use them and they are great connectors. Common Deutsch Part Numbers 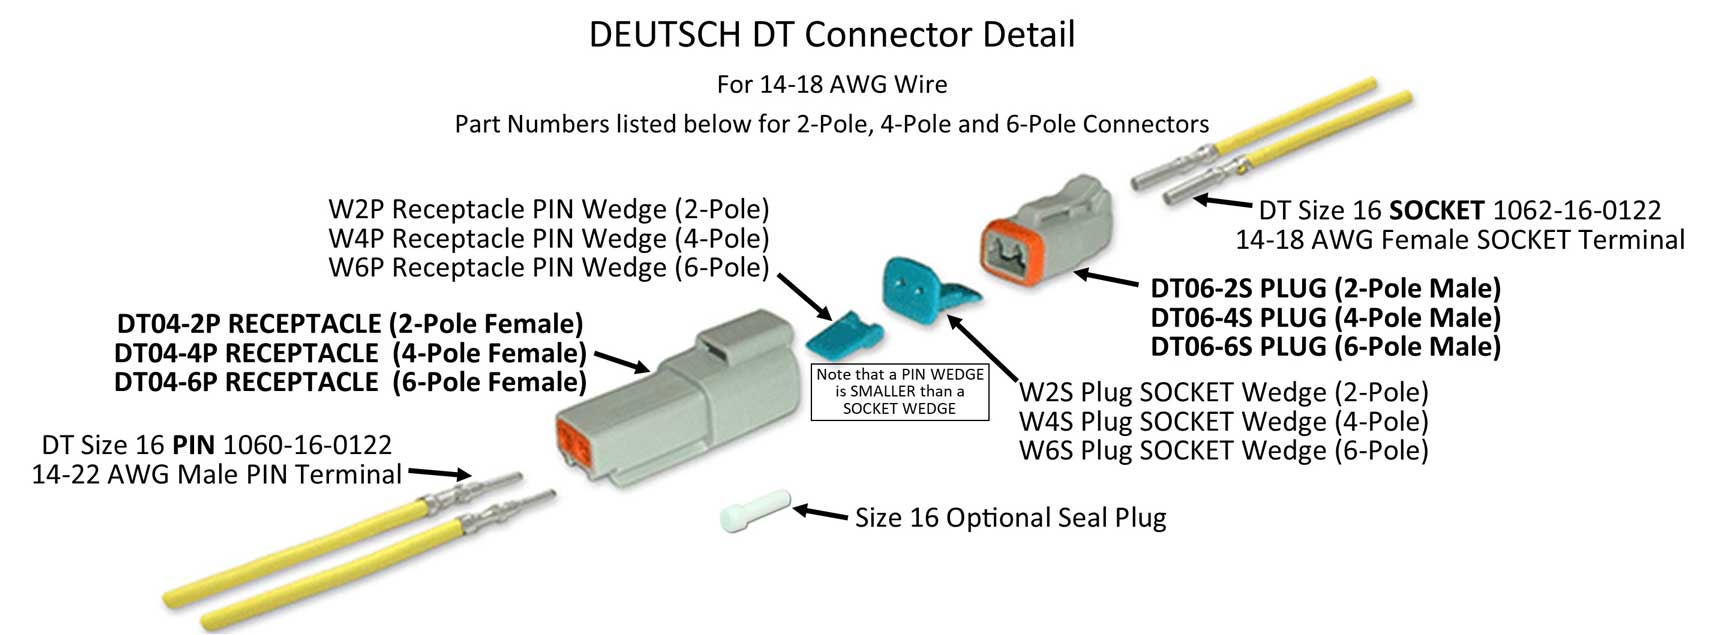 Terminology to remember: PIN and SOCKET 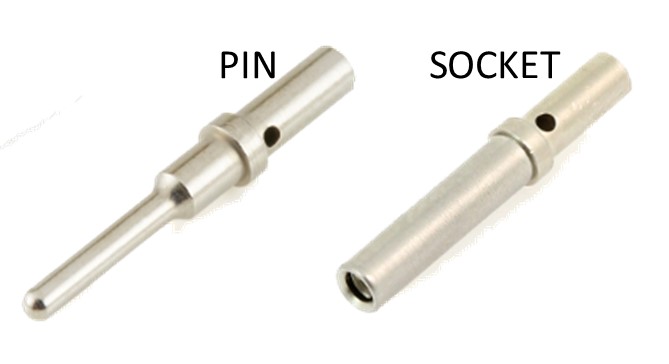 DT Connectors: 14-18 AWG, rated up to 13A. Uses Size 16 contacts (terminals). https://www.mouser.com/new/te-connectivity/te-deutsch-dt-series-connectors/ HIGHER CURRENT VERSIONS DEUTSCH DTP CONNECTORS 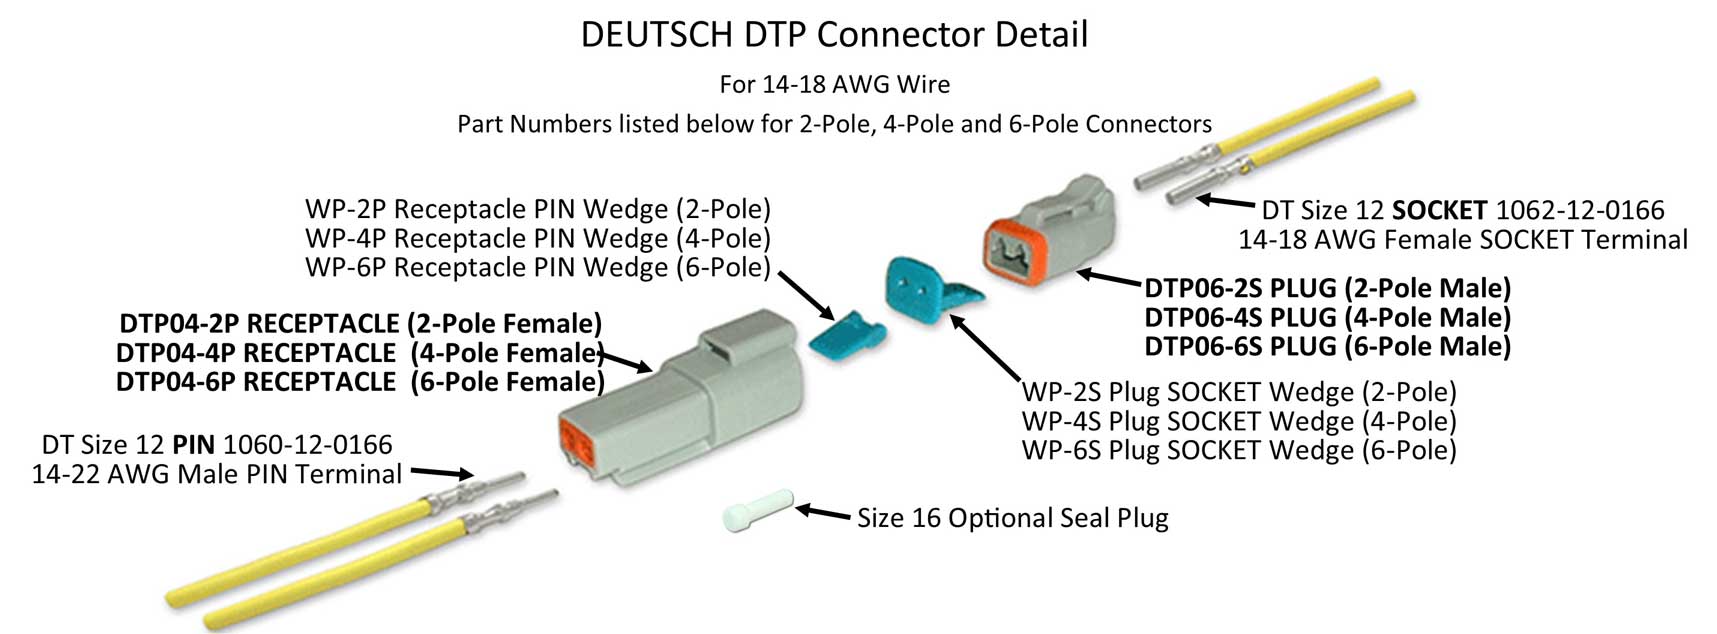 Terminology to remember: PIN and SOCKET DTP (Power) Series Connectors: 10-14 AWG, rated up to 25A. Uses Size 12 contacts (terminals). These are for higher amp power connections up to 25 amps. https://www.mouser.com/new/te-connectivity/te-deutsch-dtp-connectors/
https://www.amphenol-sine.com/a-series-connectors A comprehensive cross-reference is available here: https://www.amphenol-sine.com/DeutschConnectorsCrossReference.html Common Amphenol AT part Numbers 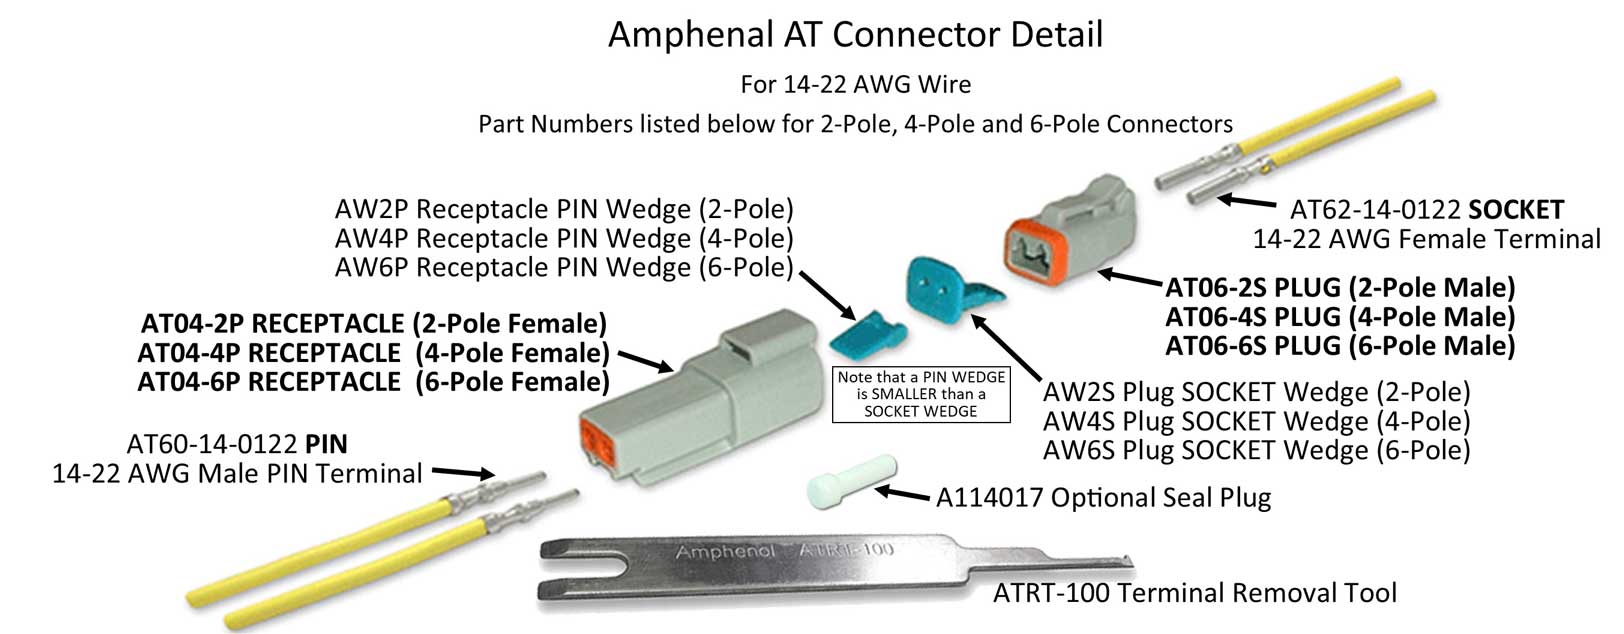 Terminology to remember: PIN and SOCKET AT Series Connectors: 14-22 AWG, rated up to 13A. Uses Size 16 terminals. https://www.amphenol-sine.com/at-series HIGHER CURRENT VERSIONS ATP CONNECTORS 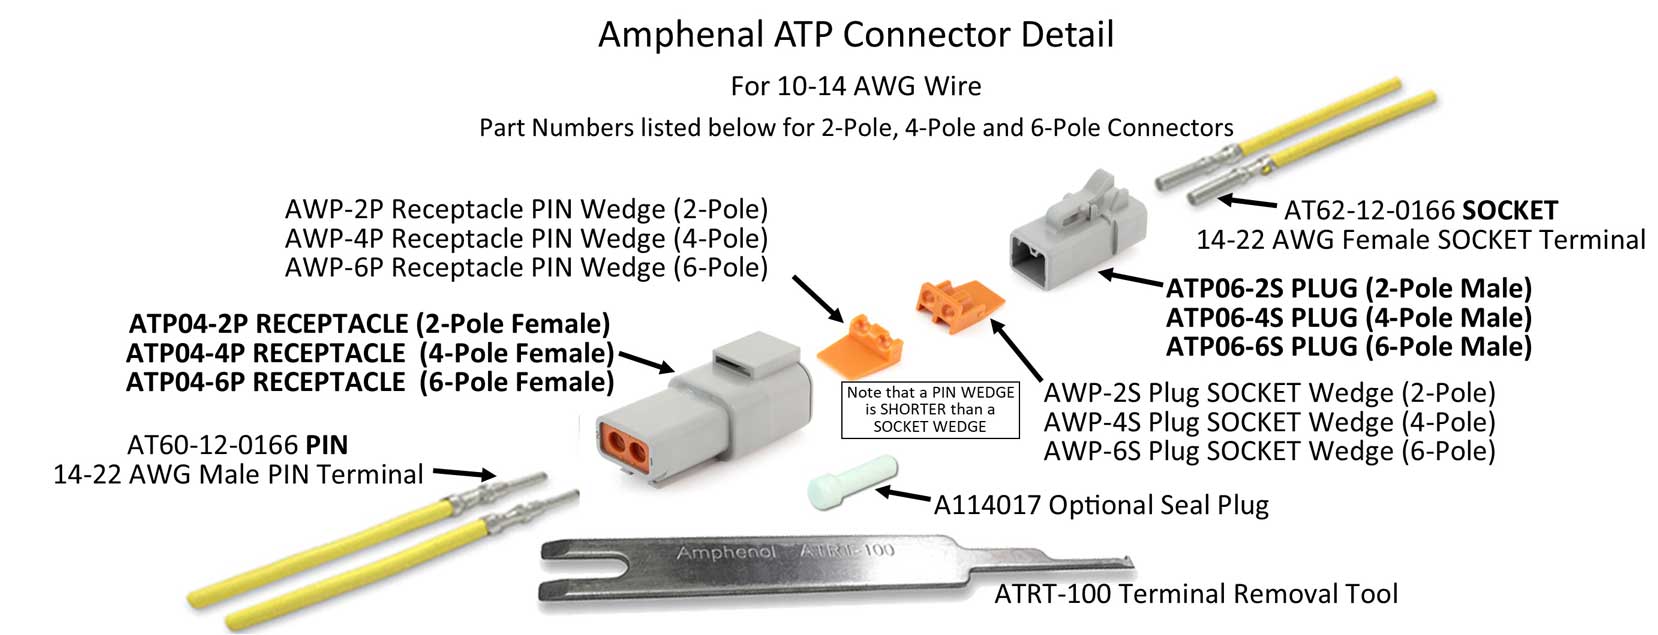 Terminology to remember: PIN and SOCKET ATP (Power) Series Connectors: 10-14 AWG, up to 25A rating, uses Size 12 terminals. These are for higher amp power connections up to 25 amps. https://www.amphenol-sine.com/atp-series
|
||||||||||||||||||
|
|
||||
| davebarton.com |
prancingmoose.com |
240turbo.com |
Special Emblems |
|
| Prancing
Moose Stickers |
Volvo
Stickers |
Body/Chassis/Engine
Labels |
240 MODS and FIXES Page | |
| Other Car Brand
Stickers |
Steering
Wheel Labels |
Center Cap Labels/Overlays |
Cool Volvo
Products |
|
| Grill Labels/Overlays |
Volvo Wire
Harnesses |
Conversion Harnesses |
Harness
Parts/Connectors |
|
| Volvo Relays |
Coil Repair
Harnesses |
240 Window
Scrapers |
740/940
Window Scrapers |
|
| Adjustable Voltage
Regulators |
Horn Buttons |
240 Odometer
Repair |
740 Odometer
Repair |
|
| Volvo Gauge
Faces |
740
Turbo/Boost Faces |
240 Black Door Vinyl |
850 Odometer
Repair |
|
| ALTERNATOR Page |
240 Power Mirrors - Switches |
240 Oil Cooler Page |
240 Fuse Panel Page |
|
| Group A
Racing 242 Turbo Page |
240 Hydraulic Clutch | Fuel Pump RELAY Page |
240 Headlight RELAY Page |
|
| Used Parts & Extra Stuff for sale |
CRIMPING Page |
240 Ignition Page |
240 Headlight Page |
|
| 240 Gauge Electrical Diagrams | 240 REAR END Page | Yoshifab Catch Can Install | 240 TAILLIGHT Page | |
| Side Marker
Lights Page |
Gentex Mirror Upgrade | Yoshifab Drain Tube Install | Modified 240 Favorites | |
| SoCal Salvage Yards | Unleaded Racing Fuel | B26FT Stroker | Dave's 245 Spec Page | |
| 240 SUSPENSION Page | 240 Lowering Page |
240 Windshield Page |
240 WIPER Page | |
| 240 BRAKES Page |
240 Dash Top Gauge Pod | Cadillac 4-Note Horn Install | 240 DYNAMAT Installation | |
| 4 Speed Fan
Controller |
Electric Cooling Fan
Page |
BRUSHLESS Cooling Fan Page |
Tropical Fan
Clutches |
|
| 240 AC Page | "KOMFORT BLINKER" Upgrade | T5 Trans Conversion Page | 240 Engine Mount Page | |
| 240 VIN Page | Stepper Idle Valve Page |
Vacuum Diagrams | 240 HOOD Page | |
| 240 Exhaust Page | 242 Power Vent Window Project |
EFI Volvo Pin Function Diagrams |
Favorite Links | |
| R-Sport
Apparel |
Prancing
Moose Apparel |
Volvo Meet Photo Albums | Texas Volvo Meets and Events | |
| Ordering Instructions | Policies | PAYMENTS Page |
Mojave Road Trail Map Page |
|
| Returns | Shipping | Shopping Cart Troubleshooting | Contact Us |
|

|


 alternators are known for poor voltage.")