| Harness Crimping Page |
 |
UPDATED: September 12, 2023
CONTACT

|
D O M
A I N S   |
|||
 |
 |
 |
 |
 |
 |
|
 |
 |
 |
 |

|

|
|
 |
 |
 |

|
|
 |
 |
 |

|
 |
 |
 |
 |
 |
 alternators are known for poor voltage.") |
 |
 |
 |
 |
 |
 |
 |
 |
 |
 |

|
 |
 |
 |
 |
 |
If you have any comments or if you can help to improve this information, please email.
CONTACT
| |
||
|
||
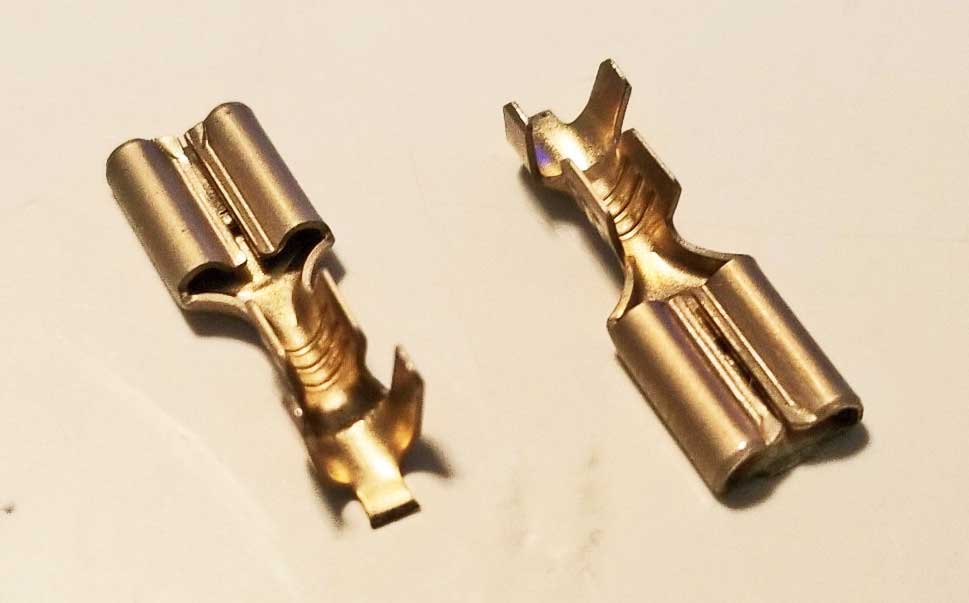 What is an OPEN BARREL terminal? What is an OPEN BARREL terminal? <<< It's a NON-INSULATED terminal with open "wings" as shown to the left. Those wings are crimped over the wire. |
||
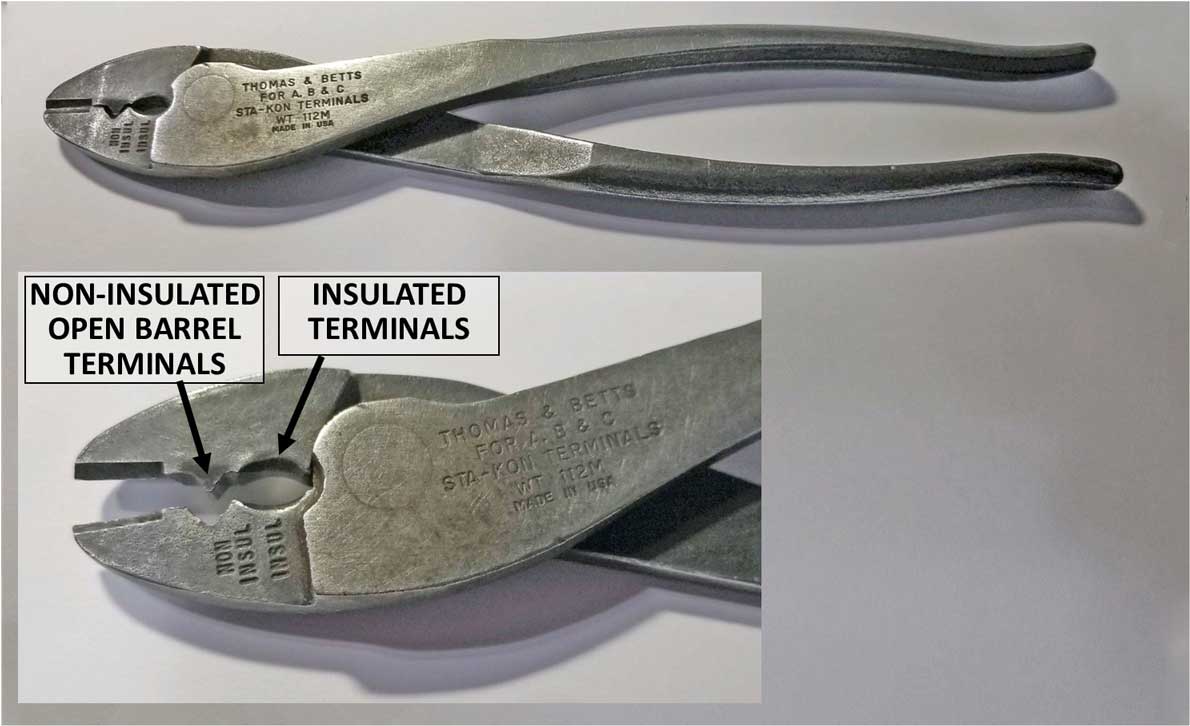 <<<
PROPER CRIMP
tools are important. Try
not
to use a cheap stamped metal crimping tool. Buy yourself something at
least as good as this one to begin with. For those of you who are curious
about what crimper I use, this is it for 90% of my
crimps for non-insulated or open barrel terminals and virtually all
insulated terminals. This is the THOMAS &
BETTS model WT 112M. It runs about $40. I've had this
one for 25 year plus. <<<
PROPER CRIMP
tools are important. Try
not
to use a cheap stamped metal crimping tool. Buy yourself something at
least as good as this one to begin with. For those of you who are curious
about what crimper I use, this is it for 90% of my
crimps for non-insulated or open barrel terminals and virtually all
insulated terminals. This is the THOMAS &
BETTS model WT 112M. It runs about $40. I've had this
one for 25 year plus. |
||
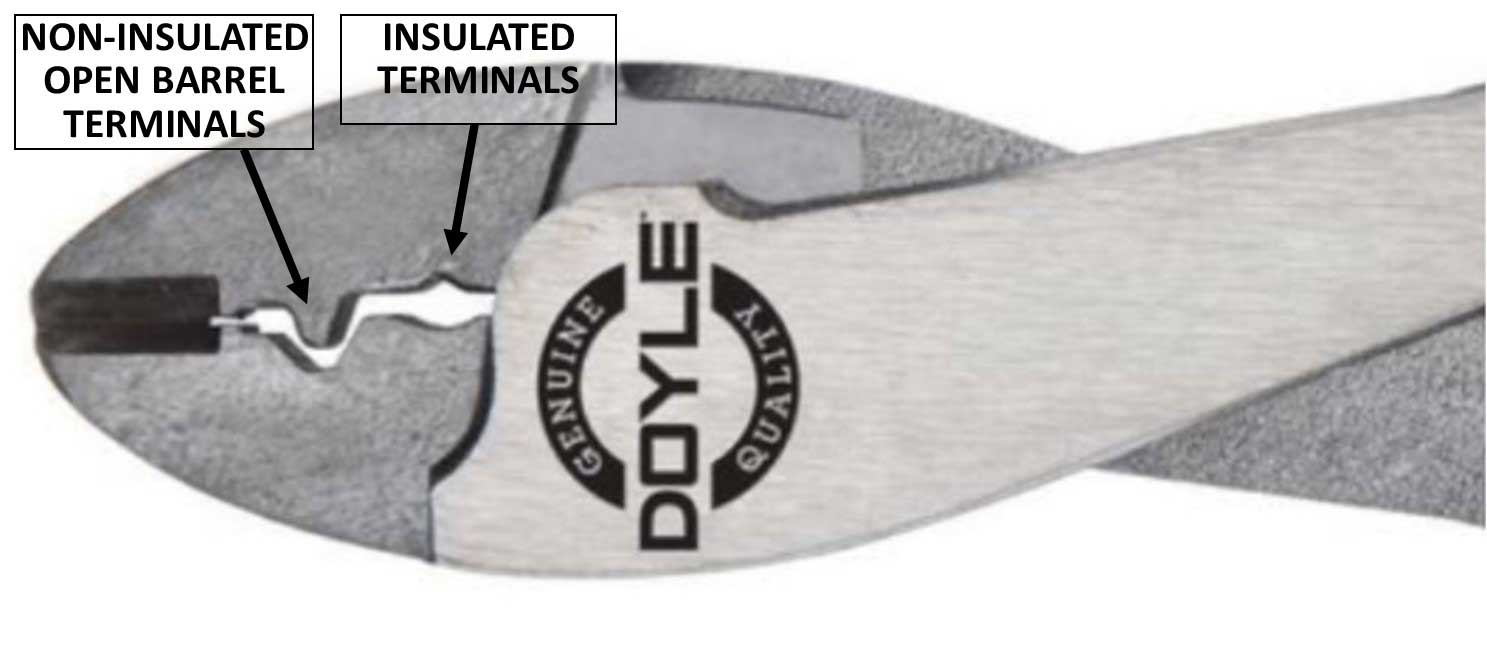 <<< Here's a fairly close copy of that crimper, which is available at Harbor Freight. <<< Here's a fairly close copy of that crimper, which is available at Harbor Freight. https://www.harborfreight.com/9-12-in-wire-crimping-tool-63989.html |
||
|
||
RATCHETING CRIMPER
|
||
 Here's an expensive MSD ratcheting crimper which I have used for many years when I need a fancy crimper. It has dies which can be swapped for different style crimps, such as for auto ignition cables. It was pretty expensive (close to $100), but years ago when I bought this one there were not many cheap tool options like there are now. So shop around. THIS MSD CRIMPER: with ignition dies: https://www.summitracing.com/parts/msd-35051/overview/ or with optional open barrel dies: https://www.summitracing.com/parts/msd-3506/overview/ |
||
|
Here's a very highly rated copy of the above expensive crimper for a fraction of the price. https://www.amazon.com/gp/product/B00OMMZ502/ref=ask_ql_qh_dp_hza 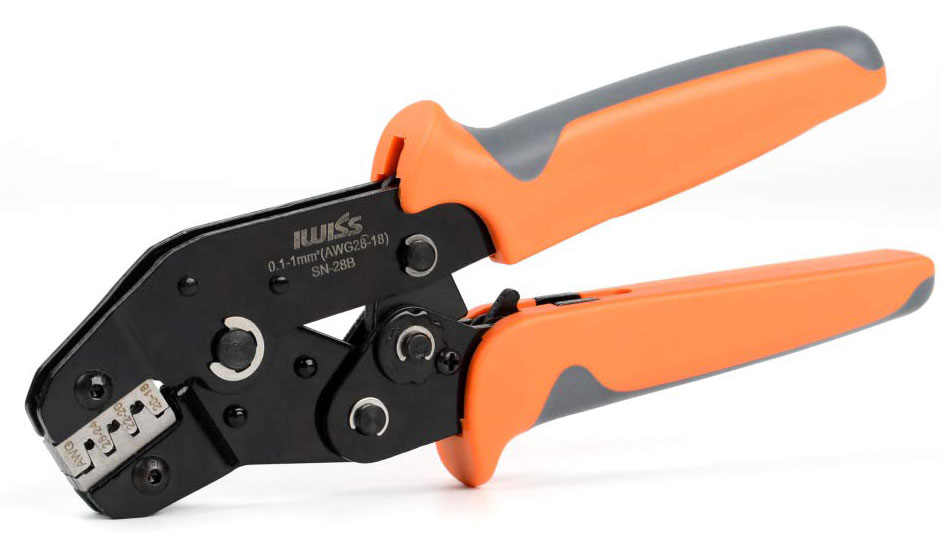 |
||
|
|
||
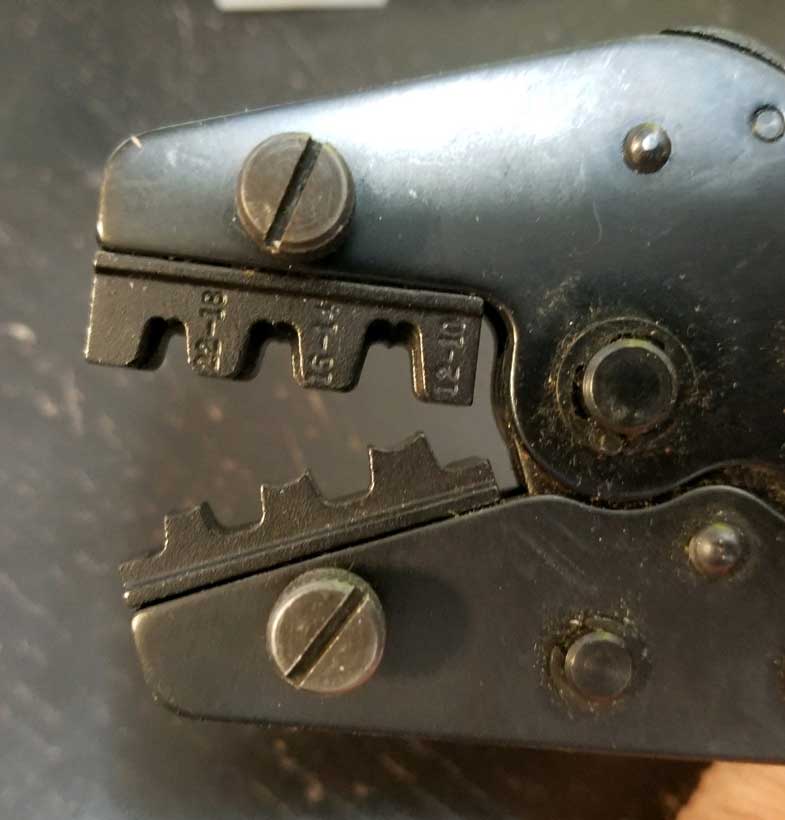
When shopping around for crimpers, try to find one that will do open barrel F type terminals.
You can spend a lot of money on one of these tools or kits,
but it you hunt carefully, you can find cheaper
ones that will work pretty well. This one pictured BELOW is under $30 for
the crimper and it comes with extra crimping dies and a wire stripper.
Sometimes you get what you pay for when buying CHEAP
tools, so shop carefully and read reviews if they exist. 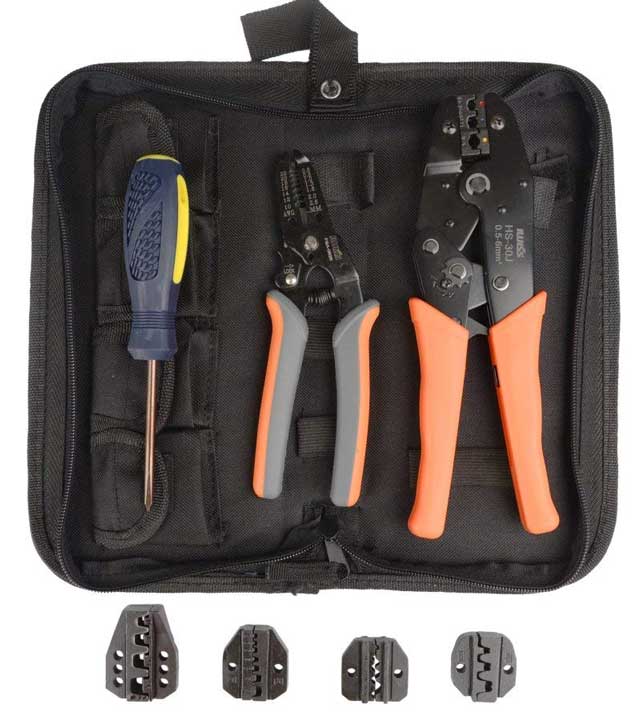 Looking at this photo ABOVE, the style of crimping die normally used for open barrel terminals that are found in my harness pages is the one on the bottom right in this photo. It's most similar to the ABOVE larger photo of my expensive MSD crimper. The other dies might come in handy, so they would be a bonus. I don't own this particular crimper. This one is cheap and might be worth the cost, or it might explode! You can never really tell until it's in your hands, but I would buy one if I didn't already have mine. HERE: https://www.amazon.com/IWISS-Crimping-different-terminals-interchangeable/dp/B0195VXA10/ |
||
| Here's a short, but decent video showing
close-up crimping action for an open barrel
terminal. https://www.youtube.com/watch?time_continue=2&v=8jcfD1UW8SE |
||
|
|
||
|
||
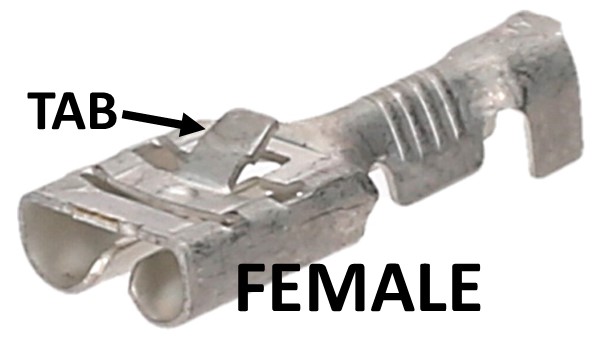 <<< Here's a FEMALE push-on terminal (AKA: Faston). The most common size is .250 inch (6.3 mm). If this terminal is in a connector housing, it will be held in by that tab. In most cases it's a simple task to insert a thin probe or pick from the front and push that tab flat. Then the terminal can be removed from the back of a connector. <<< Here's a FEMALE push-on terminal (AKA: Faston). The most common size is .250 inch (6.3 mm). If this terminal is in a connector housing, it will be held in by that tab. In most cases it's a simple task to insert a thin probe or pick from the front and push that tab flat. Then the terminal can be removed from the back of a connector. 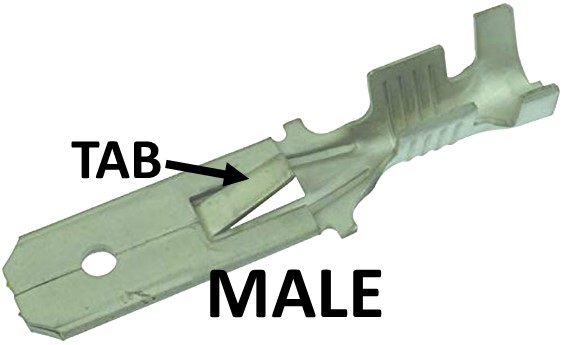 <<< Here's a MALE push-on terminal. <<< Here's a MALE push-on terminal. |
||
| Here are a couple videos that show how these terminals are inserted or removed from a connector housing. https://www.youtube.com/watch?v=YdNcIHQRLko |
||
https://youtu.be/_3GoK3xE1gs |
||
|
||
| These style connectors and
terminals are available in Dave's Volvo Page: https://www.prancingmoose.com/blackvinyl.html#EFIplugs |
||
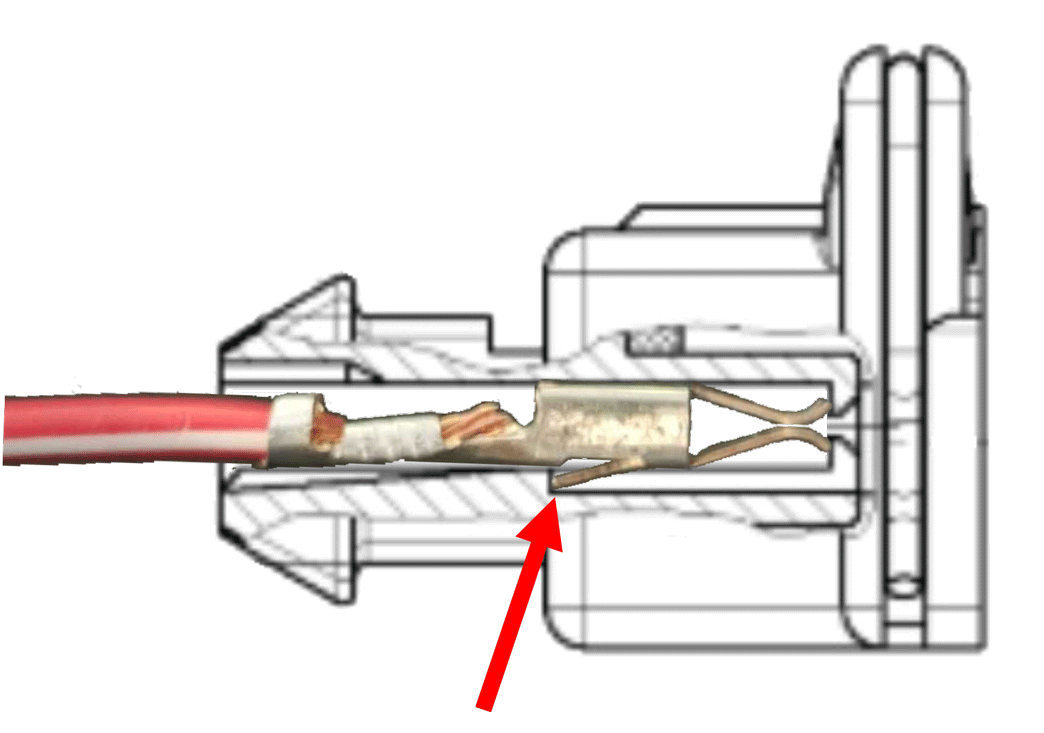
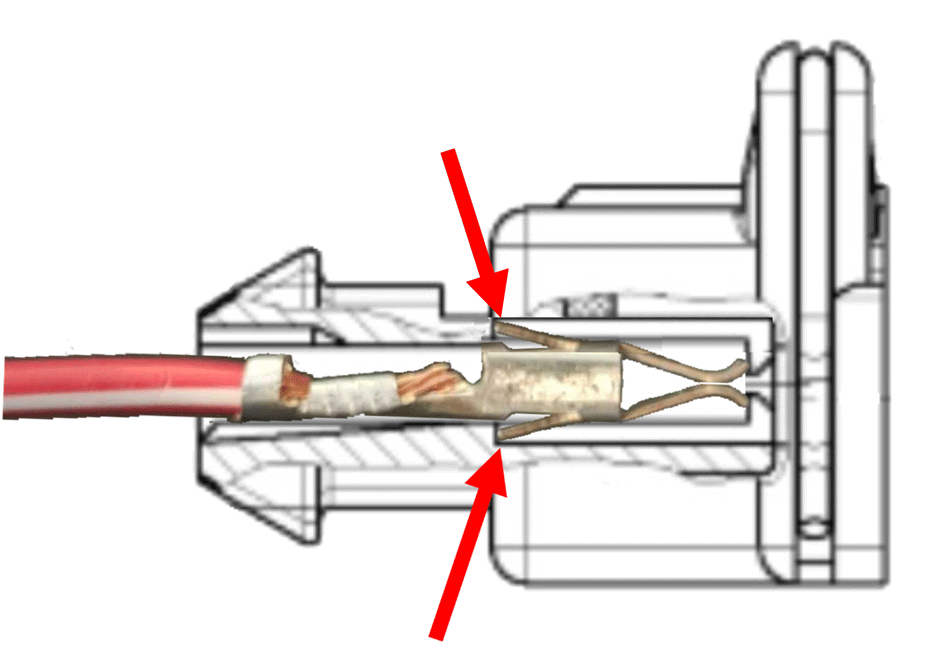
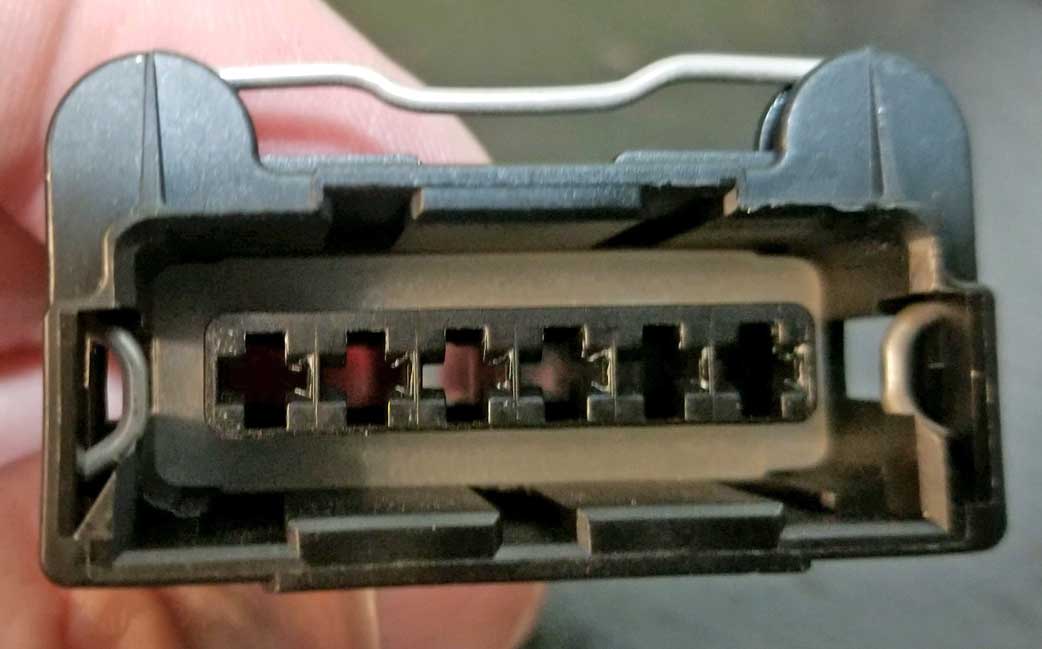 <<<
Here's a typical
sealed EFI connector housing found in many different
Bosch style fuel injection systems. This one
has 6 poles and is most often used for a MAF (mass
air flow) sensor. <<<
Here's a typical
sealed EFI connector housing found in many different
Bosch style fuel injection systems. This one
has 6 poles and is most often used for a MAF (mass
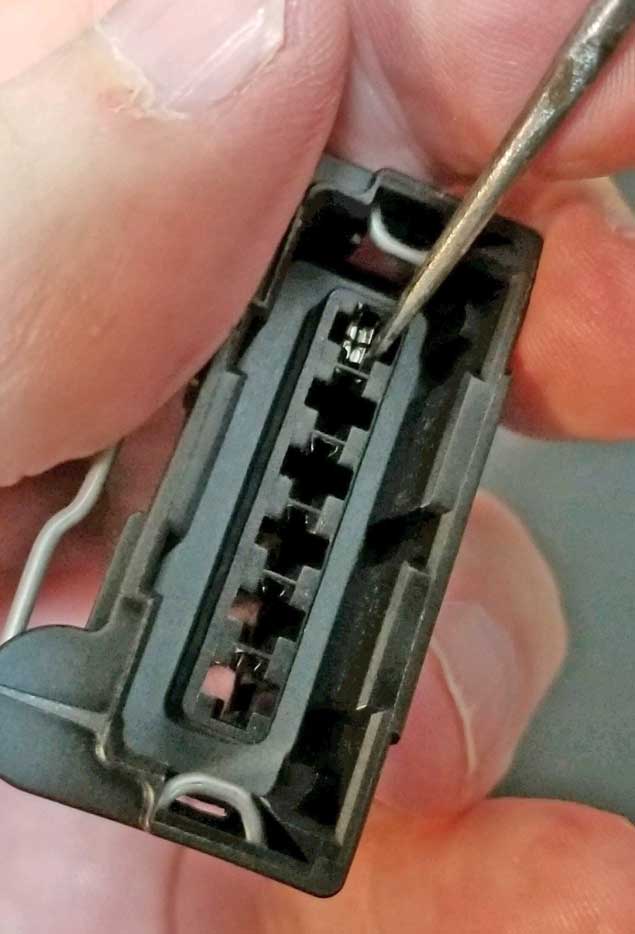
air flow) sensor. This connector housing uses FEMALE crimp terminals, so this housing is known as a FEMALE housing. Inserting or removing a crimp terminal from one of these housings is easy, but if you're never done this before, this page will show you how. |
||
|
|
||
 <<< Connector housings
like these come in a number of different
configurations. The most common one is a
2-pole connector shown here used for a Bosch
style fuel injector. This style connector is
also known as an EV-1 connector. They all
use the same style crimp terminals that are
inserted into these housings from the rear after
being crimped onto a wire. <<< Connector housings
like these come in a number of different
configurations. The most common one is a
2-pole connector shown here used for a Bosch
style fuel injector. This style connector is
also known as an EV-1 connector. They all
use the same style crimp terminals that are
inserted into these housings from the rear after
being crimped onto a wire. |
||
|
|
||
| <<< Here's a typical
ratcheting terminal crimper that works well for these
EFI terminals (same MSD crimper described
above). |
||
| The
below video will offer a quick view of this type of
crimping operation. https://www.youtube.com/watch?v=LXDedfvmI_0 (length: 1:34) |
||
|
|
||
| The
Terminals below are TYPE 1 EFI Terminals (Early type). |
||
| These terminals are most often found in Volvo engine harnesses up to approximately 1988, however if you have a harness from Dave's Volvo Page the terminal will almost always be the Type 2 (HERE). | ||
 <<<
If you're learning to
crimp these, it will take some
practice before your crimps come out just right.
The wire needs to be tightly crimped, but not so tight
that the terminal cuts into the wire strands. The crimp on the
insulation does not need to be super tight. Just make it tight
enough to stabilize the insulation portion, but not s tight that it cuts through it.
<<<
If you're learning to
crimp these, it will take some
practice before your crimps come out just right.
The wire needs to be tightly crimped, but not so tight
that the terminal cuts into the wire strands. The crimp on the
insulation does not need to be super tight. Just make it tight
enough to stabilize the insulation portion, but not s tight that it cuts through it. Be sure to pull on the wire to TEST it after crimping. It should not pull free. |
||
|
|
||
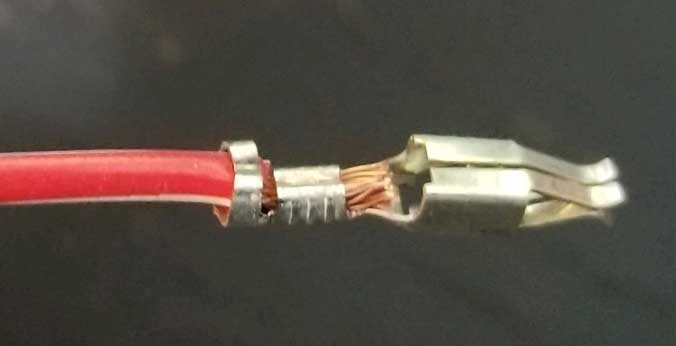
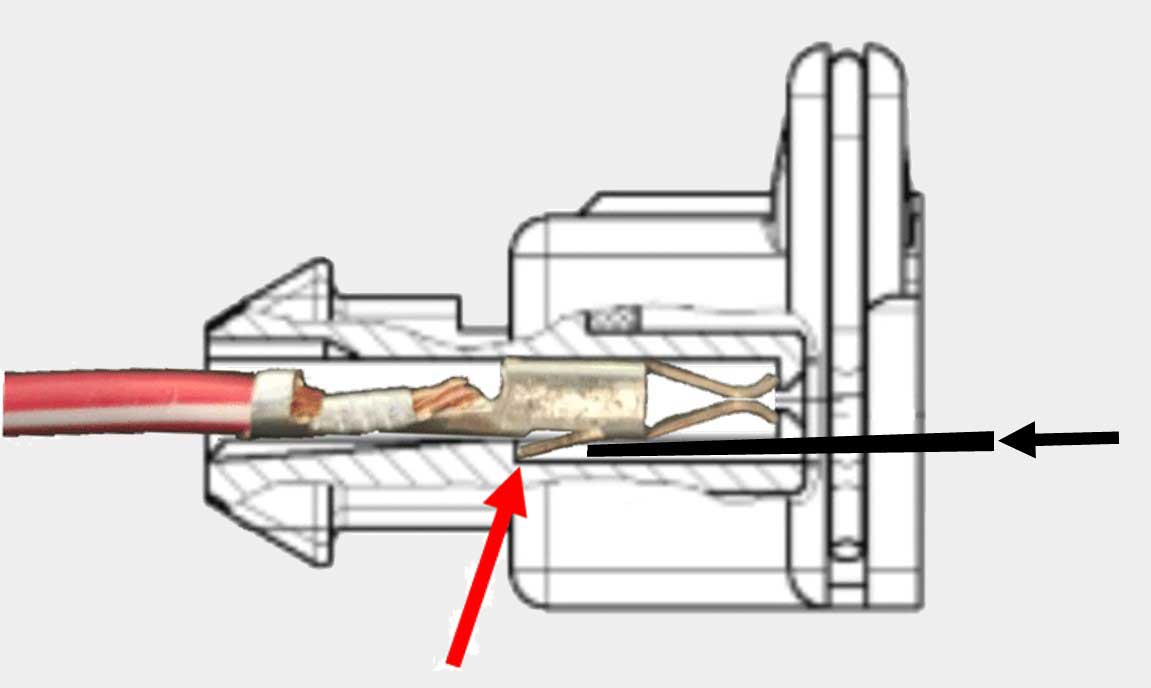
 <<< An EFI TYPE 1 terminal
will have a single HOOK
(or spur) sticking out like that one on the underside. That hook
will be what holds this terminal in place inside the
connector housing. <<< An EFI TYPE 1 terminal
will have a single HOOK
(or spur) sticking out like that one on the underside. That hook
will be what holds this terminal in place inside the
connector housing. |
||
|
|
||
 <<< As the TYPE 1 crimped
terminal is inserted into the rear of the connector
housing, that hook (or spur) will click into place when it
reaches the end and is fully inserted. <<< As the TYPE 1 crimped
terminal is inserted into the rear of the connector
housing, that hook (or spur) will click into place when it
reaches the end and is fully inserted. |
||
|
|
||
 <<< When
fully
inserted, you should hear the hook CLICK into place. <<< When
fully
inserted, you should hear the hook CLICK into place. |
||
|
|
||
 <<< Here's the backside of
the EFI connector. That hinged piece on the
bottom is there to help lock in the wire or wire
seals, if used. That hinged piece will not be present
on all EFI connectors like this and there are plenty
of these connectors out there without that part. Those work just
as well. <<< Here's the backside of
the EFI connector. That hinged piece on the
bottom is there to help lock in the wire or wire
seals, if used. That hinged piece will not be present
on all EFI connectors like this and there are plenty
of these connectors out there without that part. Those work just
as well. |
||
|
|
||
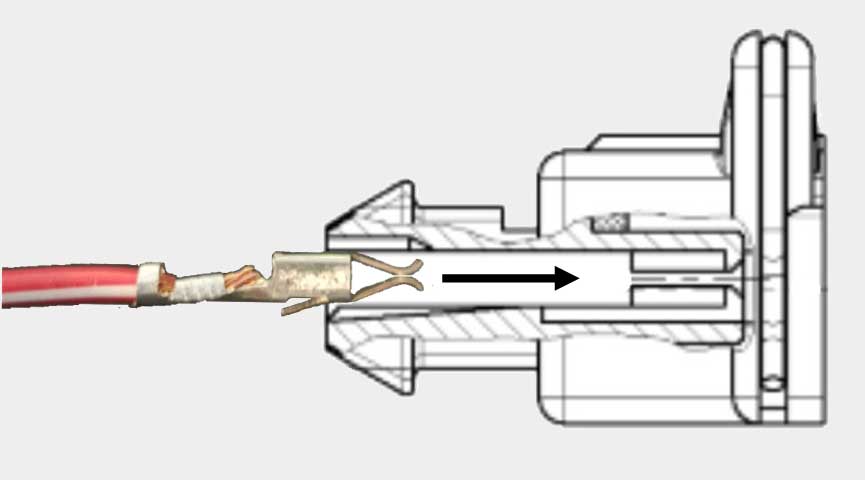
 <<<
Here I'm inserting a
crimped TYPE 1 terminal into the rear of the connector
housing. It has a silicone
wire seal installed on the wire before
crimping the terminal. Some prefer crimping the seal
onto the back of the terminal as you'll see below.
<<<
Here I'm inserting a
crimped TYPE 1 terminal into the rear of the connector
housing. It has a silicone
wire seal installed on the wire before
crimping the terminal. Some prefer crimping the seal
onto the back of the terminal as you'll see below.A wire seal like this is optional. If you decide to use a rubber boot on the back of this connector, a wire seal is not needed. |
||
|
|
||
 <<<
Once the terminal is
inserted, then the wire seal can be pushed up the
wire and into the hole.
<<<
Once the terminal is
inserted, then the wire seal can be pushed up the
wire and into the hole. |
||
|
|
||
 <<< If your connector
housing has the hinged piece, it can then be closed to
lock in the wire and seal. If your housing does
not have it, you can certainly still insert a wire
seal and it should stay in place without the need for
a locking device, especially if you decide to crimp
the wire seal onto the terminal as shown below.
<<< If your connector
housing has the hinged piece, it can then be closed to
lock in the wire and seal. If your housing does
not have it, you can certainly still insert a wire
seal and it should stay in place without the need for
a locking device, especially if you decide to crimp
the wire seal onto the terminal as shown below. |
||
| Removing TYPE 1 EFI Terminals. | ||
| These terminals are most often found in Volvo engine harnesses up to approximately 1988, however if you have a harness from Dave's Volvo Page the terminal will almost always be the Type 2 (HERE). | ||
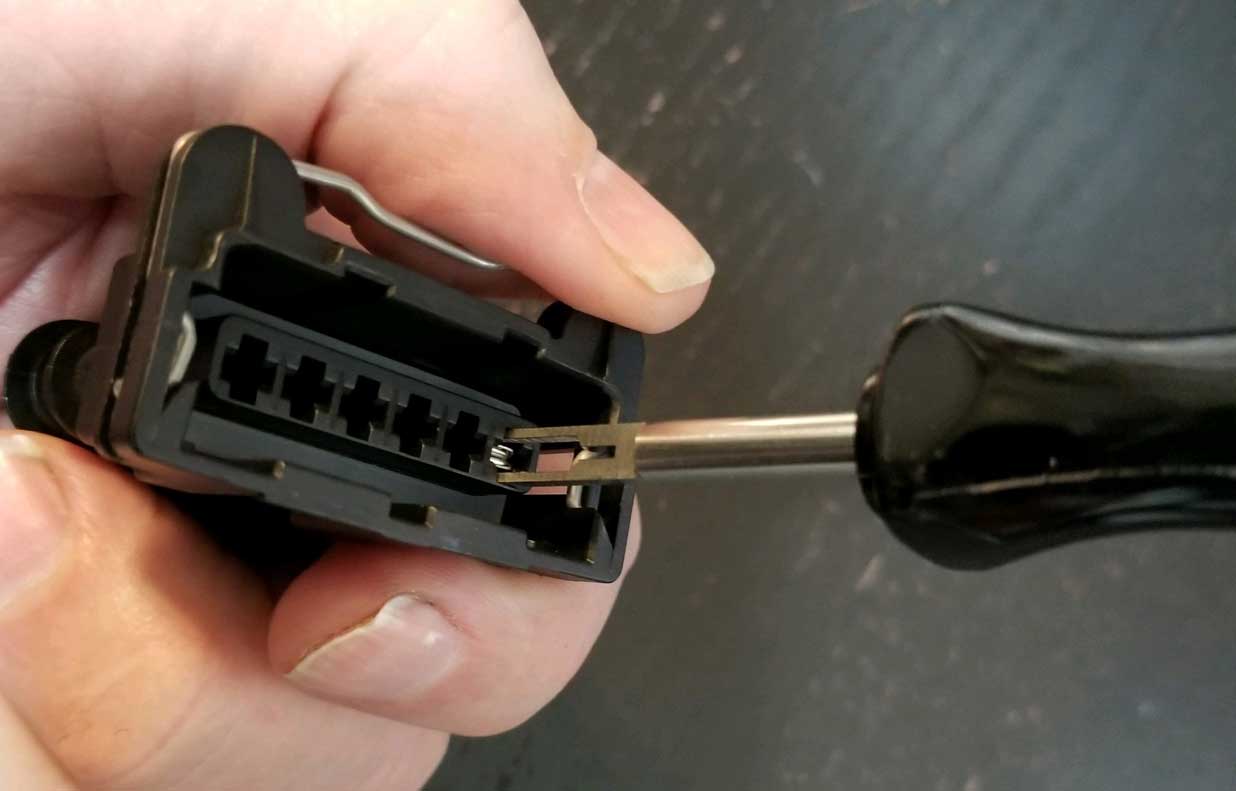
 <<< If you need to remove an EFI TYPE 1
terminal from a housing, a simple tool is
used, which may be a sharp pick or even a small micro
screwdriver. The pick is inserted into the
front of the connector housing to reach that hook.
The goal is to push that hook toward the terminal so
it gets released from the housing and the terminal
can then be pulled out the rear of the housing. <<< If you need to remove an EFI TYPE 1
terminal from a housing, a simple tool is
used, which may be a sharp pick or even a small micro
screwdriver. The pick is inserted into the
front of the connector housing to reach that hook.
The goal is to push that hook toward the terminal so
it gets released from the housing and the terminal
can then be pulled out the rear of the housing. |
||
|
|
||
 <<< Here's an illustration of a Type 1 terminal and how the above pick will depress the hook (or spur) to allow the terminal to be released. <<< Here's an illustration of a Type 1 terminal and how the above pick will depress the hook (or spur) to allow the terminal to be released. If you want to invest in a better tool, this Rennsteig tool shown in the Type 2 section BELOW also works very well to release this terminal. 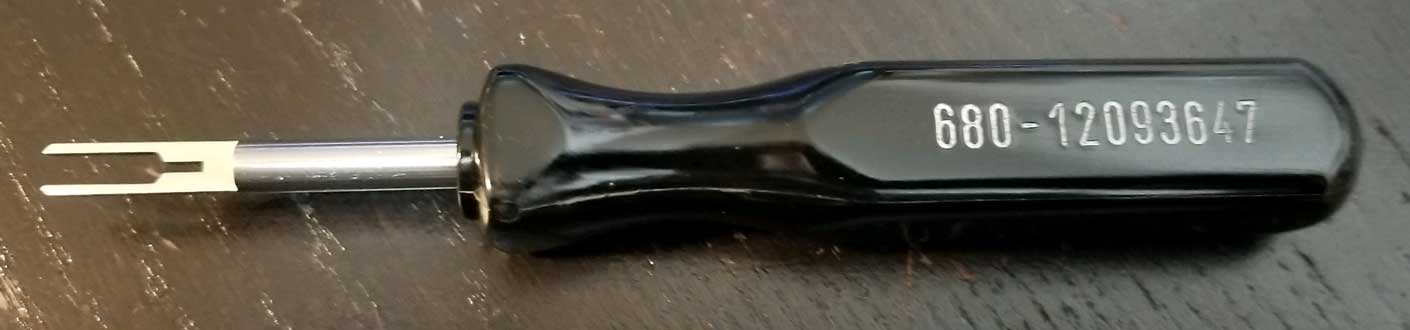 |
||
|
|
||
| <<< Type 1: CAUTION: If you remove a
terminal from a housing and intend to reuse it or
re-insert it into the connector, first inspect
the hook (or spur) to
make sure it's still sticking out. If you bent the
hook inward and it's still bent inward, it may not
catch when re-inserted. So you should carefully re-bend it back outward
so it'll click into place when re-inserted. |
||
|
|
||
| The Terminals below are TYPE
2 EFI Terminals (Later type). These terminals are most often found in Volvo engine harnesses made after 1988. |
||
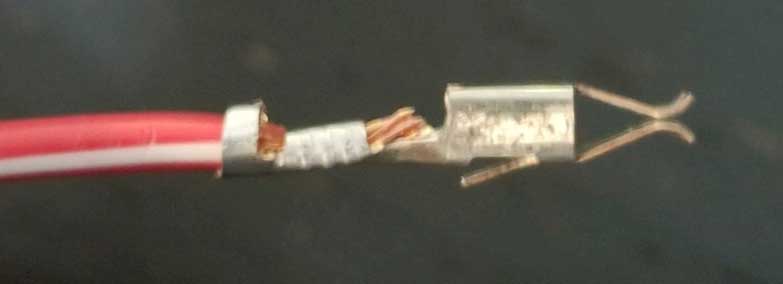
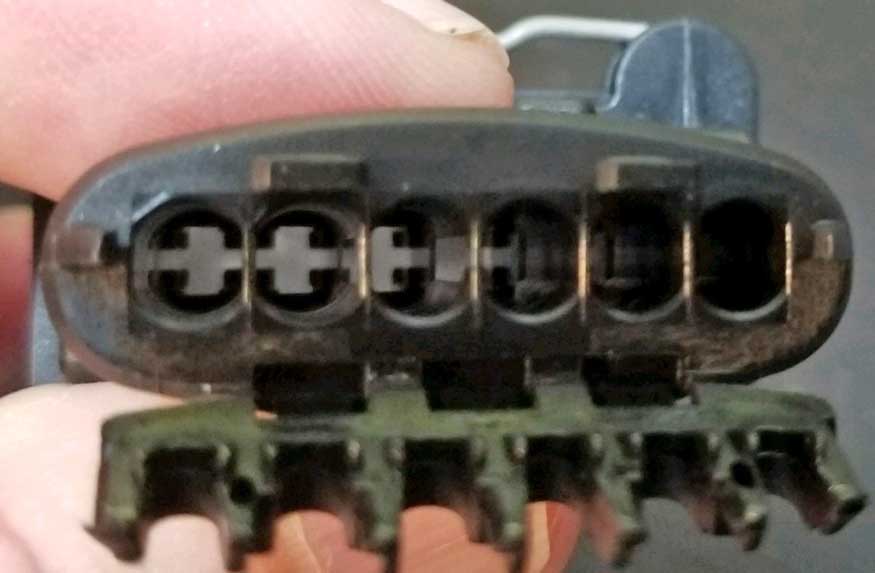
 <<< An EFI TYPE 2
terminal will have TWO
HOOKS (or spurs) sticking
out like these on either side. These hooks will be
what holds this terminal in place inside the connector
housing. <<< An EFI TYPE 2
terminal will have TWO
HOOKS (or spurs) sticking
out like these on either side. These hooks will be
what holds this terminal in place inside the connector
housing. In this photo a silicone wire seal has been added. As mentioned above, this type of seal is optional. It may be used instead of a rubber boot. It you decide to use a rubber boot, then these seals are not needed. This seal has been crimped onto the back of the terminal. This is not required. It can just be slid onto the wire too. It's up to your preference. |
||
|
|
||
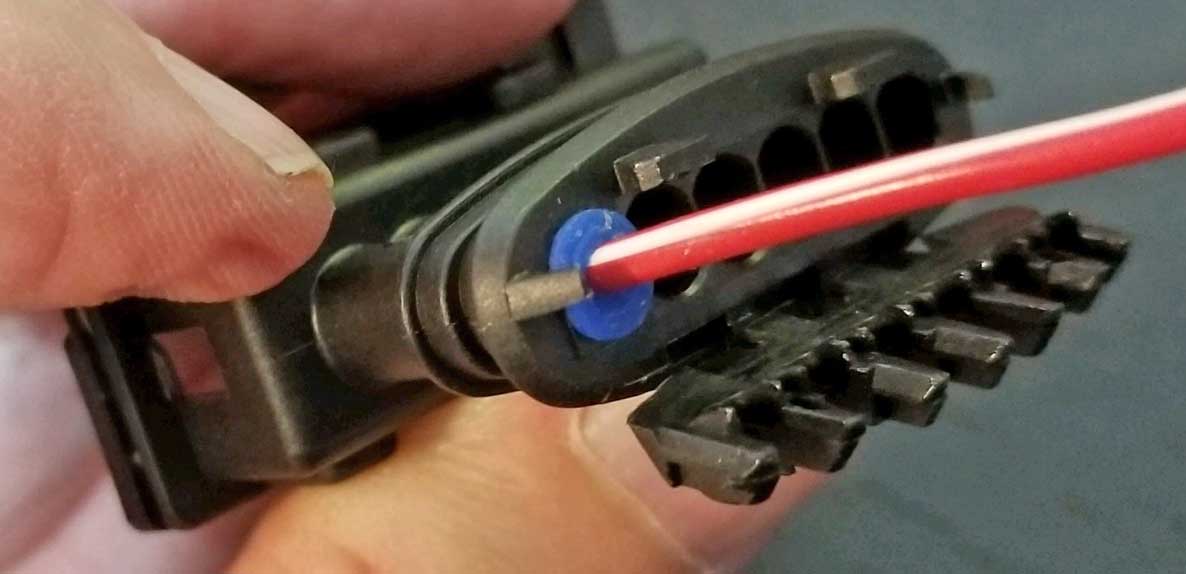
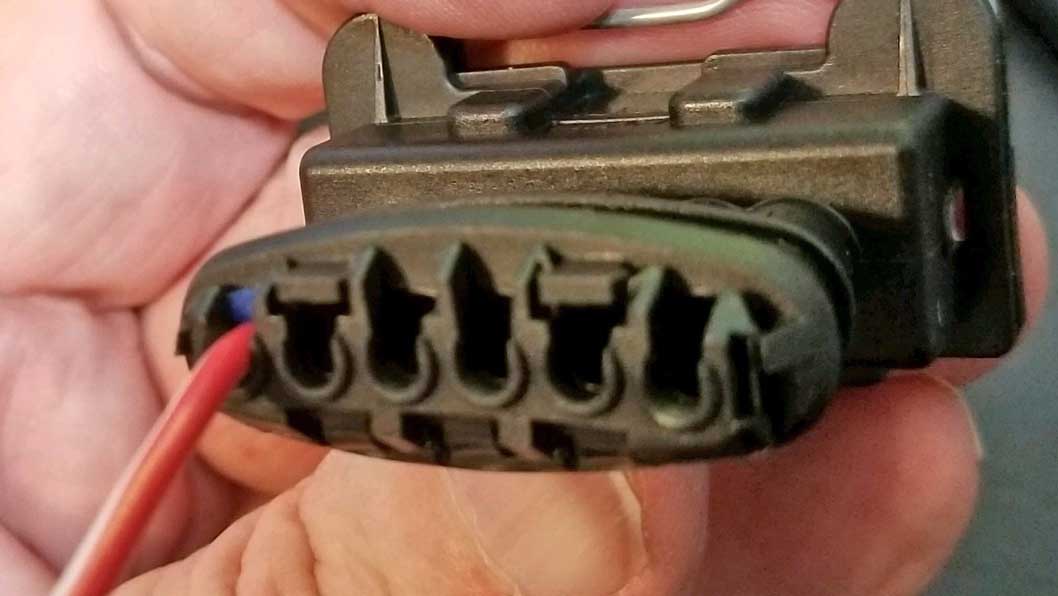
 <<< As the TYPE 2 crimped
terminal is inserted into the rear of the connector
housing, those two hooks will click into place when it
reaches the end and is fully inserted. <<< As the TYPE 2 crimped
terminal is inserted into the rear of the connector
housing, those two hooks will click into place when it
reaches the end and is fully inserted. When fully inserted, you should hear the hooks CLICK into place. |
||
|
|
||
|
RENNSTEIG TOOL:
Since the TYPE 2 terminal
has two hooks, it will be much more difficult to
release from the connector housing using a simple pick. It's possible
to use TWO PICKS (like that used for the Type 1), however the proper tool like this makes life so much easier for releasing these terminals.
This tool made by Rennsteig PN 680-12093647 works exceptionally well. https://www.digikey.com/en/products/detail/rennsteig-tools-inc/680-12093647/13573494 This release tool works quite well with Type 1 or Type 2 terminals. |
||
|
|
||
 This tool is inserted as shown ABOVE. It will depress the two hooks at the same time. Then the wire and terminal is easily pulled out from the rear of the connector housing. |
||
And here's a video for removing this terminal using a BOBBY PIN.
https://www.youtube.com/watch?v=oDWKcAiLJ_Y | ||
| RUBBER BOOTS |
||
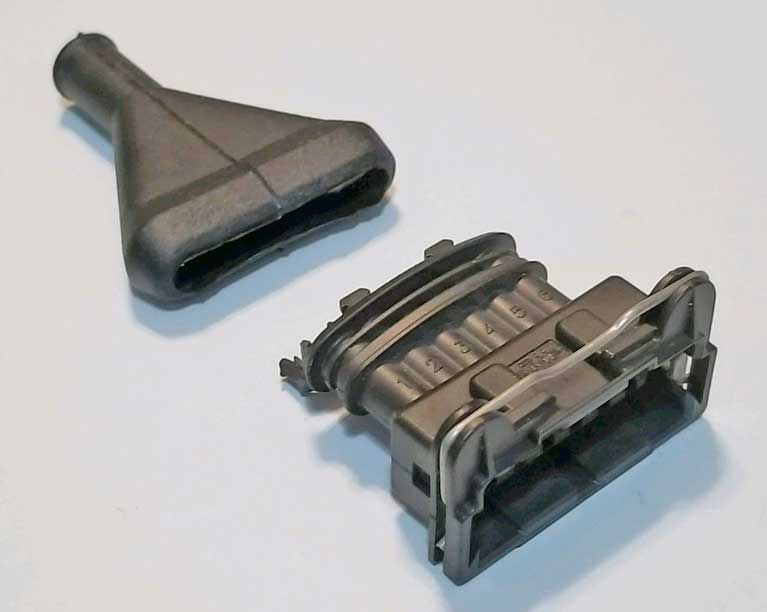 <<< Here we
have a rubber boot that mates to the 6 or 7-pole connector housing.
If you're using a
rubber boot, then using individual wire seals will not be
necessary. <<< Here we
have a rubber boot that mates to the 6 or 7-pole connector housing.
If you're using a
rubber boot, then using individual wire seals will not be
necessary. |
||
| These connectors are available in Dave's Volvo Page: https://www.prancingmoose.com/blackvinyl.html#EFIplugs | ||
Crimping Large Cable Battery Lugs. |
||
| Lots of people have a tool like this one pictured. This one is from 12 Volt Planet,
but there are many other versions available everywhere. I prefer using a VISE with this tool, NOT A HAMMER. This tool is functional and offers pretty good side support for the cable lug. There are better and much more expensive tools, but this one is pretty cheap and better than just smacking the lug with a punch or a screwdriver. The BIG disadvantage to this tool and others that use a vise is it's hard to crimp a lug under your hood. 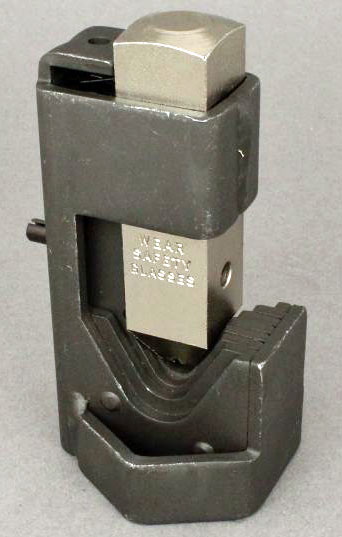 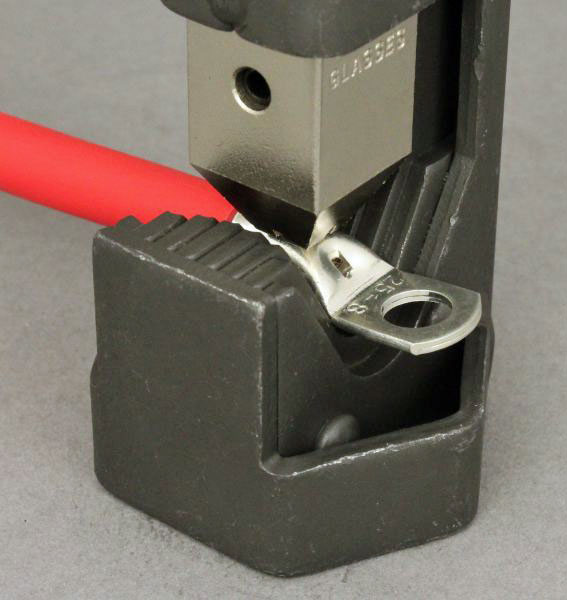
|
||
Lots of people have old tubing flaring tools laying around. Here's a new use for half of your flaring tool in a vise that also offers good side support for a large lug when crimping. This photo is from plan-to-build.com/making-lugs-for-3-0-cable-from-copper-pipe/. 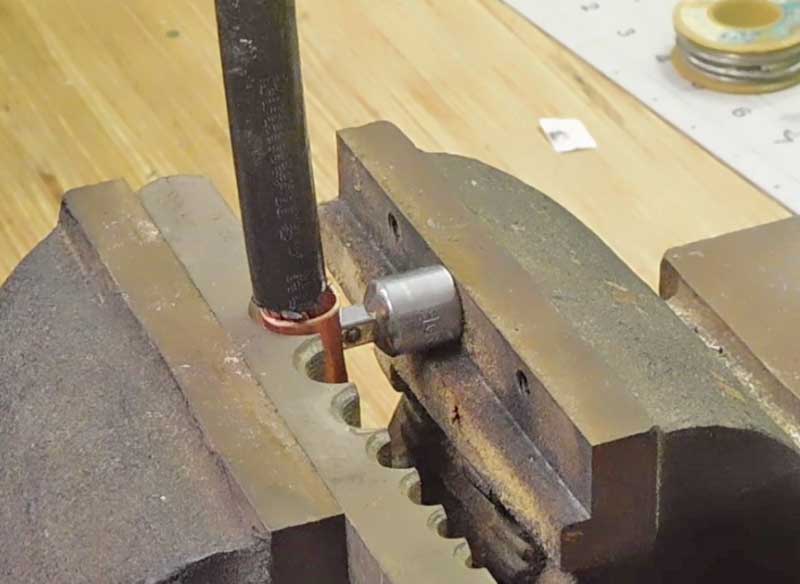 This inexpensive flaring kit from Harbor Freight will go up to 5/8 inch O.D. https://www.harborfreight.com/7-piece-tube-flaring-kit-5969.html 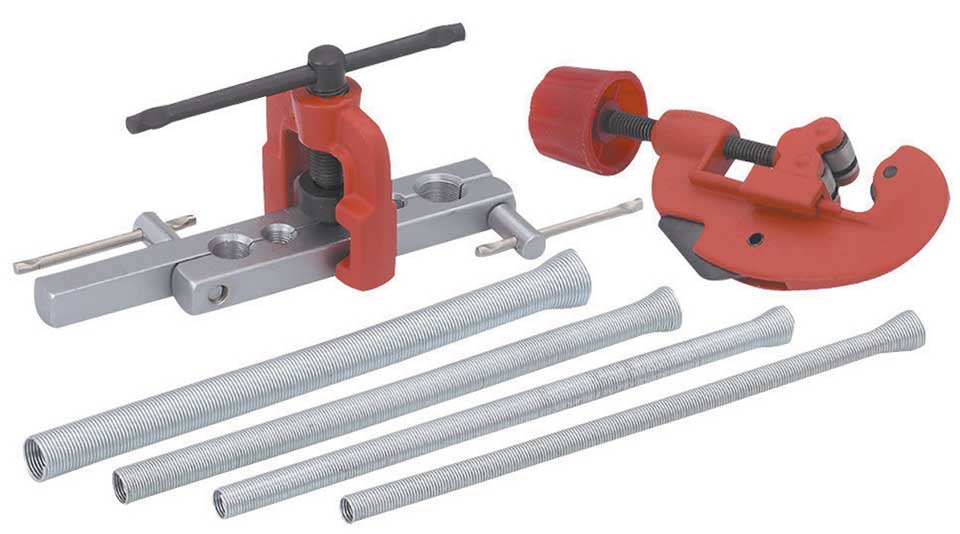
|
||
| Large Crimping Tools | ||
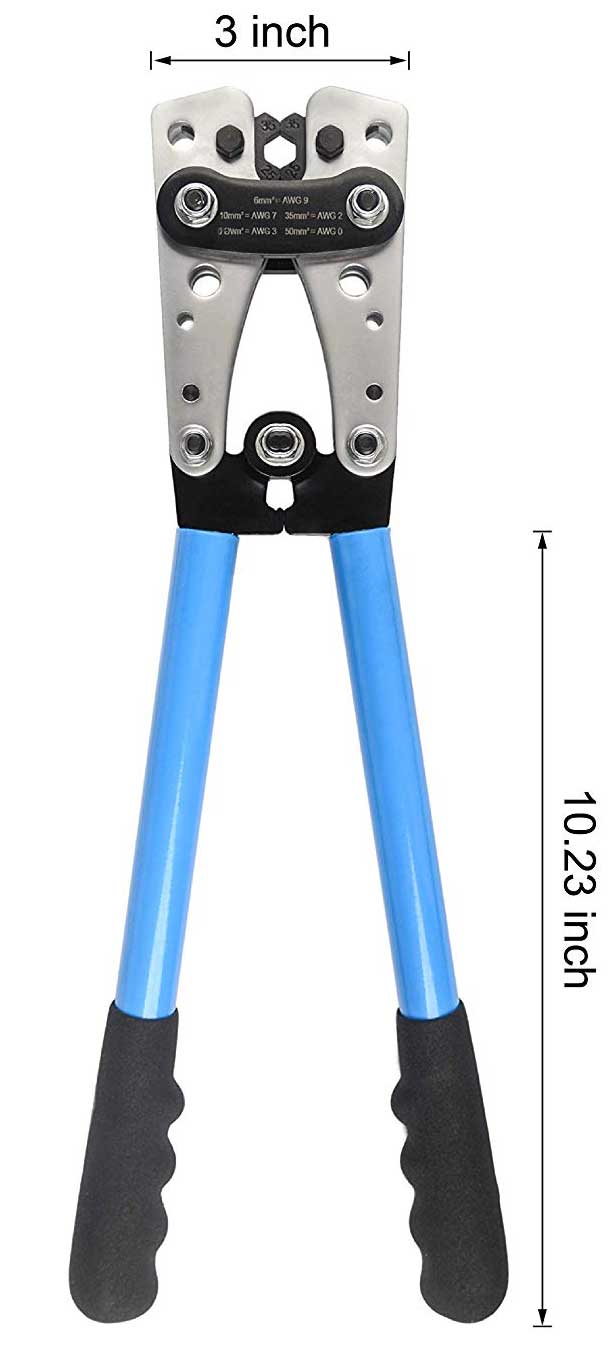 <<< If you will be doing frequent battery lug crimps or if you need to do crimps like this under your hood,
you might want a large crimping tool. These can be expensive, but
if you're been looking on-line, you've probably seen something like
this IWISS Terminal Crimping Tool on Amazon. It advertises the ability to crimp a number of large METRIC sizes, but according to the below video it slightly misses the mark if you want perfect AWG
size crimps. But for the price (under $30) it might be good
enough, especially if you have some tools to modify the crimping dies to
better fit your needs. <<< If you will be doing frequent battery lug crimps or if you need to do crimps like this under your hood,
you might want a large crimping tool. These can be expensive, but
if you're been looking on-line, you've probably seen something like
this IWISS Terminal Crimping Tool on Amazon. It advertises the ability to crimp a number of large METRIC sizes, but according to the below video it slightly misses the mark if you want perfect AWG
size crimps. But for the price (under $30) it might be good
enough, especially if you have some tools to modify the crimping dies to
better fit your needs. |
||
|
|
||
|
||
 Basic crimping with nylon butt splices. https://www.youtube.com/watch?v=UfXi60hu5zM |
||
|
||
 |
||
| https://www.youtube.com/watch?v=ArOHcJ4bBqM |
||
| SOLDERING BUTT JOINTS | ||
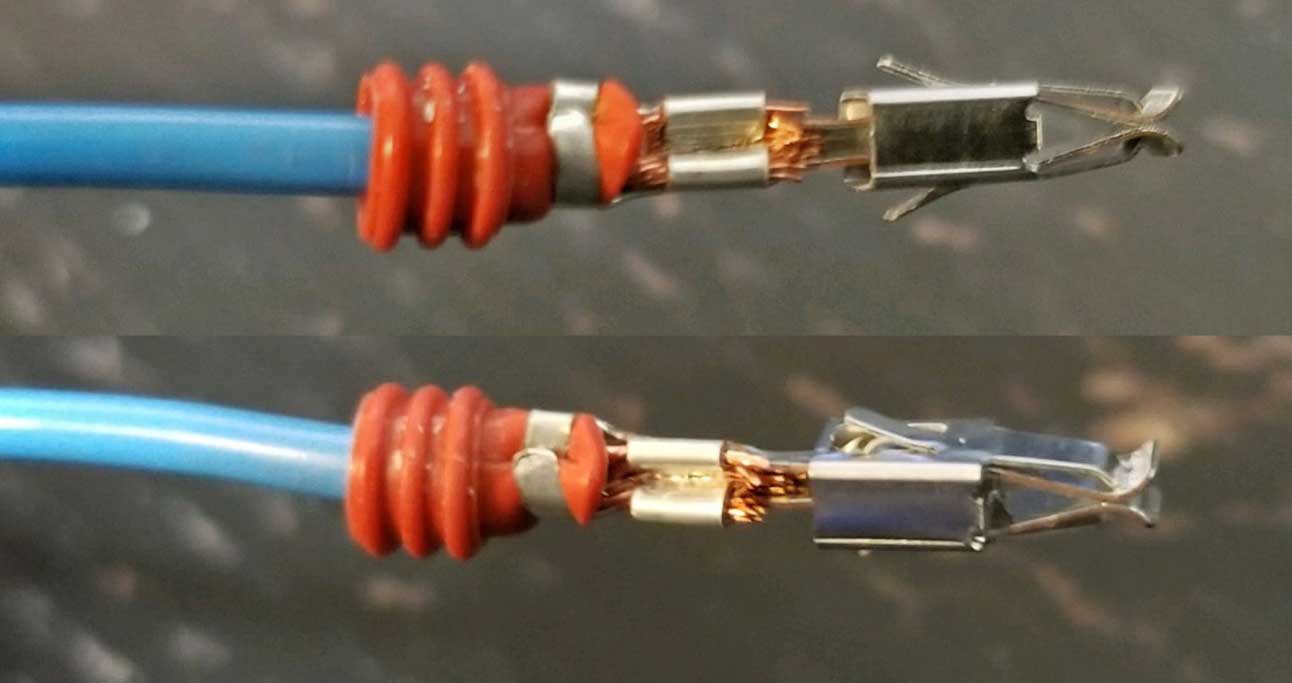
I have NOT normally been a fan of soldering when building an automotive engine harness.  Above photo from How to Splice Wires: https://learn.sparkfun.com/tutorials/working-with-wire/how-to-splice-wires Solder is fragile and tends to crack when subjected to vibration, rattling, movement, heat, or a combination of these. If an auto harness connection cracks, it will lead to immense frustration and THEN you'll hopefully have learned your lesson. Solder is just find for wires that will NOT be bouncing, rattling or vibrating. It's good for an electronic device in your house, but I don't prefer it in a car. For best conductivity in a butt joint, copper wires should be joined together COPPER touching COPPER or joined by a butt connector. COPPER TOUCHING COPPER or COPPER TOUCHING METAL is best. NOT copper joined by SOLDER. If you like SOLDER, soldering PLUS crimping can work well in a car harness. 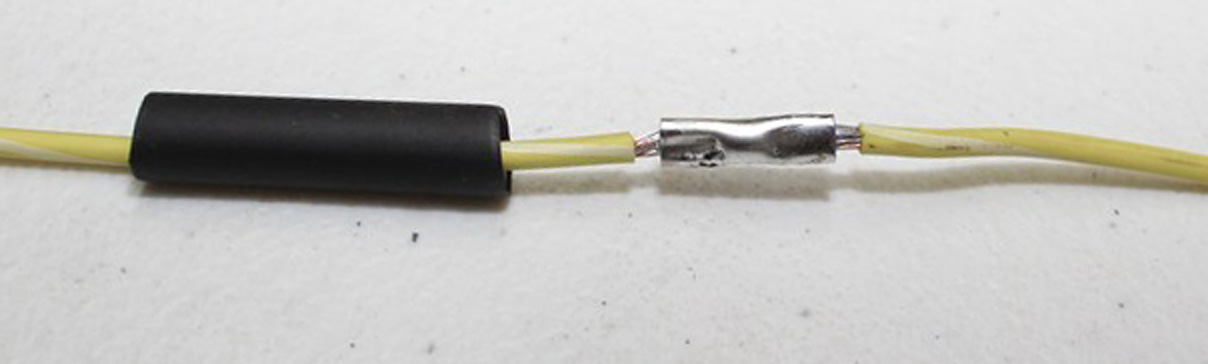 It's obviously a lot more work than just crimping, but it's a lot stronger. Here's a video below demonstrating the use of solder AFTER crimping a battery lug. Below video: https://www.youtube.com/watch?v=XkMdlPsBxkc |
||
|
|
||
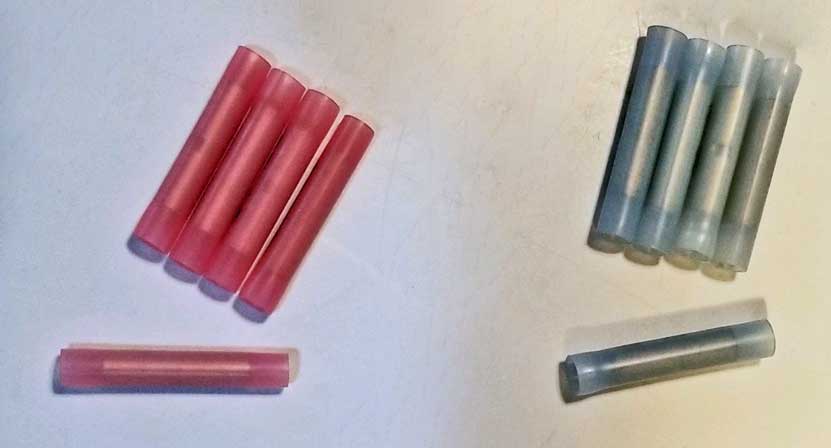
| SOLDER BUTT CONNECTORS |
||
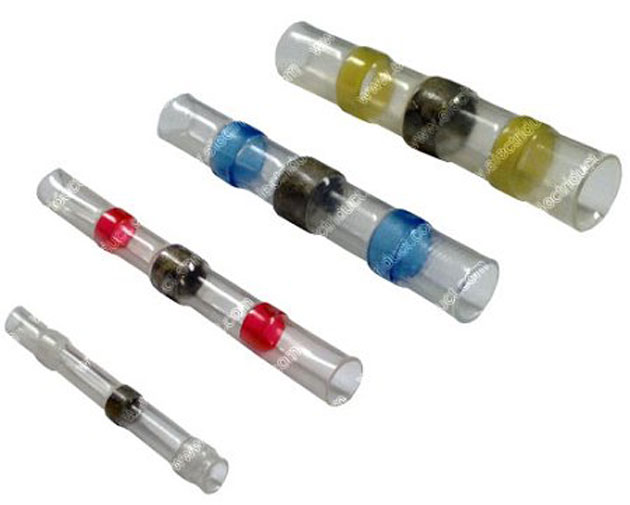 These are popular, but be aware these are not miracle connectors. These do not offer a CRIMP. These have a low-temp melt solder inside that melts at a much lower temperature than normal solder. Normally a heat gun will not get hot enough to melt solder, but low-temp solder will melt as low as 200 to 300 degrees Fahrenheit. I would not use these under my hood in an area that gets very hot, but these would be OK inside the car. The tubing will shrink and seal the connection, which is a good thing. |
||
| CRIMP AND SOLDER BUTT CONNECTORS | ||
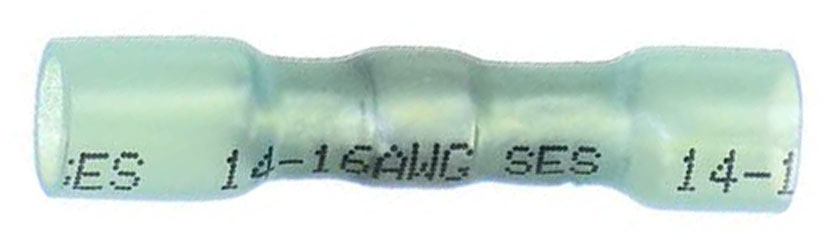 These butt connector have a metal butt crimp inside for a strong, secure connection, plus low-temp solder in the center, which will melt when heated. The plastic tube will also shrink down and seal the connection well (adhesive lined inside, which melts and glues the connection tight. These connectors are expensive, costing as much as almost $1.00 each. They come in sizes for wire in 18-20 AWG, 14-16 AWG, or 10-12 AWG. |
||
| WIRE TWIST BUTT JOINTS No Crimping, No Solder. |
||
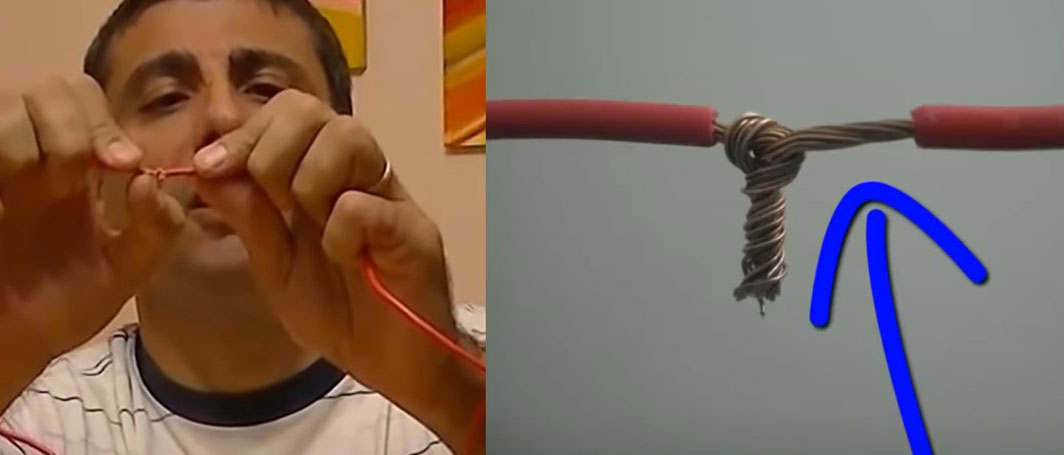 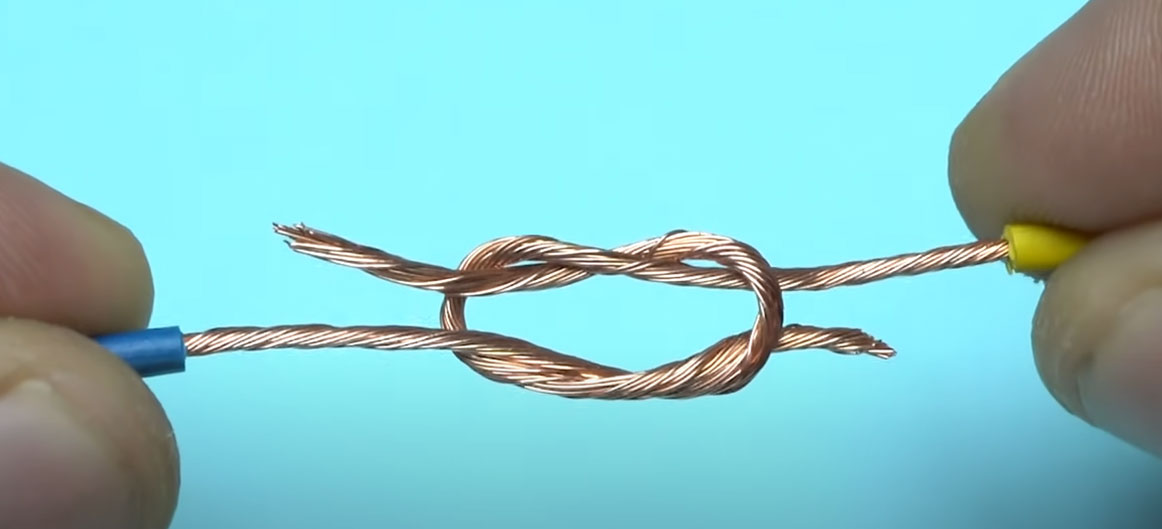 There are a number of videos showing how to twist wire together effectively WITHOUT using solder or butt crimps. Here are a few methods below. Just keep handy a supply of some different sizes of HEAT-SHRINK TUBING to cover them. |
||
| https://www.youtube.com/watch?v=xBw5hrV3aZM |
||
| https://www.youtube.com/watch?v=RdTQ1W07GRE&t=251s |
||
| https://www.youtube.com/watch?v=ZSS6ZNCuiPI |
||
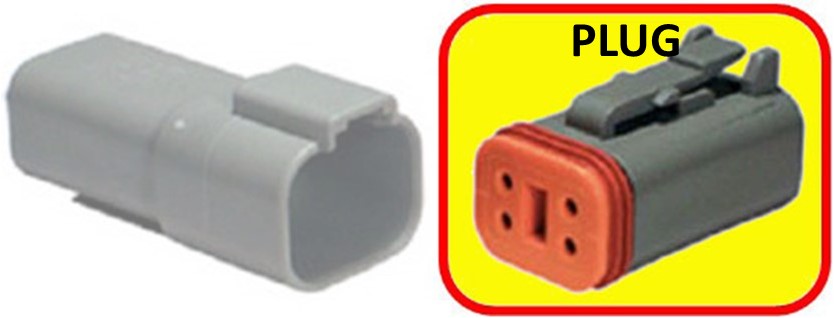
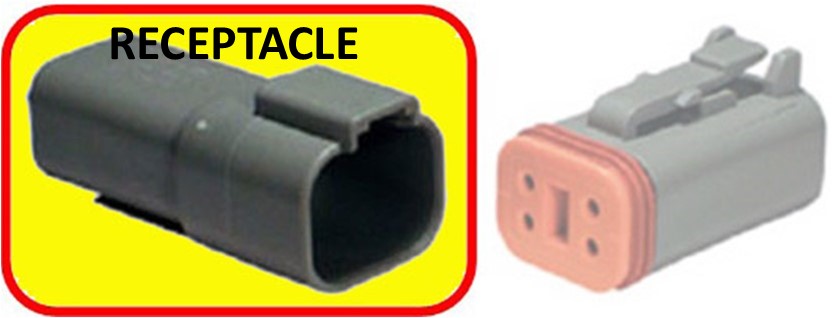
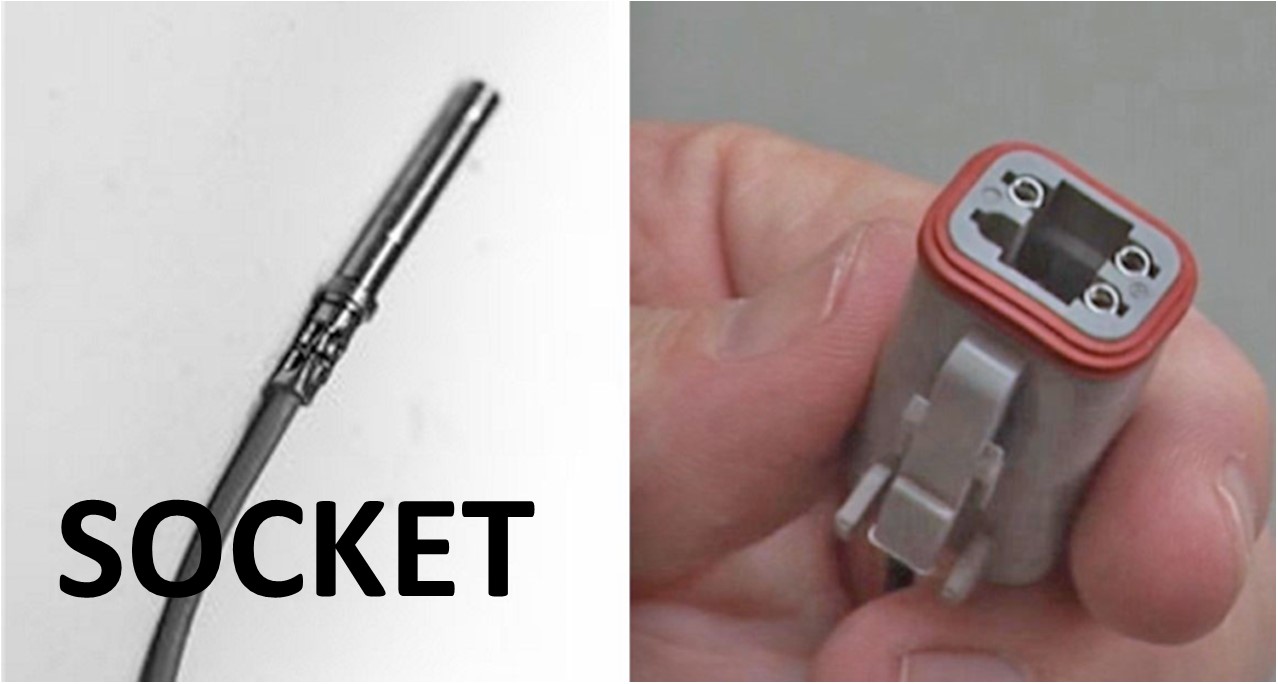
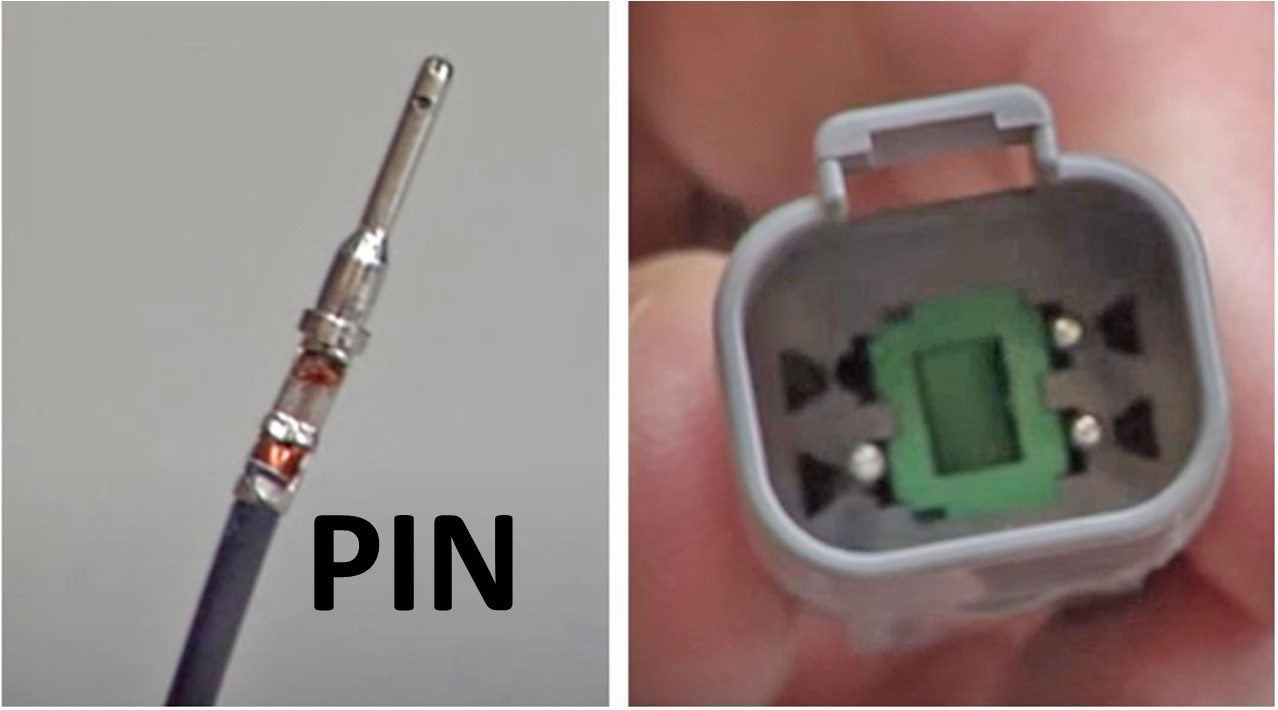
| DEUTSCH DT CONNECTORS DEUTSCH DT connectors are 100% interchangeable (every part) with Amphenol AT Series connectors. |
|||||||||||||||||
| (Amphenol AT equivalent connectors are further below CLICK HERE) Hard to spell, but Deutsch connectors are very good. Fully sealed, easy to use connectors suitable for almost any automotive application. Deutsch connectors are sold by TE Connectivity, formerly Tyco Electronics. I like these connectors, so I thought I'd highlight them here. I don't offer these in my pages because they're available pretty much everywhere. But I use them and they are great connectors. Most common types used for automotive: 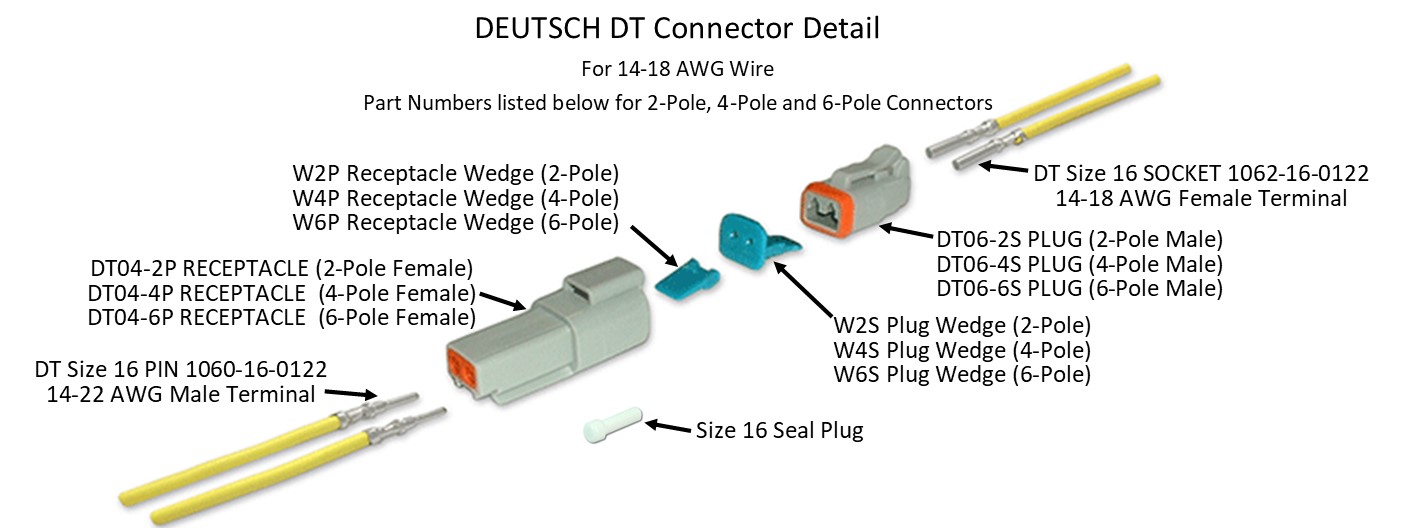
DT Connectors: 14-18 AWG, rated up to 13A. Uses Size 16 contacts (terminals). https://www.mouser.com/new/te-connectivity/te-deutsch-dt-series-connectors/ HIGHER CURRENT CONNECTORS  DTP (Power) Series Connectors: 10-14 AWG, rated up to 25A. Uses Size 12 contacts (terminals). These are for higher amp power connections up to 25 amps. https://www.mouser.com/new/te-connectivity/te-deutsch-dtp-connectors/
https://www.amphenol-sine.com/a-series-connectors A comprehensive cross-reference is available here: https://www.amphenol-sine.com/DeutschConnectorsCrossReference.html Most common types used for automotive: 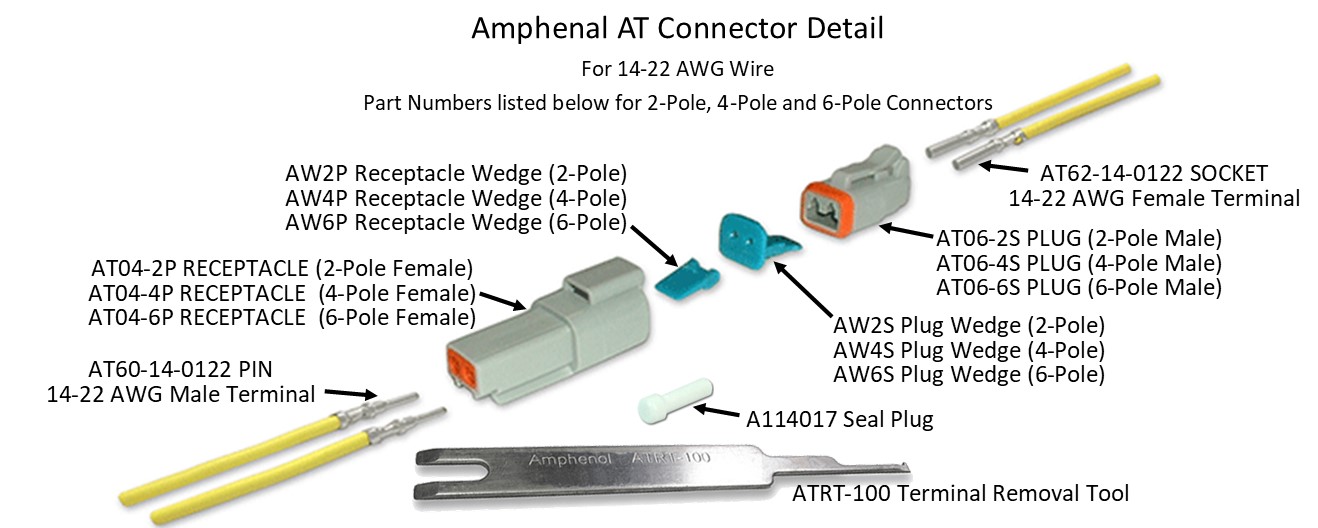
AT Series Connectors: 14-22 AWG, rated up to 13A. Uses Size 16 terminals. https://www.amphenol-sine.com/at-series HIGHER CURRENT CONNECTORS 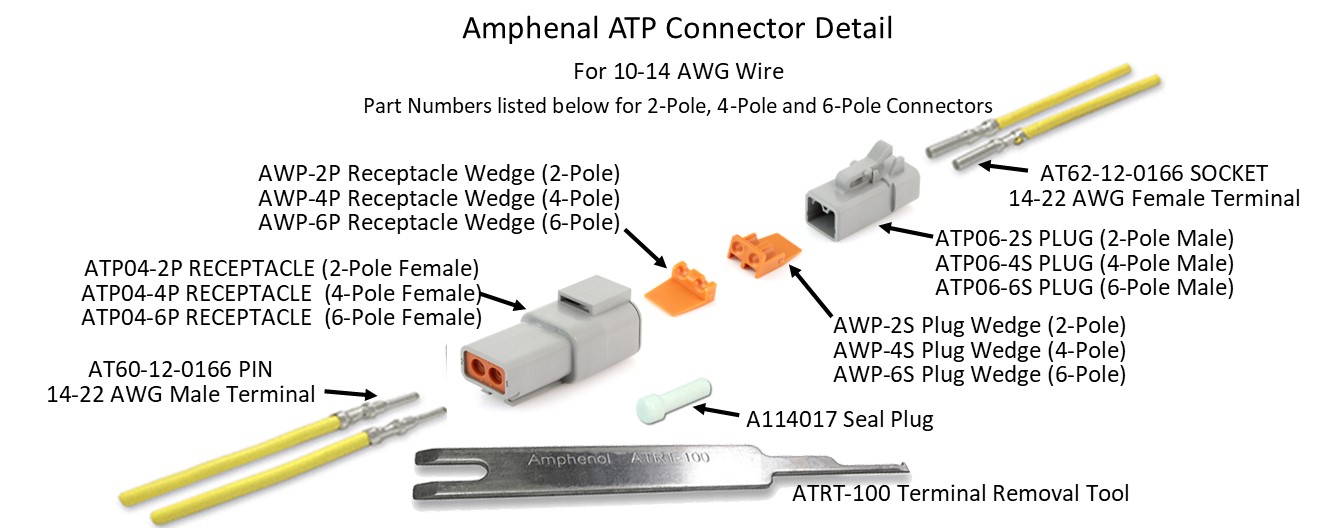
ATP (Power) Series Connectors: 10-14 AWG, up to 25A rating, uses Size 12 terminals. These are for higher amp power connections up to 25 amps. https://www.amphenol-sine.com/atp-series
|
|||||||||||||||||