2 4 0 T U R B O . C O M
D A V E ' S   V O L V O   P A G E
ELECTRIC COOLING FAN PROJECTS
for Volvos.
Brushed fans in this page

     UPDATED: April 17, 2024       CONTACT   
D  O  M  A  I  N  S
davebarton.com PrancingMoose.com 240Turbo.com
Payments and Policies
New Items
Cool Volvo Products 240 Modes & Fixes
Volvo
                  Stickers Volvo
                  SteeringWheel Labels
Volvo Wire Harnesses Volvo Harness Parts, Terminals, Connectors.
Volvo Prancing Moose Stickers Other Car Stickers Volvo Conversion Harness. Volvo 960 coil harness repairs.
Volvo Underhood, Body and Chassis Sticker and
                  Labels Other Car Stickers 740, 760, 780 Turbo Boost Faces Volvo Custom Black or White Faces.
240 Black Door Vinyl Stripes. Volvo 240 Window Scrapers 740, 940 odometer repair gears and instructions. Volvo 240 Odometer Repair Gears and Instructions.
Classic Auto AC Conversion Wheel Center Cap Overlays. Volvo Group A Racing Articles Prancing Moose, Volvo R-SPORT Horn Buttons, replica Alpina horn buttons 240 Hydraulic
                  Clutch Volvo Adjustable Voltage Regulators
Electric Fan Diagrams Modified 240s
Volvo
                  Vacuum Diagrams
Dave's 245
                  Specs Used Volvo Stuff 240 big brakes
R-Sport
                  apparel from Cafe Press
Prancing Moose Apparel from Cafe
                  Press Favorite Links
   
N A V I G A T I N G   T H I S   P A G E
Volvo 2-Speed Fan Relays
from the 1990s
All Electric Fan Conversion Projects
(starting in 1997)
(2009) Volvo 940 - 850 Fan Conversion
(2016) 4-Speed Fan Controller Project
(2014) Lincoln MARK VIII Fan Install #1
(2014) Large Griffin Aluminum Radiator
(2018) AutoCoolGuy PWM Fan Controller (2021) Lincoln MARK VIII Fan #2 (Dorman)
(2021) Hayden 16 inch P.O.S.
Big FUSE for Big Fans
Ford Taurus Fan Info
DUAL FAN Assemblies
Big Jeep Chrysler Fans
Fitting a WIDER Radiator in a 240
>>  BRUSHLESS FANS  <<
NEW PAGE CLICK HERE
.
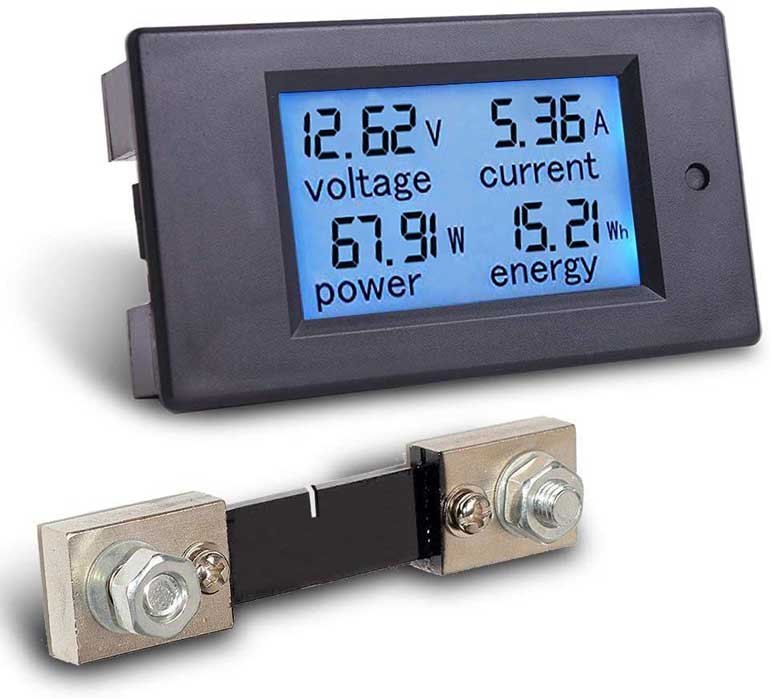
WATTS TO AMPS CALCULATOR
If you know the Watt rating of a fan, you can use that to calculate Amperage.
https://www.inchcalculator.com/watts-to-amps-calculator/

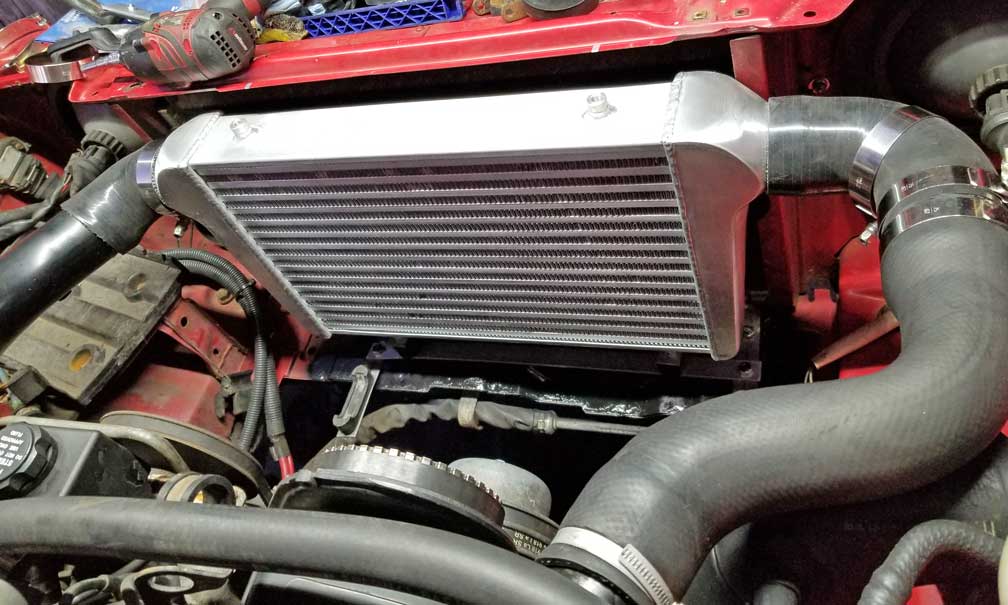
Volvo Electric Primary Cooling Fan Conversions

I began tinkering with electric primary cooling fan conversions in Volvo 240s back around 1997 after having less than a successful time keeping my '84 245 Turbo from running too hot during warm 100+ degree Southern California summers using the stock pulley fan.  I then began this page 1999 to share this info and I've been updating it on occasion ever since.  Basically, this page will outline some fairly simple and inexpensive primary electric fan conversion ideas for Volvo 240s . . .  and some that are not so simple or inexpensive. Some ideas worked ok, some not so well. Some of these ideas also will work for 
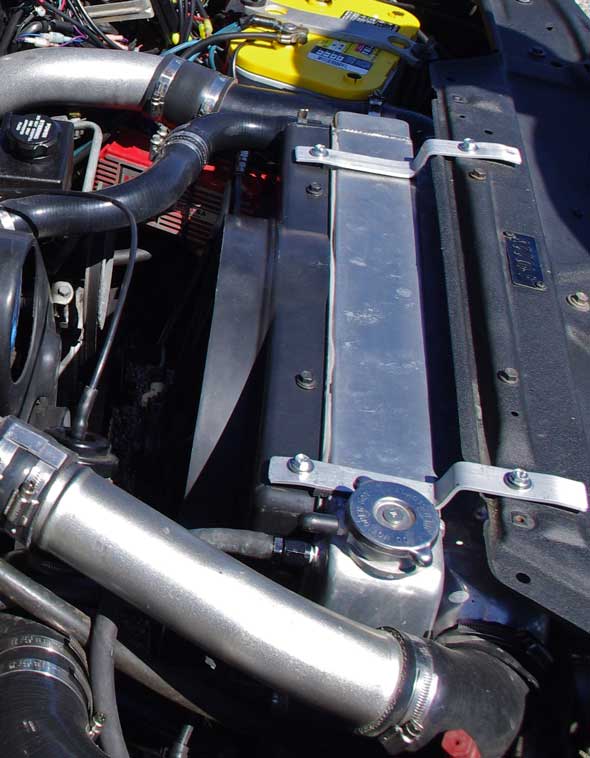
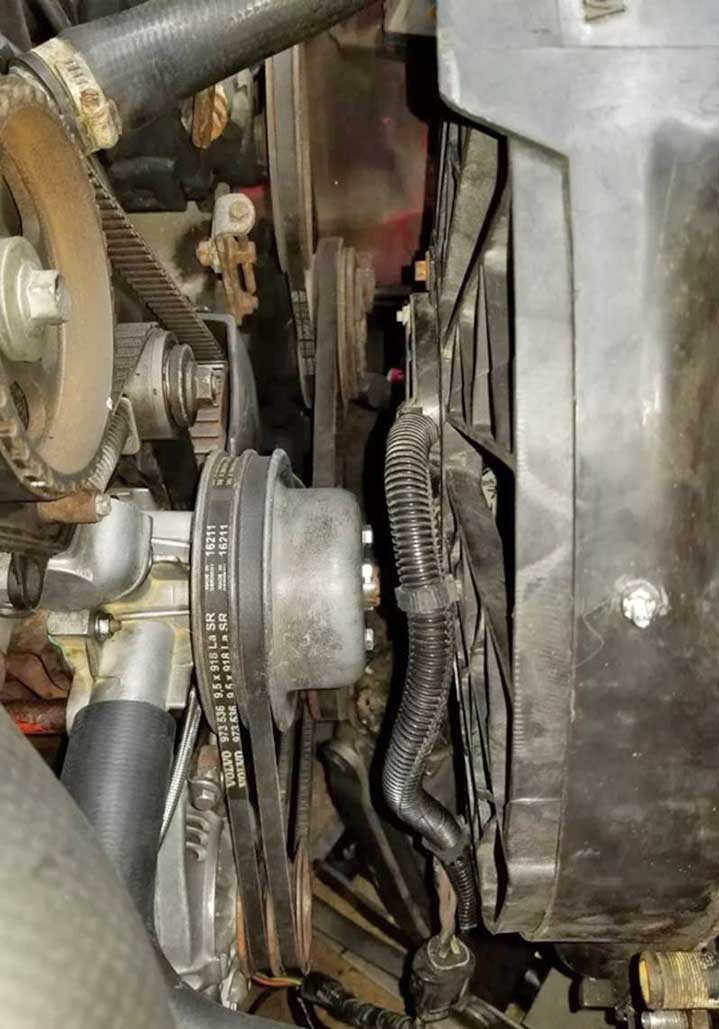
the 740, however it should be noted the 740 Turbo has less room between the radiator and water pump pulley than a 240, so some fans shown in this page may not fit the same in a 740. 


While there are many options for your Volvo when it comes to keeping cool, these are just a few. This information is presented at face value with no specific claims of magical performance, other than my own experiences and test data.

All of my electric fan projects over the years were for Volvos with AIR CONDITIONING. So keep that in mind when you tell yourself YOU didn't need a fan THAT big.  Maybe you didn't, but if you add AC (and an INTERCOOLER) that seriously changes the whole game, especially in a hot climate. 

For any electric fan installation, make sure that your fan is capable of turning itself on reliably if your engine starts to overheat.
 
There are two primary reasons for performing an Electric Fan Conversion. The FIRST is to reduce the engine drag at highway speeds. In theory you should gain a little horsepower.
The SECOND reason would be to
reduce the amount of stress on the water pump. 240s can go through water pumps faster than a typical car and it's a good idea to change them as preventative maintenance. The loads placed on the water pump bearings by the alternator and a huge belt-driven fan can shorten its potential service life.
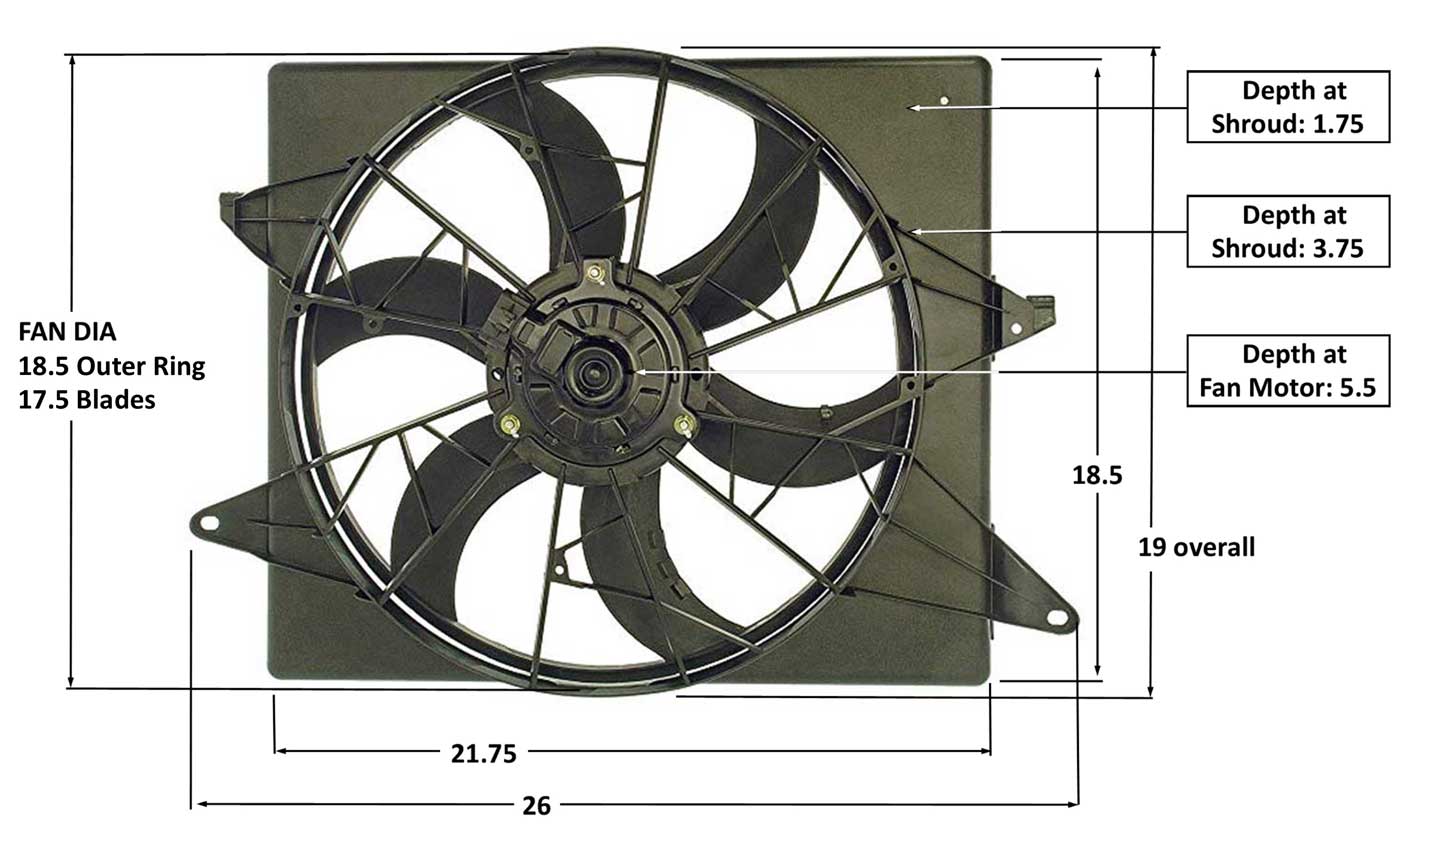
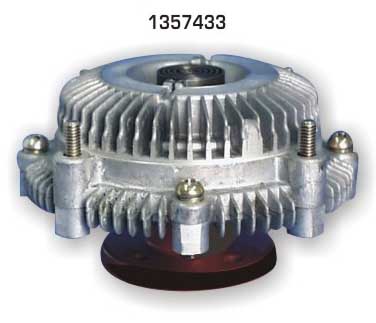
FAN CLUTCH OR ELECTRIC FAN?
You need to decide for yourself if your fan clutch is best or if an electric fan is best. If a new electric fan is big enough and really, really powerful, it might equal or exceed the cooling performance of a heavy duty fan clutch. Most electric fans will not do that.
Also an electric fan may not be as reliable as the mechanical fan. Electrical stuff fails. If you decide it's best for your Volvo to keep the belt-driven fan, you may want to consider the option of a heavy duty fan clutch.  
An interesting bit of information I discovered while trying out the below electric fan conversions over the years. 
Almost ALL electric fans I have tried over the last 30 plus years were INFERIOR in cooling capacity compared to a heavy duty tropical fan clutch
, EXCEPT for the huge fans at the bottom of this list, beginning with the big Ford fans and the big BRUSHLESS fans in the Brushless Fan Page.

More info on Heavy Duty Tropical Fan Clutches can be found in this page: https://www.240turbo.com/TropicalFanClutch.html
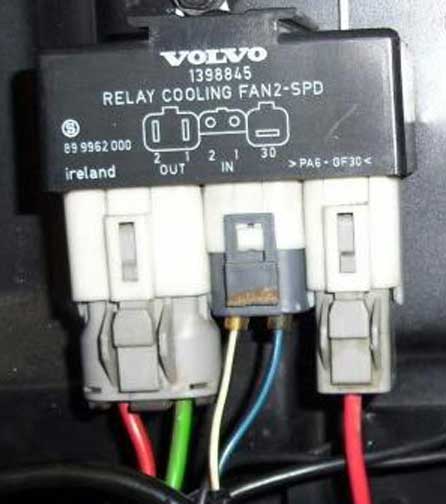
VOLVO 
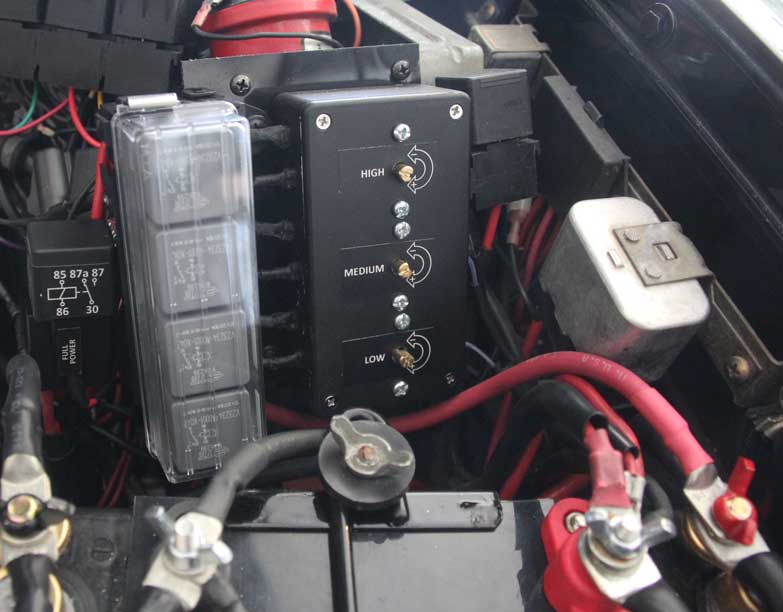
2-Speed FAN RELAY Basics.
 Lots of people are using this relay to control 2-speed fans, mainly because it's cheap if you can find it used. 

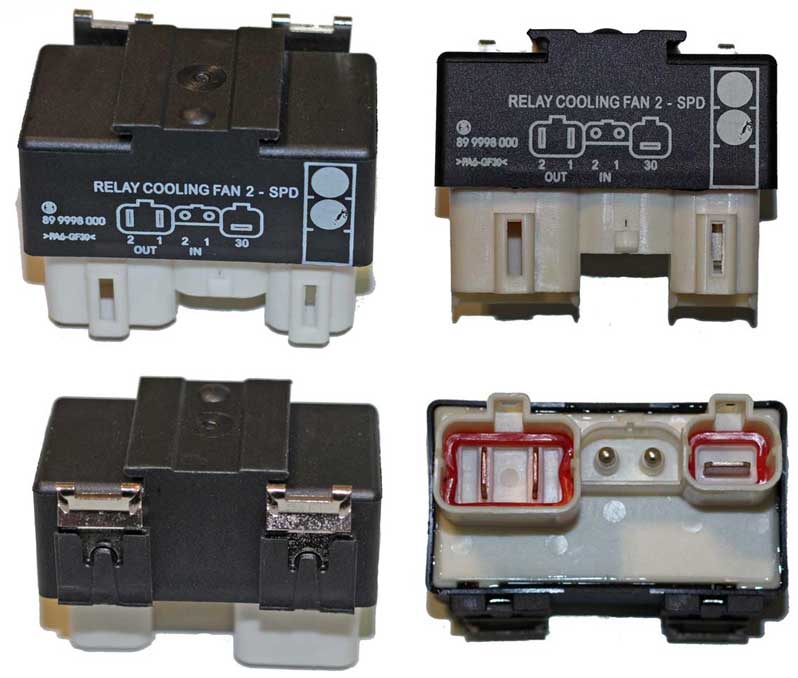
There is some suggested wiring info at: http://www.therangerstation.com/tech_library/volvo_electric_fan.shtml


<<< If you need a source for the original Volvo connectors for this relay, I offering them here: 
https://www.prancingmoose.com/blackvinyl.html#relaycoolingfan
  
 
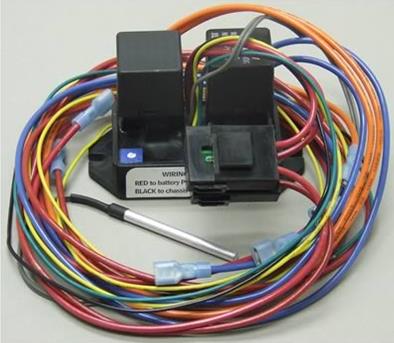
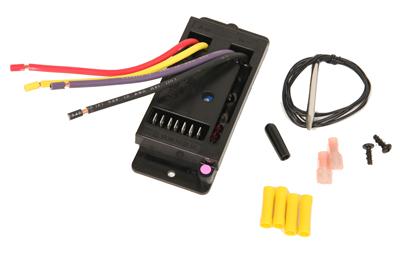
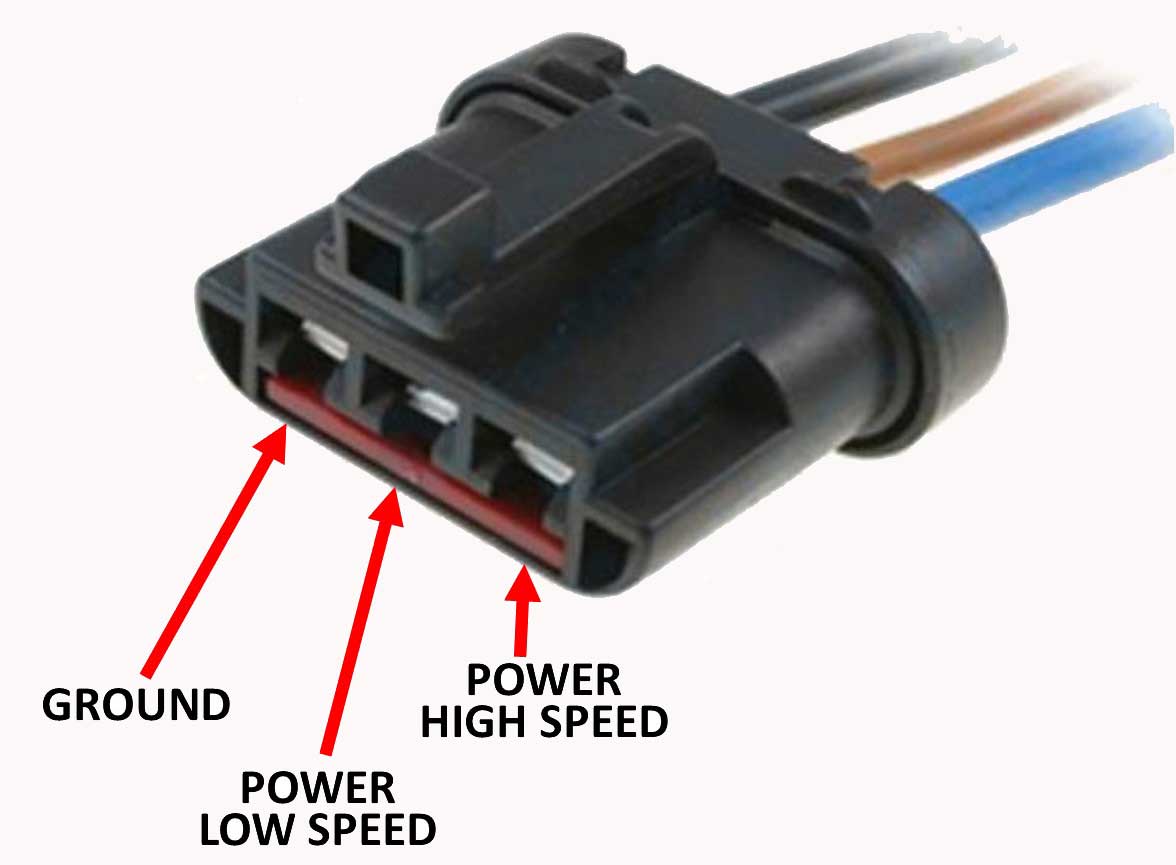
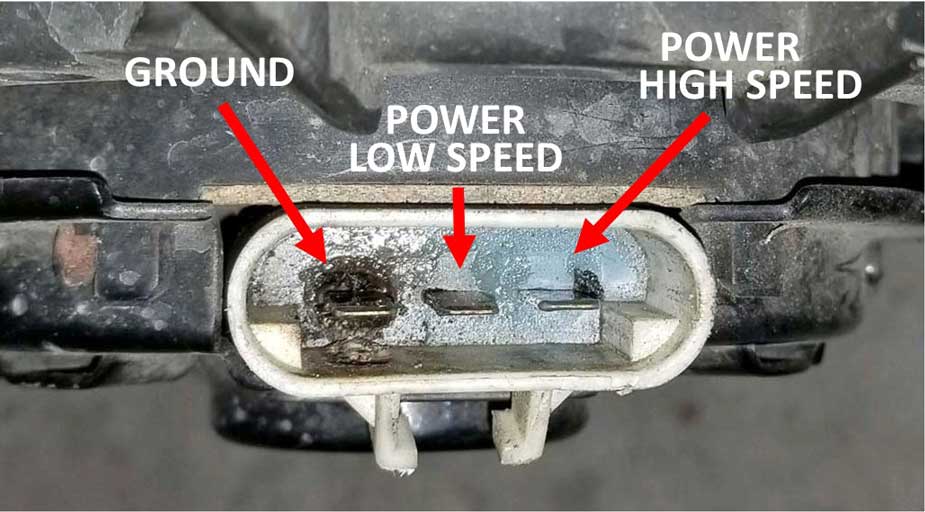
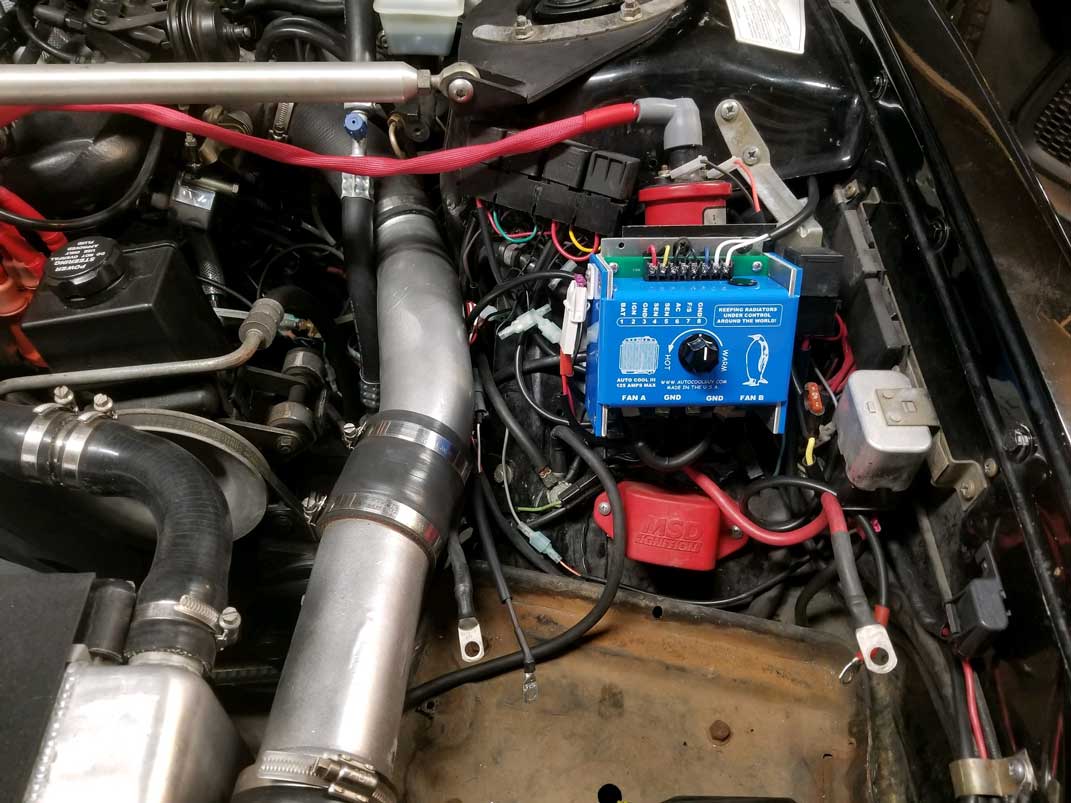
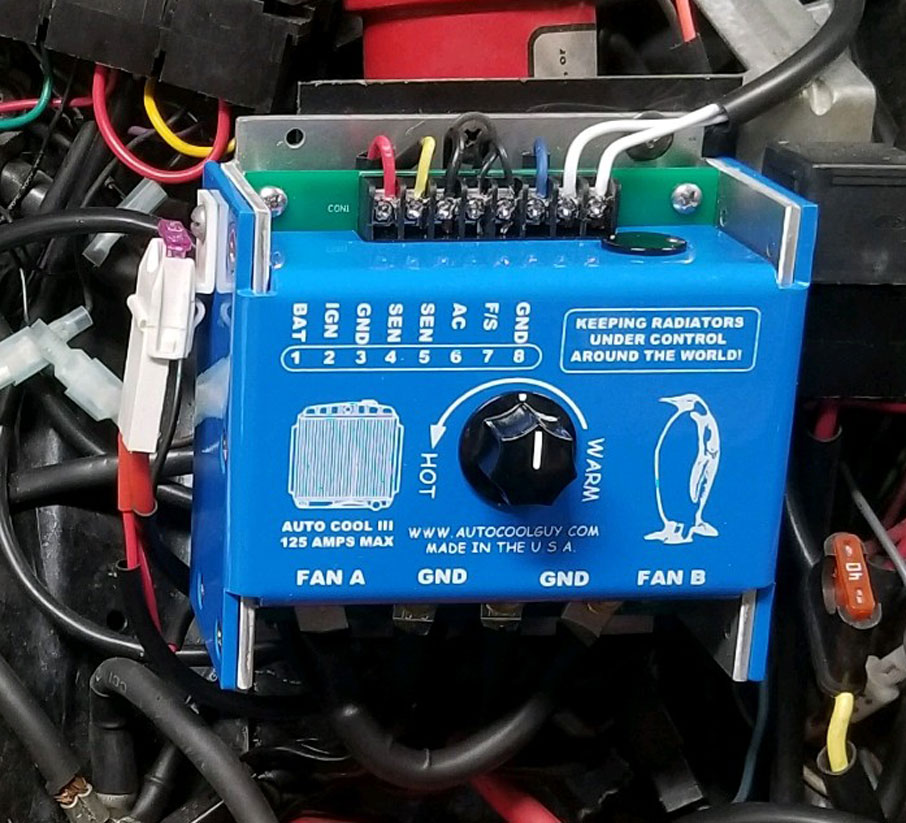
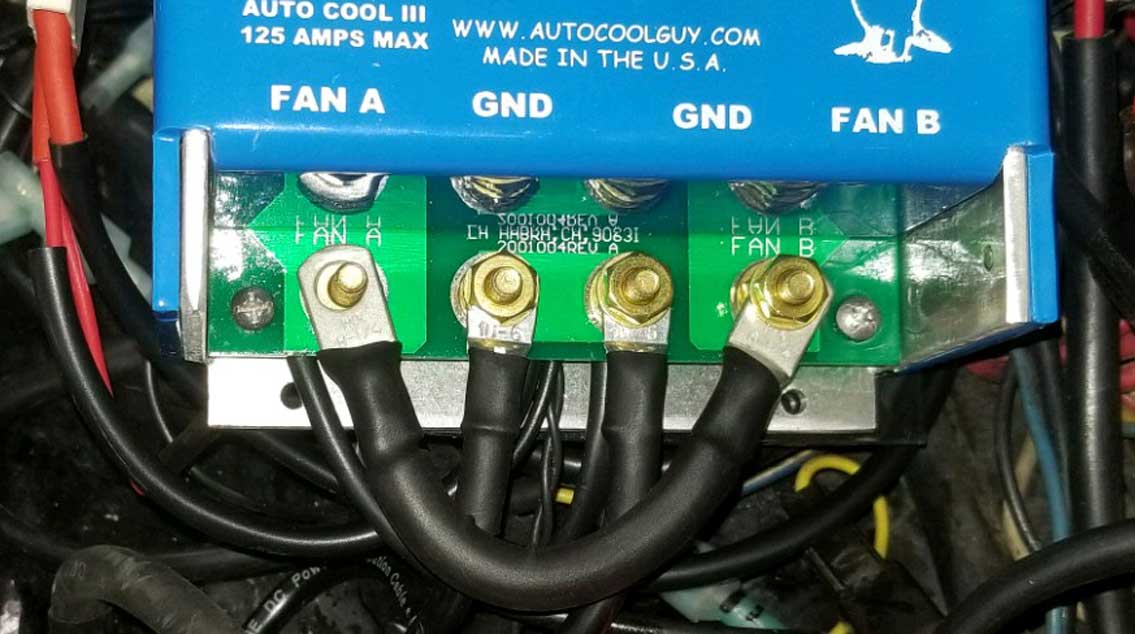
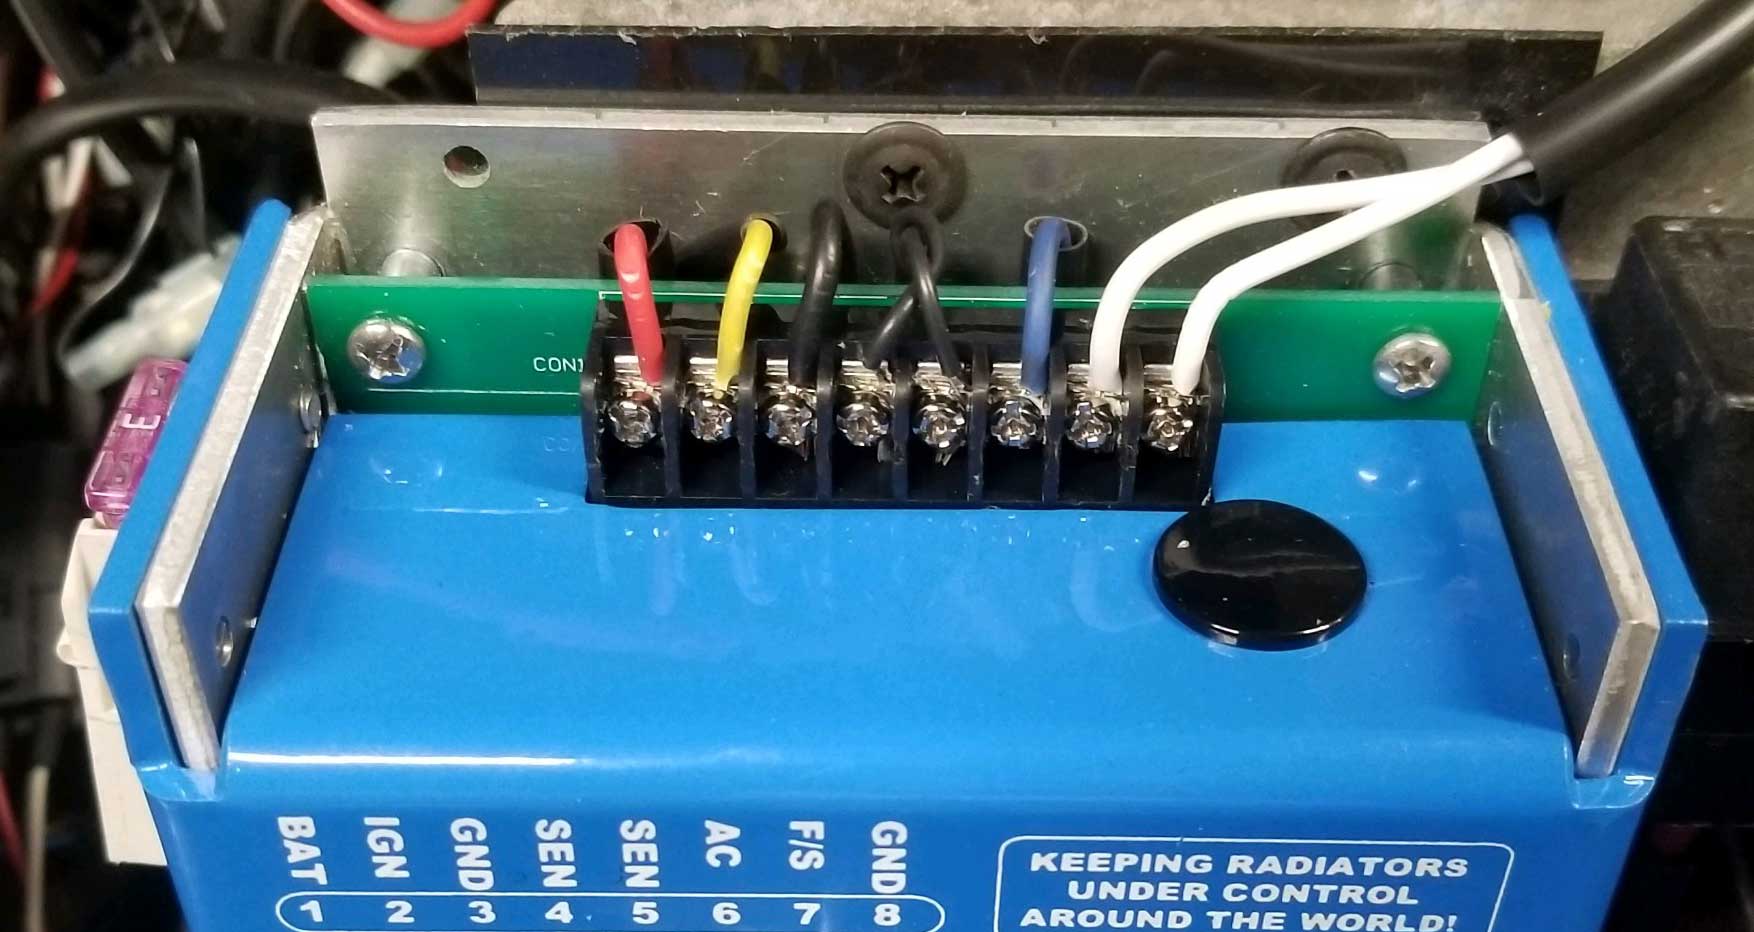
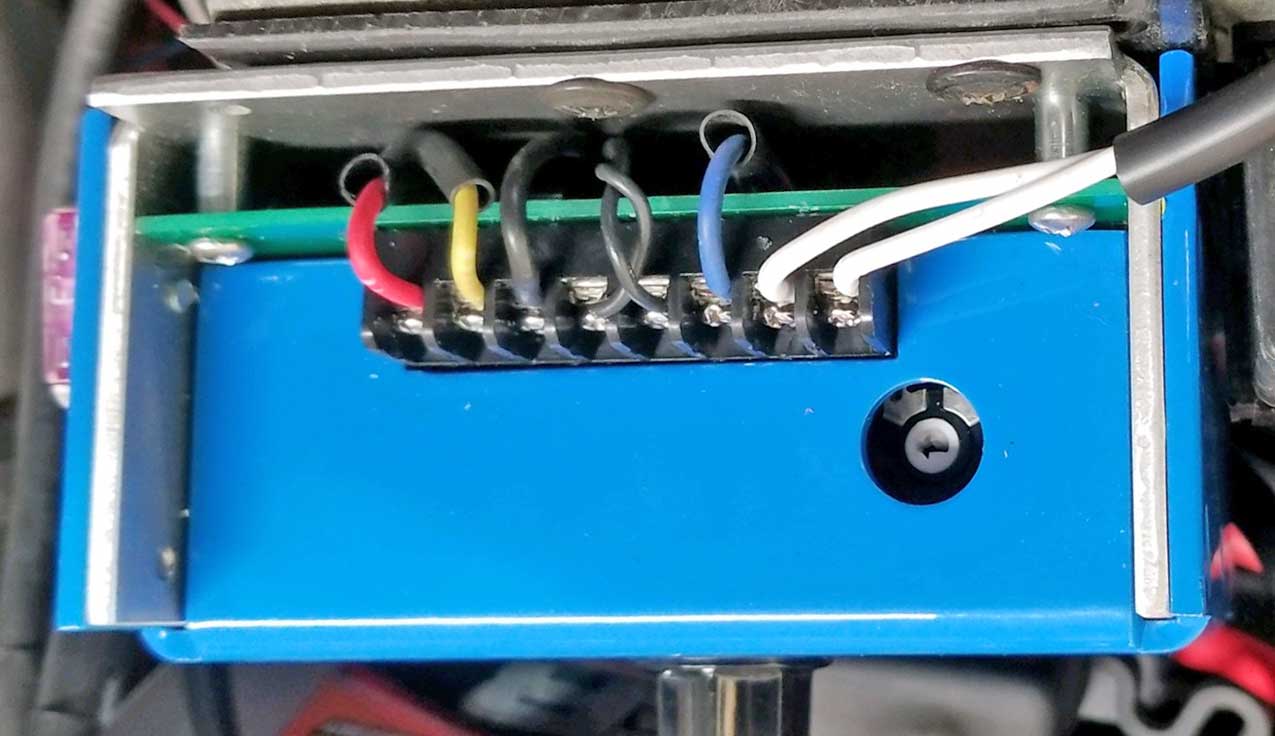
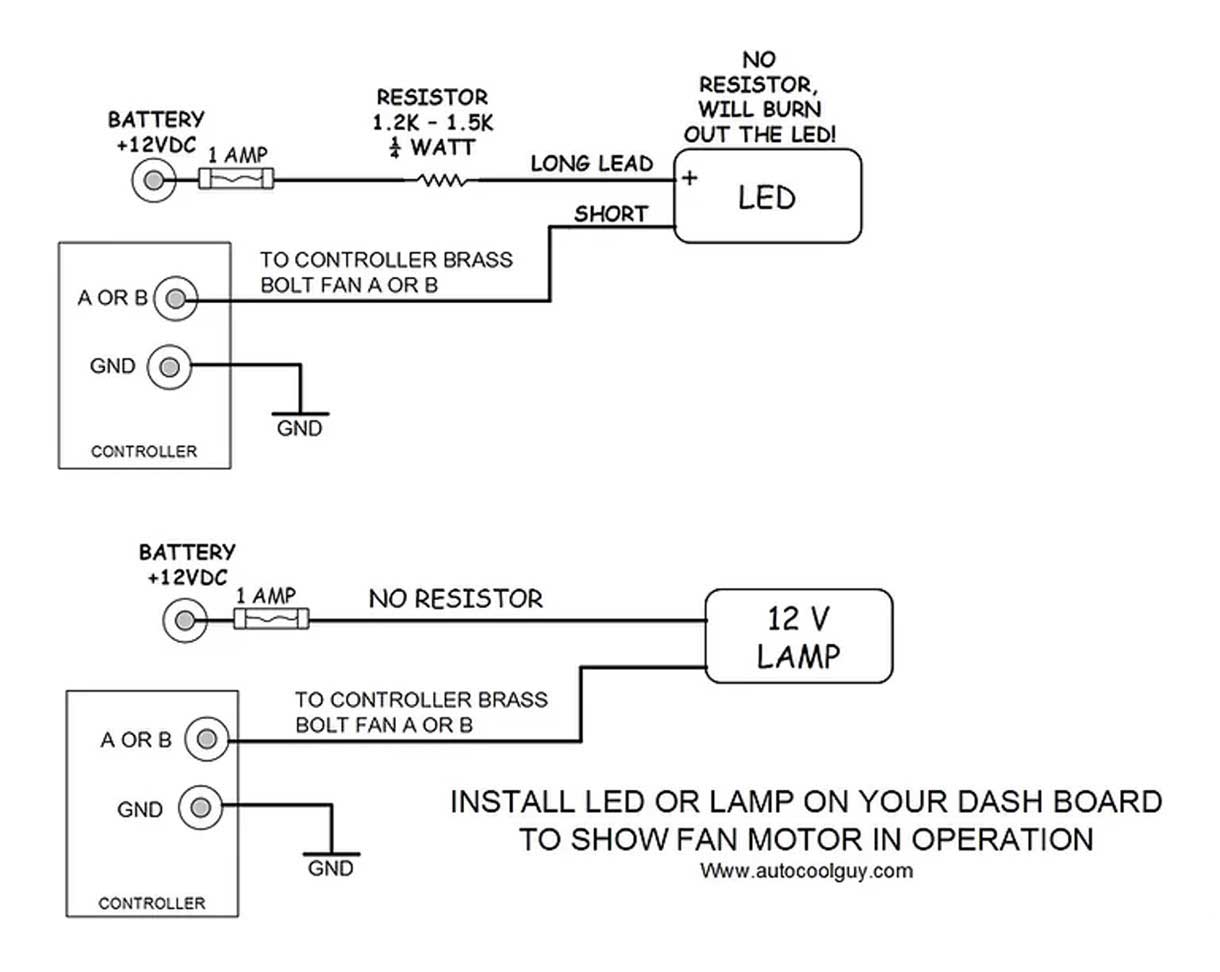
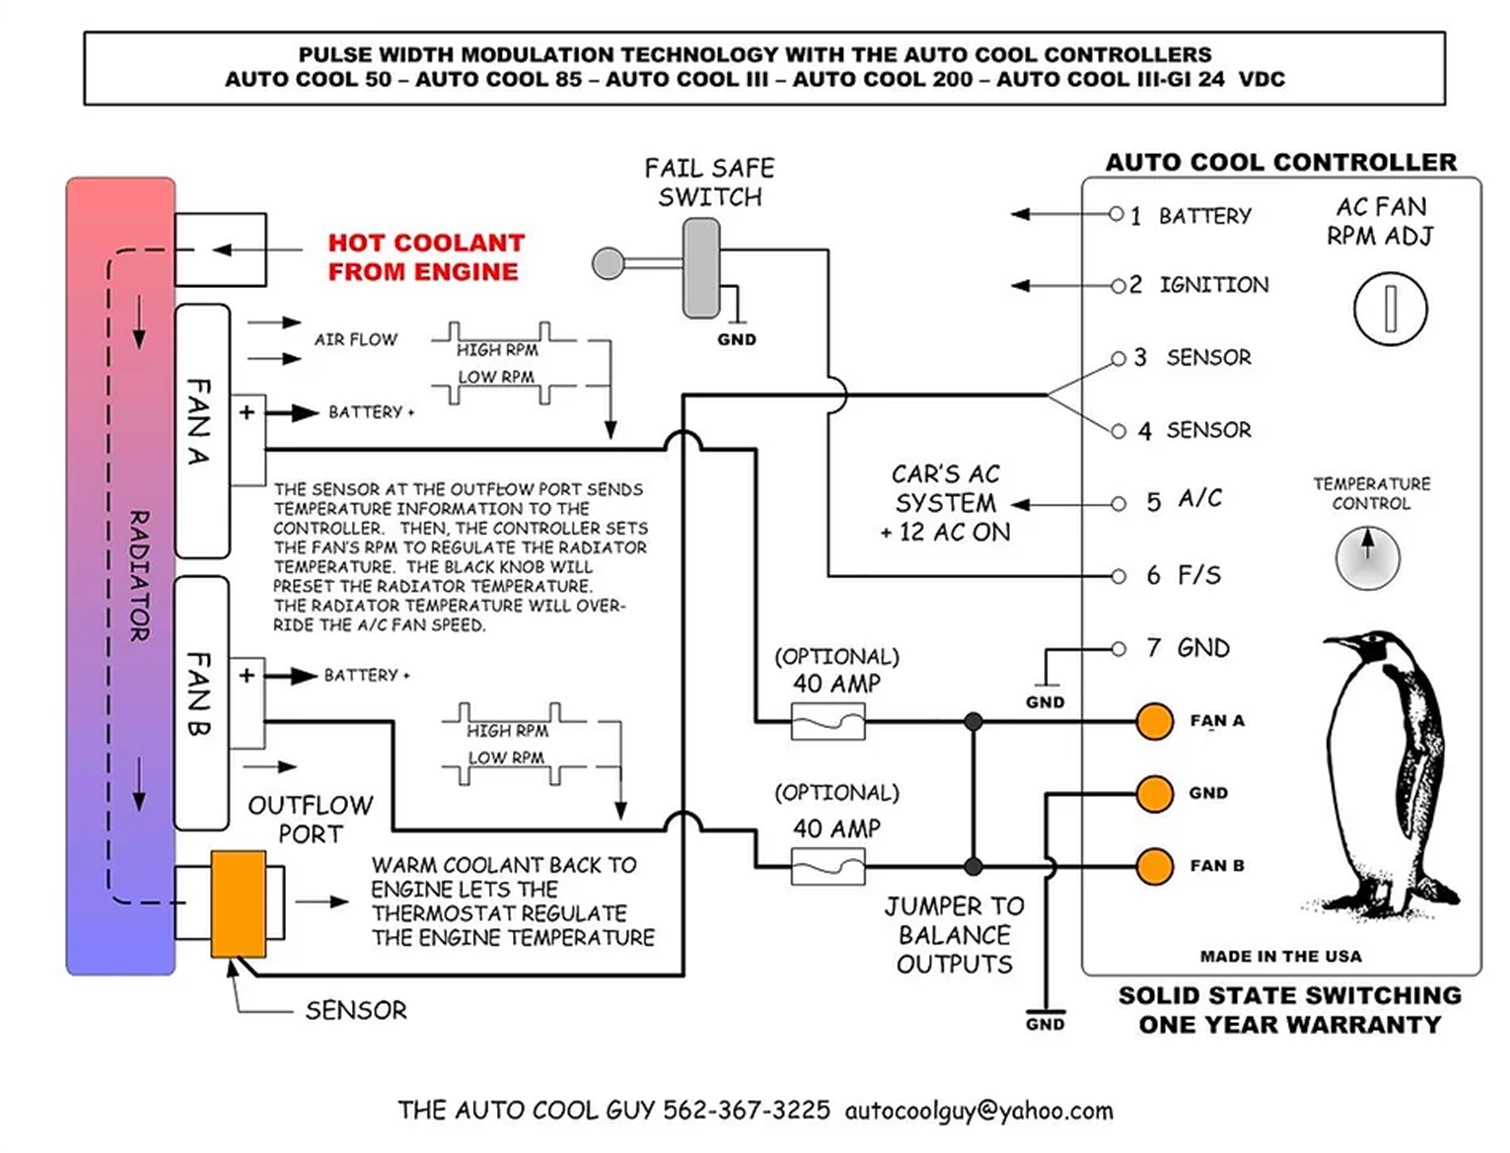
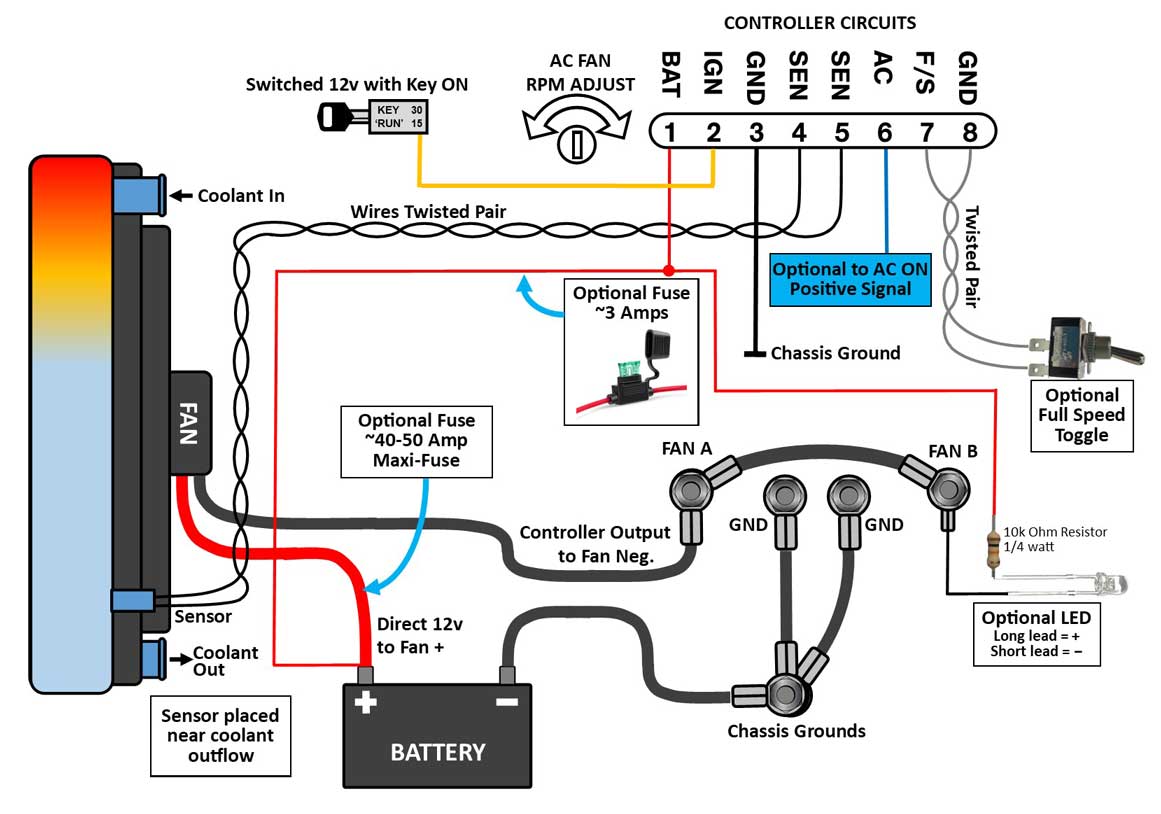
This diagram below will show how the Volvo 2-speed fan is wired from the factory. ALSO, If you want or need a different way of controlling a 2-speed relay, you might consider the Universal DC Fan Relay Controller shown here as an option. It lets you custom set the fan turn-on temperature for DC fans using an existing engine coolant temp (or gauge temp) sender, or any sensor. Instead of using a typical fixed temp sensor, this offers an adjustable option for relay turn-on temp settings. It also has an optional "force-on" override function you can use to activate the fan when your AC compressor comes on.  And since I was making a diagram, I decided to also add an option to use UPGRADED mini relays just in case you need something robust for a bigger 2-speed fan.
 

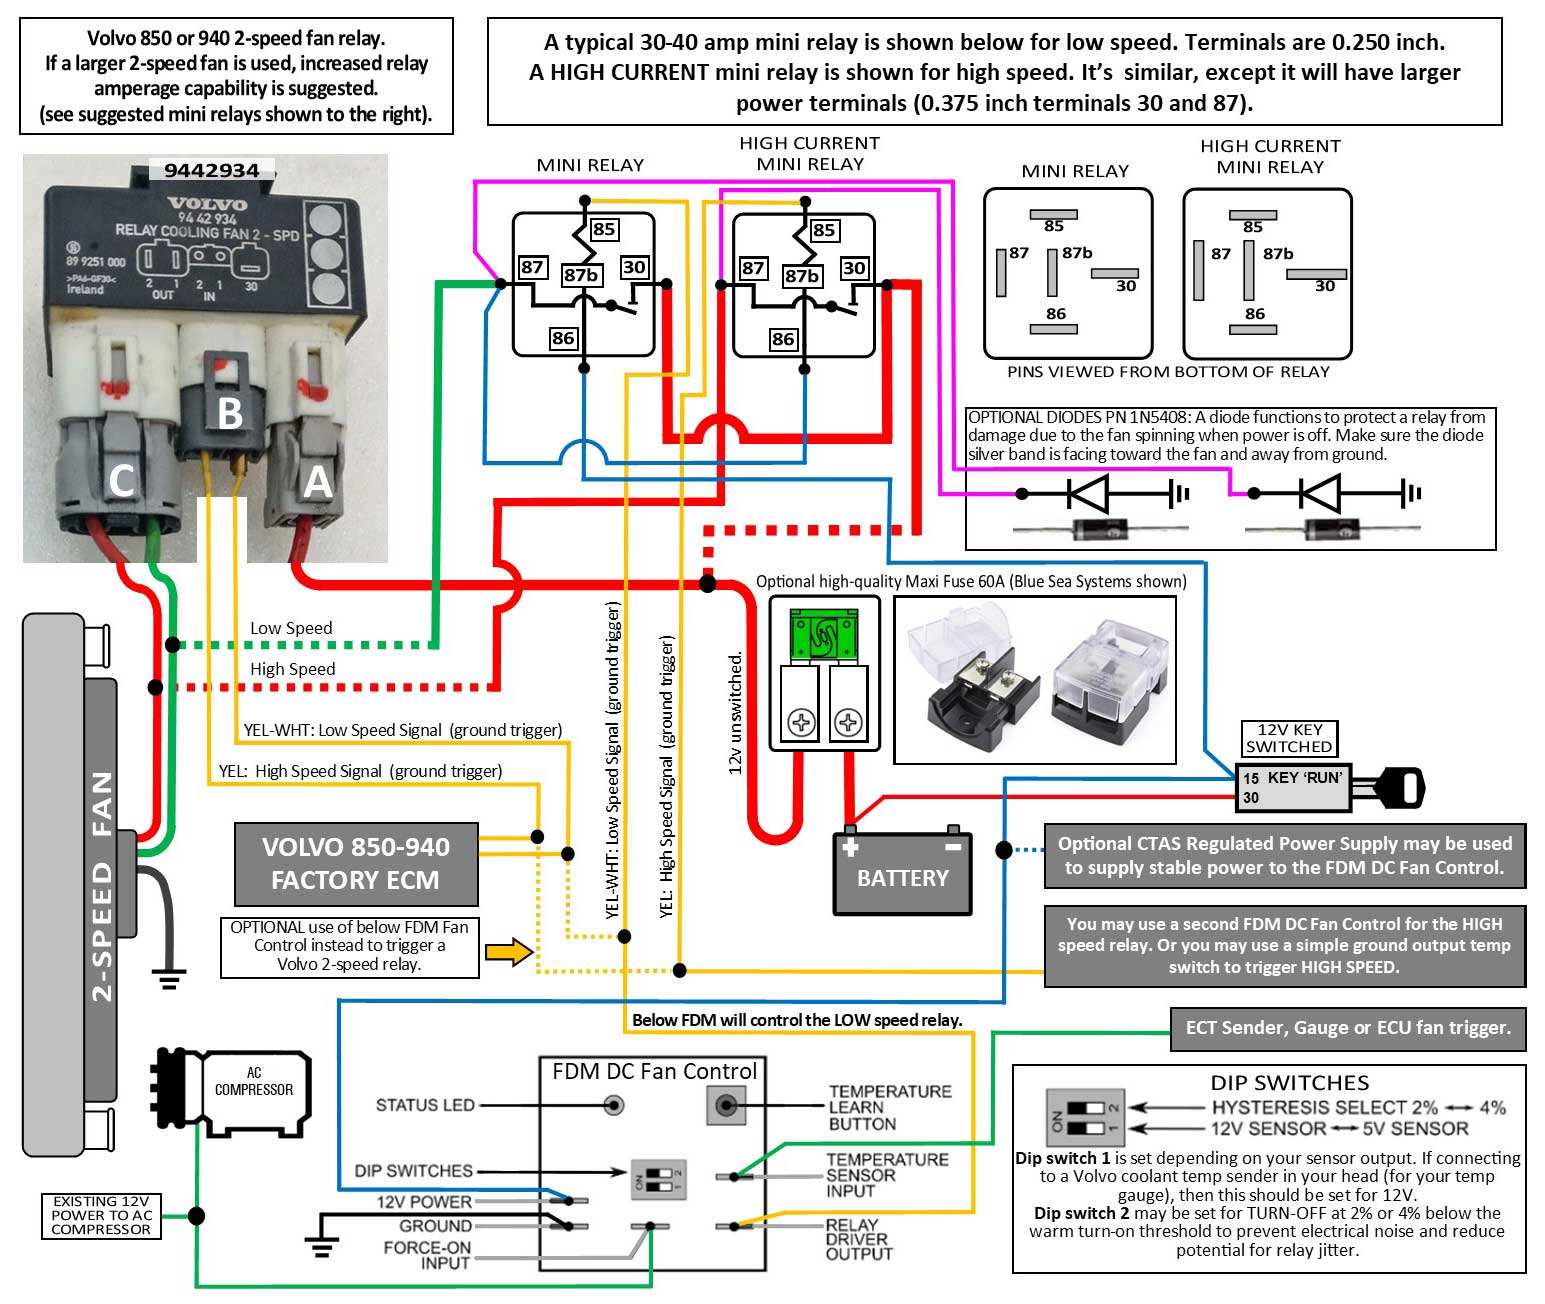
If you're curious about the dip switch selection of 12V or 5V, I have a good explanation in another page about my testing to determine which is needed for a Volvo gauge or sender. That can be found in my Brushless Fan Page.
The above FDM Fan Control can be found on eBay, direct link: ebay.com/itm/145715716008.
Also referenced is an optional CTAS Regulated Power Supply: ebay.com/itm/143083402375
Or you can find these in their catalog at
ebay.com/str/gkgoodcheapparts.


Here's a collection of coolant temp switches or senders from NAPA. This list came from a 2007 discussion thread: corral.net/fan-temperature-switch
These can be used to trigger a high speed turn-on relay, but adjustability can be limited.  If you prefer a fully adjustable turn-on setting, the above FDM Fan Control can do what's needed.
NAPA Fan switches

PN
Temp Turn ON (F)
Temp Turn OFF (F)
Threaded Size
FS100SB 216-232 201 3/8x18
FS102SB 216-232 198-218 M22x1.5
FS103SB 200-210
1/2x14
FS110SB 224-236 212 3/8x18
FS111SB 229-245
3/8x18
FS112SB 213-229
3/8x18
FS120SB 193-207 175 1/2x14
FS121SB nodata

FS130SB 191-198 182-189 M16x1.5
FS133SB 198
M16x1.5
FS147SB 194-203
M16x1.5
FS150SB 191-198 182-189 M22x1.5
FS151SB 2 circuit 190-209 209-226 M22x1.5
FS166SB nodata

FS176SB 194
185
M16x1.5
FS186SB
196-201

M16x1.5
FS205SB
185

M16x1.5
FS207SB
nodata

3/8x18
FS211SB
nodata


FS244SB
199

M18x1.5


I began this page below in the 1990s
ELECTRIC FAN CONVERSIONS
Over the years I've done a number of different electric fan conversions in 240s.  I've compiled that info below.
.
Electric Fan RELAY Wire Diagrams Collection

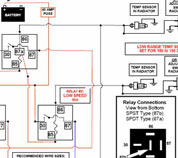
Click here for my 8 page collection of RELAY-BASED cooling fan diagram suggestions you can use to build your own stuff (PDF).
Note: Relay based fan setups are ok, but it's "old technology."  If that's ok with you, then use it. If you want better fan control, then it's available and I've included a LOT of info in this page.  So keep reading.
.
CONVERSION PROJECT #1
(originally posted 1997)
GM 14 and 16 inch Fans
(Ultimately, this didn't work well. It's NOT recommended for hotter climates or cars with AC)

All of my electric fan projects over the years were for Volvos with AIR CONDITIONING.
So keep that in mind when you tell yourself YOU didn't need a fan that big.  Maybe you didn't, but if you add AC (and an INTERCOOLER) that seriously changes the whole game, especially in a hot climate. 
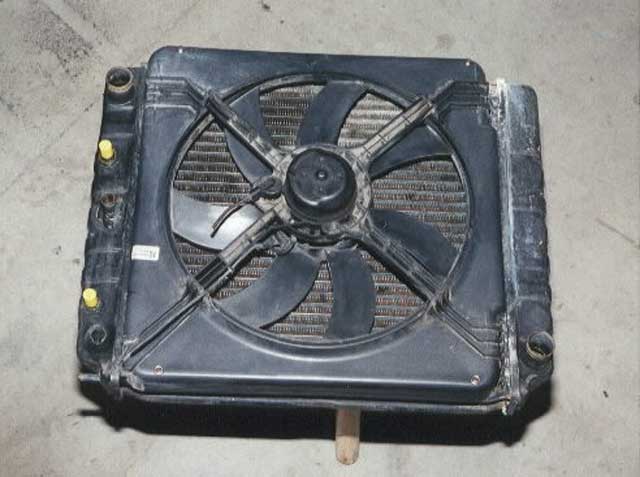
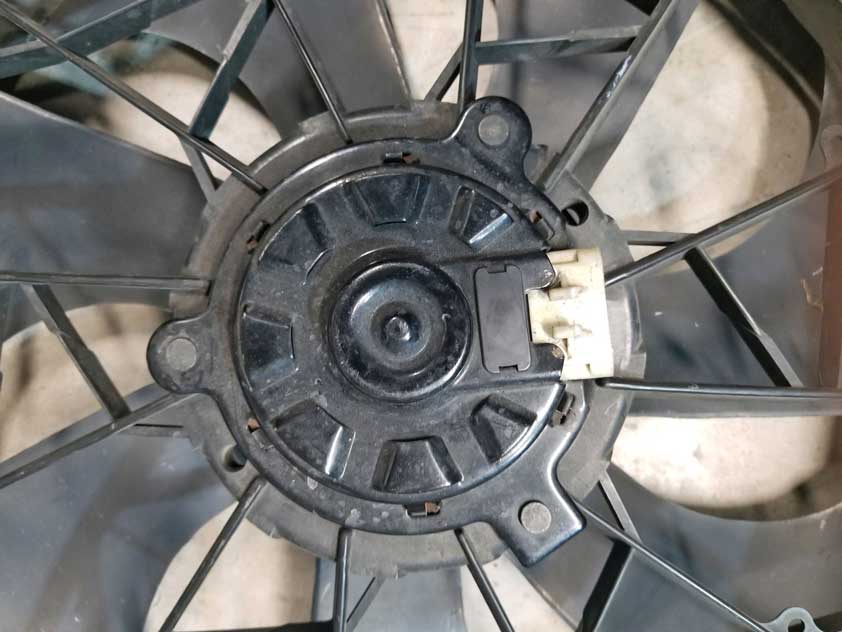
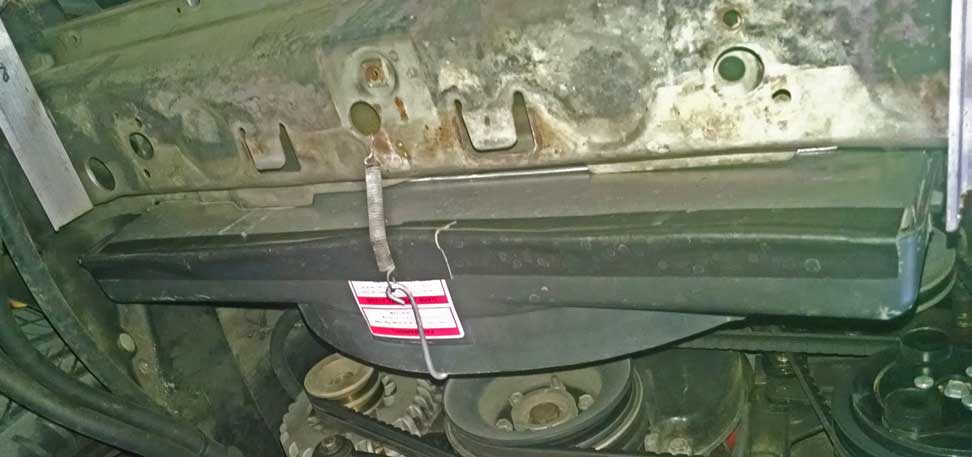
<<< Excuse the photo quality. This is a very old pic and it was originally a Polaroid. This is the first electric fan conversion I did back in 1997 for my 245 Turbo. I also used this same fan for several conversions of friend's 240s. One in a 240 non-turbo was still going strong and cooling well more than 15
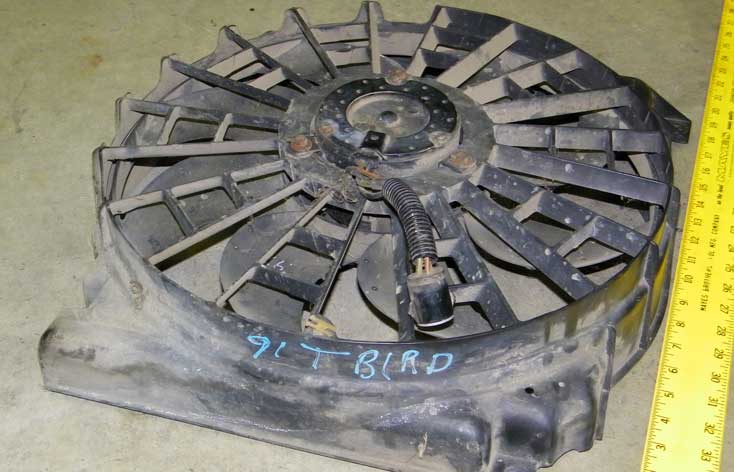
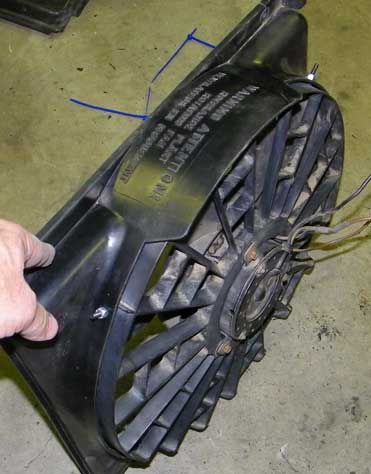
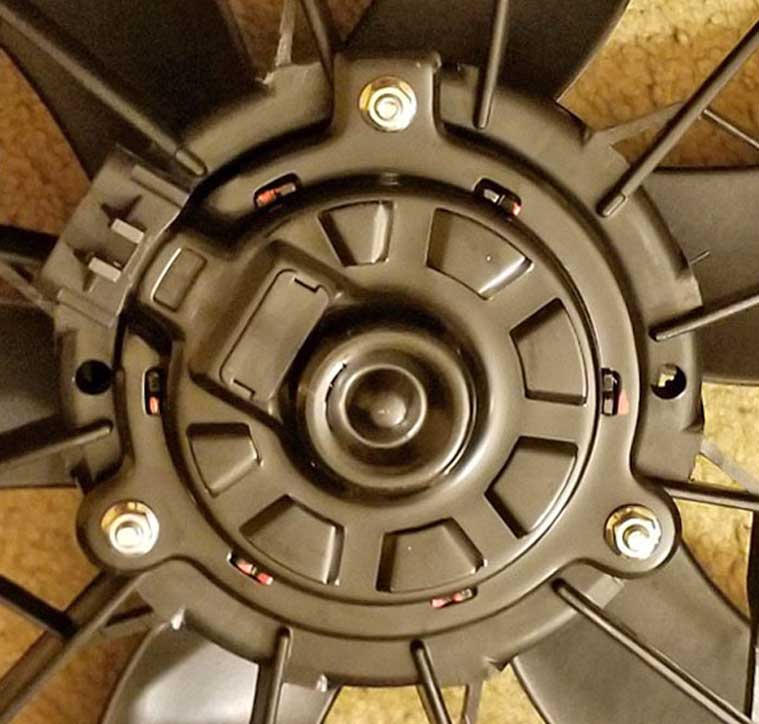
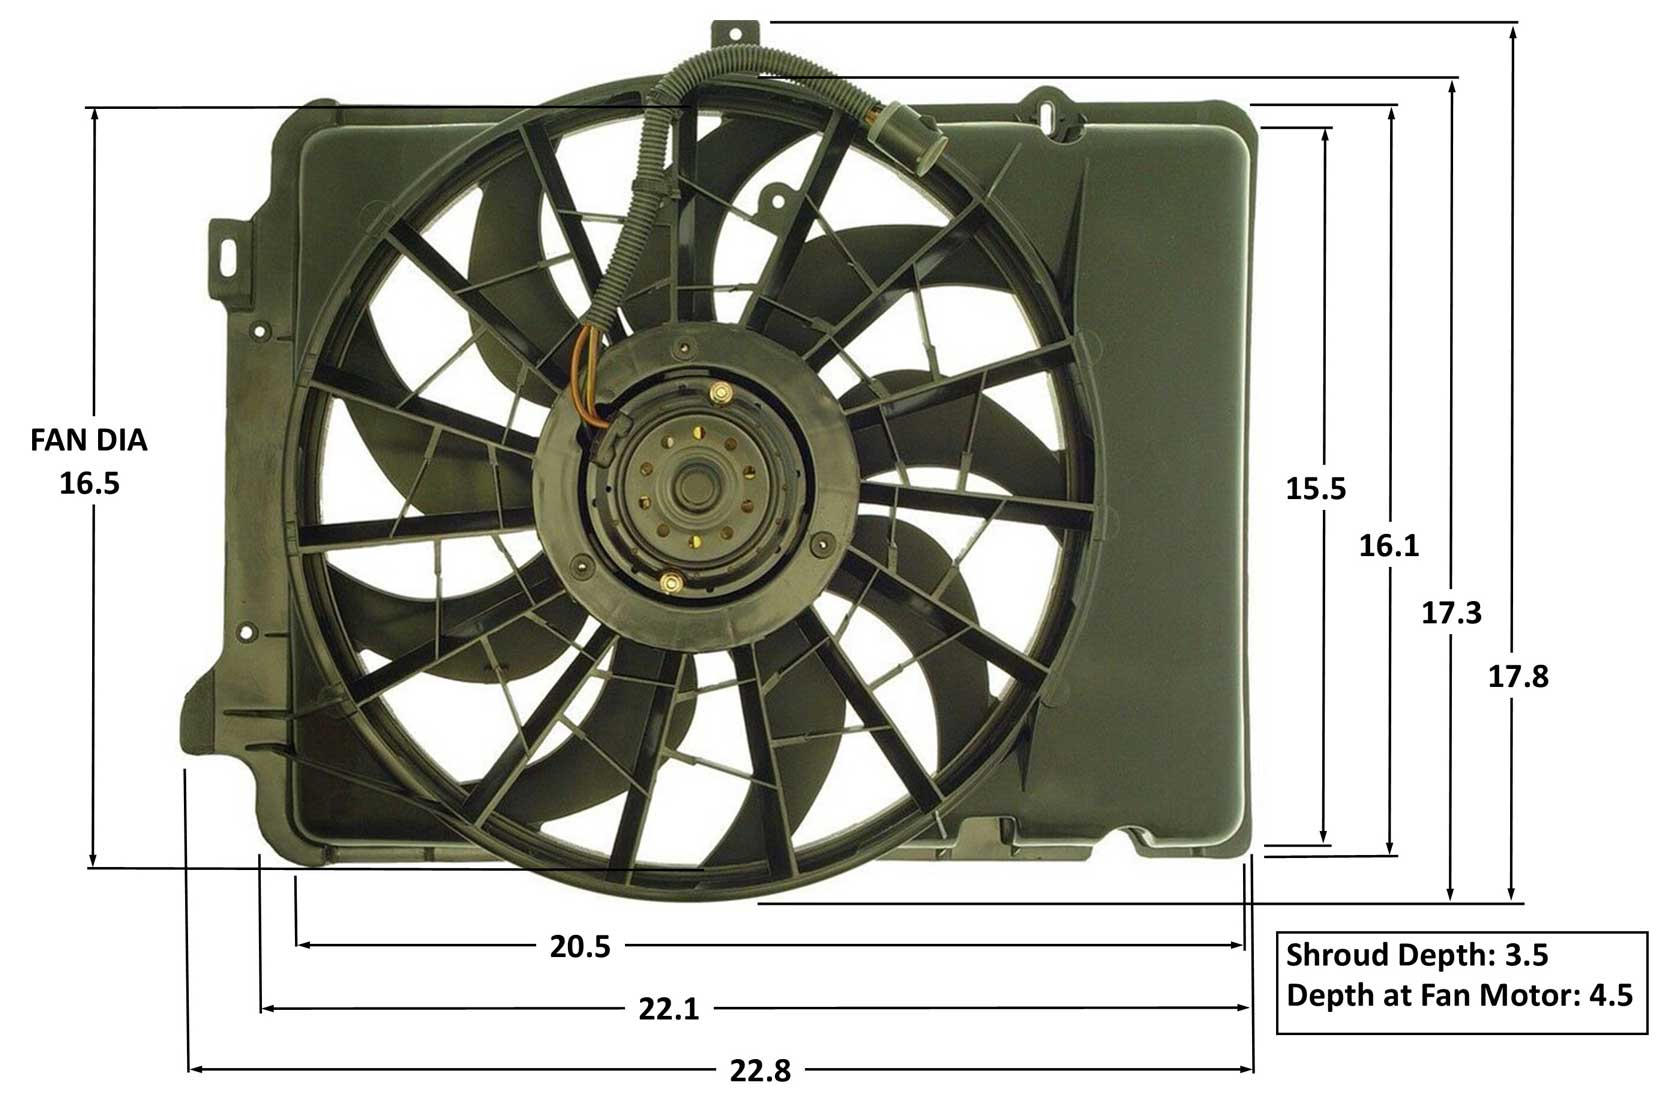
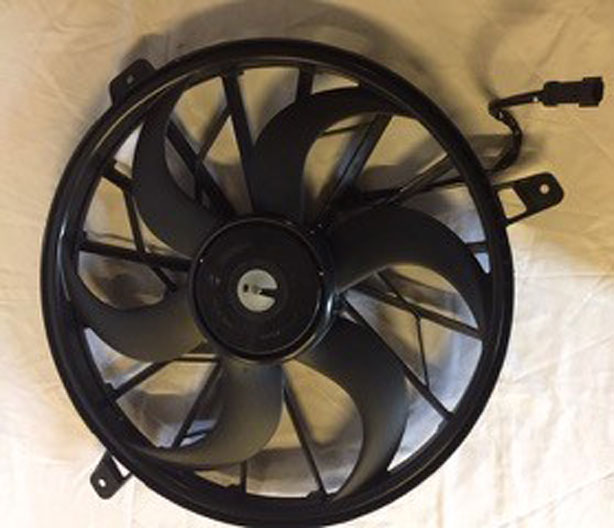
 years later.

<<< The fan depicted at left is from an early to mid-eighties Buick Century, Pontiac Grand Am, Olds Cutlass, or other General Motors mid-sized car with FWD and 4 or 6 cylinder.   It is made by AC Delco and is designed to be the primary fan for the car it originated in. 

Dimensions for this fan are as follows:


Height and Width: 17 x 17 inches at shroud edges

Depth at shroud housing next to motor: 3 1/8 inches
Depth at rear of fan motor: approx. 4 1/4 inches

Fan blade diameter: 14 inches.

The stock Volvo 240 radiator is about 17.5 x 22 inches overall.


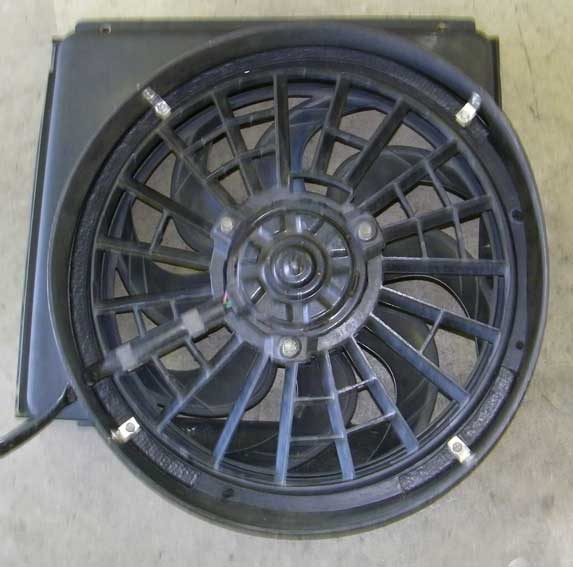
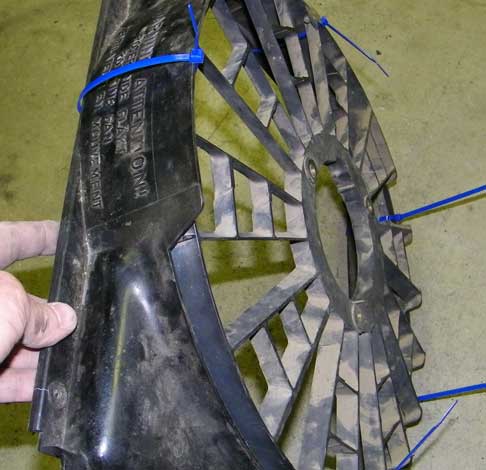
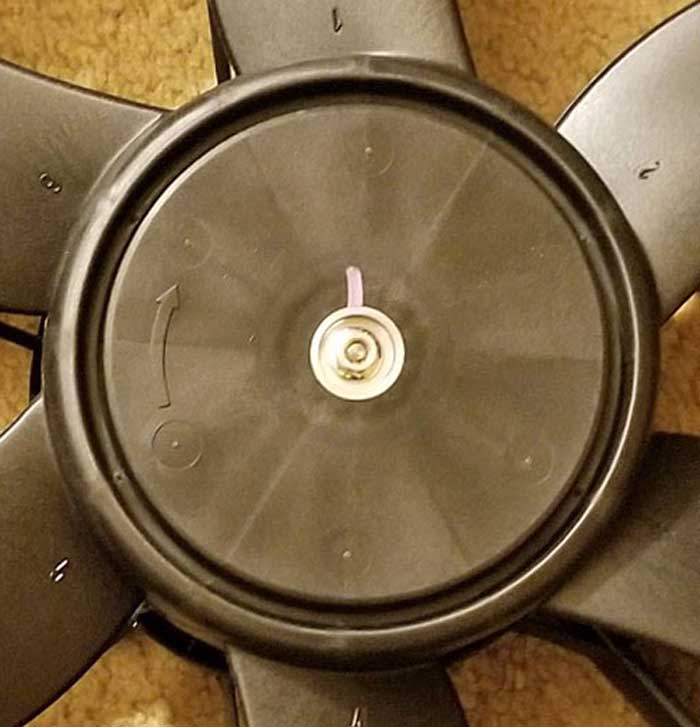
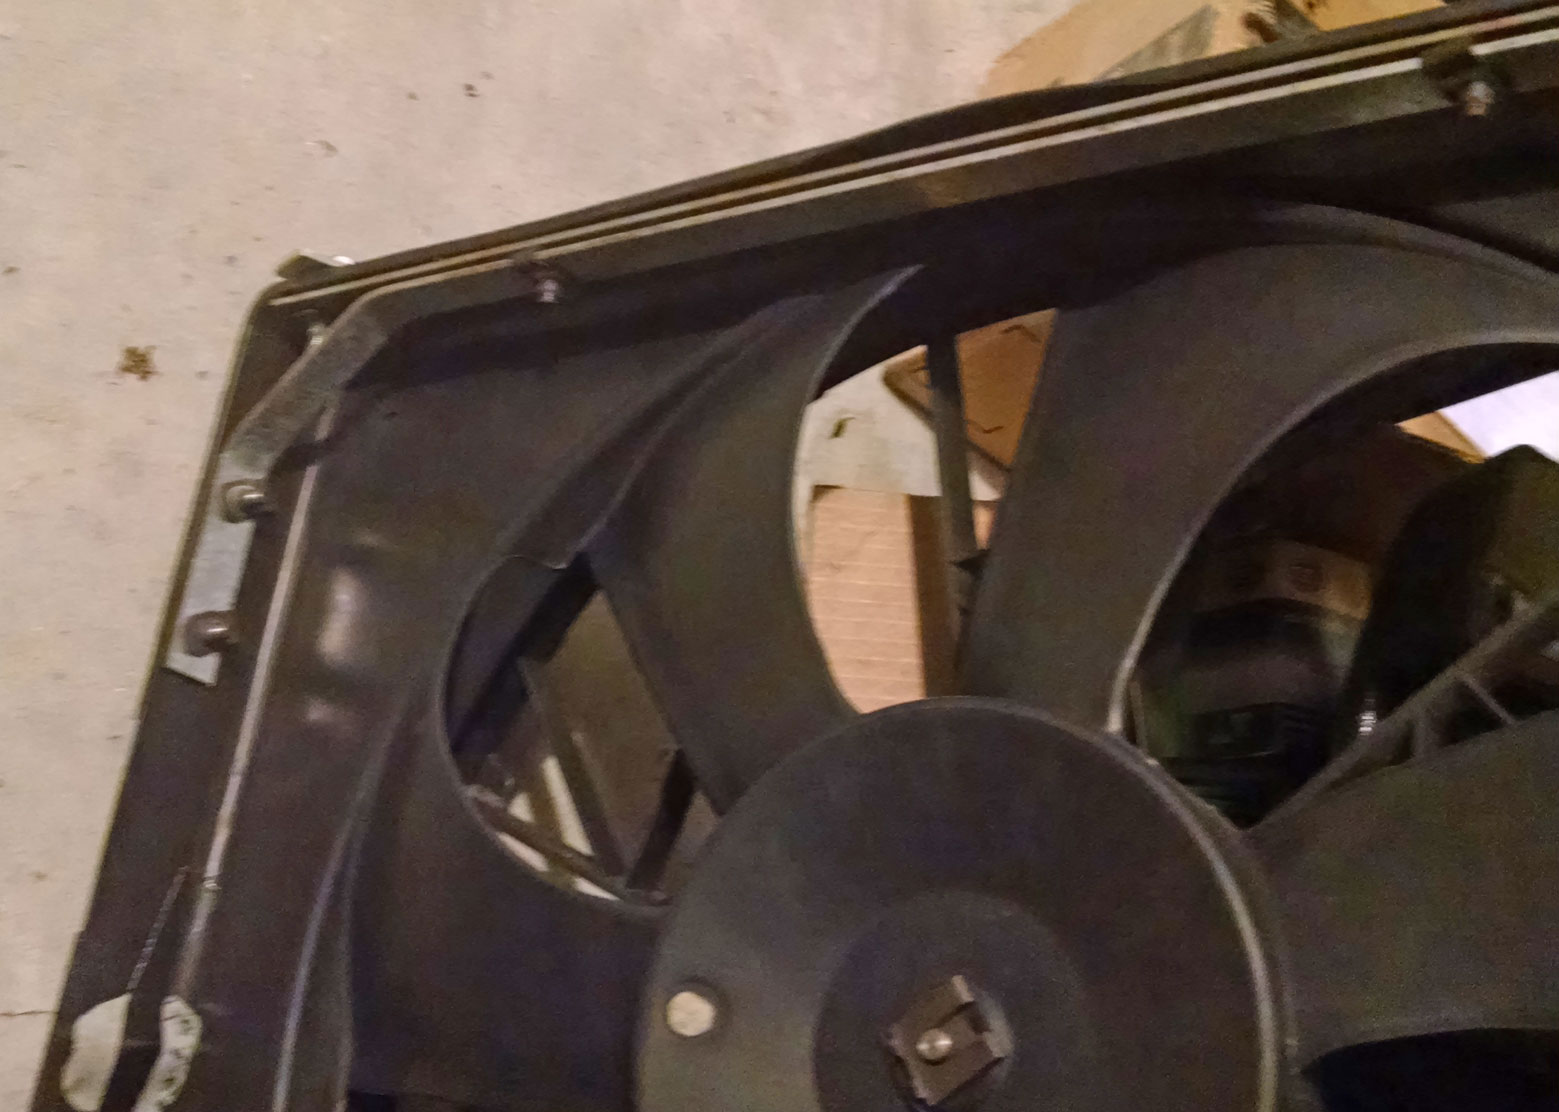
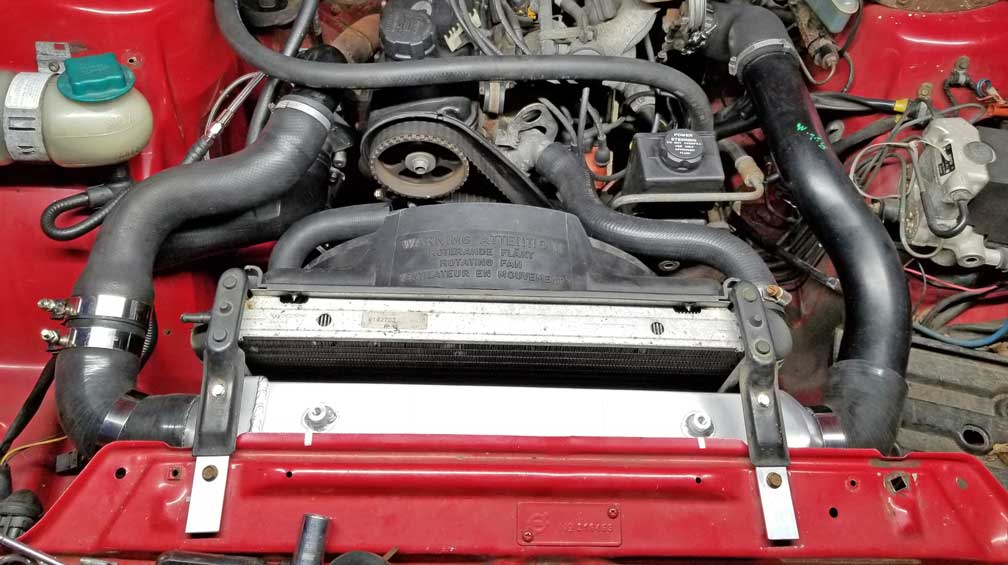
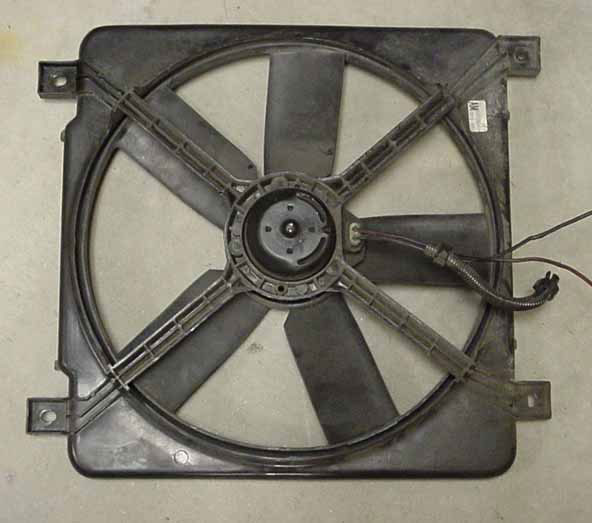
<<< A larger 16 inch diameter fan in the same version can also be found in some of the GM 6 cylinder cars.  The outer dimensions will be the same. This is important because this shroud is a perfect size to fit directly onto the typical Volvo 240/740 radiator.

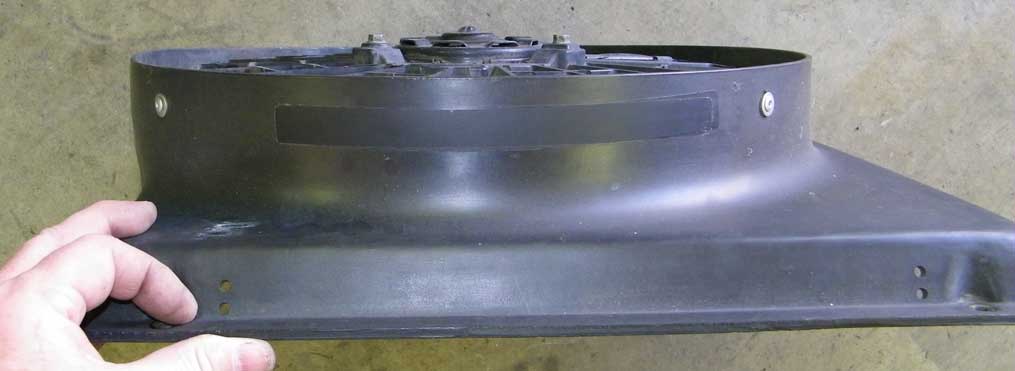
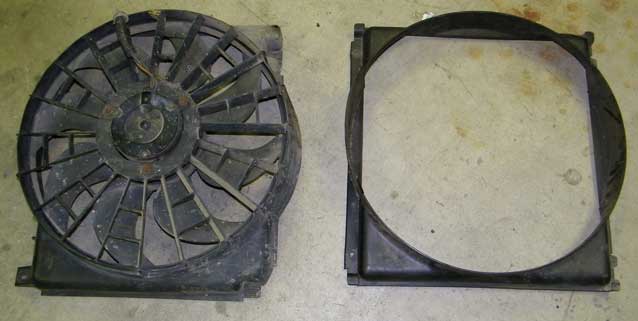
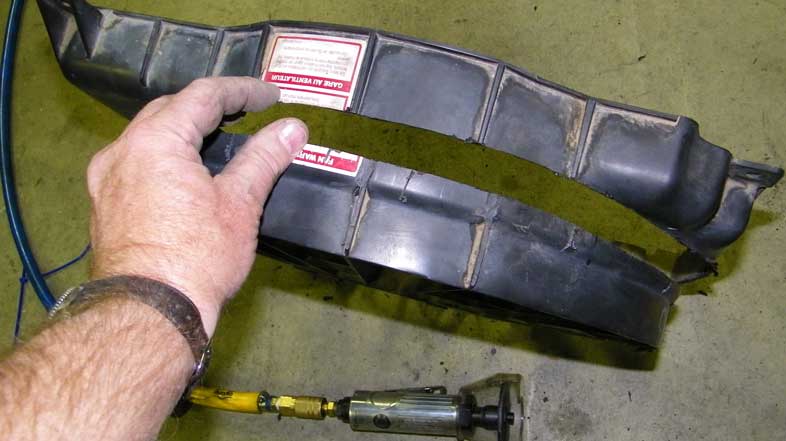
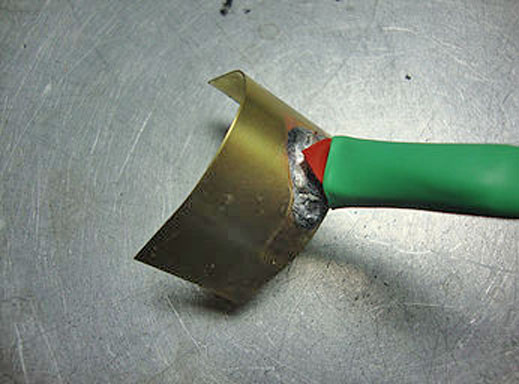
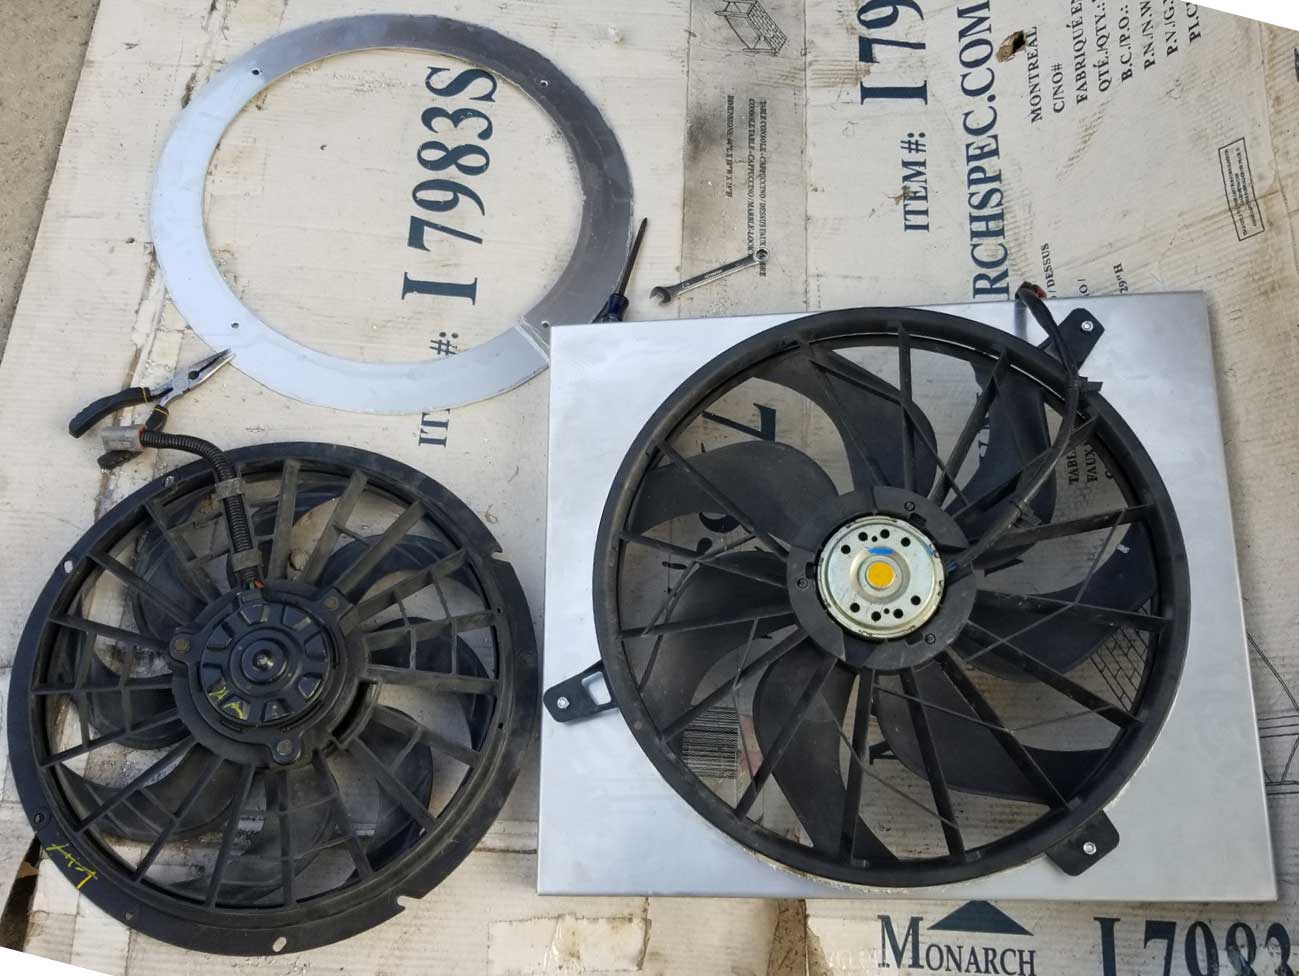
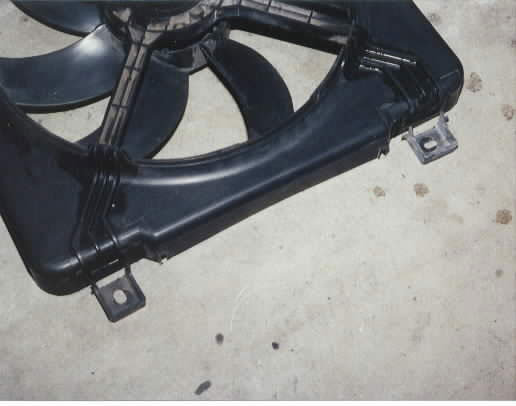
<<< All four of the original plastic mounting ears on the shroud need to be removed for fitment to a Volvo radiator. 
A hacksaw or sawzall does just fine here.  In this photo the ears have already been cut off, but I left them next to the fan so you could see where they came from.
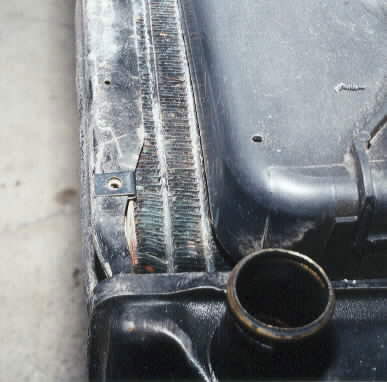
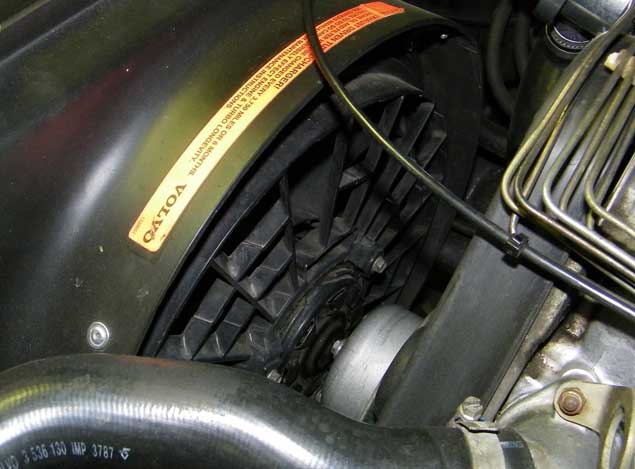
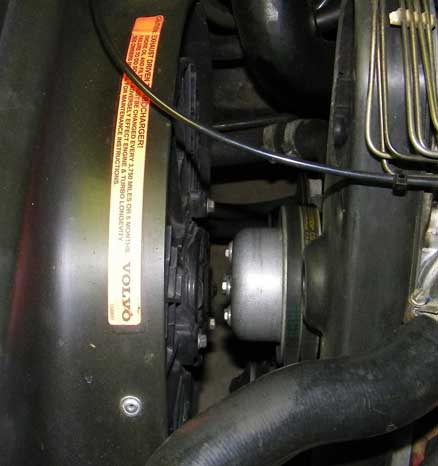
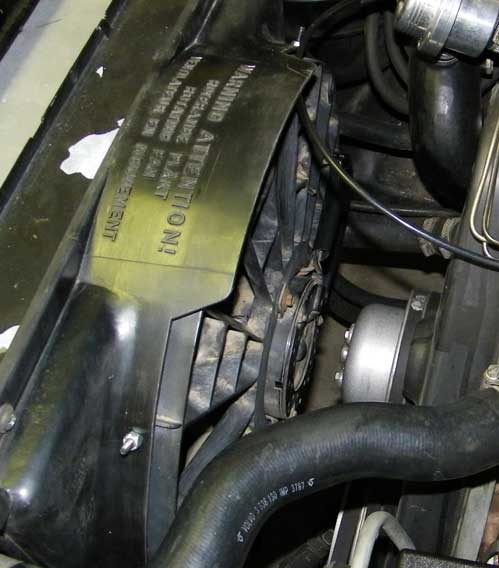
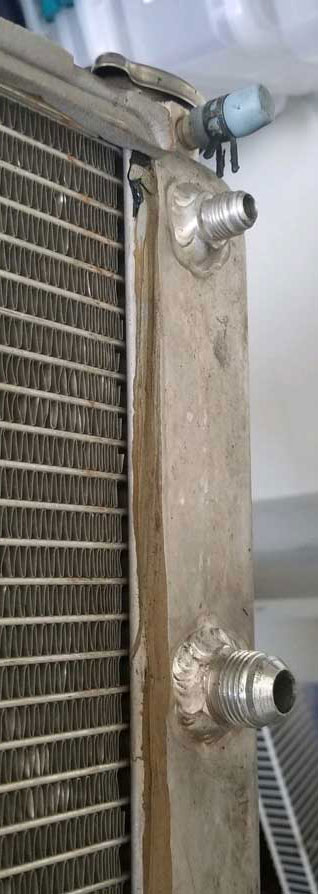
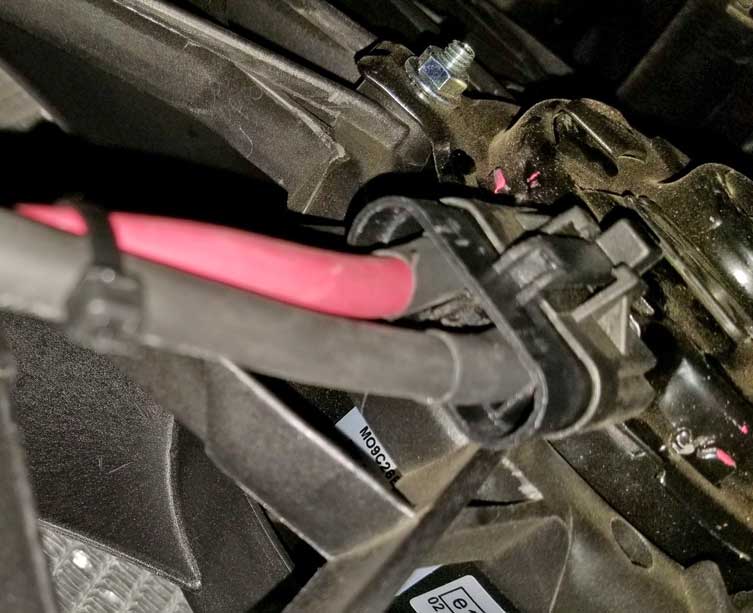
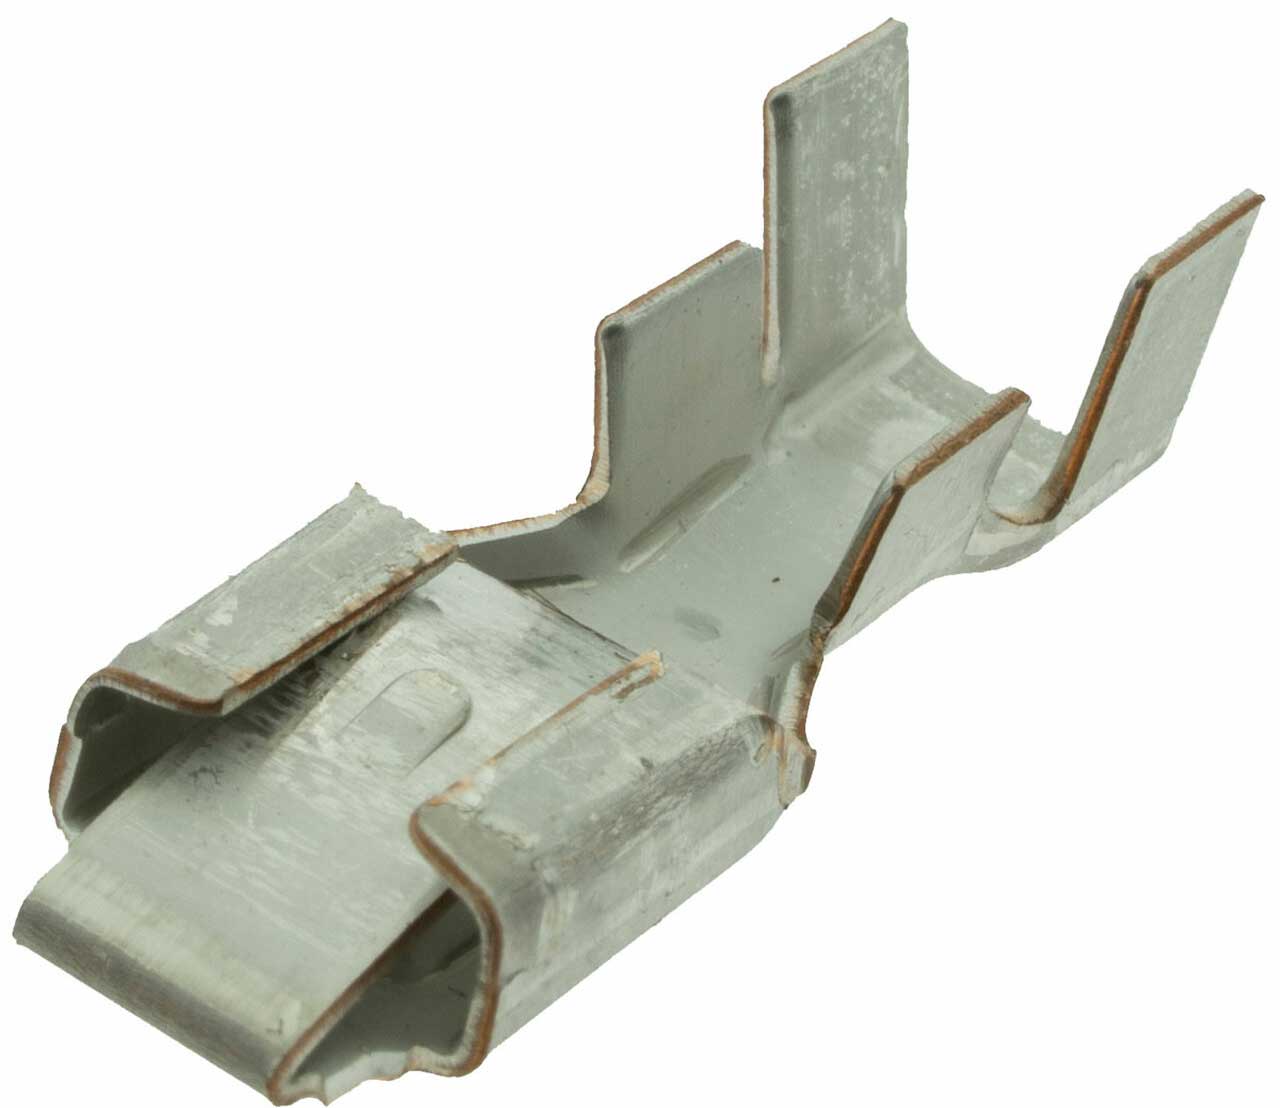
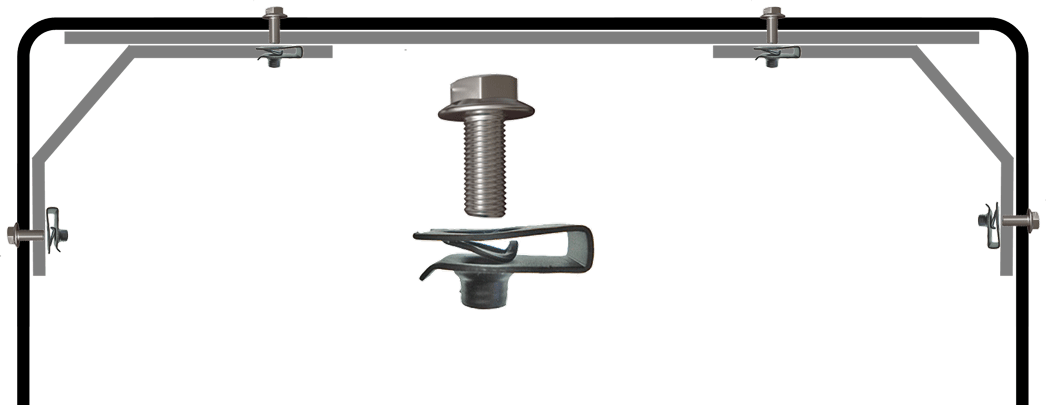
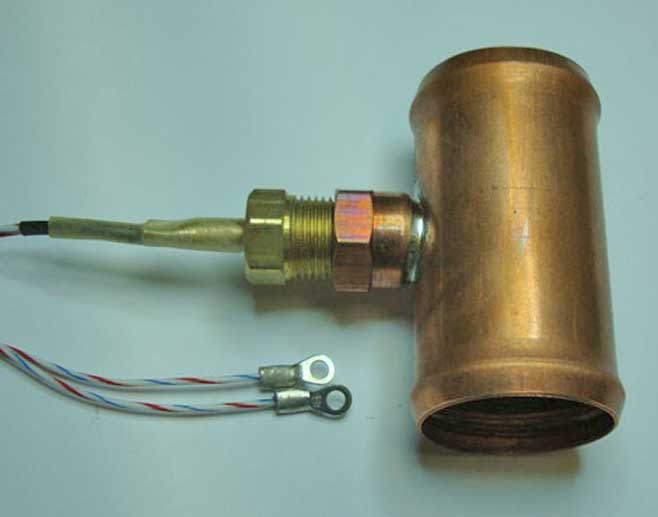
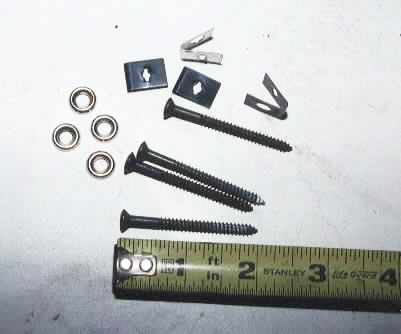
<<< Since this fan will be mounted to the radiator, you'll need some mounting hardware.  The simplest method I found is with some 2 inch sheet metal screws, washers and these funny little sheet metal nuts.  The screws I used were the counter-sunk type with some counter-sunk finishing washers.  Most any will work though.


<<< This photo shows an existing hole in the top flange of the radiator.  All Volvo radiators will have these holes for mounting of the original fan shroud.  The sheet metal nut can be used here.  You will then need to drill a small hole in the GM fan shroud directly over the original hole in the radiator.

The plan is for the new fan shroud to be fastened to the radiator by four sheet metal screws, two at the top and two at the bottom.  You may need to drill the holes in the bottom radiator flange.

<<< Here we have the new fan mounted to the radiator. 

This assembly can now be placed in the car as one unit and mounted as any Volvo radiator is mounted.

To make this fan work in your car, you have several options. You can purchase an all-in-one fan controller with a temperature probe that goes into the radiator fins. You can use a coolant sensor mounted in your radiator if it has one. 

For my 8 page assortment of relay wiring diagram options, including two-speed circuits, click here (pdf file).


CONVERSION PROJECT #2 (2009)
Volvo 940 - 850 Fan.
Fan size: 388 mm (15.27 inches).

(Also didn't work that well. NOT RECOMMENDED FOR HOTTER CLIMATES OR CARS WITH AC)
All of my electric fan projects over the years were for Volvos with AIR CONDITIONING. So keep that in mind when you tell yourself YOU didn't need a fan that big. 
Maybe you didn't, but if you add AC (and an INTERCOOLER) that seriously changes the whole game, especially in a hot climate. 

Volvo 940 - 850 Cooling Fan
This is a very popular fan used in many older Volvo conversions.  It's found in 1992 and later Volvo 940 and 960 models as well as all 850s. 
I don't have the full dimensions for this shroud, but I have been told it's 22 inches wide. If anyone can contribute more info, please EMAIL ME.


This fan shroud has a number of vents as you can see in this photo.  These vents have rubber flaps, which allow for airflow to escape during higher speeds when the fan normally isn't needed as much for cooling.  Having these flaps in place will help compensate for the relatively smaller shroud opening. The flaps allow for more air to pass through the radiator at high speeds than would be possible without the flaps.

Volvo 940 Radiator Size Info
There were reportedly a few different radiator CORE sizes (Euro region info):
Small: 450Wx418H (17.7 x 16.45 inches).
Medium: 590Wx418H (23.2 x 16.45 inches). 
Large: 590Wx499H (23.2 x 19.64 inches).

1992+ volvo 940 non-turbo radiator dimensions for U.S. market:
23.25 x 16.5 x 1.25 in. core size, 1.38 in. OD inlet, 1.38 in. OD outlet.

1992+ volvo 940T (turbo) radiator dimensions for U.S. market:
23.25 x 16.5 x 1.25 in. core size, 1.38 in. OD inlet, 1.38 in. OD outlet.


There is a similar fan found in the S70 and S80, however the S80 models I have seen feature a smaller, more compact motor.  I'm not sure if it's capacity is less.  All of these fans are
two-speed models, with low speed being about 50% of high speed.  The motor will have three wires; one ground and two hot wires (one for low and one for high).  A two-speed circuit may be used when you install one of these or you may use just the high circuit only. My installation used the high speed only.

This fan BELOW is popular in part because it's easily detached from the shroud and may then be custom mounted in your own shroud or a custom one.


Once removed from the shroud, this fan is about 4 inches deep from the end of the motor to the furthest point on the front of the fan.
The fan shown in the far left photo has been removed from the original fan shroud.
One cool thing about this fan is it simply unbolts from the original shroud. No cutting or chopping needed.

After it is removed, you'll find that the OUTER RING is about 17.5 inches across, which is why is fits well into a Volvo RWD mechanical fan shroud, which has an 18 inch opening.
The shroud ring opening for this fan is 16 inches.
The actual fan blade portion diameter on this fan is 388 mm (15.27 inches). 


For my 8 page assortment of relay wiring diagram options, including two-speed circuits, click here (pdf file).

 In 2009 I mounted this fan in this 240 fan shroud for my 242. This is a 240 Turbo (intercooler) fan shroud.
The 940 fan shroud the fan came with was too wide for the normal width 240 radiator I had, so I did not use it for this conversion. Some people have cut down 940 shrouds to fit the 240 radiator. 


 Here is one of these fans mounted in a 740 Turbo fan shroud, which works better.
Photos found in: https://ozvolvo.org/discussion/3316/850-electric-fan-in-240


<<< Again, the shroud used in these photos is a 240 Turbo (Intercooler) shroud.
The inside diameter of this shroud is 18 inches.
This particular shroud will only correctly fit the 240 Turbo.
It will NOT CLEAR the auto transmission cooling lines in a 240 non-turbo or a 740. Since a shroud normally sits further back in a Turbo intercooled car (because of the intercooler), some extra work was required to get the fan to sit deep enough into this shroud to clear the water pump. It was a tight fit when done. 


<<< And this shroud places the fan closer to the radiator, offering at least 1 inch more clearance from the water pump than a 240 Turbo shroud does. Plus it's a lot less work making it fit in a 240 engine bay.
CONCLUSION:  I believe it is better to use a 740 Turbo Fan Shroud.
I found that a shroud from a 740 Turbo
(which can be seen above) is a much better choice to mount one of these fans inside of. The 740 Turbo shroud, also with an 18 inch opening, may be used in pretty much any 740 or 240 model without any fitment issues.


OVERALL REVIEW:
  I used this fan for about a year. I was disappointed. 
Keep in mind I did NOT use rubber vent flaps.

It did not cool as quickly or as efficiently as I liked.  I believe this disappointment was because this 388 mm fan (15.27 inches) is too small. The 15.27 inch fan acted like a bottleneck during my testing. The volume of flow through the radiator with this fan was TOO SMALL (even at highway speeds).  When compared to the stock 18 inch fan shroud with a heavy duty mechanical clutch fan (which was better), it was easy to see an ACTUAL difference on my coolant gauge during warm days, on uphill grades, and especially with the A/C on.  It possibly would have worked somewhat better if it had incorporated some of those rubber vent flaps found on a 940 fan shroud.
 
For real cooling needs with AC and an intercooler blocking radiator airflow, I found that a mechanical CLUTCH FAN is probably a better choice than this one.
 
The size of the fan and the size of the shroud opening makes a difference. 
Consider how air flows through a radiator.  There is a large area in front of the radiator that "collects" the air flow.  Then as the air flow exits the back of the radiator, it must go through a SMALLER opening roughly the diameter of the fan blades. This is what I will call a funnel reduction effect, similar to pouring liquid into a funnel. You can pour the liquid faster, but the exit hole at the bottom of the funnel will only allow a certain amount through in a given time.  And yes, the fan does help to move the air through the funnel, but it has to work harder if the funnel exit is small.
Let's look at the area of a shroud opening for a few fans.
Volvo 940 fan (15.27 inches fan size, 16 inch hole): The area for a 16 inch hole is 201 square inches.
Stock belt driven fan shroud (18 inches): The area for an 18 inch hole is 254 square inches.
Circle Area Calculator: 
https://www.calculatorsoup.com/calculators/geometry-plane/circle.php

The above fan pulls a lot of amps upon start up when using the high speed circuit only. Because I wanted to avoid sudden, hard current draws to my charging system when this fan came on, I sought out a high-tech fan controller that offered a "soft-start" feature.  I chose the Delta Current Control  FK-55.  This is an all-in-one controller and it works smoothly, so no relays or other sensors are needed. When it's time for the fan to come on, it comes on slowly and smoothly, beginning with about 20% speed until more speed is needed. It regulates your radiator temperature by smoothly increasing or reducing fan speed, instead of on, off, on, off, like the old school method. Definitely not cheap. 

PROBLEMS WITH DELTA CURRENT CONTROL (DCC) CONTROLLERS
UPDATE Summer 2012:  I'm sorry to report that I can no longer recommend the controllers from Delta Current Control.  I had two of them fail after less than 2 years of use each. This makes a $180 controller way too expensive if it can't be reliable.  And to make matters worse, the owner of DCC, Brian Baskin, has found it impossible to respond to emails, even if you place an order.  When I placed an order for a third controller in 2012 my order went unanswered for 6 weeks.  No email, no order status info, no communication. Nothing.  I had to dispute the purchase with Paypal to get my money back after my order and emails went unanswered for 6 weeks. And yes, my car was down the whole 6 weeks.
Instead, out of desperation I bought a Flex-a-Lite "variable speed" controller.  See the below Ford fan conversion for more info on that.


CONVERSION PROJECT #3  (2010)

Ford Thunderbird SC 17 inch Fan
Originally found in 1989-93 T-Bird, 3.8L Supercharged.
This one WORKED WELL IN HOTTER CLIMATES AND WITH AC.
All of my electric fan projects over the years were for Volvos with AIR CONDITIONING. So keep that in mind when you tell yourself YOU didn't need a fan that big. 
Maybe you didn't, but if you add AC (and an INTERCOOLER) that seriously changes the whole game, especially in a hot climate.

In 2010 I did this conversion for my 242 Turbo: This exact fan is only found in the 1989-93 Thunderbird SC and Mercury Cougar SC (supercharged 3.8 liter 6 cyl). The depth of this unit from the fan motor to the front of the fan is only 3.75 inches (a little bit less than the 940 fan).  This fan is similar to the more common V8 Ford T-Bird fan or Lincoln Mark VIII fan, except this version is slightly smaller in diameter and a little less deep (from motor to fan), so it seems to fit in a smaller space.  It has been "rumored" that these fans will pull an estimated 4000 CFM on high. I would not use this fan with a mediocre charging system.

CFM TESTING
UPDATE 2023: I still had this fan in storage when I bought my CFM anemometer in 2023, so I pulled it out for testing.
Free air test at 14.5 volts: Maximum speed 3550 CFM at 2580 RPM using 37.8 amps.
It did very well, pulling slighting more CFM than the 18 inch Mark VIII fan I tested. I think the motor is identical to the Mark VIII fan.

The outer circular portion on this Ford shroud is 17.5 inches across. The actual fan blades are 17 inches in diameter.  After some chopping and cutting, as seen in these photos, it fits very well into the 18 inch opening of a Volvo 740 Turbo fan shroud. 

I sought out this fan because after using a belt-driven heavy duty tropical fan clutch for years in my 242 Turbo, I was spoiled by how great it cooled. 
I had tried the smaller 940 fan above for a while and that was a disappointment.  It didn't cool as quickly or as efficiently as I liked.  I believe that fans downfall was because the 15 inch fan opening became a bottleneck and the volume of air-flow through the radiator was reduced (even at highway speeds) compared to the stock shroud with an 18 inch opening and a mechanical fan. It was easy to see a difference on uphill grades, especially with the A/C on.


 Here's the Ford fan next to the 740 Turbo shroud that I mounted it in.

 
The Ford shroud needed to be cut down, separating the fan and circular ring that was then mounted into the Volvo shroud. 
I used a friction cutting wheel to trim the Ford shroud, which worked ok... not the best choice job.  A sawzall with a fine blade would work much better on this plastic.


Here are in-progress assembly pics and the completed fan. The last pic shows it mounted in my 242 Turbo.  
This T-Bird fan is a two-speed fan, like the 940 fan, except this one is much more powerful.  The low speed on this fan probably pulls at least as much air as the high speed on a 940 fan.  I have read that the high speed on this fan pulls between 35 and 40 amps when running continuously. So this is NOT a fan for a light-weight charging system.  A large capacity alternator (100 amp), heavy cables to the fan motor and a high capacity relay (50 to 70 amp) would be a good recommendation. 

For my 8 page assortment of relay wiring diagram options, including two-speed fan circuits, click here (pdf file). 

 
The diameter of the round barrel portion of this fan fits pretty well into the 740 shroud opening. The main problem with this fan is they don't appear to be very easy to find and there doesn't seem to be an aftermarket replacement. Using the larger Mark VIII fan below is not possible because the round barrel is larger than the 740 shroud barrel. A decent possibility for an available fan to fit inside this shroud is the single Ford Taurus fan further below. I haven't tried this. If you havem please let me know how it worked out.


PROBLEMS WITH DELTA CURRENT CONTROL (DCC) CONTROLLERS: 
At one time I used DCC controllers. I can
no longer recommend the fan controllers from Delta Current Control.  I had two of them fail after 2 years of use each. This makes a $180 controller way too expensive if it can't be reliable.  And to make matters worse, the owner of DCC, Brian Baskin, absolutely would not respond to emails.  My third and LAST order to replace the second bad unit resulted in NO ORDER CONFIRMATION EMAIL and he absolutely would not respond to any emails. This went on for 6 weeks.  No communication, period. And my car was down all this time.  I finally had to dispute the purchase with Paypal to get my money back. 

There are a few options for controlling a primary electric fan like this.  The old school method is using a relay (or multiple relays). Relays are pretty reliable, but electronic temperature switches are not always as good in the long term.  I installed one of the above 2-speed T-Bird fans in a friend's 240 many years ago and used I used a Hayden 3654 adjustable fan switch (shown at left. It was about $40 at Summit Racing) to turn on the fan low speed circuit for normal cooling needs. Typically I would set a controller at 180 to 190 degrees F, depending on the coolant thermostat being used.

Then for this installation I used a separate heavy duty 70 amp relay to trigger the high speed circuit as a failsafe. This relay was then wired to a standard Volvo on/off temp sender in the radiator (outlet side). This temp sender was there to trigger the high speed if the outlet temp exceeded approximately 210 degrees F, which would happen as a failsafe if the Hayden fan switch failed.  I also put an override switch on the dash to turn on the high speed circuit manually if needed.  This type of installation functioned well in hot SoCal summers using the A/C for many years, but of course this Hayden controller did eventually FAIL. The engine was saved by the failsafe relay I added.
<<< The photo at left is the Flex-A-Lite 33054 "Variable" Speed Controller. At time of writing this, Flex-A-Lite made these in 35 and 45 amp versions. The 33054 is the heavy duty 45 amp version, reportedly designed to run multiple fans if needed.  I bought this 33054 from Summit Racing for about $100 and it was in use in my black 242 Turbo (installed summer of 2012) with the big Ford fan shown above until it failed at a really bad time in 2016.  It was wired to control the fan high speed circuit only. 

This controller was actually more reliable (lasted longer) than the Delta controllers that failed (just a little).  After installing it, I discovered that this fan controller is not really a true variable speed controller.  This controller uses a probe in the radiator fins and when the set temperature is reached, it will turn the fan on at 60% power (set point is adjustable from 160 to 210 degrees F).  If the radiator temperature increases more than 10 degrees above your set temperature, the fan switches to 100%. 
So the reality is this controller is a 2-speed controller, instead of a true variable speed controller.
That was a disappointment to me, since the big Ford fan can cool quite well at very low speeds (maybe 25-30%) under light load and this controller can't do that. This controller will also operate your fan(s) for up to 30 seconds after shutting off the car if it reads a high enough temperature.  And of course it has the connections to add the A/C "ON" circuit (turns on at 60% continuous) as well as circuits for a manual override "ON" switch and manual override "OFF" switch if you want.  The installation instructions for the Flex-A-Lite 33054 can be seen here: http://static.summitracing.com/global/images/instructions/flx-33054.pdf

If you're looking for a true Zero to 100% variable speed fan controller that can handle a BIG fan, you might have a look at my
AutoCoolGuy installation HERE.

FINAL NOTE: I'm a fan of fitting larger radiators when possible (because Volvo designed their radiators for Swedish summers). This is especially needed when running AC, but there is prior planning needed when it comes to a 240 Turbo.  The standard Volvo intercooler configuration limits the radiator width to the stock dimension.  So if you go wider, you must plan to install a different intercooler so you can route intake tubes around the wider radiator.  More info on this subject can be found below or CLICK HERE.

You can also go with a taller radiator. It's even possible to install a 19 inch tall radiator where normally the limit is 17 inches tall.  Don't believe me? See the following Turbobricks thread:  https://forums.turbobricks.com/showthread.php?t=296380


CONVERSION PROJECT #4  (2014)
Griffin Radiator and Lincoln Mark VIII Fan

WORKS VERY WELL IN HOTTER CLIMATES, EVEN WITH AC!
All of my electric fan projects over the years were for Volvos with AIR CONDITIONING.
So keep that in mind when you tell yourself YOU didn't need a fan that big.  Maybe you didn't, but if you add AC (and an INTERCOOLER) that seriously changes the whole game, especially in a hot climate. 
 I decided I wanted a fatter and WIDER radiator. 
I bought this one from Griffin Radiator.  This was PN 1-55221-X, which was in their UNIVERSAL radiator section.
The overall size is 26 x 15.5 inches, 3 inches thick, and it has two rows of 1.25 inch tubes.
For that 26 inch width, the core takes up about 21.5 inches and each side tank is about 2.25 inches.
A stock 240 radiator is about
22 x 17.5 inches overall including side tanks.
The main hose inlet and outlet sizes I chose are 1.375" OD (35 mm), which was the closest choice they offered to original Volvo size, which is about 33 mm. Fits OK.
FYI:
They call this radiator a universal fit "Chevy style".
Price was about $350, not including adding the two extra hose fittings, which I had done locally after I got it.. 
 
I then had aluminum male AN fittings welded on the right side tank. The top fitting is AN -6 MALE for the hose to the expansion/overflow tank. The lower fitting is AN -10 MALE for the water-cooled turbo hose tee in the lower hose.
This radiator can be ordered with or without a top radiator cap flange. Volvo 240s normally don't use a radiator cap, but I found it became useful for filling with coolant. So I ordered it with the radiator cap flange. The cap which fits this flange is Stant PN 10230 or 10231.

Here comes the LINCOLN MARK VIII (Mark 8) FAN
The Lincoln Mark VIII fan is legendary and massive.
This fan assembly is roughly the correct width for this new radiator I bought (after trimming off the four protruding mounting ears), so it fits tight, but fairly well. 
This fan consumes between 27 and nearly 40 amps at full speed (at 14.5v plus).
Some reports say it pulls nearly 4000 CFM. I don't know if that rating is accurate, but there are also people claiming to get 4000 CFM from a Volvo 940 fan. ZERO CHANCE of THAT!  That is NOT realistic at all from that over-rated 940 fan. 
But, if you're tired of trying out fans that just aren't enough for your hot climate, like the over-rated 940 or 850 fan (
and if you have AC), you might think about one like this.
My preference is to have a fan that has huge capacity, more than needed, because I think it's better to have a fan that does not need to be running at full speed all the time to do a good job.  This fan does that for me.

Lincoln Mark VIII (Mark 8)
7 BLADE FAN

I bought this NEW complete fan assembly for my 242 several years ago. 
I think this one was originally for a 1997 model (Lincoln made the Mark VIII until 1998).
It's supposedly a SINGLE SPEED type and can typically be found as Ford PN F7LH-8C607-AB or F7LH-8146-AA.
 
Later year Ford/Lincoln single speed fans were designed for a VARIABLE SPEED CONTROLLER.  Earlier fans were designed as two-speed versions.

The 7-blade fan/shroud below is an AFTERMARKET part, Four Seasons PN 75627. I bought it in 2014
It appears the same 7 blade fan can also be found as TYC PN 620950 (made in China).


All Single speed fans use the same connector (above) as dual speed fans.
A single speed fan will only use
the two OUTER terminals.
I did a few tests of this 7 blade fan below in 2016 and the
below results can be used for your own comparison.

Dimensions:
The fan blades measure 17.5 inches in diameter. The inside opening on the shroud is almost 19 inches.
The plastic shroud is 26 inches wide including the mounting tabs or 21.75 inches wide without the tabs (I cut the tabs off of my shroud before using in my car).
The shroud is 19 inches tall overall, measuring at the outside of the shroud ring, and 5.5 inches deep to the back of the fan motor.

Weight: The complete assembly is about 8.8 lbs.
  More info here: http://forums.tccoa.com/6-general-tech/136722-ultimate-mark-viii-fan-thread.html


If you need to disassemble this fan it will not be easy. Mine had rivets holding the motor to the shroud, which would need to be drilled out.

7 Blade Fan, Four Seasons PN 75627.
FORD PNs: F7LH-8C607-AB, F7LH-8146-AA, F4SZ8C607D.
This fan assembly that I purchased is not a genuine Ford part. It was an aftermarket part from Four Seasons, PN 75627. This fan can also be found as TYC PN 620950 (made in China).

TESTED INSTALLED in 2014 with radiator
, intercooler and AC condenser.
Tested at 12.7 volts (static battery voltage, engine not running). It ran at a maximum speed of 1800 rpm. Current used: 33.6 Amps.
Also tested at 14 volts (engine running with alternator charging). It ran full speed at 2000 rpm.  Current used: 40 Amps.
I didn't have an anemometer back then.

 
Fan speed testing was done using an inexpensive hobby optical tachometer above: Turnigy Micro Tacho. This tach meter can be set to measure 2 to 9 blade fans. It was priced under $20.00.
Amperage usage was measured using this Digital 0 to 100 Amp meter. Price: $15.00. https://www.amazon.com/DROK-Digital-Multimeter-6-5-100V-Amperage/dp/B017BCXQO6/ref=sr_1_3


Here's some more Mark VIII test data that you might find useful. I cannot verify any of this.
https://forums.maxperformanceinc.com/forums/showthread.php?t=844502
Taken from above discussion forum:
The stock Ford OEM fan flowed the most, followed very closely with the Dorman 620-118 then the TYC-620950. The Dorman is made in Thailand and the TYC in China. The Dorman seems superior as they revamped the fan blade design and flowed closest to the stock design. With higher voltage on high speed I can see these fans getting close to 3800-4000CFM at 14.4V.
Without a radiator in front the low speed amperage dropped 3-5 amps and the full speed only about an amp or so. Results were as follows:

Stock Ford fan: High speed: 3415 CFM. 22 amps @ 12.7 volts.
Low speed : 2800 CFM. 18 amps @ 13.7 Volts.

Dorman: High speed: 3355 CFM. 22 amps @ 12.7 volts. (I later tested this Dorman fan again in 2023 CLICK HERE)
Low speed: 2578 CFM. 16 amps @ 13.7 volts.

TYC: High speed: 3116 CFM. 22 amps @ 12.7 volts.
Low speed: 2578 CFM. 17 amps @ 13.7 volts.

Some more Unconfirmed Mark VIII Fan part numbers and speed info I found on the internet:
1993-96 Mark VIII PN F3LY8C607A. Rotation is reportedly 1100 rpm on low and 1850 rpm on high.
1997 Mark VIII uses PN F7LZ8C607AB
1998 Mark VIII uses PN F8LZ8C607AA.  Later alleged 2-speed version rpm 1800 rpm on low and 2225 rpm on high.


SO WHY DID I NEED SUCH A MASSIVE FAN?
In most driving conditions I don't. The FIRST reason I'm using this big fan is that I like having the potential for more capacity than I need. 
The SECOND reason is that I have a big radiator with an intercooler blocking a lot of it's airflow, plus a big AC condenser blocking everything.
And I live in a state that gets over 100 degrees in the summer. Plus I drive my car across the country and across deserts to Volvo events at least once per year. Sometimes twice. The elevation changes go from sea level to over 7,000 feet. So a high cooling capacity is a pretty good thing to have.
In summary, I like my car to stay cool and I like the AC to be on when climbing grades in hot climate.

Please email me if you have any questions or comments.
CONTACT


2021 Fan Change for My 240
Lincoln Mark VIII 6 Blade Fan

It was time for a new fan.
You can still get this fan assembly (believed to be for pre-1997 cars), which will look like this one below. 
This is the aftermarket
Dorman PN 620-118.
An aftermarket version like this will typically cost under $100 for the complete fan and motor assembly with shroud as shown. 


This fan: Dorman 620-118, is reported by some sources to be a 2-speed version. It has 6 blades and is made in Taiwan.

Dimensions: The fan blade outer ring is 18.5 inches. The actual blades in the ring are 17.5 inches.
The plastic shroud is 26 inches wide using the mounting tabs or 21.75 inches wide without the tabs. The shroud is 19 inches tall at the outer ring and 5.5 inches deep to the back of the fan motor.
The complete assembly weighs about 8.8 lbs.

Dorman 620-118
CFM TESTING (2023)

Tested in FREE AIR.
14.5v: 
Max Speed 2450 RPM. 3900 CFM. 26 amps.

Tested INSTALLED in car.
Fan mounted on radiator, with intercooler and AC condenser in front of radiator.
14.5v: 
Max Speed 2450 RPM. 3200 CFM. 27 amps.
 
Testing was done using a anemometer. Same one used in this video: https://www.youtube.com/watch?v=pYkuNP1RnoM&t=26s
  Aiomest AN-846A anemometer purchased from Amazon: https://www.amazon.com/dp/B088QZ3689


If you need to disassemble this fan, the motor and fan is fastened using nuts/bolts.
 More info here:
http://forums.tccoa.com/6-general-tech/136722-ultimate-mark-viii-fan-thread.html


Ford Fan Motor Connector.
Motorcraft PN WPT-362, Ford PN
3U2Z-14S411-ESA. Fits Lincoln Mark VIII and probably some other Ford fans. 
A google search will find them in a few places. I have only found them available with 12 gauge wire pigtails.  In my opinion that's barely adequate for such a powerful fan. I changed the wire to 8 gauge wire. I use fine strand welding cable for heavy power cables, because it can flex without fatigue.


If you're using a SINGLE SPEED fan, then you will be using the two OUTER terminals only for high power and ground.
A dual speed fan may also be used as a single speed fan by using the outer terminals only.


Dorman Conduct-Tite Terminal

AKA: Ford Standard Block Technician Terminal. This is the terminal that goes into the above Ford fan motor connector.
This is considered to be a high-current terminal, because of the "tongue' design, which provides a wide contact patch. Dorman offers this as PN 85367 which fits 14-16 gauge wire. A 10-12 gauge version (or even larger) would be much better, however so far it DOES NOT EXIST. 


I improvised and used this 14-16 gauge terminal since I couldn't find larger ones. I added one of my large terminal overcrimps to make a solid, tight crimp for the 8 gauge welding cable I used.  Then I covered with heat shrink.

 When inserting this terminal into the back of the Ford connector housing with the extra fat 8 gauge welding cable, it can be a little tight going in. I opened up the holes slightly on the back of the connector to accommodate the fat insulation.  If necessary, a little trimming of the inside of the housing with a hobby knife will help it go in and click.  Mine then went in and clicked in place without an issue.


FAN FAILURES Can Happen.

If you search the internet you'll find some comments about some fan failures that have occurred with some heat damage similar to the below photo.
This photo below is a Four Seasons aftermarket fan that failed because the GROUND connector terminal overheated and eventually lost continuity.
 
These small (.250 inch) terminals are forced to carry a LOT OF CURRENT and it's believed this happened because of poor contact, probably due to some corrosion and/or maybe the terminal grip with the spade connector was not tight. 


It appears most failures like this have been when these high-amp fans were wired to a relay that runs them at FULL SPEED for a long period of time. This fan WAS forced to run full-speed many times (while using AC) when I first got it because the controller I was using at the time offered no better option. This problem will be be less likely if the fan is wired to run at a lower speed for most normal running. Even better would be using a PWM controller, which runs the fan at slower speeds until more air is actually needed.
Still, this is a potential problem that you should keep in mind and watch for if your high-amp fan gets very heavy use.

SOLUTIONS:
Some people have said that using simple .250 inch (6.3 mm) female spade terminals worked better for them, instead of
using the Ford terminals or even the plastic connector housing
DO NOT EVEN THINK ABOUT SUCH A THING. READ THE BELOW INFO FIRST.

This normal .250 inch terminal below looks like it can handle a large load, but it won't.
The designers have rated it at about 7 to 10 amps continuous and 14-23 amps maximum.
So I would NOT use one of these for a fan that can draw up to 40 amps.


This is a TE Dynamic 5000 Series .250 inch (6.3 mm) terminal, PN 1318696-6 or 1318697-6.

It's a special high current SILVER PLATED terminal, which is rated at 45 amps. 


This terminal is designed to use up to 8 gauge cable. 
These are a little more expensive compared to other terminals. More info: https://www.te.com/usa-en/product-1318696-6.html.
These terminals will slide onto the male spades in the fan motor (without using a connector housing if necessary).
They are slightly larger than a standard Ford terminal, so they will not directly fit inside the Ford connector housing without slightly modifying it, but with a few minutes of work, THEY WILL FIT (pics below).
So you can try that or use them without the connector housing and cover them with heat shrink.
When I tried them out I found it would be better to squeeze them slightly so they fit the spade a little tighter.
This TE terminal is also available for smaller 10-12 gauge cable as PN 179956-6 or 316041-6. 


Here's a pic showing the TE-5000 terminals covered in heat shrink and inserted into the fan without a Ford connector housing.


And here are some pics showing the TE-5000 terminals fitted into a modified Ford connector housing.
The modification was done by using a small set of wire cutters to trim the inner plastic walls until the terminals would slide all the way in and click into place. This makes for a nicer, more factory looking connection. Plus this method makes the terminals more secure, so they won't accidentally pull out or vibrate loose.


NOW these terminals are securely held in place AND large 8 gauge cables are attached.


Another terminal option below if another is needed:
This is the Aptiv (formerly known as Delphi) .250 inch (6.3 mm) terminal, PN 06288913-L.

It's a fairly common high-current tin plated terminal for up to 10 gauge cable. It's rated at up to 48 amps.

The design of this flat tongue is the key to more contact area for high current connections.


MOUNTING THE MARK VIII SHROUD IN MY VOLVO
After trimming off the mounting tabs from the Mark VIII shroud,
I fabricated a steel frame to brace the inside TOP of the shroud. This was important to fully support the weight of this shroud and fan (about 9 lbs), because I was  using top radiator and fan shroud brackets to hang the fan, which I made (those can be seen below).  This brace was made of 1/2 x 1/8 inch steel bar. This is pretty typical metal bar stock found at many many hardware stores. I bought bolts and clip-on barrel nuts (AKA: U-Nuts) from McMaster-Carr. The bolts are PN 98093A436, M6 x 1.0 mm, 16mm long with a flange head (see photo). These have a 10 mm head. The clip-on barrel nuts are PN 95210A150, thread size M6 x 1.0 mm made for a panel thickness of 0.8 to 4 mm.


 Here's the Griffin radiator and Mark VIII fan installed in my 240. 
As you can see the original style intercooler is gone since it no longer fits and instead I installed an eBay intercooler in front of the radiator with new intercooler pipes going around the radiator.  This radiator is WIDE and there is barely enough room to keep the battery in the original location, but it still fits.


Here's a bottom view of the Mark VIII fan.
Yes, the Mark VIII shroud is taller than the radiator by several inches.  This is fixed by adding some aluminum sheet metal to seal the gap. It's securely fastened by screws and then some duct tape added to seal the bottom gap.


After the above fan installation I (stupidly) continued using the Flex-A-Lite 33054 Variable Speed Controller that I had previously installed during conversion #3.  As I mentioned before, I was disappointed in this controller after I discovered that it's actually only a 2-speed controller instead of a true variable speed controller. I really would rather have had something that begins spinning the fan at 10% or 20% or 30% instead of beginning at 60% low speed like this controller does. This controller does have an AC mode, but that puts the fan at 100%, which is ludicrous when you have a Mark VIII fan. 
Anyway, this Flex-A-Lite controller had a complete MELT-DOWN in 2016.
If failed on a hot day when I had the AC going and while in line to pull into a car meet. 
So this P.O.S. is definitely NOT recommended for a large fan.


  CONVERSION PROJECT #5 (2016)
This continued using the Lincoln Mark VIII Fan

I didn't make any fan changes for this project. After the Flex-A-Lite fan controller above melted in 2016, I decided, out of DESPERATION, to try building my own controller.
I had concluded that NONE of the available high-tech PWM fan controllers available at that time could survive with a big 40 amp Ford fan.
So this is a Custom 4-speed (relay-based) fan controller.
All of my electric fan projects over the years were for Volvos with AIR CONDITIONING. So keep that in mind when you tell yourself YOU didn't need a fan THAT big.  Maybe you didn't, but if you add AC (and an INTERCOOLER), that seriously changes the whole game, especially in a hot climate.  
This controller worked pretty well. It had a slow SOFT START, because of the resistors I used. I used it for a couple years. It never failed or disappointed me for any reason, but it wasn't quite as precise as something true PWM technology.
 

This DIY controller has it's OWN PAGE with all the info. CLICK HERE or THE IMAGE BELOW.

Here's the detailed project page: https://www.240turbo.com/fanharness.html.

Then in 2018 I found a new, high-capacity PWM fan controller (BELOW) that could finally actually handle the load of a huge fan. 


CONVERSION PROJECT #6 (2018)
Still using the
 
Lincoln Mark VIII Fan
I didn't make any fan changes this time, but I decided I would try a
High capacity 125 amp PWM controller made by AutoCoolGuy.

I used this device until 2023, when I decided to try some experiments with brushless fans.
Not too long after completing the above 4-speed fan controller project back in 2016, I discovered these high-capacity controllers being made by AutoCoolGuy.  These controllers were very interesting and they had some features not usually found elsewhere.  Being stubborn, I stayed with my DIY 4-speed controller for a couple years and it worked really well, but I was interested in trying out one of these below, so I finally pulled the trigger in summer 2018.
Some of the Autocoolguy features I liked:
  • They have controllers designed for all the way up to 200 amps.
  • I couldn't find ANY complaints online about failing controllers or any bad comments about their customer service anywhere, and I searched hard.
  • They make controllers with an independent AC speed setting which is actually adjustable.  I really like this feature.  Running a big Mark VIII fan at a really high speed for AC is ludicrous unless you really need it, which I didn't.
  • They offer a wide variety of temperature sender options.
  • Their controllers are made to use a dash controlled FULL SPEED OVERRIDE switch if desired. I really like this.
  • And when I sent them an email (on a Sunday) asking some questions about controlling my big fan, the owner (Darryl) actually responded on the same day!
Here's a video from Autocoolguy showing a controller.
https://www.youtube.com/watch?v=30e4C9bXeJc


And here's a great video from a customer installing the Autocoolguy in his '66 Mustang.
This is the condensed version of this video.  If you want more detail, he has a 5 part series in his Youtube channel that you can find.
https://www.youtube.com/watch?v=jeHD390MFVI


There are now a number of more videos on YouTube from users showing how these controllers work.
https://www.youtube.com/results?search_query=autocoolguy


Here's Mine Installed.


 So here's the Auto Cool III that I installed in my 242 Turbo in November 2018 to control my Lincoln Mark VIII fan.  It's a 125 amp PWM fan controller.  It's internally fused for 150 amps. 

The temperature knob will adjust the radiator outflow temperature. Turning toward HOT will increase outflow temps.  Turning toward WARM will reduce outflow temps.
Here's the Autocoolguy PDF:
autocoolguy.com/_files/ugd/8511ca.pdf


This controller can run one or two fans. 
When running ONE FAN like I am, the output posts (FAN A and FAN B) are combined as shown below.  The controlled output cable for my fan negative then gets attached to the FAN A post on the left. 
The two center ground posts get connected to battery ground or chassis ground.

It may seem a bit backwards from old school methods, but these controllers are designed so that the 12v cable from the battery goes directly to the FAN POSITIVE.  Then the fan gets controlled by the negative cable, which comes from the FAN A or FAN B posts (or both in my case). 
  You can see the full DIAGRAM of my installation below or click HERE.


 That's a 3 amp fuse I added between the battery power and the controller 12v input. It's on the direct battery power to the controller.


 Here are all the input pins on top. 
Hooking this thing up is pretty simple. Pins 7 and 8 (the two white wires on the right) are for the full speed dash override switch. These contacts are labeled F/S (for "FailSafe") and Ground). When those two pins are bridged, the fan runs at full speed.

The AC speed adjustment trim pot is beneath that round black cap.


 Here's the AC trim pot from above. 
I used a photo tachometer to measure fan blade speed and I set the AC speed at 1300 rpm, which was about 65% of maximum speed (max: 2000 rpm at 14.5 volts).


 Here's the default universal temperature sensor that comes with this controller.

This is the default sensor you get, unless you order one of their optional screw-in sensors.  It's designed to partially slip under the radiator outlet hose and may be used on any ALL METAL radiator.  It's not for radiators with plastic outlets.  This is the sensor I used for my all-aluminum radiator.  It comes with long wire leads wound as twisted pair for signal protection. Autocoolguy recommends a goal of getting coolant temperatures at the radiator OUTLET to be 15 to 20ºF below your thermostat setting or below your radiator coolant inlet temperature.


  Or you may optionally choose a threaded screw-in sensor with a few different thread size options, if you can use such a sensor. Autocoolguy recommends placing this near the radiator outlet. 
 
NOTE: AutoCoolGuy does not offer or recommend universal push-in sensor probes for the radiator fins.
They say that they don't believe in those due to inaccuracy.  Not a problem.  The first universal sensor above worked well for me, but eventually I plan to add a threaded bung to my radiator for a screw-in sensor.
If needed, they also offer an in-line hose adapter.
Autocoolguy recommends a goal of getting coolant temperatures at the radiator OUTLET to be 15 to 20ºF below your thermostat setting or below your radiator coolant inlet temperature.


 Here's the full speed override switch I put on my dash.
I had seen a LOT of previous fan controllers FAIL over the years, which made me paranoid.
Having an override switch is a really good thing, even if only for peace of mind.  I also added an LED light that lights up when the fan is on.  It lights up dimly at low speeds and brighter at high speeds.
This is a really good thing for people like me
who have developed electric cooling fan anxiety.


AutoCoolGuy has a diagram for wiring this dash LED in their web page HERE (ALSO SHOWN BELOW). 
In the instructions they show the use of a 1.5k Ohm resistor in line with the LED power wire will reduce the brightness and give it a longer life.  I found that a 1.5k Ohm resistor was not sufficient.  My LED was still too bright and it really lit up the interior of the car at night.  So I switched to a 10k Ohm resistor and the brightness seems about right and won't blind me at night.  Maybe some 12v LEDs are brighter than others.


If you have any feedback or comments, please let me know:
CONTACT


What is the BUZZ or No-BUZZ mentioned in AutoCoolGuy's webpage?
I was curious too. From what I've learned, there are some fans that are prone to making a buzzing sound at low speeds when receiving PWM input. AutoCoolGuy describes this as
a mechanical issue in some fans which have a blade and armature tolerance that's not as tight as it should be.  They said many Asian made fans seem to have this issue, but many Ford or other American made fans do not.  There is more info in the AutoCoolGuy site as well as some videos of this buzzing in action. Basically, if you have a fan that does this and it bugs you enough to do something about it, then there are controllers with no-buzz circuitry built into them.   
I DO NOT have a No-Buzz controller and I have not heard any buzzing noises from any aftermarket Four Seasons or Dorman Mark VIII fans.

Here's a basic diagram for an Autocoolguy controller from the Autocoolguy site.


Here's a diagram I made below showing how MY installation was done. This uses the Autocoolguy 125 amp blue controller and a single fan.


HAYDEN "16 inch" FAN
What is THIS fan doing here???

 
This "16 inch" PULLER fan from Hayden actually has a 14.5 inch diameter fan blade. 16 inches is the overall outside dimension.
It's here because in 2021 I was on a cross-country trip and had an old Mark VIII fan motor fail about 800 miles from home. So I bought this fan from an auto parts store, removed the Mark VIII, and zip-tied this fan to my radiator. It had just enough flow to get me back on the road and as long as I didn't run my AC and the ambient temps were not too hot, it worked (just BARELY).
So the reason it's posted here is that when I later bought the CFM anemometer tester in 2023 I decided to pull it out of storage and test it.
   Tested at 12.7 volts in free air. 1500 CFM at 1930 RPM.


Big FUSE for a BIG FAN
Adding a fuse to any power circuit is a good idea. The big Mark VIII fan is no exception, however I caution you to choose a high-quality fuse holder that will not MELT when subjected to large loads.
I have seen cheap ones MELT (LIKE THE BUSSMANN BELOW).

After the Bussmann melted on me, I changed to add a higher quality Maxi Fuse Holder from Blue Sea Systems PN 5006100 (with a 50 amp fuse).  It was added to the big power cable between the battery and the fan. This fuse holder is rated to 80 amps.
When you shop for a Maxi Fuse holder, keep in mind that a lot of current will be going through it. I have seen cheaply made Maxi Fuse holders melt from heat caused by poor contacts at the fuse blades. Choose one of these CAREFULLY. 
This fuse holder below can be found at: https://www.bluesea.com/products/5006100/MAXI_Fuse_Block


I do not recommend one like this inexpensive Bussmann below.  It MELTED and totally FAILED after a couple of months. I don't have a pic of the failure, but trust me, it was bad. It severed power to the fan when it failed, even though the fuse did not blow.

The failure happened because the Bussmann fuse holder had cheap stamped metal contacts, which allowed a poor connection, which slowly created resistance and a lot of heat. Learn from my mistake and buy a HIGH QUALITY fuse holder for high-amp fuses, like the one above from Blue Sea Systems.

 
Other Ford Fans to Consider

I have NOT personally used this fan. 
Much of this info has been contributed by other people who wanted to help. If you can help or have any comments or corrections of any info here, please email me.
16.5 inch FORD TAURUS FAN

This is a popular fan for custom projects.  Keep in mind that there is more than one Taurus fan version, depending on the year. Most people referring to this fan are talking about the ABOVE image, which came on approx. 1990-94 Ford Taurus with V6.
This fan is sometimes referred to as a 17 or 18 inch fan.  The actual fan diameter at the outer ring attached to the blades is 16.5 inches.
The shroud inner opening is about 17 inches.
 This complete fan and shroud assembly is available as an aftermarket replacement from Dorman, PN 620-101. If you want to compare this fan to the Lincoln Mark VIII, those dimensions are HERE.

The connector supplied with the fan is a 3-pole female plug as shown here.  A mating male plug pigtail is listed as Ford PN WPT706, which may no longer be available.

Installing a Salvage Yard Taurus Fan
 Wes B. sent photos above of a salvage yard fan he pulled from a 1988 Ford Taurus.

He trimmed off the shroud plastic, except for the ring that supports the fan, and he inserted that into the above Volvo 740 TURBO shroud. It fits pretty well and this offers a larger electric fan alternative, which is 1.7 inches larger than a Volvo 850 fan.

Here's how Wes mounted his intercooler below and then the radiator behind it and then the shroud/fan combo in his 240. 
There's plenty of clearance between the fan and water pump pulley.  Wes said the Taurus fan was mounted inside the shroud with only a small amount of clearance between the fan and radiator.


Other Jeep, Chrysler, Mopar Fans
I have NOT personally used these fans. 

Much of this info has been contributed by other people who wanted to help. If you can help or have any comments or corrections of any info here, please email me.

Ferry H from the Netherlands began sending me some of his research when he was looking for a large fan for his car project
.
  
The above radiator fan is identified as PN 52079528AB. It's used in Jeep/Chrysler/Mopar using 4 liter and 4.7 liter V8 and 3 liter diesel engines.
There is also an aftermarket fan, Dorman PN 620-010, which appears to match this Jeep part number. 

A fan like this may be a good fit into a stock Volvo 240 or 740 mechanical fan shroud, although I HAVE NOT TRIED THAT. 
It may be worth exploring as a much large
r option than the small Volvo 940-850 15 inch fans people have been using for years.
These fans appear to have been used in Jeeps since about the year 2000, so they may be fairly easy to hunt down in a salvage yard.

DORMAN 620-041 (for JEEP)
Matt F. from South Carolina emailed me about this fan below, which he pulled from a 2005 Jeep Grand Cherokee with 4L engine.
While this fan pictured has 7 blades, the current photos for the Dorman 620-041 found online seem to show a 6 blade fan.
This fan is reportedly about 18 or 19 inches in diameter at the outside of the shroud, depending on WHERE you measure. It has been advertised with a fan area of 226 square inches, suggesting it has a 17 inch actual fan blade size. It's pictured below next to the smaller Volvo 850 15 inch fan, which it replaced in Matt's 1999 Dodge Durango 5.2L.


DORMAN 620-041
If you have one of these fans, your comments are appreciated.
NOTE: The blades on this fan do protrude past the "shroud" on the fan toward the FRONT and the mounting ears are in the middle of the shroud about an inch from the front, so some spacers may be needed if using those mounting ears to set a comfortable fan distance from the radiator.

The electrical operation of this fan is a bit unusual. Applying power to either hot wire individually results in LOW speed. It appears BOTH "+" wires must be powered for HIGH speed.


According to Matt's anemometer readings when plugging in the 226 inch² area, this fan pulls 2500 CFM on HIGH SPEED when INSTALLED with his radiator and A/C condenser combo. It reduced to 2000 CFM on LOW SPEED. 
The current draw was measured maxed out at about 25 amps at 14v.

These are similar flow numbers to a Taurus 3.8 two-speed fan, although maybe with slightly higher current draw. This Jeep fan was far easier to mount though. 

COMPARED TO VOLVO 850 FAN
Matt previously ran a Volvo 850 two speed fan on this same vehicle.  He didn't measure flow rate, but airspeed through his radiator was 8 ft/s.  Measuring in the same place on the radiator with this Jeep fan (using the same shroud, radiator, and AC condenser) resulted in 10-11 ft/s.
 

CFM TEST UPDATE SEPTEMBER 2021
I received an email from Phil Z. in Tokyo, Japan. The original fan in his Nissan 180SX was poor, so after some deliberation he decided to try mounting this Dorman 620-041 to his original Nissan shroud.
He contacted Dorman and received some info on the flow rate. According to Dorman, this fan is rated at 68.49 cmm on LOW SPEED and 79.03 cmm on HIGH SPEED.
This translates to 2429 CFM on low and 2890
CFM on high.
Amperage draw is reportedly 15 and 19 amps at 12v.


Some of these big fans were reportedly used in Jeep Grand Cherokees.
This fan pictured is PN 52079528AD. It's
similar to the above fan.
The Dorman PN 620-041 above also appears to match this Jeep part number in this link: https://www.amazon.com/Dorman-620-041-Radiator-Fan-Assembly/dp/B003S9IDUE


The original Jeep/Chrysler fans reportedly used Bosch motors. Here is a Mopar Part Number of CBG4F250, which may correspond to a 2002 Jeep Grand Cherokee with a 4.0 or 4.7 liter V8 engine.  The 4000 CFM rating listed in this photo has not been otherwise confirmed.  This part number also seems to correspond to some of the already mentioned numbers above when you search eBay, so it may be no different than those above.

If anyone can help confirm any FAN DIMENSION info, please email me.


  Wider Radiator and Dual Fan Info
If you can help with any of this info, please email me.

I thought I would collect some useful info on this subject and put it here for future reference.
I have not bought or used any of these fans below.  If you do, please email me.


Here's a popular dual fan setup that may be right for custom installations.
This dual 12 inch fan setup is from a Ford Contour or Mercury Mystique. It's rumored to offer about 3,500 CFM, however remember these are only 12 inches. A bit further below is info that suggests it's closer to 1200 CFM per fan on high speed using 20-30 amps. It has a nice compact, factory-style shroud assembly.
This fan shroud (minus the outer mounting brackets) is
24.25 inches wide, 16.75 inches tall, and 3.5 inches deep to the back of the fan motors.

To use a dual fan setup like this you'll need a radiator with an approximate overall size of about 28 x 17 inches.
Aftermarket part: Dorman PN 620-104.  Cost: about $100.00.


Matt F from South Carolina wrote me about his testing of this fan (a used Ford version from a salvage yard) in his 1986 Porsche 928.
With the engine running, charging system at 13.5v, he tested and found just over 1200 CFM per fan on high.
He hasn't measured current draw with it in the car, but on a jump box it was about 20 amps on high.  He measured 0.5-0.6 ohms resistance across the fans, so he estimated they would be in the 24-27 amp range at 13.5v and probably closer to 30 amps at 14v.


Here's a video and explanation of this Ford Contour fan and some choices for powering it. 

https://www.youtube.com/watch?v=N-o8yFmQQgo&t=354s


Dorman PN 620-350.  Phil Z. from Japan sent me some information about this dual fan after he bought one for a project. This fan is made for mid-2000s Dodge or Chrysler. This fan assembly is wider than the above Ford fans, but has a shorter height. Cost: about $100.00-$120.00.
Phil is using this fan for a Nissan S13 240SX on a Nissan downflow radiator and he says it's a perfect fit.

Although this fan is designated as a Dodge-Chrysler fan, each fan uses the same Ford style 3-pole connector as the Lincoln Mark VIII fan HERE.


The main problem with a dual fan setup like this is getting a wide enough radiator that can still fit in the car. 
For a Volvo 240 there is a limiting factor for fitting the radiator between the front frame rails.
The Volvo 260 had a larger radiator than the 240, so using these dimensions for comparisons may be useful.  Just keep in mind that a wider radiator means the stock intercooler will not fit.
Volvo 260 Radiator Overall: 17.5 inches high, 29.75 inches wide, 4.5 inches deep.
Volvo 260 Radiator Core: 17.5 inches high, 23.25 inches wide, 2 inches deep.

Stock Volvo 240 radiator dimensions.
Volvo 240 Radiator Overall: 17.5 inches high, 22 inches wide, 2 inches deep.
Volvo 240 Radiator Core: 17.5 inches high, 16.38 inches wide, 1.25 inches deep.


If you want to use a dual fan setup like to Ford Contour fan above, you should have a radiator with an approximate overall size of approximately 28 x 17 inches.
 
Looking at the Volvo 240 image above, you will see there is approximately 29 inches between the frame rails. This sounds like a lot, but
if you have intercooler tubes going around both sides of the radiator and/or a BATTERY in the original location, that will limit the room you have for a wider radiator. This means you must push the radiator toward the right side of the car to make room. The limit with a battery and intercooler tubes may be roughly the size of the GREEN rectangle above, up to about 26 x 17 inches.

If you don't have anything in the way and you're using a non-turbo engine or installing a V8, then you'll have more room to work with, especially if you move the battery out of the engine bay. This is represented by the BLUE rectangle above, roughly a maximum of about 29 x 17 inches.


If you're moving toward a custom radiator, Griffin Radiator offers some interesting custom fan shroud designs.  I think the dual fan shroud shown here that extends the sides outward is an intriguing design, since it allows for larger fans than a normal dual fan shroud would offer. 
https://www.griffinrad.com/fan_shrouds.php


Can Dual Fans flow more than ONE fan
I think most people look at dual fans and instantly think "YES" it'll flow more.  But the size of the fan and the size (or AREA) of the hole makes all the difference. 

Consider how air flows through a radiator.  There is a large area in front of the radiator which "collects" or "funnels" the air flow.  Then as the air flow exits the back of the radiator, it must go through a SMALLER opening, which is the size of the fan blade opening or shroud opening.  This is what I will call a funnel effect, similar to pouring liquid into a funnel. You can pour the liquid faster, but the exit hole of of the funnel will still only allow a limited amount through at a time. 
And yes, the fan does help to move more pressurized air through the funnel, but it has to work harder if the funnel exit is smaller.

Let's look at the area for a few fan size openings.
Lincoln Mark 8 fan (18 inch fan): The area for an 18 inch hole is 254 square inches.
Ford Contour dual fans (12 inch fans): The area for a 12 inch hole is 113 square inches (226 square inches for two fans). 
Ford Taurus 16.5 inch fan (17 inch hole):
The area for a 17 inch hole is 226 square inches.
 Volvo 940-850 fan (15.27 inch fan with 16 inch hole): The area for a 16 inch hole is 201 square inches.

Keep in mind that if you want to more accurately calculate fan area, you need to measure the diameter of the fan motor, then deduct that area from the fan diameter area.

Circle Area Calculator: 
https://www.calculatorsoup.com/calculators/geometry-plane/circle.php


Brushless Fans
Brushless Fans are in a NEW PAGE
CLICK HERE


davebarton.com
prancingmoose.com
240turbo.com
Special Emblems
Prancing Moose Stickers
Volvo Stickers
Body/Chassis/Engine Labels
New Items
Other Car Brand Stickers
Steering Wheel Labels
Center Cap Labels/Overlays
Cool Volvo Products
Grill Labels/Overlays
Volvo Wire Harnesses
Conversion Harnesses
Harness Parts/Connectors
Volvo Relays
Coil Repair Harnesses
240 Window Scrapers
740/940 Window Scrapers
Adjustable Voltage Regulators
Horn Buttons
240 Odometer Repair
740 Odometer Repair
Volvo Gauge Faces
740 Turbo/Boost Faces
240 Black Door Vinyl
850 Odometer Repair
ALTERNATOR Page
240 Power Mirrors - Switches
240 Oil Cooler Page
240 Fuse Panel Page
Group A Racing 242 Turbo Page
240 Hydraulic Clutch Fuel Pump RELAY Page
240 Headlight RELAY Page
Used Parts & Extra Stuff for sale
CRIMPING Page
240 Ignition Page
240 Headlight Page
240 Gauge Electrical Diagrams 240 REAR END Page Yoshifab Catch Can Install 240 MODS and FIXES Page
Side Marker Lights Page
Gentex Mirror Upgrade Yoshifab Drain Tube Install Modified 240 Favorites
SoCal Salvage Yards Unleaded Racing Fuel B26FT Stroker Dave's 245 Spec Page
240 SUSPENSION Page 240 Lowering Page
240 Windshield Page
240 WIPER Page
240 Big Brakes Page
240 Dash Top Gauge Pod Cadillac 4-Note Horn Install 240 DYNAMAT Installation
4 Speed Fan Controller
Electric Cooling Fan Page
BRUSHLESS Cooling Fan Page
Tropical Fan Clutches
240 AC Page "KOMFORT BLINKER" Upgrade T5 Trans Conversion Page
240 VIN Page Stepper Idle Valve Page
Vacuum Diagrams  
240 Exhaust Page 242 Power Vent Window Project EFI Volvo Pin Function Diagrams
Favorite Links
R-Sport Apparel
Prancing Moose Apparel
Volvo Meet Photo Albums Texas Volvo Meets and Events
Ordering Instructions Policies PAYMENTS Page
Mojave Road Trail Map Page
Returns Shipping Shopping Cart Troubleshooting Contact Us

Online Payments